How to choose the right lacrosse head for pink mesh stringing. What are the key factors to consider when selecting mesh type and pocket style. How to maximize the visual impact of pink mesh on your lacrosse stick.
Selecting the Ideal Lacrosse Head for Pink Mesh
Choosing the right lacrosse head is crucial when stringing with pink mesh. The head’s shape and design significantly impact how well the vibrant pink color will be displayed on the field.
Wide Face Shape: Maximizing Pink Visibility
A wide scoop is essential for showcasing pink mesh. Why? It provides a larger surface area for the mesh to be visible. Heads marketed as “high scoop” or “wide scoop” are ideal choices. These designs allow for maximum exposure of the pink mesh, ensuring your stick stands out on the field.
Offset Configuration: Enhancing Mesh Display
An offset head configuration can significantly improve the visibility of your pink mesh. How does this work? The angled scoop in an offset design increases the visible mesh area by reducing obstruction from the ball stopper and sidewall. This configuration allows for an unobstructed view of your pink mesh throughout the game.
Low Pockets: Showcasing More Pink
Opting for a low pocket is advantageous when using pink mesh. Why choose a low pocket? It increases the amount of visible pink mesh beneath the ball. This is particularly beneficial for midfielders and attackers who want to maximize the display of their pink mesh. However, defenders should be cautious not to string the pocket too low, as ball protection remains crucial.
Choosing the Right Mesh Type for Vibrant Pink Stringing
The type of mesh you select plays a significant role in how well the pink color will appear on your lacrosse stick.
Soft Mesh vs. Hard Mesh: Which is Better for Pink?
Soft mesh is generally the superior choice for pink stringing. Why does soft mesh work better? It absorbs dye more effectively, resulting in brighter and more vibrant pink tones. Hard meshes, such as nylon, tend to produce faded pink colors. Soft polyester meshes, like StringKing Type 3X, are excellent options for achieving that eye-catching pink you desire.
Full Mesh Coverage: Maximizing Pink Impact
To achieve the most striking pink effect, consider stringing full pink mesh into your head. This approach provides complete coverage, surrounding every diamond, knot, and shooter in a rosy hue. For optimal pink visibility, mesh both the main triangular portion of the head and the sidewalls.
Head Finish and Color Considerations
The finish and color of your lacrosse head can significantly affect how well the pink mesh stands out.
Glossy vs. Matte Finish: Which Enhances Pink Mesh?
A glossy finish on your lacrosse head can enhance the appearance of pink mesh. How does a glossy finish help? The high-shine surface acts as a reflective backdrop, making the pink color appear more vibrant. Heads from companies like Epoch and Maverik with glossy finishes are excellent choices for pink stringing.
Contrasting Head Colors: Making Pink Pop
To make your pink mesh stand out, choose a head color that provides high contrast. Solid colors like black, white, or gray work well as they don’t compete visually with the pink mesh. Avoid busy prints or loud fades that might detract from the main pink attraction.
Stringing Techniques for Optimal Pink Display
The way you string your pink mesh can significantly impact its visual appeal and performance.
Diamond Patterns: Simple is Best
When stringing pink mesh, it’s best to stick with basic solid color diamonds. Why avoid intricate designs? Complex multicolor patterns can shift focus away from the pink mesh, diminishing its impact. Keep the diamonds simple to let the brilliant pink hue shine through.
Weaving Technique: Tight vs. Wide
A tight stringing weave enhances the flawless pink aesthetic. How does weave affect appearance? Wide-weave techniques can distort the pink visual by creating gaps and uneven diamond spacing. Aim for consistent, tight diamonds without gaps to achieve the best pink display.
Additional Considerations for Pink Mesh Stringing
Beyond the head and mesh, there are several other factors to consider when stringing with pink mesh.
Color Coordination: Enhancing Overall Aesthetics
Consider coordinating other equipment with your pink mesh for a cohesive look. How can you achieve this? Match your shaft, gloves, cleats, and helmet with complementary colors. Even adding pink tape to your shaft can create a nice accent. Get creative with color coordination to enhance your overall on-field appearance.
Crown Integration: Durability and Performance
Heads with integrated crowns are ideal for pink mesh stringing. Why choose integrated over detachable crowns? Integrated crowns flex better with the mesh, optimizing pocket feel and durability. They move naturally with the pink mesh, whereas detachable crowns may wiggle loose over time. The Nike CEO and Maverik Centrik are excellent options featuring integrated crowns.

Advanced Options for Pink Mesh Enthusiasts
For those looking to take their pink mesh game to the next level, consider these advanced options.
Carbon Fiber Heads: The Ultimate Backdrop
Carbon fiber lacrosse heads pair exceptionally well with vibrant pink mesh. How do they enhance the look? The muted gray carbon color provides a perfect neutral backdrop, allowing the bright pink to command center stage. The sleek look of carbon fiber complements the vibrant pink mesh, creating a striking visual contrast.
Custom Dye Jobs: Personalizing Your Pink
For truly unique pink mesh, consider custom dye jobs. How can you personalize your mesh? Experiment with various shades of pink or create gradient effects. You can even incorporate other colors for a multi-toned look. Custom dyeing allows you to create a one-of-a-kind pink mesh that reflects your personal style.
Maintenance and Care for Pink Mesh
Proper care is essential to maintain the vibrancy and performance of your pink mesh.
Cleaning Techniques: Preserving Pink Brilliance
Regular cleaning helps maintain the bright pink color of your mesh. How should you clean pink mesh? Use mild soap and cool water to gently clean the mesh. Avoid harsh chemicals or hot water, which can fade the pink dye. After cleaning, allow the mesh to air dry completely before use.

UV Protection: Preventing Color Fading
UV exposure can cause pink mesh to fade over time. How can you protect against this? Store your stick in a cool, dark place when not in use. Consider using a UV-resistant spray designed for sporting equipment to provide additional protection against sun-induced fading.
Performance Considerations with Pink Mesh
While aesthetics are important, it’s crucial not to overlook performance when stringing with pink mesh.
Break-In Period: Optimizing Pocket Performance
Pink mesh, like any new mesh, requires a break-in period. How long does this take? Typically, it takes about 2-3 weeks of regular play for the mesh to fully break in. During this time, the pocket will soften and conform to your playing style, improving ball control and consistency.
Weather Effects: Adapting to Conditions
Different weather conditions can affect the performance of pink mesh. How does weather impact play? In wet conditions, pink mesh may become slightly heavier and hold more water than white mesh. In hot, dry conditions, the mesh may become slightly stiffer. Be aware of these potential changes and adjust your game accordingly.
- Choose a wide-faced head for maximum pink visibility
- Opt for soft mesh to achieve vibrant pink tones
- Use a glossy head finish to enhance the pink color
- String a low pocket to showcase more pink mesh
- Stick with simple diamond patterns for the best pink display
- Consider color coordinating your equipment with the pink mesh
- Explore custom dye options for unique pink shades
By following these expert tips, you’ll be well on your way to creating a stunning pink mesh lacrosse stick that not only looks great but performs excellently on the field. Remember, the key is to balance aesthetics with functionality, ensuring your pink mesh enhances both your style and your game.
Selecting the Right Head for Pink Stringing
So you want to string your stick with vibrant pink mesh? Right on, my friend! Adding a pop of color to your lacrosse head is a great way to express your personal style on the field. However, not all heads are created equal when it comes to pink stringing. You’ll need to choose the right head shape and configuration to really make that rosy mesh shine.
In this handy guide, we’ll walk through the key factors to consider when choosing a lacrosse head for optimal pink stringing. Follow these pro tips to find the head that will give your knots and diamonds that perfect pink glow.
Focus on a Wide Face Shape
When stringing with pink mesh, you’ll want to use a head with a nice, wide scoop. This will maximize the amount of visible pink on the field. Avoid heads with pinched scoops, as they limit mesh exposure. The wider and more open the scoop area, the better the pink will pop. So be on the lookout for heads marketed as “high scoop” or “wide scoop” when making your selection.
Consider an Offset Configuration

In most cases, you’ll want to choose a head with an offset configuration over a centered one. The offset design angles the scoop slightly to one side, increasing mesh visibility. With a centered scoop, some of that pink flair gets blocked from view by the ball stopper and sidewall. Go offset for unobstructed pink perspective all game long.
Low Pockets are Best
To maximize pink presence, you’ll need to string a lower pocket. This will increase the amount of pink mesh visible beneath the ball. High pockets block some of that precious pink real estate. For midfielders and attackers especially, a nice low pocket will keep the pink on full display. Just be careful not to go too low if you play defense – you still need to retain some ball protection.
Soft Mesh Over Hard Mesh
Soft mesh usually yields the best results for pink stringing. It provides excellent hold for dye and allows the color to really soak in. Hard meshes like nylon don’t absorb dye as well, resulting in faded pink tones. Soft polyester meshes give you that bright, eye-catching pink you want on the field. StringKing Type 3X is a great option that really makes pink pop.
Go with a Glossy Finish
When available, choose a head with a glossy finish rather than a matte one. The high-shine glossy surface provides the perfect reflective backdrop for pink mesh. It makes the color look extra vibrant, much more so than a dull matte finish. Glossy heads from companies like Epoch and Maverik are excellent for pink stringing.
Mesh It Up
You’ll get the most pink mileage by stringing full pink mesh into your head. This provides complete coverage and surrounds every diamond, knot, and shooter in rosy splendor. For optimal pink impact, mesh the main triangular portion of the head along with the sidewalls. More mesh equals more pink visibility.
Stick With Solid Diamonds
When stringing pink mesh into your head, stick with basic solid color diamonds rather than attempting intricate multicolor designs. Intricate diamonds shift focus away from the maximum pink effect you want. Remember, it’s all about the pink! Keep the diamonds simple to let that brilliant hue shine through.
Consider Color Coordination
Beyond the head itself, consider color coordinating other elements like your shaft, gloves, cleats and helmet with that vibrant pink mesh. Matching your pocket swag with complementary accessories can look really sharp on the field. Even pink tape on your shaft can accent nicely. Get creative with the color coordination!
Crown Integrated is Ideal
For the best pink presence and durability, look for heads featuring integrated crowns rather than detachable crowns. Integrated crowns flex better with the mesh to optimize pocket feel. Detachable crowns can sometimes wiggle loose over time. Integrated crowns move naturally with the pink mesh. The Nike CEO and Maverik Centrik are great choices here.
Watch Your Weaving
When stringing pink mesh into your head, avoid a wide-weave technique. This can distort the pink visual by creating gaps and uneven diamond spacing. A tight stringing weave enhances the flawless pink aesthetic. Shoot for consistent, tight diamonds without gaps by avoiding wide weaves.
Go for Contrast
To make that pink mesh stand out, go for high contrast with the plastic components of the head. Choose heads in solid colors like black, white, gray, etc. Avoid busy prints and loud fades which compete visually with the main pink attraction. Keep it clean and simple.
Consider Carbon Fiber
The sleek look of carbon fiber lacrosse heads pairs supremely well with vibrant pink mesh. The muted gray carbon color provides the perfect neutral backdrop, allowing the bright pink to command center stage. Carbon fiber heads from Warrior and STX are great for highlighting pink.
Get The Right Tools
Don’t forget to arm yourself with high-quality stringing tools before mounting that precious pink mesh. You’ll need properly sized jigs, quality screw-in sidewall stringing needles, sturdy pliers, and optionally, a mesh prep tool for pre-stretching. Don’t risk botching the string job – get the right tools.
With the guidelines above, you’re ready to pick the perfect head for showcasing that fabulous pink pocket. Express your style while maintaining high performance on the field. Remember to have fun with it! Lacrosse should ultimately be about passion and personal flair. So get out there and elevate your game with custom pink stringing that reflects your high vibe and determination to succeed. The right head makes all the difference, so choose wisely. Game on!
Choosing Durable Pink Lacrosse Mesh
So you want to string your lacrosse stick with vibrant pink mesh? Right on! A colorful pocket is a great way to express your style on the field. But not all mesh is created equal when it comes to durability. Pink mesh brings style, but it also needs to bring the hold and performance you need in a pocket.
Let’s dive into the key factors to consider when selecting high-quality, durable pink lacrosse mesh for your stringing project. Follow these pro tips to choose mesh that will maintain its integrity and keep you playing at your best!
Focus on Abrasion Resistance
Durability starts with a mesh’s ability to resist abrasion. Look for options specifically engineered for maximum abrasion resistance. This enhances longevity by preventing rips, holes, and snags during play. Abrasion-resistant pink mesh options from StringKing and ECD are great starting points.
Softer is Better
In most cases, softer pink meshes will be longer-lasting than stiffer versions. The flexibility better withstands contact stresses and reduces the chance of tears during play. Softer meshes like StringKing Type 3X pair great durability with excellent ball control and hold.
Target Consistent Structure
Consistency is key for pink mesh durability. Look for options with uniform diamonds that maintain their shape over time. Irregular diamond shapes can lead to early deterioration. Top brands like ECD focus heavily on engineering consistent structure into their mesh.
The Thicker the Better
Thicker mesh gauge correlates strongly with increased durability. Look for stringing mesh in the higher thickness range of 16G-12G. Thinner 20G-18G mesh is more prone to damage over time. The extra thickness boosts longevity while still providing great feel.
Polyester Outperforms Nylon
Polyester-based meshes often outlast their nylon counterparts, all else being equal. Polyester better retains its structure over hundreds of throws, increasing longevity. Brands like StringKing and ECD concentrate on advanced polyester construction.
Favor Performance Weaves
Specialized performance weaves in meshes like StringKing Type 3X and ECD Bravo provide durability along with enhanced hold, control and feel. Look for weaves engineered not just for longevity, but also optimized on-field performance.
Test Abrasion and UV Resistance
When possible, look for objective data on a mesh’s abrasion resistance and UV/sunlight resistance. Brands like ECD and Warrior actually test new meshes using abrasion machines and accelerated UV chambers. The numbers don’t lie!
See If Your School Uses It
Scan the gear used by local high school and college teams. If you notice certain meshes really dominating in your area, those are likely good durability bets. Talk with players to see what meshes are holding up best through entire seasons of play.
Avoid Excessive Stretching
Take care not over-stretch mesh during stringing. This weakens the structure and decreases durability over time. Use mesh prep tools to gently condition the material rather than forcefully over-stretching by hand.
Hybrid Mesh Can Be Ideal
Some brands offer “hybrid” mesh options that combine nylon and polyester properties. This balances durability with stretch, feel and control. Warrior’s Hybrid Pro mesh is an excellent example of this combo approach.
Match It With Durable Shooting Strings
Using a more durable shooting string like nylon opposing the pink mesh can increase pocket longevity. This provides extra abrasion resistance right where it’s needed most. A quality nylon shooter paired with polyester mesh is a proven combo.
Check Consumer Reviews
Online lacrosse communities contain a wealth of data on real-world mesh durability. Check forums and reviews to see what players with months of use experience say about longevity. Customer consensus can help point you toward proven options.
Keeping these tips in mind will ensure you select a pink lacrosse mesh that provides both style and enduring performance. Take some time to research the different options and read player reviews before deciding. With the right mesh choice, you’ll keep that vibrant pocket in play all season long!
Finding Compatible Lacrosse Stringing Kits
So you’re ready to string your own lacrosse stick and want an all-in-one stringing kit. Smart move! Stringing kits provide everything you need for a custom pocket. But with so many options out there, how do you ensure you get a kit that will work with your stick?
Let’s look at the key factors in choosing a compatible DIY lacrosse stringing kit for your exact setup.
Know Your Head Specs
First, gather details on the head you’ll be stringing – the brand, specific model, scoop type (high/low) and sidewall hole configuration. This info is crucial for identifying the right stringing components.
Mesh Style Matters
Mesh style affects compatibility. Hard meshes like nylon often require more breaking in to fit certain heads. Softer meshes like StringKing Type 3X can be more forgiving for beginners. Consider your skill level.
Account For Pocket Placement
Factor in desired pocket placement – higher, lower, mid and so on. Kits with adjustable length strings allow you to customize pocket height during stringing for compatibility.
Shop Brand-Specific If Possible
Some brands offer stringing kits designed exclusively for their heads, like ECD and Maverik. These guarantee model-specific compatibility. If available for your head, opt for a brand-matched kit.
Measure Sidewall Hole Spacing
Use calipers to precisely measure hole spacing along the sidewalls. Then match your kit’s included sidewall strings to those specs for a flawless length fit.
Account For Head Offset

Offset heads angle the scoop slightly, affecting string placement. Ensure the kit has the right amount of scoop lace and shooting strings to accommodate offset configurations.
Consider DIY Customization
Many kits allow full customization during stringing. This gives you flexibility if the stock components don’t quite match up out of the box. Add-on lacrosse stringing supplies can help.
Learn The Lacing Basics
Understand basic lacrosse head lacing patterns – numbers vs. letters, U vs. straight runners, etc. This ensures you get a kit tailored for your preferred lacing approach.
Read The Reviews
Scan reviews to see if others have used a particular kit with your head and had good results. You can learn a lot from fellow stringers’ experiences.
Confirm All Parts Are Included
Double check that the kit contains every piece needed – sidewall strings, shooting strings, mesh, screws, winding sticks, etc. Missing components can sabotage compatibility.
Watch Stringing Tutorials
YouTube tutorials from stringers like Throne of String and Stringers Society demonstrate the stringing process on specific heads using certain kits. Check if they use your model.
Ask The Pros
The experts at lacrosse specialty stores are invaluable compatibility resources. Describe your setup and needs, and let them advise on ideal kits.
Focus On Beginner-Friendly
If new to stringing, prioritize user-friendly kits with softer mesh, pre-cut and -measured sidewalls, easy-tighten shooting strings, etc. Don’t overcomplicate it initially.
Compare Company Recommendations
Many brands provide specific stringing kit suggestions for their heads on their websites. Cross-reference recommendations from different companies for your model.
With attention to these details, you can zero in on a lacrosse stringing kit that’s fully compatible with your stick right out of the package. But don’t stress if some tweaks or additions are needed during the process. The ability to customize your creation is all part of the fun!
Understanding Pocket Placement Basics
So you’re ready to string your own lacrosse stick and want the perfect pocket placement. Getting the pocket tuned just right is crucial for optimal ball control and quick releases. But with so many stringing variables, where do you even start?
Let’s break down the key factors that determine pocket placement on a lacrosse head. Follow these tips to gain a solid understanding of this critical stringing foundation.
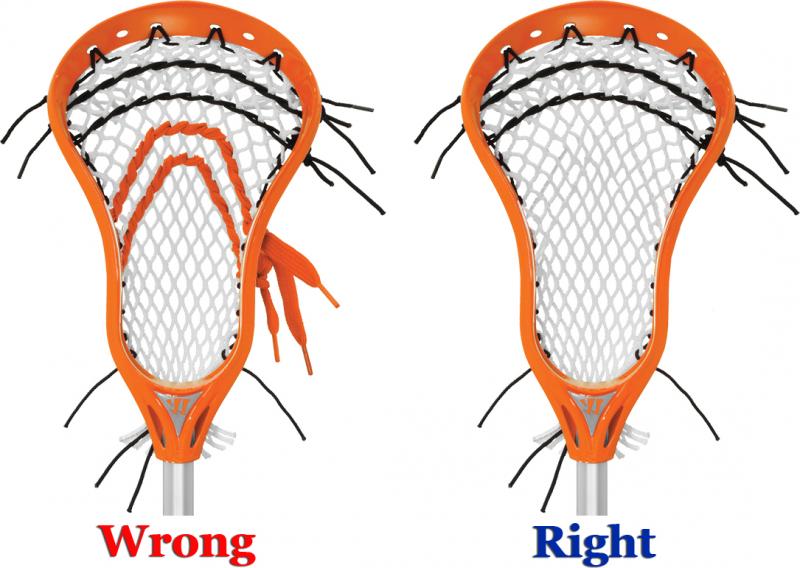
Pocket Height Matters
The height of the pocket in the head affects passing, catching and shooting mechanics. Mid-placement pockets are the most versatile for all-around play. High pockets promote control, while low pockets emphasize faster throws and shots.
Mesh Style Makes a Difference
Softer meshes usually allow lower pocket placement than stiff meshes like nylon. The more malleable material extends deeper into the head. This provides more adjustability when stringing.
Take Your Position Into Account
Pocket placement can vary optimized by player position. Midfielders and attackers often favor lower or mid-low pockets for quicker releases. Defenders tend to use mid or mid-high pockets for protection.
Sidewall String Length Matters
The length of the sidewall strings determines how deep the mesh extends into the head. Shorter sidewalls pull the mesh higher, longer sidewalls drop it lower. Adjust accordingly for desired height.
Shooter Setup Impacts Height
Shooting string placement influences overall pocket height. Tight top shooters cup the ball higher, while lower bottom shooters allow the ball to drop deeper.
Mesh Tensioning Makes It Drop
Pre-stretching and tensioning mesh before stringing will increase how much it stretches into the lower head. This simple step can drastically improve pocket placement.
Diamond Number Sets Baseline
The basic pocket diamond pattern number (10 diamonds, 12 diamonds etc.) provides the foundation around which you can customize exact height.
Wider Heads Go Lower
Wider lacrosse head shapes promote lower pocket placement overall. Narrower heads constrain the pocket higher in the scoop area by design.
Skip Holes to Tweak Height

Skipping sidewall stringing holes during the process, or using different start/end points allows fine tuning of pocket height within the head.
Material Shrinkage Lowers Over Time
Natural mesh shrinkage through break-in play will reduce overall pocket height. Account for this by starting slightly higher than your final target placement.
Test Different Head Angles
Subtly adjusting the angle of the head during stringing can facilitate pocket placement. Downward angles allow gravity to extend mesh lower.
Make Micro Adjustments
Small tweaks to sidewall and shooting string lengths after initial stringing can refine pocket height. Don’t be afraid to make incremental improvements.
Mastering these key concepts will give you the knowledge to adjust your specs and dial-in ideal pocket placement. Setting the precise pocket height for your game is an art. But getting the basics down will set you up for stringing success!
Learning Proper Stringing Techniques With Pink Lax Mesh
Stringing a lacrosse stick can be an intimidating process for beginners. With so many options for mesh, string, and stringing patterns out there, it’s easy to feel overwhelmed. However, mastering DIY lacrosse stringing is much simpler than it seems. With a bit of guidance and the right gear, you’ll be stringing sticks like a pro in no time.
One popular stringing choice is pink lacrosse mesh. Visually bold and eye-catching, pink mesh adds personality to any stick. While the color itself doesn’t affect performance, many players love the look. So if you’re eager to string your stick with some pink lax mesh, read on for 15 must-know tips.
Pick High-Quality Mesh
Not all mesh is created equal when it comes to performance and durability. Investing in a reputable brand ensures you get mesh that will hold its shape and provide great ball control. Some top manufacturers of pink lacrosse mesh include Throne, StringKing, and East Coast Dyes. You can also often find quality mesh from companies like ECD and Jimalax in various pink shades to suit your style.
Match Mesh and Sidewall Holes
Trying to string mesh with mismatched sidewall holes will only lead to frustration. So always ensure your mesh and sidewall stringing holes align properly. Sidewall holes on heads today are typically categorized as traditional (larger holes spaced farther apart) or universal (smaller holes spaced closer together). Verify which size holes your head has before selecting mesh.
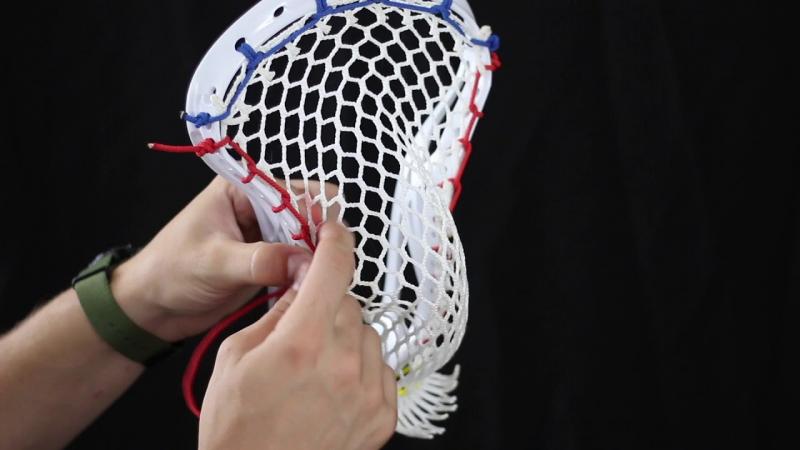
Prep the Mesh
Brand new lacrosse mesh often needs to be “broken in” before stringing to maximize performance. After attaching the mesh to the sidewalls, soak the mesh in water and use a lacrosse ball or ice dye disc to soften and shape the pockets. Gently massaging and squeezing the mesh helps set the ideal pocket shape and removes any factory stiffness.
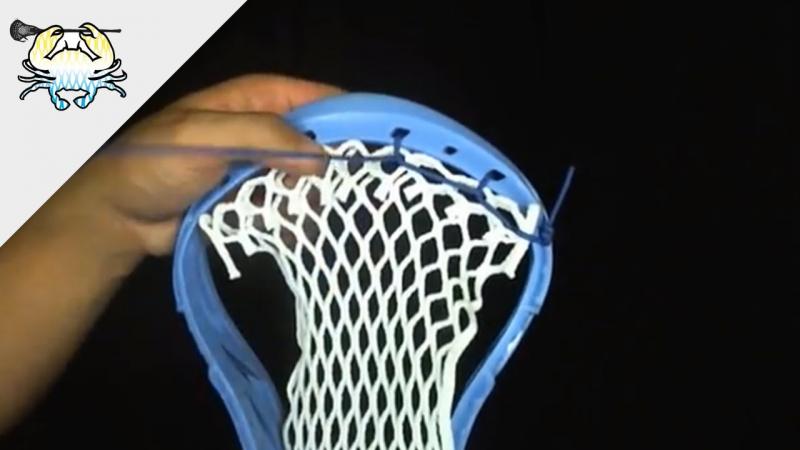
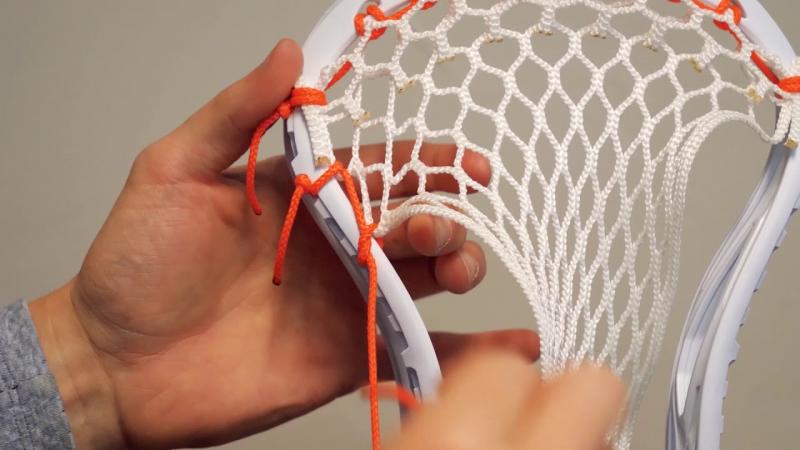
Anchor the Top String
Trying to string mesh that isn’t anchored is a nightmare. So the first step is always securing the top string. Tie one end tightly around the top of the head, going over the scoop and through two sidewall holes twice for durability. Pull it taut as you work back across to the other side. The top string keeps the mesh pulled up in the head during stringing.
Use a Stringing Shackle
A strong metal or plastic stringing shackle is extremely useful for getting even pocket depth. Attach it to the top string in the center of the head. As you string the diamonds and adjust whip/channel, keep the shackle at the desired pocket depth. This ensures symmetry and makes mesh adjustments much simpler.
Know Your Stringing Pattern
Choosing the right stringing pattern is key for performance. Beginners should stick to basic patterns like traditional or semi-traditional to learn. More complex patterns like pinched sidewalls or scattered take advanced techniques. Ensure the stringing pattern complements your playing style and mesh properties.
Use a Quality Cross Lace
The cross lace connects the mesh during stringing, making it a vital piece. Use high-grade hockey lace or string rather than trying to cut costs here. The cross lace takes a lot of abuse during play, so durable materials prevent premature snapping or fraying.
String the Diamonds Consistently
Stringing inconsistent diamonds leads to uneven pocket tension, so maintain symmetry. Make sure diamonds increase in length from the top diamond to center diamond evenly. This improves pocket balance. Keep diamonds the same length across the head as well. Consistent diamonds enhance ball control.
Set Proper Whip & Channel
Tuning the whip and channel is how you customize pocket performance. More whip creates deeper pockets, while wider channels open up the pocket. If stringing with mesh for the first time, start with a medium whip/channel and tweak from there. Things like shooting style, stick skills, and position impact ideal settings.
Check Pocket Depth Frequently
Checking pocket depth throughout the stringing process ensures you achieve your desired specs. Place a ball in the pocket and hold the stick upside down to see where it sits. Adjust the diamond lengths, whip, or channel if the depth needs lowering or raising.
Weave Even Rows
Weaving neat, straight rows not only looks more aesthetically pleasing, it also enhances performance. Keep rows uniform in width and pattern. If rows become uneven, it affects ball control and release. Maintaining symmetry takes practice, but makes a noticeable difference.
Utilize a Stringing Needle
Stringing needles simplify weaving significantly, making the process quicker with cleaner results. The metal tip let’s you accurately thread sidewall string through holes at tight angles. You can find sturdy stringing needles online or at most lacrosse retailers.
Go Slow & Check Your Work
Patience is key, especially when stringing mesh for the first time. Rushing leads to messy rows, uneven diamonds, and incorrect pocket shape. After finishing each section, examine thoroughly for any errors before moving on. Don’t be afraid to undo and redo rows if needed.
Test & Break In the Pocket
After fully stringing the head, test it out to ensure the pocket forms as expected. Take plenty of practice shots and passes to start breaking in the pocket. The mesh will shift a bit during the break-in process, settling into a sweet spot. Tweak the diamonds or sidewall if any adjustments are needed.
Stringing your own lacrosse stick takes dedication, attention to detail, and practice. But with the right techniques and gear like vibrant pink lax mesh, you’ll be customizing sticks to your exact preferences. Be patient, follow crucial steps like anchoring the top string and consistent diamonds, and enjoy the rewards of mastering DIY lacrosse stringing.
Achieving Optimal Pocket Depth
One of the keys to mastering DIY lacrosse stringing is learning how to achieve the ideal pocket depth. An optimal pocket improves ball control, hold, and release. But consistently attaining proper pocket depths, especially when stringing with vibrant pink lax mesh, requires attention to detail.
Pocket depth is a personal preference based on factors like playing style, position, and skill level. Attackmen tend to like deeper pockets for cradling and ball retention, while defenders need shallower pockets for quick passing and checks. Regardless of preferences, following some essential stringing steps will help you nail the perfect pocket depth time after time.
Start With Quality Mesh
High-quality lacrosse mesh like StringKing or Throne shapes and maintains pocket depth much better than cheaper mesh options. The materials and construction have more structure for consistent stringing results. If opting for flashy pink mesh, go with a reputable brand like Jimalax or ECD to ensure ideal performance.
Prep the Mesh Thoroughly
Out-of-the-box lacrosse mesh often needs significant shaping before stringing to remove any stiffness. Thoroughly prep pink mesh by soaking in water, kneading with your hands, and using a ball or disc to form the ideal pocket shape. Proper prepping makes it easier to achieve your desired depth when stringing.
Use a Stringing Shackle
Stringing shackles are a simple but extremely effective tool for getting symmetrical pocket depths. Attach the shackle to the center of the top string and adjust to your preferred depth. As you string diamonds, continually check shackle placement to maintain consistency across the head.
Pay Attention to Diamond Lengths
The diamond lengths have the biggest impact on pocket depth. Longer rungs pull the mesh deeper, while shorter diamonds create shallower pockets. Use the shackle as a guide and increase diamond lengths incrementally from the top to lowest diamonds. This creates even backside tapering for better ball control.
Find the Right Sidewall Pattern

The amount of whip in the sidewalls influences pocket depth as well. More whip equals deeper pockets. Start with a medium amount of whip when stringing with new mesh and adjust from there. A semi-traditional sidewall with 3 straight shoots is a good starting point to learn.
Adjust the Channel Width
Wider channels between sidewall strings open up the pocket more, allowing deeper pocket settings. Use single strings or skip holes to widen channels and double-up sidewall in other areas to tighten channels, controlling depth precisely.
Check Depth During Stringing
Repeatedly check the pocket depth from multiple angles as you string. Place a ball in the pocket and hold the head upside down to see where it sits. The ball should sit just above the bottom edge of the scoop when held upside down at the desired depth.
Weave Rows Consistently
Inconsistent sidewall rows throw off pocket symmetry. Maintain evenly spaced rows all the way around the head for balanced depth. Neat rows also enhance ball control and release speed.
Correct Mesh Mid-Stringing If Needed
If the pocket depth is off, you can adjust the diamonds and whip mid-stringing to get it dialed in. Adding or removing a row, lengthening diamonds, or adjusting sidewall whip are all options to fine-tune depth while stringing.
Check Again After Stringing
Give the pocket a final depth check from multiple angles after fully stringing the head. Have a teammate look at it as well to get a second opinion. Put the stick through its paces with passing, catching, and shooting to confirm the depth feels right.
Tweak Depth During Break-In
Brand new mesh will shift a bit during the break-in process after stringing. Use this to your advantage by working the pocket and molding it to the final desired depth as you break it in. Aim to have the starting depth slightly shallower knowing it will settle deeper.
While stringing the perfect pocket takes practice, focusing on key steps like prepping the mesh, using a shackle, and frequently checking depth will get you dialed in. Be patient, take notes, and don’t be afraid to tweak the diamonds or sidewalls as needed. With the right techniques, you’ll be consistently stringing sticks with awesome pink mesh and optimal pocket depth.
Tying Secure Interlocking Sidewall Strings
Creating clean, durable sidewall stringing is crucial for any well-strung lacrosse head. Interlocking the sidewalls properly gives the pocket structure and enhances ball control. When stringing with vibrant pink lax mesh, taking time to tie solid interlocks prevents premature fraying or loosening.
The interlocking sidewall knots join each string to create whip, shape the channel, and anchor the diamonds. Sloppy interlocks lead to uneven stringing and negatively impact performance. By using proper technique and high-quality mesh and string, you can confidently string sidewalls that will hold up for many games.
Use Durable Sidewall Material
Choosing quality sidewall string makes a noticeable difference in durability. Multi-filament nylon lacrosse string, rather than cotton string, provides excellent abrasion resistance and knot strength. It may cost a bit more, but quality sidewall string is worth the investment.
Keep Tension When Tying
Maintaining consistent tension is vital for knots to hold securely. Pull both ends tight when tying interlocks so the knot sits snugly against the head. This prevents looseness or slipping that leads to uneven stringing over time.
Don’t Overtighten the Mesh

Overtightening the sidewalls flattens the mesh pocket shape. Keep even tension between interlocks, but avoid pulling excessively tight. The mesh should have room to pocket properly, enhancing ball control and feel.
Tie Identical Knots
Tying each interlock using the exact same technique and direction ensures symmetry. Alternating start and finish knot directions can cause uneven tension. Establish a consistent knotting method and direction for all interlocks.
Weave Rows in a Set Pattern
String sidewall rows in the same sequence every time, whether woven, 1s and 2s, or another technique. Varying the weave randomly affects string angles and pocket shape. Follow a set sequence for consistent results.
Keep Rows Uniformly Spaced
Consistent row spacing maintains pocket symmetry and ball control. After interlocking each row, check spacing above and below to ensure even gaps. Adjust tension as needed to keep rows uniformly spaced.
Check Interlocks Frequently
Inspect each interlock thoroughly before moving on, especially when first learning. Firmly pull the knots in opposite directions to verify tightness. Rework loose knots immediately to prevent poor performance down the line.
Avoid Frayed Knots
Fraying sidewall knots are weak points prone to untying. Singe knot ends with a lighter and apply a dab of lacquer or clear nail polish on each interlock. This seals the knots for a clean, finished look.
Secure Ends Properly
Tie off sidewall string ends tightly so they can’t slip back through holes. Melt the ends or knot multiple times for redundancy. Proper end termination prevents gradual loosening that throws off pocket shape.
Check Sidewalls Post-Stringing
Give sidewalls a final inspection after stringing, aggressively pulling knots in all directions to check for slippage. Also check for loose knots or uneven row spacing. Re-tighten any suspect knots before break-in.
While interlocking sidewalls takes practice, master stringers make it look easy every time. Be patient, use quality mesh and sidewall material, maintain symmetry, and routinely inspect knots. Repeating sound fundamentals lets you string confidently with eye-catching pink lacrosse mesh.
Creating Consistent Diamond Top Stringing
Properly stringing the top diamonds lays the foundation for a well-shaped pocket. With quality pink lacrosse mesh, taking time to string clean diamond tops enhances overall consistency. Uniform diamonds improve ball control, hold, and release from the pocket.
Rushing through diamond tops often leads to sloppy, uneven stringing. By developing sound stringing fundamentals, you can confidently nail consistent diamond tops every time. Your pockets will look crisper and perform at their peak, regardless of the flashy mesh color.
Anchor the Top String Properly
Anchoring the top string ensures the mesh stays put during stringing. Wrap it twice through the tip-top sidewall holes and pull it taut across the head. This gives the mesh stability to keep diamonds uniform.
Use High-Quality Lace
The diamond lace or string takes a beating during play, so use something durable like multi-filament nylon hockey lace. Avoid cheaper cotton laces prone to premature fraying or breakage leading to sloppy diamonds.
Maintain Even Tension & Spacing

String each diamond at the same tension, keeping them uniformly spaced across the head. Inconsistent tension or gaps between diamonds throws off pocket shape. Take your time and check symmetry.
alternate Start & Finish
Alternating the start and finish knot gives better tension balance. String half the diamonds starting left and finishing right, then alternate start/finish direction on the other diamonds.
Pull Lace Straight Through
Guide the lace straight through diamond holes without bunching or twisting for clean looks. Bent lace affects stringing angles and alters pocket shape.
Follow Set Patterns
Adhering to a consistent stringing sequence ensures uniformity. Simple patterns like 1s and 2s provide good diamond symmetry. More advanced patterns work too once you master basics.
Check Dimensions Frequently
Inspect each diamond after stringing and adjust as needed. Compare diamond width, row spacing, hole spacing, and lace tension to surrounding diamonds. Strive for precision.
Correct Mistakes Right Away
Fix any diamond errors immediately rather than ignoring them. Attempting to compensate for a mistake later often compounds stringing issues. Perfect each diamond before moving on.
Shape & Set Pockets Gradually
Let pocket shape evolve across the head naturally by gradually increasing whip or diamond size rather than forcing an abrupt angle. This creates better pocket control and hold.
Secure Ends Tightly
Loose diamond lace ends lead to premature untying and uneven pockets. Melt the ends or knot multiple times for a finished, professional look that performs consistently.
While diamond stringing is tedious, nailing the fundamentals results in crisp, consistent pockets with any color mesh. Be patient, string each diamond meticulously, frequently check symmetry, and correct errors immediately. Before you know it, you’ll be stringing sticks like the pros!
Integrating Unique Shooting Strings
Adding personalized shooting strings is a great way to make your lacrosse stick unique. With bright pink mesh as the foundation, customizable shooters let you put your own creative twist on stringing. Tailored shooting cords provide both visual flair and functional performance benefits.
Stock nylon shooters work fine, but integrating unique materials, colors, or patterns makes a pocket really stand out. Getting creative with shooters also enables precise fine-tuning for specialized ball control. By understanding shooter functions and options, you can confidently integrate custom cords that align with your style.
Match Shooter Layout to Pocket Shape
Consider how the shooting cords will integrate with the pocket shape. Wider heads and deeper pockets typically benefit from stacked or zig-zag patterns. Narrower heads allow for straighter alignments or cross-weaves.
Incorporate Colorful Materials
Multi-color twine or variegated string adds flair. Intertwine different shades for fades or patterns. Alternate colors down the head or use one color for cross-weaves. The options are endless for personalized style.
Try Unique String Types
Get creative with shoelaces, paracord, leather lacing, fishing line, or pre-waxed lace. Mixing materials like nylon and wax lace provides contrast. Just ensure the cords are durable enough for gameplay wear and tear.
Adjust Shooter Front/Side Placement
The exact position of sidewall versus front cords affects release. Experiment to find the optimal setup for passing, shooting, ball-handling, or securing holds. Personalize stringing based on your needs.
Integrate Meaningful Beads & Trinkets
Small beads, pendants, or charms add sentimental value. Consider items symbolizing team spirit, competitive mentality, or personal interests. Just avoid anything too bulky or hazardous.
Try Complex Lacing Patterns
Advanced patterns like box, pillar, or triangle top stringing require skill but deliver unique flair. Watch tutorials to learn technical lacing techniques for next-level style.
Adjust Shooter Tension Strategically
Varying individual cord tension fine-tunes release and hold. Keep cross-strings looser to open up channels and tighten stacked cords for security. Target tension areas based on needs.
Simplify Shooters for Beginners
Newer players may want basic straight runners or cross-weaves to learn. As skills improve, integrate more complex patterns and materials to progress with confidence.
While stock nylon works fine, integrating personalized shooters boosts style and optimizes performance. Match your stringing technique level, position needs, and aesthetic preferences. Combined with vibrant pink mesh, truly customizable shooting cords let your personality shine.
Incorporating V Channels in the Midsection
One way to optimize ball control and pocket performance is integrating V channels in the midsection. A V channel uses two sidewall strings that angle down to a centered diamond row, creating a distinct V-shape through the middle diamonds. This configuration aligns the pocket for superb hold while still allowing clean releases.
With flashy colored mesh like pink, strategic midsection V channels take the stringing to another level. Integrating a defined channel helps focus the pocket shape and enhances overall playability. By understanding the steps for clean V channels, you can easily incorporate them into heads strung with any mesh.
Pick Diamonds for the Channel Start
Determine the diamond rows where the V will start, based on pocket shape needs. Wider heads benefit from lower starting points. Deeper pockets need higher apexes for adequate ball control.
Anchor Channel Strings at Top
Securely anchor the two sidewall strings at the chosen V channel start diamonds. This keeps them from slipping during stringing. Position anchors equidistant from center for symmetry.
Angle Strings Gradually Downward
As you string, slowly angle the sidewall strings down toward the center point. Avoid forcing an abrupt angle, instead letting the V shape develop gradually for optimal pocket performance.
Maintain Sidewall Tension
Keep even tension on both channel strings as you string the V. This results in a centered bottom point and balanced sidewalls. Uneven tension will pull the channel off-center.
Widen Midsection Channels
Use single strings or wider diamonds around the V to open up the surrounding channel area. This gives the ball freedom to drop into the V for superior control.
Incorporate Shooters Strategically
Add shooters above or below the V channel to fine-tune pocket performance. Shooters through the V apex provide adjustable hold points for versatility.
Check Spacing & Dimensions
Frequently check V width, sidewall spacing, and bottom point alignment as you string. Adjust tension where necessary to maintain optimal shaping.
Tie Off Channel Strings Securely

The V channel experiences heavy strain during play. Tie sidewalls off tightly at the bottom to prevent loosening or slipping over time.
With practice, V channel integration becomes second nature. Start with a simple mid-pocket V, then expand to more complex shapes across the entire head once you master the basics. Combined with vibrant pink mesh, defined midsection V channels take pocket engineering to the next level.
Adding Custom Throne Strings and Rolls
When stringing with vibrant pink lacrosse mesh, integrating creative touches like custom Throne strings and lace rolls puts a unique stamp on your pocket. Throne offers hundreds of variants on traditional lacrosse string, letting you customize color combos, patterns, and materials.
By strategically working Throne string rolls and shooting cords into the stringing, you can optimize the pocket for your playing style while adding personal flair. Understanding how to integrate these upscale customizable elements will take your stringing game to the next level.
Match Throne Strings to Mesh Colors
Choose Throne rolls that complement the mesh color palette. For pink pockets, opt for bold accent colors like vibrant green cords or try fades mixing pink and black. Coordinated colors look crisp.
Use Strings That Reflect Personality
Show your style with strings featuring favorite colors, cool patterns like digi-camo, or trendy metallics. Let the stringing reflect aspects of your personality for a custom feel.
Pick Materials Based on Durability Needs
Throne offers strings in nylon, waxed lace, and multi-filament blends. Know your play style and position needs when selecting materials for optimal performance life.
Incorporate Precision Rolls for Control
Precision-rolled sidewall strings maintain consistent tension and shape better than pre-cut lengths. They’re ideal for stringing intricate Throne patterns flawlessly.
Add Pizzazz with Decorative Throne End Caps
Optional string end caps from Throne provide extra flair and a polished finish. Metallic, leather, or glow caps enable even more personalization.
Use Two-Tone Throne Shoelaces for Shooters
Shoelace cords with color transitions look amazing as shooters. Position the color switch strategically for added style when shooting or dodging.
Match String Types to Pocket Areas
Use different string types in specific zones to optimize performance. Soft mesh and waxed lace up top for hold, nylon in the middle for consistency, multi-filament on bottom for durability.
With countless combinations to work with, Throne strings let you engineer next-level pockets with vibrant pink mesh. Explore all the options to create a one-of-a-kind look and feel personalized to your game.
Securing Durable Bottom Stringing
The bottom stringing on a lacrosse head takes a beating, so it’s crucial to string it for maximum durability. With flashy mesh like vibrant pink, you’ll want bottom cords that can withstand abuse while retaining structure and functionality.
Following sound stringing techniques for the bottom strings will prevent premature fraying, untying, and damage. Durable bottom cords maintain pocket shape better and provide consistent ball control over time. By using quality materials and integrating reinforcements, you can confidently string bottoms that will last.
Use Heavy Nylon Cord

Opt for thick nylon shooting cord instead of softer materials like cotton twine. Nylon’s abrasion resistance preserves the bottom cords much longer through constant ground, stick, and ball contact.
Double Up Key Diamonds
Weave critical diamonds like those around the ball-stop with two cords for added reinforcement. Any diamonds prone to extra wear deserve double strength.
Incorporate Double Nods
Work double nods into the bottom stringing pattern. Two stacked knots at diamonds’ cords ends better secure stringing and prevent untying.
Integrate Backup Nylon Loops
Extra nylon cord loops threaded through each bottom diamond provide insurance if primary laces fray or snap. The backup keeps the shape intact.
Reinforce High-Wear Areas
Use extra cords or special reinforcing techniques on the ball-stop, lower sidewalls, and scoop areas. Protect the most abuse-prone regions.
Choose Durable End Caps
Secure ends with reinforced metal caps instead of standard nylon ends. The caps neatly contain fraying while providing more structure and longevity.
Incorporate Stop Laces Under Ball-Stop
Short stop laces threaded horizontally behind the ball-stop maintain its positioning and shape over time. They prevent distortion from ball impact.
Check String Tension Frequently
Retighten loose knots or cords as needed while stringing and after completing the head. Proper tension preserves durability and pocket shape.
With strategic reinforcements, thick nylon, and knot protections, you can string incredibly durable pink lacrosse mesh bottoms. Take time to implement strength backups, and your bottom cords will withstand seasons of aggressive play.
Balancing Pocket Whip and Hold
Crafting an optimal lacrosse pocket involves balancing two key characteristics: whip and hold. Whip refers to the pocket’s flexibility and release, while hold focuses on ball control and security. When stringing with vibrant pink mesh, tuning these factors correctly results in peak performance.
Excessive whip yields sloppy pockets that lose balls easily, while over-emphasis on hold creates rigid, slow pockets. By understanding how stringing elements like diamonds, sidewalls, and shooters impact whip and hold, you can strike the right balance for your position and playing style.
Loosen Diamonds for More Whip
Wider diamonds with more open space increase overall pocket whip. This enhances quick releases for passing and shooting but compromises hold.
Use Tighter Diamonds for Hold
Compact diamonds with narrow spacing grip balls better for superior cradling control. But dense diamonds reduce flexibility and release speed.
Add Sidewall Whip for Hold
Extra sidewall whip pulls the pocket inward, allowing it to contour around and control the ball. Too much whip hinders release though.
Go Easy on Sidewall for More Whip
Minimal sidewall whip keeps the pocket flexible and responsive. But this can result in sloppy ball retention and insecure holds.
Incorporate Shooters for Hold
Shooting cords thread through mesh diamonds to enhance hold strength. Place strategically to fine-tune control and security.
Adjust Shooter Tension for Variable Hold
Increase shooter tension to tighten hold points or loosen up for more whip. Targeted tuning creates pocket zones with differing play.
Test Pocket with Use

Only gameplay testing fully reveals overall pocket function. Cradle and shoot to ensure the balance between hold and whip suits your needs.
Optimizing whip and hold takes experimentation and fine-tuning during stringing. But by mastering how pocket elements impact each, you can consistently achieve ideal function from any mesh, including bold pink.
Testing Throws for Consistent Release
No matter how carefully you string a lacrosse head, the true test is how it performs in action. With flashy mesh like vibrant pink, testing different types of throws ensures you achieve optimal pocket release.
Since throw technique impacts release, it’s crucial to test a freshly strung head with all the pass and shot varieties you’ll use in games. Testing helps fine-tune the pocket shape, shooter placement, and sidewall tension for your playing style. Dialing in consistent throwing and shooting from your stick results in more goals, assists, and overall effectiveness on the field.
Practice Different Passing Releases
Test quick sticks, feeds, and outlet passes to gauge pocket performance. The release should feel smooth and consistent on all standard pass types.
Vary Shot Power and Placement
Take shots high and low, hard and bouncing to see how the pocket launches balls from all angles. You want reliability regardless of shot variation.
Attempt Cradling and Shooting in Motion
Cradle, dodge, and shoot on the run to mimic game motions. The pocket should hold smoothly while running then release cleanly when shooting.
Check Release at Different Pocket Locations
Focus shots specifically from high, center, and low pocket areas. Make sure the release feels consistent across the head length.
Test Tip-of-Pocket Holds
Attempt angled cradling where just the ball top shows to ensure the pocket opening holds it securely when only partially exposed.
Practice Quick Stick Redirects
Catch and immediate redirect passes at sharp angles to test pocket control. This mimics in-game passing sequences.
Try Bouncing Ground Balls
Scoop bouncing grounders to gauge how well the pocket traps and secures balls off awkward hops.
Ask Teammates for Feedback
Get another person’s perspective on pocket performance as you test different release motions. Team input can prove invaluable.
While primary stringing establishes pocket function, only thorough field testing reveals true performance. Refining the pocket based on testing with all your usual throws leads to maximized throwing consistency and confidence in games.
Maintaining Pocket Shape and Longevity
One of the keys to mastering lacrosse stringing is learning techniques to preserve the optimal pocket shape over time. With flashy mesh like pink, proper stringing allows the pocket to maintain top performance and durability through seasons of play.
Pockets often loosen up and degrade rather quickly, especially if strung poorly. But implementing structural stringing elements and proper break-in helps retard pocket loosening. Taking steps to stabilize shape from the start and reinforce wear zones results in long-lasting pockets with vibrant pink mesh.
Use High-Quality Mesh and String
Premium mesh and string materials retain the ideal pocket shape far longer than cheaper versions. Invest in mesh brands like Throne known for durability.
Incorporate a Mid-Pocket Anchor
A simple anchor point in the lowest diamond row secures the base to prevent dramatic loosening and drop over time.
Reinforce Wear Zones
Double up mesh diamonds and sidewall in high-abrasion areas like near the scoop and ball ramp. This protects shape in key spots.
Check and Retighten Stringing
Frequently check knots and cords for loosening and adjust tension as needed. This maintains pocket integrity over the long haul.
Minimize Mesh Shifting
Tie off mesh diamonds and sidewalls tightly so they can’t shift or loosen. Eliminate any play that might alter shape.
Break In the Pocket Gradually
Gently work the pocket in over time, molding it into the ideal shape. Avoid over-stressing new stringing to prevent premature wear.
Soften Mesh Before Stringing
Soak and pre-shape mesh before stringing so it forms the desired pocket naturally with minimal post-stringing adjustments.
Use a Protective Mesh Coating
Optional coatings like StringKing’s WaxMesh waterproof pockets to reduce mesh degradation from moisture or dirt.
With careful stringing and pocket break-in, lacrosse sticks strung with vibrant pink mesh will maintain awesome performance and style season after season.


