What tools and materials are needed for a complete lacrosse stringing kit. How to select the right sidewall strings, shooting strings, and mesh for your playing style. Why learning to string your own lacrosse stick can save money and improve performance.
The Importance of a Well-Equipped Lacrosse Stringing Kit
Customizing your lacrosse stick is a crucial aspect of the sport, allowing players to fine-tune their equipment to match their unique playing style. While professional stringing services are available, learning to string your own stick offers numerous benefits. Not only does it save money in the long run, but it also provides the flexibility to continuously adjust your pocket until you achieve the perfect feel.
To embark on your DIY stringing journey, you’ll need a comprehensive lacrosse stringing kit. Having the right supplies at your fingertips will streamline the process and help you avoid frustrating setbacks. Let’s explore the essential components of a well-equipped stringing kit and how they contribute to creating your ideal pocket.
Sidewall Strings: The Foundation of Your Pocket
Sidewall strings are the backbone of your lacrosse pocket, connecting the plastic runners of your head and providing the framework for your mesh. When selecting sidewall strings for your kit, consider the following factors:
- Material: High-quality nylon is a popular choice due to its durability and resistance to stretching.
- Coating: Waxed versions offer enhanced grip and water resistance.
- Thickness: Thinner strings create a softer pocket with more hold, while thicker strings provide added stability.
Is there a significant difference between waxed and unwaxed sidewall strings? Waxed strings offer better grip and water resistance, making them ideal for wet conditions. However, unwaxed strings allow for easier adjustments and can create a slightly softer feel. Experiment with both to determine your preference.
Recommended Sidewall String Options
- East Coast Dyes Venom Sidewall
- StringKing Type 3 Performance Lacrosse String
- Throne of String Sidewall
Shooting Strings: Perfecting Your Release
Shooting strings, also known as “V” strings, play a crucial role in controlling ball speed, spin, and accuracy during passes and shots. Your stringing kit should include a variety of shooting string options to allow for experimentation and fine-tuning.
How do different shooting string configurations affect ball control? Straight shooters provide consistent release and are great for beginners. V-shaped configurations offer increased whip and hold, while U-shaped setups can enhance accuracy for more experienced players. Include pre-cut lengths of each style in your kit to easily swap and test different setups.
Popular Shooting String Materials
- Solid nylon
- Dyed multi-colored strings
- Resin or wax-coated shooters
- Leather shooting strings (for traditional pockets)
Mesh: The Heart of Your Lacrosse Pocket
Mesh forms the customizable pocket of your lacrosse head, where you carry, cradle, and release the ball. A well-stocked stringing kit should contain various mesh types to accommodate different playing styles and weather conditions.
Does the type of mesh significantly impact playing performance? Absolutely. Different mesh varieties offer unique characteristics that can enhance specific aspects of your game:
- Traditional nylon mesh: Durable and consistent, ideal for all-weather play
- Soft mesh (e.g., Phenom or Elite mesh): Increased ball control and feel
- Wax mesh: Enhanced grip in wet conditions
- Performance mesh: Lightweight with excellent hold and release
Include backup pieces of your preferred mesh types to facilitate easy re-stringing when pockets become worn or damaged.
Essential Tools for Lacrosse Stringing Success
Beyond the core components of sidewall strings, shooting strings, and mesh, a comprehensive lacrosse stringing kit should include several tools to aid in the stringing process:
- Stringing needles: For threading strings through tight spaces
- Scissors: To cut strings and mesh precisely
- Lighter: For sealing string ends and preventing fraying
- Leather gloves: To protect your hands during stringing
- Pocket pounder tool: For breaking in new mesh and shaping the pocket
Are specialized lacrosse stringing tools necessary, or can household items suffice? While it’s possible to string a stick with basic household tools, specialized lacrosse stringing equipment can significantly improve the efficiency and quality of your work. Investing in proper tools will save time and frustration in the long run.
Mastering the Art of Lacrosse Stringing
Even with a fully-equipped stringing kit, learning to string a lacrosse head requires patience and practice. Consider these tips to improve your stringing skills:

- Study online video tutorials to learn proper techniques before attempting your first string job.
- Start with sidewall installation, focusing on maintaining even tension throughout the head.
- Avoid over-tightening, which can result in a stiff, unresponsive pocket.
- Familiarize yourself with legal stringing dimensions for your specific head and league regulations.
- Continuously reference your installed sidewalls to ensure proper pocket placement and centering.
How long does it typically take to master lacrosse stringing? With regular practice, most players can become proficient in basic stringing techniques within 3-5 attempts. However, developing the skills to create advanced pocket styles and fine-tune performance may take several months of experimentation and play testing.
Fine-Tuning Your Lacrosse Pocket for Optimal Performance
Once you’ve completed the initial stringing process, it’s time to fine-tune your pocket for optimal performance. Consider these adjustments to enhance your stick’s feel and functionality:

- Experiment with shooting string placement: Strings closer to the scoop have a greater impact on ball release, while lower strings improve overall control.
- Try skipping holes in the top mesh to create more defined pocket channels.
- For wide heads, consider double stringing for increased hold.
- Use a pocket pounder tool to break in new mesh and soften the pocket.
- Test different sidewall patterns to adjust pocket depth and shape.
How often should you adjust your lacrosse pocket? It’s common to make minor adjustments every few practices as you get a feel for your new stringing job. Major changes or complete re-strings are typically necessary every 15-20 intense playing sessions, or when you notice significant wear on your mesh or strings.
Maintaining Your Lacrosse Stick for Longevity and Consistency
Proper maintenance is crucial for preserving the performance and longevity of your lacrosse stick. Incorporate these habits into your routine to keep your stick in top condition:
- Regularly inspect your pocket for signs of wear, such as fraying sidewalls or loosening mesh.
- Re-string proactively before holes develop in heavily used areas of the mesh.
- Clean your stick after playing in muddy or wet conditions to prevent material degradation.
- Store your stick in a cool, dry place to avoid warping or material breakdown.
- Consider re-stringing your stick at the beginning of each season for optimal performance.
Can proper maintenance extend the life of your lacrosse stick? Absolutely. Regular inspection, cleaning, and timely re-stringing can significantly extend the lifespan of your lacrosse head and maintain consistent performance throughout multiple seasons.
Signs It’s Time to Re-String Your Lacrosse Stick
- Visible holes or tears in the mesh
- Frayed or broken sidewall strings
- Inconsistent ball release or reduced accuracy
- Difficulty maintaining proper pocket depth
- Excessive stretching or bagging of the mesh
By assembling a comprehensive lacrosse stringing kit and mastering the art of DIY pocket customization, you’ll have the tools and knowledge to maintain peak performance throughout your lacrosse career. Remember that perfecting your ideal pocket takes time and experimentation, so don’t be afraid to try new stringing techniques and materials as you develop your skills on the field.
Stringing Kit Essentials – Sidewall Strings, Shooting Strings, Mesh
So you just got a new lacrosse head and you’re ready to string it up with a fresh pocket before hitting the field this season. Customizing your lacrosse stick to fit your individual playing style is one of the best parts of the sport. While you can always pay for a pro stringing job at your local shop, learning how to string your own stick can save you money in the long run. Plus, it allows you to continuously tweak your pocket until you find your lacrosse stringing sweet spot.
Before you dive into stringing, you’ll need to make sure you have all of the essential gear in your DIY lacrosse stringing kit. Having the right stringing supplies on hand will make the job much smoother and help you avoid frustrating setbacks. Here are the key items your kit should contain:
Sidewall Strings
Sidewall strings connect the plastic runners of your lacrosse head, creating the foundation for weaving your pocket. You’ll need high quality sidewall string that won’t stretch or deform over time. Nylon lacrosse string is a popular choice, providing excellent durability and hold. Waxed versions add extra grip and water resistance. The thickness of sidewall string can impact pocket feel, with thinner strings creating a softer pocket with more hold. Make sure to have backup sidewall string in your kit for re-stringing down the road.
Shooting Strings
Shooting or “V” strings control ball speed, spin, and accuracy as you pass and shoot. You have options like solid nylon shooting string, dyed multi-colored strings, and shooters with resin or wax coatings. Your kit should have pre-cut lengths of shooting string in the most common configurations like straight, v-shaped, and u-shaped. Keeping extra shooting string makes it easy to swap out styles for fine tuning your release.
Mesh
Mesh forms the customizable pockets of your lacrosse head where you carry, cradle, and pass the ball. With so many mesh varieties available, having a range on hand lets you experiment. Start with traditional nylon mesh before exploring soft meshes like phenom or elite mesh for increased ball control. Don’t forget backup pieces of your favorite mesh so you can re-string evenly worn pockets down the road. Consider adding unique meshes like wax mesh orerated mesh to your kit to test out each season.
Once you have these three core stringing components, you can start piecing together the perfect pocket for your game. Here are some other useful supplies to include in your DIY lacrosse stringing kit:
- Stringing Needles
- Scissors
- Lighter
- Leather gloves
- Pocket pounder tool
- Backup heads
- Extra sidewall strings
- Variety pack of shooting strings
- Pre-waxed mesh
- Traditional nylon mesh
- Soft mesh
- Mesh in different colors
- Leather shooting string
- Nylon cord
Even with the right gear, stringing a lacrosse head for the first time can be challenging. Having patience and avoiding frustration will help the learning process go smoothly. Consider watching online video tutorials to pick up proper stringing techniques before attempting to string a pocket from scratch.
Start by installing your sidewalls and focus on keeping even tension throughout the head. Don’t pull too tightly or else you’ll end up with a stiff over-tightened pocket. Know the rules and regulations for legal stringing dimensions for your head. As you weave your mesh, continually reference the sidewalls you installed to keep the pocket placement centered.
When installing shooting strings, less is often more. Start with a simple straight nylon shooter setup and play with adding additional v-shapes as you get used to the feel. Shooters placed closer to the scoop will have more impact on releasing the ball, while lower shooters help with overall ball control. Consider skipping holes in the top of the mesh to create more defined pocket channels. Wide heads can benefit from double stringing for added hold.
Once your pocket is fully strung, use a pocket pounder tool to break in the fibers of the mesh. Compress your new pocket by crushing a ball firmly at the base and then cradling to soften up the pocket overall. Pay close attention to how the ball sits in the freshly strung pocket, and make adjustments to the tightness if needed. Over time, continue tweaking your sidewalls, shooting strings, and mesh type until you create your ideal customized stringing setup.
Maintaining your lacrosse stick is just as important as the initial stringing. Keep an eye out for areas of mesh wearing down from heavy usage and re-string proactively before holes develop. Fraying sidewalls, stiff shooters, and loosening mesh can all impact your performance. Consider re-stringing your stick after 15-20 hardcore playing sessions to restore that fresh pocket feel.
Having all the right gear in your lacrosse stringing kit is crucial for crafting your perfect pocket from home. But don’t forget that learning proper stringing techniques takes time and practice. Be patient with the process, reference tutorials as needed, and don’t rush into cutting strings or mesh until you’re confident in the steps. Finesse your pocket incrementally and enjoy the satisfaction of customizing your lacrosse stick to match your personal playing preference. Once you string up the first pocket, you’ll be hooked on doing all your lacrosse sticks yourself moving forward.
Finding the Right Head – Attack, Midfield, Defense, Goalie
So you’re looking to string your own lacrosse stick this season? That’s great! Stringing your own stick allows you to customize it exactly how you want. Whether you’re an attackman looking for a quick release, a middie searching for added hold, or a defenseman focused on control, you can craft your pocket to fit your needs. But before you can string, you need to make sure you have the right equipment in your lacrosse stringing kit.
The most important thing is getting the right head for your position and skill level. Attackmen generally use narrower heads for increased ball control and quicker passes and shots. Wider heads with bigger scoops are preferred for midfielders and defensemen to help with ground balls and checks. Goalies also opt for wider heads with large scoops to aid outlet passes. For beginners, mid to wide heads are recommended as they make catching and passing easier to learn. Intermediate and advanced players may use narrower heads once their skills progress. Make sure to get a head that fits your needs and level of play.
You’ll also need the right mesh, strings, and sidewall strings for your pocket. Mesh comes in different styles like hard mesh, soft mesh, and nylon/synthetic blends. Hard meshes maintain their shape better while soft meshes are more flexible. Nylon and synthetic meshes offer benefits from both. Your stringing style and preference dictates what mesh to use. Leather, nylon, and dyneema strings are available to accommodate traditional or mesh pocket stringing. Thinner strings increase hold while thicker strings widen the pocket. Sidewall strings also come in different materials so you can find the right blend of nylon, dyneema, or leather. Having a variety gives you options when stringing.
Make sure you have stringing pliers and cutters too. Stringing pliers allow you to tension mesh and pull strings tight when tying knots. Cutters let you trim strings once tied off. This keeps everything neat and even. Scissors can work in a pinch but dedicated lacrosse cutters create cleaner cuts. A wooden lacrosse mallet is also extremely useful for pounding and molding mesh to properly form your pocket. Don’t forget a long metal hook too for stringing those hard to reach sidewall holes. Optional extras like leather conditioner, gloves, and string wax can further aid the stringing process as well.
So what are some must-haves for your lacrosse stringing kit? Here’s a basic checklist to get you started:
- Lacrosse head (Attack, Midfield, Defense, or Goalie)
- Mesh (Hard, Soft, Nylon, Synthetic)
- Sidewall, Shooting, and Cross Strings (Leather, Nylon, Dyneema)
- Stringing Pliers
- Cutters
- Wooden Lacrosse Mallet
- Metal Hook
- Leather Conditioner
- Stringing Gloves
- String Wax
With the essential stringing supplies in your kit, you’ll be ready to weave your dream pocket. An inherent part of lacrosse is making the stick your own. Stringing gives you control over your most important piece of equipment. Taking the time to customize your head to your game is extremely rewarding once you get out on the field. And who knows – you may even find yourself becoming your team’s go-to stringer!
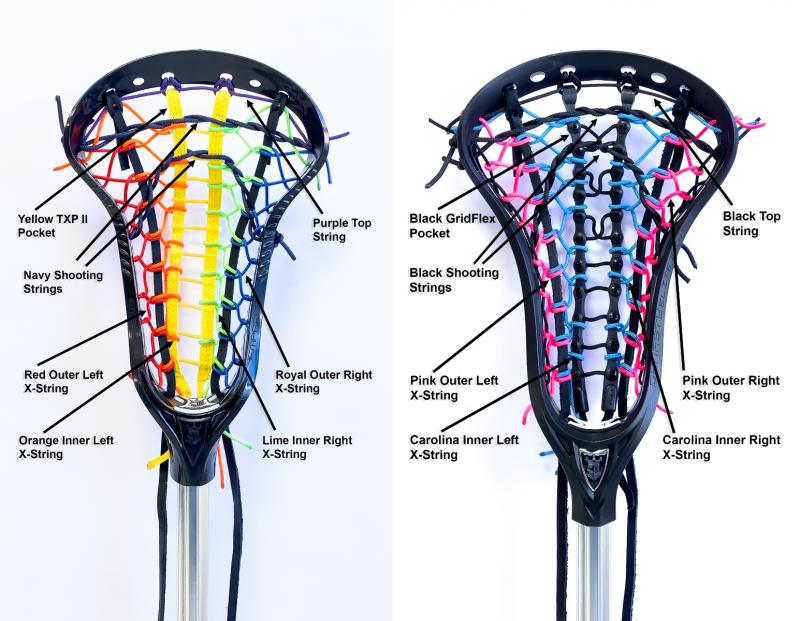
Types of Mesh
When stocking your lacrosse stringing kit, one of the most important choices you’ll make is picking your mesh. Mesh comes in a variety of styles, materials, colors, and diamond sizes. This gives you a lot of options to find the right pocket feel for your game. Here are some of the most popular mesh types:
- Hard Mesh – Made of nylon, hard mesh is thick and durable. It holds its shape extremely well and provides great ball control. However, hard mesh lacks pocket flexibility. Best for pre-strung pockets.
- Soft Mesh – Softer, flexible nylon mesh conforms to the head for increased pocket movement. Faster break-in time but less shape retention than hard mesh.
- Memory Mesh – Features the soft feel of soft mesh with the shape memory of hard mesh. Provides a blend of durability, flexibility, and pocket control.
- Waxed Mesh – Coated in wax to repel water. Keeps pockets firmer in wet conditions. Adds weight so many middies and attackers avoid it.
- Poly Mesh – Lowest maintenance mesh made from polyethylene plastic. Extremely durable and weather resistant with decreased pocket friction.
- Diamond Mesh – Smaller diamond sizes increase hold while larger diamonds make for a deeper pocket. Personal preference dictates mesh diamond size.
In addition to material and diamond size, you can choose different mesh colors. White and black are classics. Dye colors like red, orange, yellow, green, and blue have emerged too. Select mesh that matches your style and complements your head design.
Shooting Strings
Shooting strings run horizontally along the upper portion of the head. They affect ball acceleration, hold, and release point. Wider heads allow for more shooting strings while narrower heads only utilize one or two. Shooting string patterns include:
- Straight – Simple pattern with one straight shooting string.
- V-nylon – One string that crisscrosses in a V pattern.
- Chevron – Two strings that form repeated V patterns.
- Triple V – Alternating V and inverted V patterns.
- Diamond – Interwoven diamond shooting string formation.
Straight and V-nylon patterns are beginner favorites for their simplicity. More complex formations like Chevron, Triple V, and Diamond shooting strings require advanced stringing skills. Shooting strings often utilize the same materials as cross strings. Popular options include nylon, dyneema fiber, and composite strings.
Sidewall Strings
Sidewall strings interlace along the sidewalls of the head to shape the pocket and give it depth. They run perpendicular to the cross strings. Most heads have holes spread two diamonds apart for double sidewall stringing. Key sidewall stringing steps include:
- Determine desired pocket depth based on position.
- Choose thicker material for a deeper pocket: nylon, non-waxed linen, leather.
- Weave sidewall string through every sidewall hole.
- Intertwine with cross strings by going over one, under one.
- Tie off ends neat and tight.
Many players double up the sidewalls using two strands of varying materials like leather on nylon. Getting the sidewall stringing right is critical for creating your ideal pocket. Don’t be afraid to redo them until it feels perfect!
Stringing a Traditional Pocket

If you’re just starting out stringing, a traditional pocket is the way to go. Traditional pockets utilize string instead of mesh, allowing you to get a feel for string patterns before adding in mesh variables. To string a traditional pocket:
- Interlace the sidewall strings through every sidewall hole and tie off.
- Anchor the first cross string roughly 3/4 up the head and one diamond from the scoop.
- Weave cross string along the top of the head in one diamond increments.
- Angle cross strings from one sidewall to the other between anchors.
- On the bottom cross string, loop the string and tie it off to itself.
- Repeat along the bottom of the head moving up in rows.
- Form the pocket by gradually increasing the number of diamonds between anchor points as you string up the head.
- Tie off the top string below the scoop.
Traditional stringing is fundamental to learning the basic string patterns that apply to both mesh and traditional pockets. It never hurts to brush up on the basics. Once you have traditional stringing mastered, you can transfer those skills over to weaving some sweet mesh pockets.
Whether you’re a seasoned veteran or rookie stringer, having the right lacrosse stringing kit makes a world of difference. With quality mesh, durable strings, and essential stringing tools, you’ll be stringing sticks like the pros in no time. Creating your perfect pocket is a special feeling. So grab your stringing kit and let the weaving begin!
Proper Pocket Placement – Mid/Low/High Pockets
So you’re looking to string your own stick this lacrosse season? Awesome! Stringing your own stick is a rite of passage for any aspiring lacrosse player. With the right lacrosse stringing kit, you’ll be ready to give your stick that customized pocket you’ve been dreaming of in no time.
Before picking up your supplies, it’s important to decide what type of pocket placement you’re going for. Will it be a mid, low or high pocket? This will impact the supplies you need. Let’s quickly go over the pros and cons of each.
Mid Pocket
A mid pocket is one of the most versatile and commonly used pocket placements. As the name suggests, a mid pocket has the ball resting in the center of the head when holding the stick vertically. This provides a nice blend of ball control and quick release.
Pros:
- Balances control and release speed
- Easy to master for beginners
- Works well for a variety of player positions
Cons:
- Less ball control than a low pocket
- Slower release than a high pocket
Low Pocket
A low pocket sits further down in the head, with the ball resting towards the bottom when holding the stick upright. Low pockets maximize ball control and retention when being checked. They work best for ball carriers and dodgers.
Pros:
- Superior ball control
- Easier to cradle and retain possession
- Ideal for midfielders and attackmen
Cons:
- Slower release
- Less accurate passing and shooting
- Can be harder to master stringing
High Pocket
A high pocket has minimal stringing below the ball, allowing it to sit higher up in the head. This enables incredible ball speed for fast shots and quick releases.
Pros:
- Lightning-quick release
- More power and velocity on shots
- Great for shooters and snipers
Cons:
- Reduced ball control
- Easy for opponents to check
- Less accurate passing
As you can see, pocket placement has a big impact on stick performance. Keep your playing style and position in mind when choosing high, mid or low. Now let’s look at what you need in your stringing kit!
Lacrosse Stringing Kit Essentials
Putting together your lacrosse stringing kit is an important step before stringing your first stick. Having the right supplies on hand will make the process much smoother and help you nail the pocket you want.
Here are the essential items your stringing kit should contain:
Lacrosse Head
Obviously you can’t string a pocket without a head! Having a spare head on hand gives you something to practice on until you get it right. Opt for an unstrung model so you can start from scratch. MIDI and high school heads are versatile and budget-friendly.
Mesh
Mesh is the most common pocket material used today. It comes in a variety of styles including hard mesh, soft mesh, and wax mesh. Hard mesh holds its shape better while soft mesh offers more flexibility while stringing. Consider your pocket placement when choosing mesh type.
Sidewall String
Sidewall string connects the mesh to the sidewalls of the head. It threads up and down the rows of holes. A strong nylon multifilament string works best. Make sure you have at least 20 yards on hand.
Shooting Strings
Shooting strings run horizontally along the upper part of the head. They form woven loops that cradle the ball in the pocket. You’ll need 1-2 shooting strings depending on your pattern. Opt for hockey laces or polyester shooting cord.
Stringing Needle
A good stringing needle is vital for weaving the sidewall and shooting strings. Look for a needle with an eye big enough for 2-3 cords and a bent tip to easily maneuver inside head rails.
Scissors
A pair of sturdy scissors will make cutting strings and mesh to size much easier. Get lacrosse specific stringing scissors if possible.
Lighter
Using a lighter to singe the ends of synthetic strings will prevent fraying. This keeps the strings intact as you weave them.
Leather Stringing Gloves
Optional but highly recommended. Leather gloves protect your hands from string burns as you pull cords through the head.
Pocket Former
A pocket former is inserted into the head after stringing to help the mesh retain its shape as it sets. A rubber lacrosse ball or other rounded object can also work.
Stringing Jig

A stringing jig holds the head in place while stringing for easier handling. Not required but can be extremely helpful for beginners.
With these essential stringing tools in your kit, you’ll have everything you need to string a legal pocket that suits your playing style. Don’t be afraid to experiment with different techniques and patterns as you learn. The ability to customize your setup is part of what makes lacrosse so great.
The key is starting with quality materials – buying pro-grade mesh, durable sidewall and shooting strings, and the right head for you. Don’t try to cut costs here. Top notch gear will perform better and last longer through those tough games, slashes, and checks.
Remember to double check pocket depth regulations for your league before you start stringing. Follow the steps carefully and you’ll have a beautifully crafted pocket in no time. Then it’s off to hit the field and break in your new personalized pocket!
Choosing Mesh Type – Hard/Soft, Traditional/Waxed
When putting together your lacrosse stringing kit, one of the most important choices is selecting your mesh type. Lacrosse heads can be strung with either traditional nylon mesh, or wax mesh infused with paraffin wax. Within those two categories, you’ll also have to decide between soft or hard mesh.
Let’s take a look at the pros and cons of each to help you determine the best mesh type for your playing style and position.
Soft Mesh
As the name implies, soft mesh is more flexible and pliable than hard mesh. The strands tend to be thinner, allowing the diamonds to stretch and shift as you string. This customizable nature makes soft mesh great for achieving specific pocket shapes.
Pros:
- Easier to string into exact pocket placements
- Conforms to head shape better
- Provides a “broken-in” feel immediately
- Ideal for beginner stringers
Cons:
- Less durable over time
- Pocket loosens faster
- Weather affects it more (bagging in rain)
Hard Mesh
Hard mesh features thicker, stiffer strands that hold their shape against stretching. Pockets strung with hard mesh keep their defined shape longer before breaking in. The stiffness also provides more responsiveness for passing and shooting.
Pros:
- Superior ball control and quick release
- Much more durable over years of play
- Maintains pocket shape longer
- All-weather performance
Cons:
- Less customizable stringing
- Can be harder for beginners to string
- Stiff feel until broken-in
Traditional Nylon Mesh
Traditional nylon lacrosse mesh has been used for decades. It’s known for providing excellent ball control once broken in. Traditional mesh comes in a wide range of diamond sizes to suit all positions.
Pros:
- Time tested and proven effective
- Most affordable option
- Readily available from all brands
- Range of diamond sizes for customization
Cons:
- Absorbs moisture and can get waterlogged
- Not as durable as waxed mesh
- Slower break-in period
Waxed Mesh
Waxed mesh has gained popularity in recent years. It’s coated with paraffin wax which repels moisture. This improves performance in wet conditions. The wax also minimizes mesh stretch to help maintain pocket shape.
Pros:
- Sheds water and minimizes rain bagging
- Wax coating improves durability
- Minimizes premature stretching
- All-weather performance
Cons:
- Can be tacky at first until wax coating wears in
- Wax can melt and get sticky in extreme heat
- More expensive than traditional nylon mesh
When choosing between soft or hard mesh, consider your style of play. Midfielders and attackmen who stickhandle a lot benefit from the superior ball control of soft mesh once broken in. Defenders and face-off specialists favor the quick release of hard mesh. Shooting specialists also like the responsiveness of hard mesh.
For outdoor play in wet conditions, waxed mesh is a smart choice to prevent waterlogging. While a bit pricier, the all-weather durability and performance often justifies the cost. Indoor players will do fine with traditional nylon mesh.
Don’t just default to soft mesh as a beginner. Be willing to experiment to find what works for your game. Trying out different mesh types is part of the fun of stringing your own stick!
The key is getting high quality mesh from leading lacrosse brands like StringKing, ECD, Maverik, or East Coast Dyes. Cheaper mesh will bag out faster and need restringing more often. Invest in performance mesh for best results.
Match your mesh selection to the skill level you’re striving for. Youth and entry level players can start with softer mesh for easier stringing and pocket formation. As you improve, shift to harder mesh for increased command and responsiveness.
Along with mesh type, pay close attention to the diamond shape. Wider diamonds offer more ball control while narrow diamonds provide quicker release. Find your ideal combination based on what you need most – control or speed.
Don’t just blindly copy what the pros use either. Mesh preferences are highly personal at the elite level. Cater your stringing to your own strengths and weaknesses as a player.
With the right mesh and diamond size chosen, you’ll be ready to string up the perfect pocket to elevate your game. Take your time, follow meshing tutorials, and don’t be afraid to experiment. The ability to customize your setup is a huge advantage of stringing your own stick.
Soon you’ll have a beautifully crafted pocket ready for action. Break it in nicely with wall ball sessions and light playing at first. Let the pocket gradually form to your game. Before you know it, you and your custom threaded stick will be making plays out on the field!
Sidewall String Styles – Traditional, Straight, Modified

The sidewall string is a vital piece of any lacrosse head stringing project. This string secures the mesh to the sidewalls as it threads up and down the rows of holes. With the right sidewall string, you’ll get a pocket that’s both secure and optimized for play.
When stocking your lacrosse stringing kit, you’ll need to decide on a sidewall string type. The main options are traditional, straight, and modified sidewall string.
Traditional Sidewall
Traditional sidewall string has been used for decades to attach mesh to heads. It creates a zigzag pattern as it alternates through the sidewall holes. The zigzag helps lock the mesh in place and prevent shift.
Pros:
- Proven to securely anchor mesh pockets
- Zigzag adds stability and prevents mesh movement
- Works well for all pocket placements
Cons:
- Time intensive to string
- Uses more sidewall string
- Not optimal for certain wide heads
Straight Sidewall
As the name suggests, straight sidewall runs in a simple up and down pattern through the holes. This creates a quicker, more direct stringing method. It’s become popular for wider heads that don’t work as well with traditional sidewall.
Pros:
- Much faster and simpler to string
- Uses less sidewall string
- Ideal for wider heads
Cons:
- May allow more mesh movement
- Pockets tend to bag out faster
- Not as secure on narrow heads
Modified Sidewall
Modified sidewall combines elements of traditional and straight sidewall stringing. It uses strategic zigzags along with straight runs to optimize security and simplicity.
Pros:
- Enhanced security versus straight sidewall
- Faster to string than traditional sidewall
- Balances control and simplicity
Cons:
- Slightly more complex stringing method
- Requires finding ideal zigzag placement
For beginner and intermediate players, traditional sidewall is a smart choice to ensure mesh stability. As you advance, a modified approach balances security with quicker stringing.
Wider heads, especially stiff composite frames, often benefit from straight sidewall. Make sure to anchor the bottom with a tight interlock for stability. For maximum hold on wider heads, incorporate a few zigzags along with straight runs.
Midfielders who prefer a quicker release may favor straight sidewall for its tendency to speed bag out. Attackmen and defenders relying on superior control will get more life out of traditional sidewall stringing.
No matter which technique you use, choose a high-quality sidewall string. Look for strong multifilament nylon that resists stretching and fraying. Brands like StringKing, ECD, and Throne offer excellent sidewall string options.
Having at least 20 yards of sidewall string on hand gives you plenty of length to work with. You can always trim off excess, but running short mid-stringing is extremely frustrating!
If unsure, buy spools of both straight and zigzag string to allow mixing styles for your preferred combination. Use zigzag on the lower half of the head for stability, and straight runs up top for quicker stringing.
Don’t settle for basic hardware store string for your sidewalls. The small investment in performance string pays dividends in pocket integrity and longevity. Take your time finding the specialized stringing supplies that work for you.
Weaving the sidewall is the most intricate and tedious part of stringing a lacrosse head. But pushing through the process correctly results in a head that’s truly your own. Patience and care here translates to a pocket you can trust game after game.
Follow sidewall stringing tutorials closely as you learn. Don’t rush – set aside proper time to get the pattern right. Proper sidewall technique is vital to getting a clean channel and defined pocket.
Soon you’ll have a sturdy base ready for shooting strings and break-in. Dialing in your sidewall setup gets you one step closer to stringing up a new favorite stick before hitting the field.
Take pride in the craftsmanship of your stringing. As your skills improve with each head, it will be incredibly rewarding to see your vision come to life pocket by pocket. Just don’t be surprised when teammates start asking you to string their sticks too!
V-Strings vs. U-Strings for Shooting Strings

An important decision when stringing up a new lacrosse head is choosing between V-shaped or U-shaped shooting strings. Shooting strings are the horizontal laces along the throat of the head that help form the pocket. Let’s examine the pros and cons of Vs and Us.
V-Strings
V-strings consist of two shooting strings threaded through loops to create connected V shapes. This results in diamonds along the width of the head for cradling the ball.
Pros:
- More points of contact to grip ball
- Diamond shape holds ball securely
- Allows precise fine-tuning of pocket
- Enables adjusting release speed
Cons:
- More time consuming to string
- Can overcomplicate pocket
- Not legal for high school in some states
U-Strings
U-strings are a single shooting string threaded straight across in a U shape. They create a simpler horizontal cradle for the ball to sit in.
Pros:
- Quick and easy to string
- Simple pocket for beginners
- Less string so pocket bags out faster
- Legal for high school and youth
Cons:
- Less ball control
- Harder to customize pocket
- Less adjustability of release
Attackmen tend to prefer the superior ball control and finesse that V-string pockets offer. The connected diamonds grip and cradle the ball well for stick handling and quick changes of direction.
Midfielders often opt for simpler U-string pockets to get the fastest possible release when unloading on the run. Single shooting strings also bag out quicker for increased whip.
Beginners do well starting with 1-2 basic U-strings to form an entry level pocket. As skills improve, shifting to a woven V-string pocket provides more customization and command.
Ensure V-string pockets remain legal for game standards. Weave shooting strings no closer than 3 inches apart. Tightly bunched diamonds will get disqualified in inspections.
Hybrid setups combine 1-2 U-strings up top for quick release, with V’s down low for improved ball control. This balances the benefits of both shooting string styles.
No matter which shape you choose, use high quality shooting string. Hockey laces work well for durability. Brands like Throne, StringKing and ECD also make shooting strings designed specifically for lacrosse.
Take your time ensuring the top strings are evenly spaced and symmetrical.Shooting strings control the entire pocket shape and function. Rushing this step can ruin all your hard sidewall stringing work.
Weave shooting strings in a consistent over-under pattern through the sidewall string loops. Make sure diamonds are uniform with no twisting or bunching.
Shooting strings often take fine-tuning after stringing to dial in ideal tension and release. Carry a spare stringer’s needle in your bag for on-the-fly adjustments as you break in your pocket.
Don’t neglect maintenance either. Check shooting strings regularly for fraying and replace as needed. Shooting strings take a beating from ground balls, poke checks and bad weather.
With the shooting strings laced perfectly across the head, you’re so close to stringing up that new dream pocket. Take pride in getting these intricate details right.
Soon your vision will come to life as you put the final touches on a head that’s uniquely yours. All that’s left is the tedious process of breaking it in nicely. Gradually work the pocket in with wall ball sessions to get it game ready.
In no time you’ll be unleashing rocket shots, threading crisp passes, and scooping up ground balls like a pro. Your custom pocket will give you the confidence and command to take your game to the next level.
Then when teammates ask who strung up your sweet new stick, you can proudly say you did it yourself. Next step – starting a stringing side business and becoming the team stringer!
Adding a Throat Lace for Extra Hold

An optional but effective addition to consider when stringing up a new lacrosse head is incorporating a throat lace. A throat lace is an extra shooting string threaded around the throat of the head for enhanced ball retention.
While not strictly necessary, a throat lace can provide some nice benefits for players who need maximum pocket control and hold.
Increased Hold
The main purpose of a throat lace is to improve ball control for stick handlers and dodgers. An extra shooting string at the throat area keeps the ball locked into the pocket, preventing unexpected bounces on checks and slashes.
Attackmen and midfielders often add a throat lace for this added security when carrying and cradling the ball through traffic. Especially on heads strung with straight or modified sidewalls, the extra hold at the throat keeps the ball from popping out.
Quick Adjustments
A throat lace also provides an easy way to make quick adjustments to pocket hold. Simply loosening or tightening the lace can tweak ball retention without having to restring the entire head.
Being able to fine tune hold on the fly is useful for dialing in the ideal pocket tension based on game conditions. Rainy weather calls for tighter throat hold, while dry terrain may benefit from loosening up.
Customizable Placement
The exact placement of the throat lace provides further pocket tuning. Weaving the shooting string deep in the throat clamps down on ball security. Up towards the scoop offers a bit more freedom of movement.
Experiment with lace height to find your perfect fit. The ability to customize hold based on personal style and position is a nice bonus.
Downsides of a Throat Lace
While throat laces provide excellent ball control, there are a couple potential drawbacks to consider:
- Can slow down release speed
- Adds time and complexity to stringing
- May not be legal by high school or youth rules
Make sure to check regulations for your league before adding a throat lace. Shooting strings woven too deep may violate pocket depth rules.
Also be aware that aggressive throat hold can hinder passing and shooting speed. Stick handlers and dodgers will appreciate the control, but shooters may want to skip the lace for maximum velocity.
Weigh the pros and cons based on your playing style and needs. A midfielder may add a throat lace for cradling but remove it come game time to snap off quicker passes.
Stringing a Throat Lace

Stringing a throat lace takes a few simple steps:
- Tie off one end of the shooting string through the sidewall
- Thread up through desired throat holes from one sidewall to the other
- Wrap around and crisscross through the throat area
- Finish off by securing the other end to the sidewall stringing
As with normal shooting strings, use strong lace material like hockey laces. This ensures maximum durability for the high wear area at the scoop and throat.
Take your time weaving the throat lace evenly across the width of the head. Criss cross back and forth for optimal hold. Check that weaving remains symmetrical from side to side.
Test pocket retention and make adjustments as needed. You want a snug cradle without overtightening. Consider removing the lace for games requiring quicker release speeds.
Maintain the lace by watching for fraying, especially around the scoop. Replace the throat lace at the first signs of wear to prevent full breakage during play.
A perfectly threaded throat lace puts the final touch on a new dream pocket. Enjoy the enhanced control as you break in the fresh stringing with wall ball sessions and practice.
Soon you’ll be ready to hit the field cradling, dodging and scoring with confidence, thanks to a pocket customized for your game. Don’t forget a backup lace in your bag for quick adjustments on the fly.
As your stringing skills improve, consider experimenting with adding multiple laces, or a different material like leather. Master stringers get creative with double and triple throat laces for maximum hold.
Now that you have all the pieces in place, get out there and see your vision come to life with every pass, shot, and big play. Enjoy the pride that comes with crafting a personalized pocket from the ground up!
Pre-Stretching the Mesh Before Stringing

One technique that can improve performance and longevity when stringing up a lacrosse head is pre-stretching the mesh. Taking the time to manually stretch out mesh before stringing helps minimize premature loosening and bagging out.
Especially with softer mesh types, pre-stretching allows for better defined pocket shapes that maintain their structure longer under game conditions.
Why Pre-Stretch?
Fresh mesh often needs significant break-in time for the diamonds to widen up and form an ideal pocket shape. Pre-stretching accelerates this process so the pocket reaches its sweet spot faster.
The constant tension from sidewall strings and shooting strings exerts force on the mesh during stringing. Pre-stretching loosens things up in advance to counteract this pressure.
Pre-stretched mesh also helps minimize bagging out after heavy wall ball sessions and practice. The material has already undergone controlled expansion beforehand.
Less dramatic shape change results in a more consistent pocket feel as the stick breaks in. Pre-stretching also extends the life of the mesh before needing restring.
How to Pre-Stretch Mesh
Performing controlled pre-stretching is easy using a few simple steps:
- Attach one end of the mesh piece to a fixed object using clamps
- Grab the opposite end and pull taught with steady tension
- Hold for 30 seconds, then release
- Repeat pulling process on same piece 5-10 times
- Rotate mesh and repeat on all sections
The key is applying even tension across the full width of the mesh, without focusing on just a few diamonds. Use enough force to widen diamonds slightly, without fully popping them open.
Take care not to over-stretch the mesh. This can deform the shape and prevent forming a consistent pocket. Gentle controlled tension is the goal.
Ideal Mesh Types to Pre-Stretch
In general, softer mesh benefits the most from pre-stretching:
- StringKing Type 3s
- ECD Lacstar Soft
- StringKing Soft Mesh
- Throne Soft Mesh
Hard meshes like StringKing Type 4s and Throne Q30 hold their structure better and require less pre-stretch focus.
Mid-level meshes like StringKing Type 2F can still improve from gentle pre-expansion to optimize shape.
Weaving a Long-Lasting Pocket
Pre-stretching is one part of crafting a pocket built to last. Be sure to also:
- Use qualitymesh rather than cheap no-name brands
- Incorporate a reinforced interlock
- Anchor bottom with double sidewall knots
- Weave gradually wider diamonds up the head
Combine pre-stretching with structural stringing techniques to create a pocket that maintains its shape through seasons of play, never needing replacement.
Put in the work up front to minimize hassles down the road. Players will need to restring far less often, saving money and time.
Improve Performance from Day 1
With pre-stretched mesh ready for stringing, you can look forward to immediate results when hitting the field. The pocket reaches its ideal state faster, making the stick game-ready sooner.
Enjoy weeks and months of consistent pocket feel. Tweaking and adjustments become less necessary compared to untreated mesh. Just lace in the shooting strings and start scoring goals!
Pre-stretching is one more way to get elite results from your stringing time investment. The extra attention to detail lets you craft a precise, durable pocket customized to your game.
Stringing Tips for Beginners – Start Loose, Tighten as Needed

For first-time stringers, the process of lacing up a new lacrosse head can seem daunting. With practice though, you’ll be crafting custom pockets in no time. Follow these key beginner stringing tips to get started off right.
Choose Beginner Mesh
As a new stringer, softer mesh types will be easier to work with. Brands like StringKing, Throne, and ECD offer “soft” mesh lines at entry level price points. Avoid stiff meshes until you have more experience.
Wider middle diamonds also make initial stringing simpler. Go with mid-pocket placement over high or low to start.
Focus on Sidewalls First
Perfect your sidewall technique before moving on to shooting strings. Straight or 1-2 skip sidewalls are best for beginners. Take it slow and focus on straight, tight sidewalls.
Start Shooting Strings Loose
Leave extra slack when stringing shooting strings and throat lace. It’s much easier to tighten up later than trying to loosen overtightened stringing.
1-2 basic U-shoots are ideal starting out. Woven Vs can come later as skills improve.
Check Pocket Depth Often
Ensure stringing remains legal throughout the process. Use a lacrosse ball to test depth meets regulations for your league.
Leave Extra Sidewall Length
When in doubt, leave several inches of extra sidewall hanging. This gives room to tighten pockets as needed after stringing.
Use a Pocket Former
A piece of plastic or rolled up sock in the head will help set the pocket shape as the mesh breaks in.
Start with Cheaper Heads
Practice on mid-range heads first before moving up to elite sticks. You’ll make some mistakes starting out, so use heads you won’t mind restringing.
Watch Stringing Tutorials
Study YouTube tutorials to pick up techniques from experienced stringers. Take notes on their sidewall, shooting string, and interlock methods.
Invest in Quality Mesh
Cheap mesh will bag out and need restringing quickly. Spend a little more for mesh brands that hold their shape longer term.
Be Patient During Break-In
Expect the stick to need significant break-in time at first. Keep using it and gradually the pocket will improve.
Carry Backup Shooting Strings
Throw an extra lace and sidewall spool in your bag for quick adjustments on the fly as you dial in pocket feel.
Don’t get discouraged if your first few stringing projects need rework. It takes time to develop expertise. Follow the steps closely, watch tutorials, and focus on consistency.
Gradually work up to more complex techniques like woven v-shoots, advanced sidewall patterns, and custom throat laces. But start simply.
Before you know it, you’ll be stringing up gorgeous pockets for yourself and teammates. Just stay patient and keep practicing!
Skipping Holes and Stringing Angles for Desired Pocket Shape
More advanced lacrosse stringers use techniques like skipping holes and calculated stringing angles to craft specific pocket shapes. Understanding how to leverage these methods allows for highly customized pockets.
Let’s examine how intentional hole skipping and string angles can fine tune pocket types during stringing.
Skipping Holes on Sidewalls
Skipping holes is when the sidewall string does not go through every hole down the sidewall. For example, going through every other hole creates a 2-skip pattern.
More skipped holes equals tighter diamonds and increased ball control. Fewer skips creates wider diamonds for quicker release.
Common skip patterns:
- 1-Skip: Most common for good balance
- 2-Skip: Maximum ball control
- 3-Skip: Aggressive hold and whip
- Straight: No skips for fastest release
Go with 1-2 skip for elite attack pockets. Use straight sidewalls on midfield sticks for lightning fast outlet passes.
Strategic Hole Skipping Locations
Where holes get skipped also impacts pocket function. Some patterns to try:
- Skip lower holes only: Superior ball retention
- Skip upper holes near scoop: Quick release
- Skip middle holes: Balanced pocket
- Skip sides only: Angled pocket
Sidewall String Angles
Intentionally stringing sidewalls at calculated angles affects pocket shape.
Pulling tension sideways rather than vertical presses mesh for defined diamonds. Common angles:
- 45 degrees: Slight angled shape
- 60 degrees: Heavier angled bias
- 90 degrees: Vertical diamonds
Aim for 45-60 degrees when stringing up angled sidewall pockets. Use 90 degrees for straight vertical channels.
Shooting String Angles
Shooting strings woven on a diagonal also impacts pocket function.
Steeper horizontal angles pinch the ball, while shallower angles allow faster release. Adjust angles by:
- Wrapping shooting strings wider around sidewall
- Changing sidewall string path
- Weaving shooter strings tighter or looser
Test different release speeds by tweaking shooter angles during stringing.
Mastering Advanced Stringing
Like any skill, calculating hole skips and strategic string angles takes practice. Be patient and experiment to find what works for your game.
Focus on consistency across both sides of the head. Match angles and skips perfectly to prevent undesirable pocket bias.
Gradually work up to more complex patterns. Start with simple 1-skip straight sidewalls and 90 degree shooters before attempting advanced techniques.
Use ball retention tests to ensure adjustments translate to desired on-field handling. Just because it looks cool doesn’t mean it will perform.
Pushing your stringing skills opens up a whole new level of customization. You’ll be able to craft specialized pockets for every position, weather condition, and preference.
Just take it slow and build proficiency over time. Mastering the intricate details is incredibly rewarding and well worth the journey.
Double Strung Heads for Added Ball Control
For elite players demanding maximum command, double stringing a lacrosse head can provide next-level ball retention and handling. By essentially creating two pockets, double stringing forms a tight channel that locks down possession.
While tricky to execute, double stringing results in incredible control for dodgers, handlers, and face-off specialists.
How Double Stringing Works
Double stringing uses two lacrosse sidewalls in tandem on each side. The primary lower sidewall forms the base channel. A secondary sidewall strings above it, essentially creating two pockets stacked vertically.
This allows less distance between sidewall strings, tightly gripping the ball from both above and below. Mesh diamonds become elongated for cradling power.
Maximized Ball Control
The biggest benefit of double stringing is phenomenal ball control, especially on cradle and stick fakes. Two pockets grip the ball through all angles of motion.
By limiting ball movement vertically, double strings keep possession secure during poke checks and hits. The ball has minimal room to be jarred free.
Reinforced Sidewalls

Double sidewalls also strengthen overall sidewall structure. Twice the amount of string means double the tension anchoring in mesh diamonds.
This prevents premature mesh shifting and bag out. Pockets hold their shape much longer through seasons of play.
Downsides of Double Stringing
While excellent for control, double stringing does have some drawbacks:
- Significant time investment to string
- More difficult technique to master
- Reduced ball speed on passes and shots
The tight channel slows release velocity. Double stringing prioritizes command over speed.
Stringing Considerations
When attempting double stringing:
- Use hard mesh optimized for ball retention
- Skip sidewall holes aggressively (2+ skips)
- Weave sidewalls tightly but not overstretched
- Focus on clean diamonds and symmetry
Test ball control and release speed as you string. Overcompensate and you’ll end up with a puck rather than a pocket!
Perfect for Face-off Specialists
Due to exceptional ball control, double stringing is extremely popular among face-off specialists in lacrosse. FOGOs rely on vice-like cradling to rake and retain possession off the draw.
For FOGOs, the priority is securing the ball before outletting to midfielders. Double shooting strings ensure maximum clamping power for face-off dominance.
While a niche technique, double stringing fulfills a vital role. For players who rely on ball command over shot speed, nothing beats the cradling magic of double strings.
With practice, you can learn to craft double strung pockets with impressive precision. Your teammates will be begging you to string up their sticks next!
Personalizing with Unique Stringing Styles
One of the best parts of stringing your own lacrosse stick is the ability to customize it with unique style elements. Get creative with personalized shooters, intricate sidewalls, and styled meshes to craft a one-of-a-kind pocket.
Let your personality shine through by making the pocket truly yours. Here are some ways to inject personal flair:
Creative Shooting Strings
Shooting strings offer lots of opportunities for customization. Try unique styles like:
- Multi-color laces
- Alternating materials (leather, nylon, wax)
- patterned designs
- Tye-dyed or dip-dyed strings
- Personalized names/numbers woven in
Make bold shooters to showcase your playing style. Just ensure patterns remain symmetrical across both sides.
Artistic Sidewalls
Sidewall string allows for personal flair as well. Consider:
- Color coordinated sidewall colors
- Unique sidewall materials like leather or rubber cord
- Intricate zig-zag or wave patterns
- Contoured angles rather than straight lines
Let your sidewall artistry reflect the hours spent mastering stringing skills.
Stylized Mesh
Mesh allows for all kinds of custom looks:
- Tye-dyed or dip-dyed mesh
- Colour fade effects
- Patterned or icon meshes
- Number/name printed on mesh
- Neon and vibrant colors
Consider mesh styles that highlight your playing number, position, or nickname.
Throat Accents
Don’t forget the throat and scoop areas. Personalize with:
- Colorful shooters wrapping the throat
- Throat lace matching custom mesh
- Leather, suede, or rubber accents
Show off your style in the highly visible throat section that opponents see up close.
Pushing Creativity Within Rules
When getting creative, ensure stringing remains regulation-legal for your league. Overstyled pockets may not pass inspections.
Prioritize playability. Unique elements should enhance overall pocket function, not just look cool.
Maintain symmetry across both sidewalls. Mismatched or uneven stringing affects ball control.
Not every stylistic choice will translate on-field. Focus on clean execution balanced with personal elements.
Most importantly, enjoy the process of designing your dream pocket from scratch. Take pride in having a one-of-a-kind stick no one else has.
With the right blend of skill and style, you’ll stand out on the field with a pocket as unique as you are. Just stay within guidelines so your next masterpiece doesn’t get benched!
Maintaining Your Stick – Re-Stringing, Weatherproofing
Properly maintaining your lacrosse stick through re-stringing and weatherproofing will maximize performance and prolong pocket life. Take time focusing on stick upkeep.
With the proper care, your hand crafted pocket will thrive for seasons to come.
Re-Stringing Over Time
No matter how well crafted, every lacrosse pocket will need re-stringing periodically. Intense play loosens shooting strings and sidewalls over time.
Expect to re-string sticks at least once per year depending on level of play. Youth and high school players can likely go longer between string jobs.
To get the most life from stringing:
- Start with quality materials – don’t cut corners on mesh and sidewall string
- Maintain consistent pocket tension with checks
- Replace individual shooters immediately when fraying
Take time re-lacing just a few diamonds or shooters mid-season to optimize pocket performance before excessive bag out occurs.
Weatherproofing Mesh and Strings
Lacrosse pockets suffer greatly from moisture exposure. Rain, snow, and humidity wreak havoc on mesh and strings.
To minimize weathering:
- Choose wax mesh instead of nylon
- Coat strings and mesh with waterproof solutions
- Avoid leaving sticks in extreme heat or cold
- Bring extra strings when rainy games expected
Reapply waterproof treatments regularly, especially on stringing. Treated mesh and strings will perform better and resist bagging.
Protecting Your Stick Investment
Caring for your lacrosse stick extends beyond just the pocket. Also focus on:
- Wiping off dirt after each use
- Storing sticks properly when not playing
- Avoiding excessive mongo in cold weather
- Not using sticks on hard surfaces
- Checking for cracks in the head
Take pride in your custom pocket by keeping the full stick in top shape. Avoid damage from improper storage, weather, and wear and tear during play.
Routine Maintenance Is Key

Make stick upkeep a regular habit, not just when problems arise. Get on a schedule of:
- Re-stringing before every season
- Spot re-stringing as needed mid-season
- Weatherproofing strings and mesh
- Inspecting pocket and head before each game
Proactive maintenance will add seasons of life to your stick and pocket. Take care of your tools and they will take care of you on the field.
With proper care for your customized setup, it will maintain top performance for years to come. Just like you, your stick deserves the best!
Proper Stringing Technique to Avoid Illegal Pockets
As lacrosse season approaches, many players look forward to stringing their own sticks. A properly strung lacrosse head is crucial for optimal ball control, quick passing, and powerful shooting. However, stringing a stick incorrectly can lead to an illegal pocket that results in penalties or ejection from a game. By following proper stringing techniques and understanding the rules around pocket depth and width, you can avoid illegal pockets and enjoy a successful season.
Before you begin stringing, make sure you have the necessary supplies in your lacrosse stringing kit. This includes a lacrosse head, sidewall strings, shooting strings, mesh, stringing pliers, a screw, and a mallet. You’ll also want athletic tape on hand. Ensure you select a head size – midi, senior, or junior – appropriate for your position and age level. Attackmen and midfielders generally prefer narrower heads for tighter ball control, while defenders opt for wider heads with deeper pockets for scooping up ground balls. For mesh, hard mesh is more durable but less flexible, while soft mesh shifts more easily to cradle and pass.
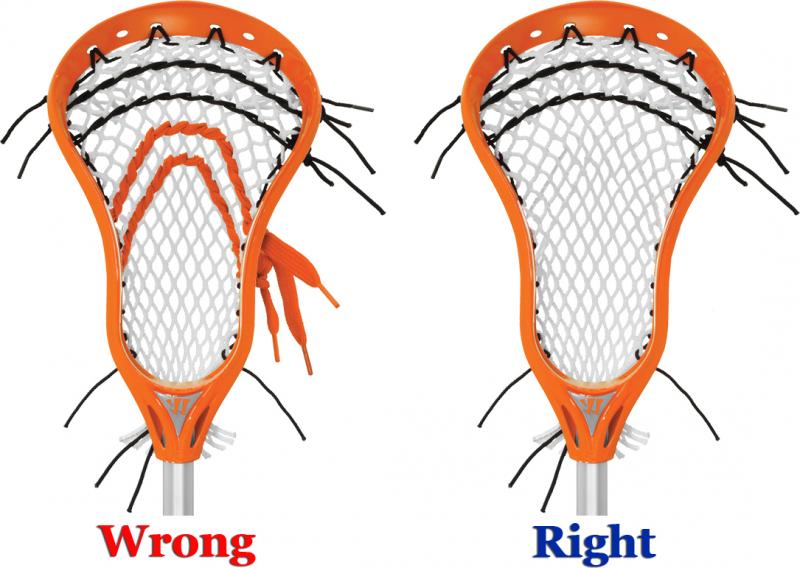
To start stringing, thread the sidewall strings in an interlocking pattern, starting at the bottom of the scoop and working downwards. Leave 1-2 diamonds unstrung at the base of the head before tying off the sidewalls. Sidewalls should be strung tightly enough to hold the mesh in place but not so tight that the pocket hammocks or warps. Use stringing pliers to gently pull the sidewalls taut as you go.
Once the sidewalls are strung, install the mesh. Anchor it by tying knots in the first diamond at the scoop and the last diamond at the base. Then, use the screw and mallet to attach the mesh to the sidewalls, screwing the mesh into place every 3-4 diamonds. Be sure to alternate mesh screw placement on each sidewall to distribute tension evenly. Leave 1-2 diamonds unscrewed at the base. When screwing, be careful not to overtighten, as this can tear the mesh.
With the mesh secured, it’s time to string the shooting strings. Shooting strings consist of V-shaped nylon strings that cradle and channel the ball out of the pocket. Start by stringing straight across the upper third of the head, 2-3 diamonds down from the scoop. Skip 1-2 diamonds and string another straight shooting string halfway down the head. Then, string V-shaped shooting strings from sidewall to sidewall, leaving 1-2 diamonds between each V. End with another straight string 2-3 diamonds above the bottom of the pocket.
At this point, you can customize pocket depth and shape. Shift diamonds along the sidewalls or adjust shooting string placement as needed. Deepen the pocket by manipulating the mesh to create a wider channel. Shallow the pocket by pinching the mesh diamonds together beneath the shooting strings. Just be sure not to make the pocket too deep – this slows ball release and often results in penalty.
To check pocket depth, place the ball in the pocket and hold the head parallel to the ground, with the scoop facing forward. The ball should sit above the bottom of the sidewalls, resting slightly inside the head. There should be a defined channel but no excessive sagging mesh beneath the ball. An ideal mid-to-low pocket allows the ball to sit 1-1.5 ball diameters from the bottom of the sidewall. Attackmen generally prefer pockets on the deeper end of this range for stick tricks and ball retention, while midfielders opt for more mid-range pockets for quicker passes and shots.
The final step is whipping – wrapping nylon cord around the bottom of the pocket to secure the sidewalls and shooting strings. Wrap the whipping string tightly around the intersection of the sidewalls, cinching the pocket into place. Leave a loop at the end of the whipping string rather than tying a knot, as this helps deter pocket wear during play.
Throughout the stringing process, continually check your work under the rules governing pocket depth, width, and ball release. Use a ball and ruler to ensure pocket measurements comply with league regulations. When finished, test throwing, catching, cradling, and shooting to ensure the pocket has the right feel based on your preferences and position. With practice, you’ll become adept at stringing sticks tailored optimally for your game.
Stringing a lacrosse stick correctly takes precision, patience, and finesse. But a well-strung pocket provides excellent ball control for elevating your play. By starting with high-quality mesh, maintaining proper sidewall and shooting string tension, and customizing pocket depth for ideal ball placement, you can string up sticks all season long that enhance performance on the field.
Customizing Your Kit – Extra Strings, Custom Mesh, Tools
When preparing your lacrosse stick stringing kit, it pays to customize it with extra supplies that make stringing easier and allow you to craft specialized pockets. While a basic kit contains necessities like sidewall strings, shooting strings, mesh, and pliers, adding extras enables you to string truly unique heads tailored to your playing style.
One of the best customizations is packing additional sidewall and shooting strings. Having spare strings on hand allows you to re-string pockets as needed to alter pocket shape, depth, and shooting channel placement. Sidewall strings especially take a beating, so keep extra sets pre-cut and ready to seamlessly re-lace blown out pockets. Varied shooting string widths like premium nylon, leather, or raised fluorocarbon also let you customize channel shape for specialized throwing and accuracy.
Consider stocking backup meshes in different materials, gauges, and pocket styles. Hard meshes like AstroTurf Monster Mesh offer superior ball retention and shot power at the cost of flexibility, while soft meshes like Stringking Type 3 are more finesse-friendly for quick releases. Mixing mesh types gives flexibility in stringing. Keeping a range of pocket styles – mid, mid-high, mid-low, low – also allows you to string sticks for different player positions and preferences. Having a variety on hand saves you from needing to order more mid-stringing.
Don’t forget customizable throat plugs, end caps, and sidewall cap strings. Swapping these out alters aesthetics and allows matching your stick to team colors and gear. Carry extra of each size – standard, midi, junior – so any head can get decked out. Consider a variety of colors and designs to personalize each stick. End cap and sidewall string silencers also dampen noise for quieter play.
To make stringing easier, pick up pro-grade stringing tools. Snip loose strings and cut fresh sidewalls and shooting strings to length using high-carbon steel stringing scissors. Needle nose pliers with stringing grooves grip and thread strings into tricky spots. A pro-quality stringing table with clamps holds heads securely while you work. And a draw string tensioner lets you variably cinch shooting strings for consistent pocket channel shape.
Don’t forget maintenance supplies like heavy-duty nylon whipping cord, athletic tape, and high-strength head cement. Whipping the bottom and taping shooting strings prevents premature fraying and blow out. Cementing split scoops and holes extends head lifespan. Mini stick racks for drying pockets prevent warping and misshaping between games. And ball stop pads cushion pocket bottoms against ball wear.
To truly customize pockets, stock up on pro-grade mesh accessories. Colored nylon lacing adds adjustable pocket nylon to define channel shape and finesse pocket mechanics. Rolled nylon shooting string aids defined ball centering and release direction. Power rings boost ball hold and pocket depth for playmakers. And colored leather and nylon string silencers customize look while dampening noise.
When designing custom pockets, don’t forget unique accessories that enable specialty throwing styles. Mongo mesh extends pocket length for Canadian-style box lacrosse balls skills. Offset stringing punches holes for asymmetrical pocket mechanics geared towards certain handedness. And double sidewall kits allow tying both sidewalls entirely from the scoop for adjustable pocket lambdacrosse.
Pre-pped with such accessories, you can continually experiment to create new pocket shapes, channel configurations, and throwing actions. Swap out components at will and re-string until achieving your ideal mechanics. Keep notes on string tensions, shooting setups, and mesh configurations so successful designs can be replicated. And carry tools for adjustments and repairs at games to keep your custom kit in top shape all season.
While a basic stringing kit contains the bare essentials, customizing with advanced accessories opens up new possibilities. With the right strings, meshes, tools, and components, you can craft lacrosse sticks specialized for any playing style. Experiment freely and create new designs to gain an edge on the competition. A customized stringing kit makes it easy to re-invent your pocket game after game.