How can pitchers improve their performance. What are the best training tools for increasing pitch velocity. Which throwing aids help enhance control and accuracy. How do weighted baseballs benefit pitchers. Why are resistance trainers effective for pitching development. What role do long toss trainers play in arm strength building. How do wrist weights contribute to improved pitching mechanics.
Pitcher’s Mounds: Elevating Technique and Building Leg Strength
Pitcher’s mounds are fundamental tools for developing proper mechanics and leg strength. These elevated platforms simulate the game environment, allowing pitchers to refine their delivery and build lower body power. But how exactly do pitcher’s mounds contribute to a pitcher’s development?
Firstly, the incline of the mound forces pitchers to drive downhill, engaging their leg muscles more intensely than on flat ground. This helps develop the explosive power needed for generating velocity. Additionally, the height difference between the rubber and home plate trains pitchers to maintain a consistent release point, crucial for accuracy and deception.
Portable mounds offer versatility for practice sessions. They can be set up in various locations, enabling pitchers to train in different environments. Some models even feature adjustable heights, allowing pitchers to gradually increase the challenge as they improve.
Key Benefits of Pitcher’s Mounds:
- Simulate game conditions for more effective practice
- Develop leg drive and lower body strength
- Improve balance and body control during delivery
- Enhance consistency in release point
- Allow for varied training environments with portable options
Do pitcher’s mounds help with injury prevention? While not a guarantee, practicing on proper mounds can help pitchers develop more efficient mechanics, potentially reducing the risk of arm injuries caused by poor form or overcompensation.
Weighted Training Baseballs: Strengthening Arms and Refining Mechanics
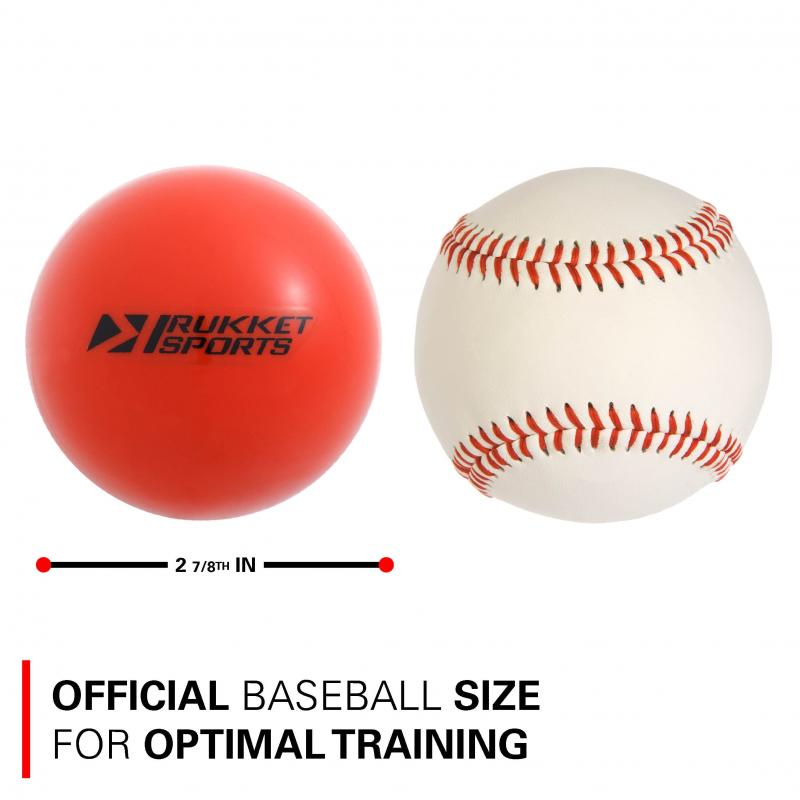
Weighted training baseballs have become increasingly popular among pitchers looking to boost their velocity and refine their mechanics. These specialized balls, typically ranging from 4 to 5 ounces, offer a unique set of benefits for pitchers at various skill levels.
The added weight of these balls engages the muscles used in pitching more intensely than standard baseballs. This increased resistance helps strengthen the arm, shoulder, and core muscles crucial for generating power and maintaining control throughout the pitching motion.
Beyond strength building, weighted baseballs also serve as excellent tools for teaching proper throwing mechanics. The extra weight forces pitchers to focus on maintaining correct arm speed and extension throughout their delivery. This heightened awareness can help identify and correct flaws in a pitcher’s technique.
How to Incorporate Weighted Baseballs into Training:
- Start with lighter weights and gradually increase
- Focus on maintaining proper form and mechanics
- Use in conjunction with regular baseballs for contrast training
- Implement in specific drills targeting arm strength and speed
- Monitor fatigue and adjust training volume accordingly
Can weighted baseballs increase pitch velocity? Many pitchers and coaches report significant velocity gains when using weighted baseballs as part of a structured training program. However, it’s essential to use them properly to avoid injury and maximize benefits.
Pitching Resistance Trainers: Enhancing Arm Strength and Mechanics
Pitching resistance trainers are innovative tools designed to add tension to the throwing motion, providing a unique way to build arm strength and refine pitching mechanics. These devices typically attach to the wrist or arm and create resistance throughout the pitching motion.
By introducing controlled resistance, these trainers engage the muscles used in pitching more intensively than standard throwing. This increased engagement can lead to improved strength, stamina, and overall arm health when used correctly.
One of the key benefits of resistance trainers is their ability to reinforce proper mechanics. The added tension forces pitchers to focus on maintaining correct form throughout their delivery, helping to ingrain efficient movement patterns.
Popular Pitching Resistance Trainers:
- ZipnHit: Offers adjustable resistance levels
- Driveline PlyoCare: Combines resistance with plyometric training
- J-Band: Simple yet effective resistance bands for arm care
- TAP Baseball: Features a unique pulley system for varied resistance
How should pitchers integrate resistance trainers into their routine? It’s crucial to start with very light resistance and focus on maintaining proper form. Gradually increase tension as strength and comfort improve, always prioritizing quality of movement over quantity or intensity.
Long Toss Trainers: Building Arm Strength and Range of Motion
Long toss has long been a staple in pitchers’ training regimens, known for its ability to build arm strength and improve range of motion. However, traditional long toss requires a partner and ample space. This is where long toss trainers come in, offering a solution for pitchers to practice this valuable technique independently.
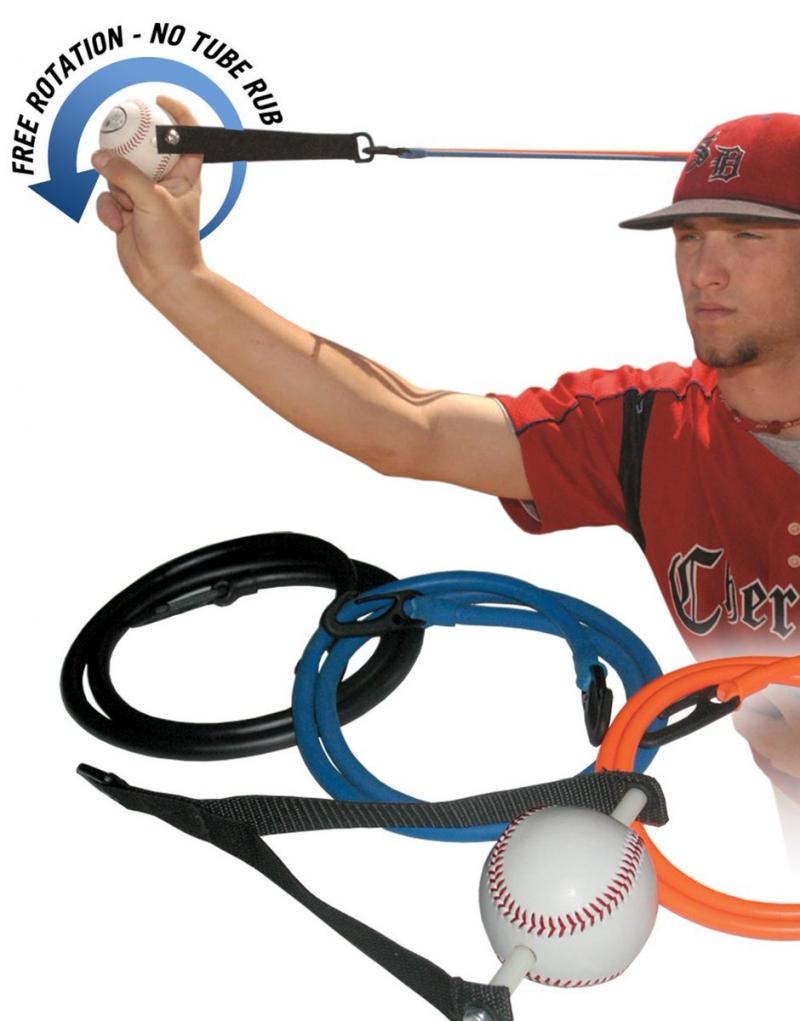
Long toss trainers, such as the Throw Right System, typically consist of a tethered ball that can be attached to a fence, wall, or net. This setup allows pitchers to simulate the long toss motion without needing a partner or expansive field.
The benefits of long toss extend beyond just building arm strength. This practice helps pitchers develop a feel for proper arm slot, improve their ability to generate power from the lower body, and enhance overall throwing mechanics.
Advantages of Using Long Toss Trainers:
- Independent practice without needing a partner
- Consistent resistance throughout the throwing motion
- Ability to train in limited space
- Immediate feedback on throw quality
- Customizable resistance levels for progressive training
How often should pitchers incorporate long toss into their training? The frequency can vary based on individual needs and overall training load, but many coaches recommend 2-3 sessions per week during off-season training, gradually reducing frequency as the competitive season approaches.
Wrist Weights: Enhancing Arm Speed and Velocity
Wrist weights are simple yet effective tools for pitchers looking to increase arm speed and, consequently, pitch velocity. These weights strap securely around the wrist, adding resistance to various pitching drills and exercises.
By introducing additional weight to the throwing arm, wrist weights engage the muscles of the forearm, wrist, and hand more intensively. This increased engagement can lead to greater arm speed when throwing without the weights, potentially translating to higher pitch velocities.
Beyond velocity enhancement, wrist weights can also help pitchers develop better arm extension and follow-through. The added resistance encourages pitchers to fully extend their arm and maintain proper mechanics throughout the entire pitching motion.
Effective Ways to Use Wrist Weights:
- Shadow pitching: Practice full pitching motion with light weights
- Arm circles: Perform forward and backward arm circles to build shoulder strength
- Towel drills: Use a towel for resistance while wearing wrist weights
- Light long toss: Incorporate weights into shortened long toss sessions
- Wrist flicks: Isolate wrist movement to strengthen grip and release
Are there risks associated with using wrist weights? While generally safe when used correctly, excessive weight or improper form can potentially strain the elbow and shoulder. It’s crucial to start with very light weights and focus on maintaining proper mechanics throughout all exercises.

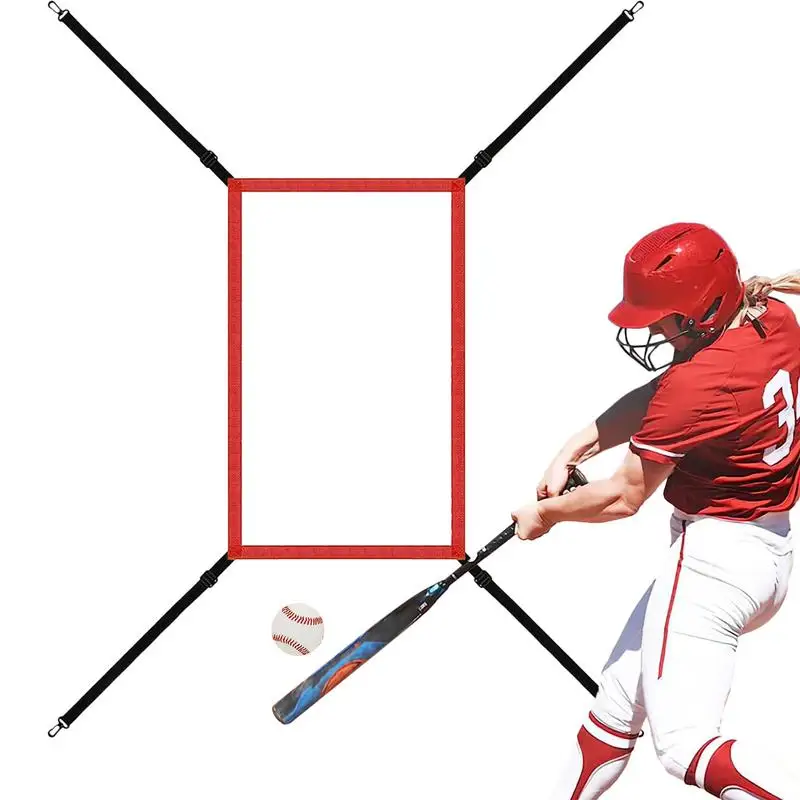
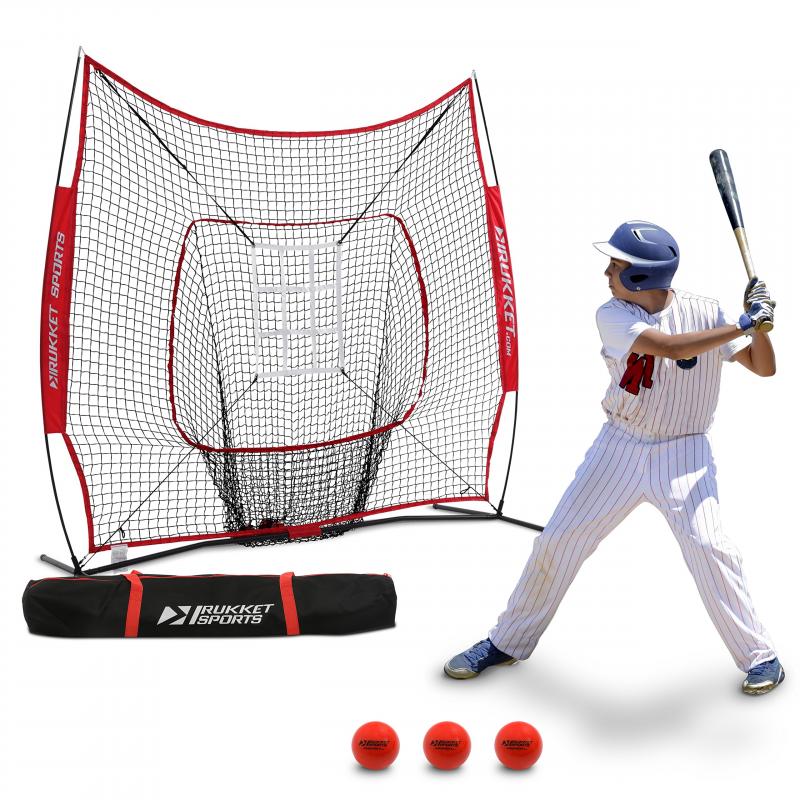
Pitching Screens: Perfecting Mechanics and Location
Pitching screens, also known as protective L-screens, are essential tools for pitchers looking to refine their mechanics and improve their command without the presence of a batter. These screens provide a safe environment for pitchers to practice at full intensity, focusing solely on their delivery and pitch location.
By eliminating the need for a batter, pitching screens allow pitchers to concentrate on specific aspects of their mechanics without worrying about the outcome of each pitch. This focused practice can lead to more consistent mechanics and improved muscle memory.
Moreover, pitching screens enable pitchers to work on their command and control. By setting up targets or zones on the screen, pitchers can practice hitting specific locations repeatedly, enhancing their ability to place pitches accurately during games.
Types of Pitching Screens:
- Stationary L-screens: Sturdy, fixed position screens for consistent practice
- Portable folding screens: Easy to set up and transport for varied training locations
- Adjustable screens: Allow for different heights and angles to simulate various pitching scenarios
- Multi-sport screens: Versatile options that can be used for batting practice as well
How can pitchers maximize the benefits of using a pitching screen? Incorporate specific drills targeting different aspects of pitching, such as focusing on release point, working on off-speed pitches, or practicing pitch sequencing. Using the screen in conjunction with a radar gun or video analysis can provide valuable feedback on both mechanics and pitch quality.

Radar Speed Trainers: Measuring and Improving Velocity
Radar speed trainers have become indispensable tools for pitchers serious about increasing their velocity. These devices provide instant feedback on pitch speed, allowing pitchers to make real-time adjustments to their mechanics and effort level.
By offering immediate velocity readings, radar guns help pitchers understand the relationship between perceived effort and actual pitch speed. This awareness can be crucial for developing consistency and learning how to generate maximum velocity without overthrowing.
Modern radar speed trainers come in various forms, from professional-grade models used by Major League teams to more affordable, portable options suitable for individual training. Many now integrate with smartphone apps, providing additional features like pitch tracking and analysis over time.
Benefits of Using Radar Speed Trainers:
- Immediate feedback on pitch velocity
- Ability to track progress over time
- Helps identify optimal effort levels for maximum velocity
- Can be used to measure the effectiveness of other training methods
- Motivates pitchers to push their limits safely
How accurate are consumer-grade radar guns compared to professional models? While professional-grade radar guns offer the highest accuracy, many consumer models from reputable brands like Pocket Radar and Bushnell provide reliable readings within 1-2 mph of professional equipment, making them suitable for most training purposes.
Slow-Motion Video Analysis: Perfecting Pitching Mechanics
Slow-motion video analysis has revolutionized the way pitchers and coaches approach mechanical refinement. By capturing pitching motions at high frame rates and analyzing them in slow motion, pitchers can gain invaluable insights into their technique that are impossible to see with the naked eye.
This technology allows for a detailed breakdown of every aspect of the pitching motion, from the initial wind-up to the follow-through. Pitchers can identify subtle inefficiencies, timing issues, or deviations from optimal mechanics that may be impacting their performance or increasing injury risk.
Modern smartphones and specialized apps have made slow-motion video analysis more accessible than ever. Pitchers can now record and analyze their mechanics without the need for expensive equipment, although professional-grade high-speed cameras still offer the highest level of detail for serious analysis.
Key Aspects to Analyze in Slow-Motion Video:
- Arm path and elbow position throughout the delivery
- Timing of hip rotation and trunk rotation
- Front foot placement and leg drive
- Hand position at ball release
- Follow-through and deceleration phase
How frequently should pitchers use slow-motion video analysis? While it can be tempting to analyze every pitching session, most coaches recommend periodic check-ins, perhaps once every few weeks during the off-season and less frequently during the competitive season. This approach allows for meaningful changes to be implemented and assessed over time.

Incorporating these essential throwing aids into a structured training program can significantly enhance a pitcher’s development. From building arm strength with weighted baseballs to refining mechanics through slow-motion analysis, each tool offers unique benefits. However, it’s crucial to remember that these aids are most effective when used as part of a comprehensive training approach that includes proper rest, nutrition, and overall physical conditioning.
As pitching technology continues to evolve, new training aids and methods will undoubtedly emerge. Pitchers and coaches should stay informed about the latest developments while always prioritizing proper form, gradual progression, and injury prevention. By leveraging these tools effectively, pitchers can work towards reaching their full potential on the mound, boosting both velocity and control to become more formidable competitors.
Pitcher’s Mounds: Elevate Technique and Build Leg Strength
As a pitcher, having proper mechanics and leg strength is absolutely crucial for delivering powerful and accurate pitches. While natural talent certainly plays a role, even the most gifted pitchers require training aids and tools to elevate their technique and build lower body power. In this article, we’ll explore some of the top baseball training aids available to help pitchers take their game to the next level.
Weighted Training Baseballs
One of the most popular and effective pitching aids are weighted training baseballs. These special balls come in a variety of weights, typically ranging from 4 oz to 5 oz. The extra weight strengthens the arm, shoulder, and core muscles used for pitching. It also teaches proper throwing mechanics and forces pitchers to maintain proper arm speed and extension throughout the delivery. Weighted balls boost velocity by increasing arm strength, speed, and stamina. Just be sure to gradually build up weight and volume to avoid overstressing the arm.
Pitching Resistance Trainers

Resistance trainers attach to the wrist and add tension during the throwing motion. This extra resistance strengthens the muscles and improves mechanics. Brands like ZipnHit and Driveline make excellent resistance trainers with adjustable tension levels. Use a very light setting at first and focus on maintaining proper throwing form against the resistance. This trains the neuromuscular pathways and engages the correct muscles. Over time, increase the tension to continue building arm strength.
Long Toss Trainers
Long toss is a great way for pitchers to build arm strength and range of motion. Long toss trainers like the Throw Right System allow you to practice long toss by yourself. The trainer attaches to a fence or net, providing tension against your throw. This allows you to simulate long toss mechanics while training alone. Start with light tension at shorter distances and gradually move back as arm strength increases. Long toss trains arm endurance while preserving accuracy and control.
Wrist Weights
Wrist weights are another excellent training tool for pitchers. Attach them comfortably around the wrist while doing pitching drills, long toss, or simply shadow throwing. The extra weight engages the muscles in the forearm, wrist, and hand, resulting in greater arm speed and velocity. Wrist weights also encourage proper throwing mechanics, arm extension, and finish. Just be cautious of excessive weight, which can alter mechanics and strain the elbow and shoulder.
Pitching Screens
Pitching screens, also called protective L-screens, allow pitchers to practice throws full force without a batter. Set the screen up just in front of or alongside the catcher, then work on pitching consistent strikes. Screens enable you to refine mechanics, release point, and location without a hitter in the box. Portable folding screens are easy to set up or take down as needed. Use pitching screens along with target nets or bullpen mounds to further enhance practice.
Bullpen Mounds
Bullpen mounds simulate game conditions more closely and allow pitchers to practice hitting their locations. Portable artificial mounds provide a regulation 10 inch height for working from the stretch or wind up. The angled mound trains proper landing and follow through. Mounds help groove mechanics and release point, enabling pitchers to perfect their pitching delivery. Look for sturdy metal and synthetic rubber mounds that can be used outdoors on grass or indoors.
Pitching Target Nets
Target nets attach to fences, poles, or stands to give pitchers something specific to aim for. Chute-style nets feature smaller openings to target, enabling pitchers to develop greater command and accuracy. Using a target net trains muscle memory and consistency, while tracking hits and misses reinforces location. Some nets have colored zones or targets for varied precision drills. Train alone or hit the targets as a catcher calls out locations.
Radar Speed Trainers
Handheld radar guns instantly provide feedback on pitch speed, helping pitchers train for greater velocity. Radar units are a staple conditioning tool for many Major League Baseball teams. While expensive professional models exist, more affordable consumer-grade options from Pocket Radar and Bushnell provide reliable speed measurement. Matching up perceived effort versus actual pitch speed helps pitchers make adjustments to mechanics, positioning, and strength training.
Slo-Motion Video Analysis
Recording throwing sessions with a high speed, high definition camera allows pitchers to analyze their mechanics in detail. Apps even allow you to watch video in ultra slow motion to break down subtle movements and timing. Being able to see issues like improper arm slot, early rotation, or flawed landing in slow motion makes it much easier to correct. Set up the camera behind the pitcher or to the side to capture the entire delivery sequence.
With the right pitching aids and tools, players can elevate their technique, boost velocity and control, and reduce injury risk. Training smarter, not just harder, is key to developing next level pitching skills. Remember to build up gradually as you integrate new training methods and equipment. Pitching performance thrives through variety, specificity, and intentional practice. With the wide array of pitching aids available today, pitchers at all skill levels have ample opportunity to enhance performance.
Weighted Baseballs: Safely Increase Throwing Velocity
As a pitcher, throwing hard is a huge advantage. Nothing deflates a hitter more than facing blistering fastball speed. While natural ability plays a role, weighted baseballs allow pitchers to safely build arm strength and increase velocity. By overtime gradually increasing the weight of baseballs used for training, pitchers can see significant gains in speed. However, proper program design and smart progression is key to getting positive results while avoiding injury. In this article, we’ll explore how weighted baseballs can boost velocity if used correctly.
How Weighted Balls Increase Velocity
Throwing heavier baseballs strengthens the shoulder and elbow joints along with the muscles of the rotator cuff, arm, and back. The greater resistance trains the body to produce more power and speed. Throwing overweight and underweight balls varies the stresses placed on the arm, preventing overuse and strain. The changing weights enhance proprioception and ball feel. Weighted balls encourage using the entire body when throwing versus just the arm. Pitchers learn to engage the legs, core, and torso for maximum energy transfer to the hand. Throwing harder becomes a full-body motion.
Gradual Progression Minimizes Injury
While an aggressive weighted ball throwing program can boost velocity quickly, it also risks injury if rushed. Arm tissues like tendons and ligaments adapt slower than muscles. Gradual progression allows connective tissue to properly strengthen. Start with lighter balls at closer distances focusing on form. Increase weight conservatively in small intervals with more rest days early on. Monitor for signs of fatigue or soreness and adjust accordingly. Proper throwing mechanics also help reduce loading on joints and tissues. Long toss, resistance training, and arm care should complement a weighted ball routine.
Recommended Weight Ranges
Most experts suggest the following weight ranges for training pitchers:
– 4-6 oz for warm up and recovery sessions
– 5 oz for extended long toss
– 5.5-6 oz for mechanical drills
– 6-7 oz for shorter throwing builds arm speed and muscle
– 7-10 oz for specialty overload training in small doses
Heavier balls above 5 oz should be limited to 25-30 throws per session mixed with lighter throws. Monitor arm health closely when using the heaviest balls above 7 oz.
Sample Weighted Ball Routine
A proper weighted ball routine will blend different ball weights into a progressive schedule with rest days. Always begin with warm up tosses with a light ball. Here is a sample week program:
– Day 1: 5 oz long toss – 60 throws, 6 oz mechanics – 30 throws, rest
– Day 2: 4 oz recovery tosses – 30 throws, arm care exercises
– Day 3: 6 oz long toss – 50 throws, 7 oz overload throws – 15 throws, rest
– Day 4: 5 oz drills – 40 throws, rest
– Day 5: 8 oz overload throws – 20 throws, 6 oz mechanics – 30 throws, rest
– Day 6: 5 oz long toss – 60 throws, 4 oz warm down – 20 throws
– Day 7: Rest
Additional Throwing Considerations
Here are some additional factors to incorporate for an effective weighted ball throwing program:
– Emphasize proper throwing mechanics and lower body use
– Perform warm ups and cool downs with lighter balls
– Use overload throws just 1-2x per week after building tolerance
– Ensure plenty of rest for tissue recovery
– Support with mobility work, foam rolling, massage
– Stop immediately if pain or soreness arise
– Monitor velocity changes to gauge effectiveness
– Focus on control and accuracy, not just speed
Weighted baseball training can take velocity to the next level, but must be done smartly and progressively to avoid arm injury. Patience is required to allow the body to adapt safely to the training stresses. When used properly, weighted balls can add several ticks to your fastball speed and take your pitching performance to new heights.
Pitching Screens: Protect from Live Hitting for Accuracy

As a pitcher, developing pinpoint control and command of your pitches is critical. While pitching live to batters has value, screens provide protection so you can refine location without fear. Portable pitching screens, also called L-screens, enable pitchers to throw full velocity while dialing in accuracy. Used properly, pitching screens are an invaluable training aid for sharpening command of the strike zone.
Why Use a Pitching Screen?
Pitching screens allow focused repetition without a batter in the box. This serves several key purposes:
– Protects pitchers from comeback line drives
– Lets pitchers attack the zone at full velocity
– Removes batter variables to isolate pitcher mechanics
– Builds muscle memory hitting locations consistently
– Allows specifically sequencing pitches and locations
– Provides freedom to work on new pitches without consequence
– Saves energy and intensity for game situations
Proper Set Up
Position the screen just in front of home plate, slightly angled to protect the catcher while still giving the pitcher a clear view of the plate. Some coaches set up behind the catcher. Keep the screen perpendicular to the mound, not angled towards the batter’s box. The bottom of the screen should be flush to the ground to block balls. Leave a safety gap between the rear of the screen and the backstop.
Accuracy Drills
With the screen set up, coaches can call out specific pitch locations to hit. Start by hitting the four corners of the strike zone, then move to targeting the inner and outer edges, as well as up and down in the zone. Mix in sequences calling for different pitch types. Challenge pitchers to hit small targets like corners or edges repeatedly before moving. Use tempo drills having pitchers deliver the ball quickly after receiving the location. Get creative designing accuracy competitions and challenges.
Additional Targets
Consider complementing the pitching screen with visual targets to aid refinement of location. Some options include:
– Hanging tennis balls or foam balls on strings as targets
– Placing cones or floor markers around the catcher
– Using strike zone net targets with different size openings
– Having the catcher provide visual glove targets
– Drawing chalk targets on the backstop
Visual references help drive neural connections for pitching to exact spots.
Monitor Accuracy
Track misses high, low, inside, outside, as well as called strikes during screen drills. The feedback provides accountability for hitting locations. Have coaches or players call out pitch locations, balls, and strikes as if live pitching. Some devices like PitchLogic training aids display strike accuracy percentages after pitched balls. Quantitative feedback improves the learning curve on hitting spots.
Simulate Game Situations
Pitching screens allow you to simulate game sequences more realistically than live batting practice. Call out multiple pitch locations in an order that sets up certain pitches or packs the sequence with difficulty. Shift calling locations quickly to force concentration and urgency. Also practice varying looks and timing of pitching from the stretch to mimic game situations with runners on base. Get creative with “what-if” scenarios to grow command.
Integrate Other Training Aids
Take advantage of pitching screens to use other training aids for development:
– Throw weighted balls to overload muscles at max effort safely
– Attach resistance trainers to the wrist for added challenge
– Use wrist weights or donut ring weights on throws
– Practice new grips and pitch types without risk
– Experiment with tweaked mechanics or arm slots
Combining screens with weighted balls, resistance, video, radar guns, and more can enhance training effect.
Mound Variations
Along with a regulation dirt mound, consider using pitching screens with these setups:
– Portable artificial mounds to simulate game mound height
– Completely flat ground to isolate upper body mechanics
– Slope decline mounds to encourage downhill extension
– Inside off turf mounds for true bounce pitches
– Outside off grass to require fuller ground force transfer
Varying mound height and surfaces activates muscles differently.
Pitching screens are a simple yet valuable training tool for honing command of the zone. They allow pitchers to develop consistency, accuracy, and muscle memory without the variables live hitters introduce. Set up properly, screens can help take pitch location to the next level.
Radar Guns: Track and Improve Pitch Speeds
For pitchers, few things are more satisfying than hearing that pop as the ball smacks into the catcher’s mitt. While good mechanics and technique are critical, pitch velocity plays a major role in a pitcher’s success. The faster the pitch, the less reaction time for the batter. Fortunately, there are tools that can help pitchers track and improve pitch speed.
One of the most useful pitching aids is a radar gun. Radar guns measure the speed of each pitch, providing hard data that pitchers can use to track progress and make adjustments. Modern radar guns are affordable, portable, and easy to use. Some models connect to mobile apps via Bluetooth, allowing for convenient data tracking. Other features like stopwatches and pitch count tracking make radar guns an essential training tool.
Once armed with pitch speed data, pitchers can begin tweaking mechanics and developing routines to enhance velocity. Some approaches include:
- Focusing on lower body strength and mechanics – having a strong base and drive from the legs and hips translates to more speed.
- Increasing wrist strength and flexibility – the wrists act like a rubber band, snapping to add extra zip.
- Long toss and sprint work – building arm strength and fast-twitch muscle fibers improves explosiveness.
- Core and shoulder conditioning – having a stable, strong core and rotator cuff reduces energy loss and risk of injury.
By tracking pitch speed over time, it’s possible to zero in on the training methods that deliver results for each individual. And nothing builds confidence like seeing those radar gun numbers tick upward.
Weighted and Resistance Balls
In addition to radar guns, weighted and resistance training balls are excellent throwing aids for boosting velocity. These specialty balls look similar to regular baseballs but have added weight to provide an overload effect. Throwing balls that are heavier than 5 ounces trains the arm to work harder and generate more force. The result is increased arm strength, speed, and stamina.
The most common weighted balls range from 6 ounces up to 32 ounces. Pitchers use a gradual progression starting with lighter balls before moving up to the heaviest weight. Sets and reps depend on the specific overload training program. It’s important not to overdo it too soon with weighted balls to avoid injury.
Resistance balls provide a similar benefit. These balls have a coating that creates drag and makes them harder to throw. Some coatings use a rough texture while others add dimples like a golf ball. The extra effort required improves arm and shoulder strength to enhance velocity.
Wrist Weights and Sleeves
In addition to weighted balls, wrist weights and sleeves help develop the wrists and forearms for faster pitching. The wrists generate tremendous force as they snap forward during each pitch. Stronger wrists mean more speed imparted to the ball.
Pitchers wear adjustable wrist weights strapped above the throwing hand while performing pitching motions and shadow throws without a ball. Progressive overload is applied by increasing the weight over time. Wrist weights in the 2 to 5 pound range provide a moderate strength boost without overstressing the wrists.
Resistance sleeves worn on the forearms also strengthen the wrists along with the forearms. The sleeves have tension bands inside that create opposition as the arms move. Use while doing shadow throws and pitching practice to make the muscles work harder. Just be careful not to overdo it too quickly.
Pitching Trainers and Return Nets
One of the best ways to improve pitching is through quality repetition and pitching practice. Training aids like pitching trainers and return nets provide an easy way to turn any location into a pitcher’s practice area.
Pitching trainers feature a strike zone area made of impact material that allows repeated pitches without wearing out a catcher. Some trainers angle the strike zone upward to encourage throwing overhand and working the lower half. By providing visual feedback on aim, trainers reinforce proper pitching mechanics.
Portable return nets give pitchers a target to throw into continuously. Nets catch and return balls with minimal effort required for retrieval. Some nets include target outlines or are angled to emulate pitching off the mound. Return nets improve consistency, control, and endurance by allowing pitchers to throw far more pitches than normal.
Video Analysis Tools
One of the best ways to improve pitching is through video analysis. Seeing problems and mechanical inconsistencies on video makes them easier to correct. Nowadays, video analysis tools are more accessible than ever.
Smartphone cameras provide all the technology needed for effective video evaluation. Useful features include slow motion, overlay graphics, and side-by-side video comparisons. Free or low cost apps offer robust tools for analyzing video. Share videos with coaches anywhere by uploading to online platforms.
More advanced solutions like Rapsodo and Edgertronic cameras give professional-grade video feedback. These systems track and visually display metrics for each pitch including speed, break, and location. Side-by-side video comparison and mark-up tools help players self-diagnose issues.
Regardless of the video source, consistency is key. Recording regularly under the same conditions provides reliable feedback on progress. Keep past videos organized on platforms like Hudl or iVideo to conveniently reference when making adjustments.
Mounds, Targets, and Miscellaneous Tools
In addition to the training aids already covered, a few other tools can help hone pitching skills:
- Portable mounds – Allow simulated pitching off an angled surface for mechanics practice anywhere.
- Visual targets – Provide aiming points to improve accuracy and consistency of pitch location.
- Leg bands – Build leg drive and hip strength to increase velocity.
- Grip strengtheners – Improve hand and finger strength for better control and spin on pitches.
Pitchers can assemble a diverse array of training tools to build the specific physical abilities needed on the mound. With the right throwing aids and practice approach, velocity, control, movement, and consistency will all make a leap forward.
One final tip – be sure to counterbalance specialized training with proper rest and recovery. Pitching is an explosive activity that demands down time to avoid overuse injuries. Day to day consistency trumps intensity when developing baseball pitching skills.
Wrist Weights: Resist Arm Drag for Power
Ask any pitcher – nothing beats the feeling of bringing the heat. Throwing smoke and overpowering hitters requires more than just natural ability. Pitchers need focused training to build arm strength and maximize velocity. While long toss, sprints, and weighted balls all help, one of the most effective aids for adding speed are wrist weights.
Wrist weights may seem simple, but they produce major gains in arm power. That’s because the wrists generate a huge amount of force during the pitching motion. As the arm rotations through internal rotation, the wrist acts like a rubber band, storing energy and snapping forward to impart speed to the ball.
By training the wrists directly, pitchers can strengthen this key area and reduce that ‘arm drag’ holding velocity back. The beauty of wrist weights is they provide targeted overload exactly where it’s needed most – in the final explosive phase of each pitch.
Focus on Wrist Strength and Flexibility
Wrist strength provides a foundation for maximizing wrist power. Weights improve grip strength, key for controlling pitches and spin. Flexible wrists that extend fully also allow pitchers to utilize their full natural velocity.
Use lightweight wrist weights in the 2-5 pound range for training. Strapping small weights just above the throwing hand provides direct resistance. Perform pitching motions, shadow throws, and wrist curls to overload the muscles and increase strength.
Do higher rep sets focused on conditioning the wrists and building muscular endurance. Start with lower weight and progress gradually over time. For flexibility, wrist mobility drills get the joints moving through their full range of motion.
Elastics Add Variable Resistance
Resistance bands and tubing provide another effective way to train wrist strength. These elastic tools allow applying variable resistance through the entire pitching motion.
Attach tubing or mini-bands to a fence or post. Grab hold and step back, so there is tension in the band. Then perform throwing motions, driving hard against the elastic resistance. The further back you step, the more tension occurs.
Resistance hits the wrists and forearms hardest at the end as the hands and wrists snap forward. This allows overloading the exact point in the motion where velocity is created. Adjust resistance as needed to keep wrist training challenging.
Maintain Full Range of Motion
While building wrist strength, maintain a full natural range of motion. If the wrists get too stiff from overtraining, velocity can actually decrease and injury risk goes up.
Use active recovery between weight sessions to keep the wrists loose and flexible. Gentle wrist circles and rotations mobilize the joints through a full range. Rice bucket exercises also improve mobility and tissue quality in the hands and wrists.
Monitor for pain or decreased velocity that could signal overtraining. If the wrists feel worn out, back off the weight and focus on active recovery until fully recharged.
Perfect Pitching Motion Timing
Proper sequencing and timing are just as important as wrist strength for generating maximum velocity. The entire body must work together to transfer energy to the wrist at the right moment.
Break down the pitching motion into phases. The stride and hip rotation load the wrist. As the arm rotates internally, the wrist ‘cocks’ back. The wrist then explodes forward, adding speed to the release.
Practice shadow throws with resistance bands to feel the timing. Start slow with pauses between phases. Smooth acceleration and a strong wrist finish will transfer momentum through the ball for extra pop.
Reload Between Pitches
Even with rock solid wrist strength, velocity drops without full recovery between pitches. Each throw must start from a loaded, athletic position.
Power starts from the ground up. Maintain flex in the ankles, knees, and hips, with weight centered over the mound. Keep the throwing shoulder down and scapula retracted to stabilize the arm.
Use resistance bands during warmup routines to reinforce loading. Drive hard against the band before simulating fast pitching motions. This trains explosiveness from a tight, coiled wrist and arm position.
Take time between pitches to reset posture and relax the arm. Avoid rushing – recharging the wrists ensures every pitch taps into 100% power potential.
Monitor Progress with a Radar Gun
A radar gun takes the guesswork out of tracking velocity gains. Accurately measuring pitch speed provides tangible feedback to tell if wrist training is working.
Test velocity every few weeks under the same conditions – warmed up, full intensity. Look for small, steady increases as the program builds strength. Breaking through plateaus by adding more wrist resistance keeps momentum going.
Apps like Rapsodo track both aggregate and pitch-by-pitch velocity trends. Isolate wrist training effects by looking at fastball spin rate and speed consistency – both are linked to wrist explosiveness.
Of course, the radar gun isn’t everything. Feedback from coaches and hitters will confirm if added speed translates into better performance during games.
Recover and Reduce Arm Stress
While wrist weights power up pitches, overuse will lead to injury. Remember – a strong arm requires more than just strong wrists.
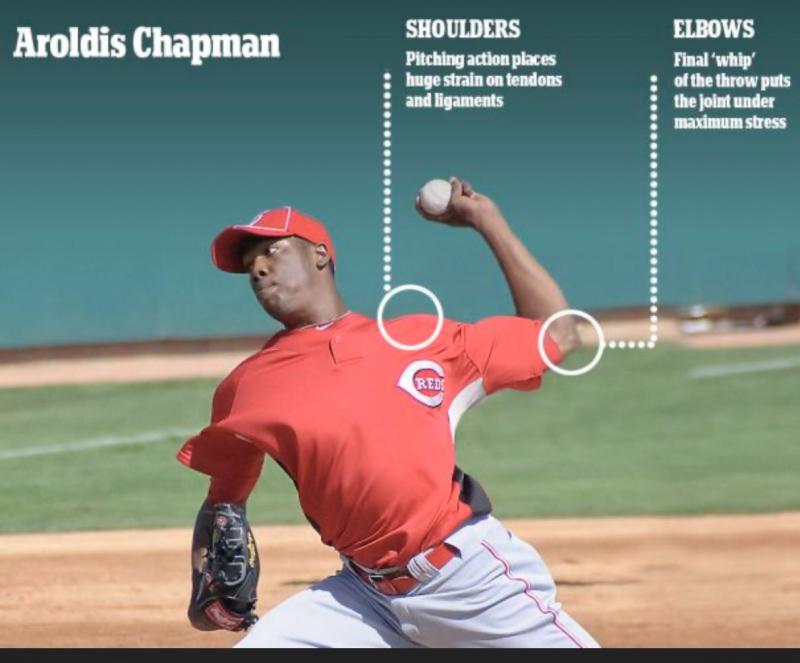
Build complementary strength in the shoulders, elbows and arm decelerators like the lats. Proper throwing mechanics reduce strain by engaging the entire body.
Always balance focused wrist training with periods of active rest and recovery. Listen to your body and take time off when the wrists feel fatigued or sore.
With a smart, progressive approach, wrist weights provide one of the fastest ways to start hitting speed peaks and dominance hitters. Just keep those wrists trained, tuned, and ready to bring the heat!
Resistance Bands: Mimic Throwing Motion for Arm Strength
Ask any MLB pitcher – velocity is king. The faster you can throw strikes, the more dominant you’ll be. While proper throwing mechanics and lower body drive are key, the arms and shoulders deliver that extra oomph to overpower batters.
To strengthen the arm safely and effectively, resistance bands are a go-to training tool. Mimicking the pitching motion against tension builds arm speed, power, and resiliency to maintain top velocity all game long.
Train Explosiveness with Variable Resistance
Unlike weights, resistance bands provide variable resistance that can be customized to match the body’s strength curve. More tension is created during the arm acceleration phase to overload the muscles when it matters most.
Set up with the band anchored to a fence or post. Stepping back increases tension through the band. Perform throwing motions starting with the arm extended backward, then accelerating forward to release.
Explosively drive against the resistance on each rep, focusing on accelerating through the release. Move quickly and use full force for the best gains in ballistic throwing power.
Target Key Muscles in the Throwing Arm
Proper throwing mechanics require coordinated action of muscles throughout the arm to both accelerate the ball and control stresses on the elbow and shoulder.
With bands, train both the internal and external rotators. Rotate the arm inward against resistance to strengthen the pecs and latissiumus muscles. For the external rotators, row the band back maximally activating the rear delts and rotator cuff.
Warm up the often-neglected decelerators like the teres minor that controls stress across the joint. Multi-angle exercises target each muscle through its full range of motion.
Increase Resistance Gradually
To avoid injury, gradually progress band resistance over time. Adding too much tension too fast can strain muscles and connective tissues.
Start with very light bands giving minimal resistance through the motion. Focus on perfecting form and developing mind-muscle connection. Increase resistance incrementally each week to drive continued adaptation.
Reduce sets and reps if intensity is increased each session. This allows training to stay challenging while minimizing strain on the arm and shoulder.
Protect Elbows and Shoulders
While essential for power, intense band training can inflame joints if done incorrectly. Always focus on quality reps with full control.
Maintain proper shoulder positioning and scapular retraction throughout motion. Avoid letting the shoulders creep up toward the ears.
Keep a firm but relaxed grip on the handles to reduce elbow strain. Bands allow adjustments mid-rep to protect tender areas.
Ice tender joints after intense sessions. If pain arises, back off intensity until it can be performed pain-free.
Emphasize Eccentric Control
The eccentric or deceleration phase of throwing is crucial to protect the arm but often neglected. Resistance bands train controlled eccentric motion.
Accelerate the band forward then resist actively as the band pulls the arm back to the start position. Fight the pull rather than letting the arm travel uncontrolled.
Slow the eccentric motion down to really overload those decelerators. Pause and hold the extended position to build eccentric strength through the entire range.
Use Band Routines as Warm Ups
Band routines make excellent pre-throwing warm ups. They elevate the heart rate, warm up the rotator cuff muscles, and help tune throwing mechanics.
Begin with very light resistance focusing on proper movement patterning first. Higher reps prime the muscles and get synovial fluid flowing in the joints.
Emphasize external rotation to activate the rotator cuff pre-throw. Some inward rotation in moderation can also help get the throwing muscles firing.
Train Power and Endurance
Vary band routines to build both power and muscular endurance. Power trains explosiveness. Endurance enables maintaining velocity deep into games when fatigue sets in.
For power, use heavier resistance for lower reps per set – 3 to 5 reps works well. Focus on maximum acceleration against the band on every rep.
For endurance, set the band light enough to perform 15-20 reps. Mimic a pitcher’s rhythm – efficient wind up and delivery without rushing each rep.
Use Bands On the Field
Don’t limit band training just to workout sessions. Bring the bands out onto the field too.
Anchor a band to the bullpen fence or a partner. Perform throws while resisting the band on both the wind up and follow through. This engrains proper pitching sequencing.
Between innings, make quick band arm circles to keep muscles loose and primed to throw heat. Use lighter resistance to avoid fatigue.
Resistance bands let pitchers train arm strength, power, and endurance any time, anywhere. Used consistently, they build a pitching arm poised to overpower batters all game long.
Pitching Targets: Hit Your Spots for Command
For pitchers, command is king. Being able to consistently hit your spots and keep the ball out of the middle of the plate is essential to getting hitters out. As the old saying goes, “Pitching is disrupting timing.” Even the most powerful sluggers can’t do much damage if they are constantly off-balance and guessing due to precise location.
Improving command takes countless reps and focused practice. Thankfully, there are a variety of excellent training aids available to help hurlers improve consistency and hit their targets. From simple lightweight balls to sophisticated tech gadgets, today’s tools provide actionable feedback and create muscle memory to boost command.
Lightweight Practice Baseballs
One of the most useful and affordable pitching aids is a lightweight ball. Reducing the weight of the ball allows pitchers to smoothly repeat their throwing motion and work on location without straining their arm. Throwing too many full-weight balls can lead to fatigue, which causes mechanics to break down and command to fade.
Lightweight balls range from 4-6 ounces, compared to around 5 ounces for a regulation baseball. The reduced load allows pitchers to maintain proper arm speed and release point when practicing for long periods. A lightweight ball provides a “feel” workout to ingrain mechanics and location without taxing the arm.
These balls are available in various materials including polyurethane, rubber, and plastic. Softer balls more closely mimic the feel of a real baseball coming off the fingers, while harder balls are extremely durable. A wide variety of weights and textures allows pitchers to select a ball with just the right feel to enhance command training.
Weighted Training Baseballs
In contrast to lightweight balls, weighted balls add resistance to build arm strength and velocity. Heavier balls generally range from 6-10 ounces. The additional weight during throwing strengthens muscles and connective tissue in the shoulder and elbow.
Weighted balls must be used carefully and progressively to avoid injury, but they can boost velocity by increasing arm speed strength when used properly. Weighted balls help pitchers extend their arm for maximum whip during the throwing motion. As athletes grow accustomed to the heavier load, going back to a normal 5-ounce baseball makes it feel lighter and easier to throw hard.
Weighted balls also improve arm endurance by forcing muscles to work harder. A stronger, resilient arm is less likely to lose velocity and precision during games. Combining weighted balls with lightweight balls provides a powerful one-two punch for improving command and velocity.
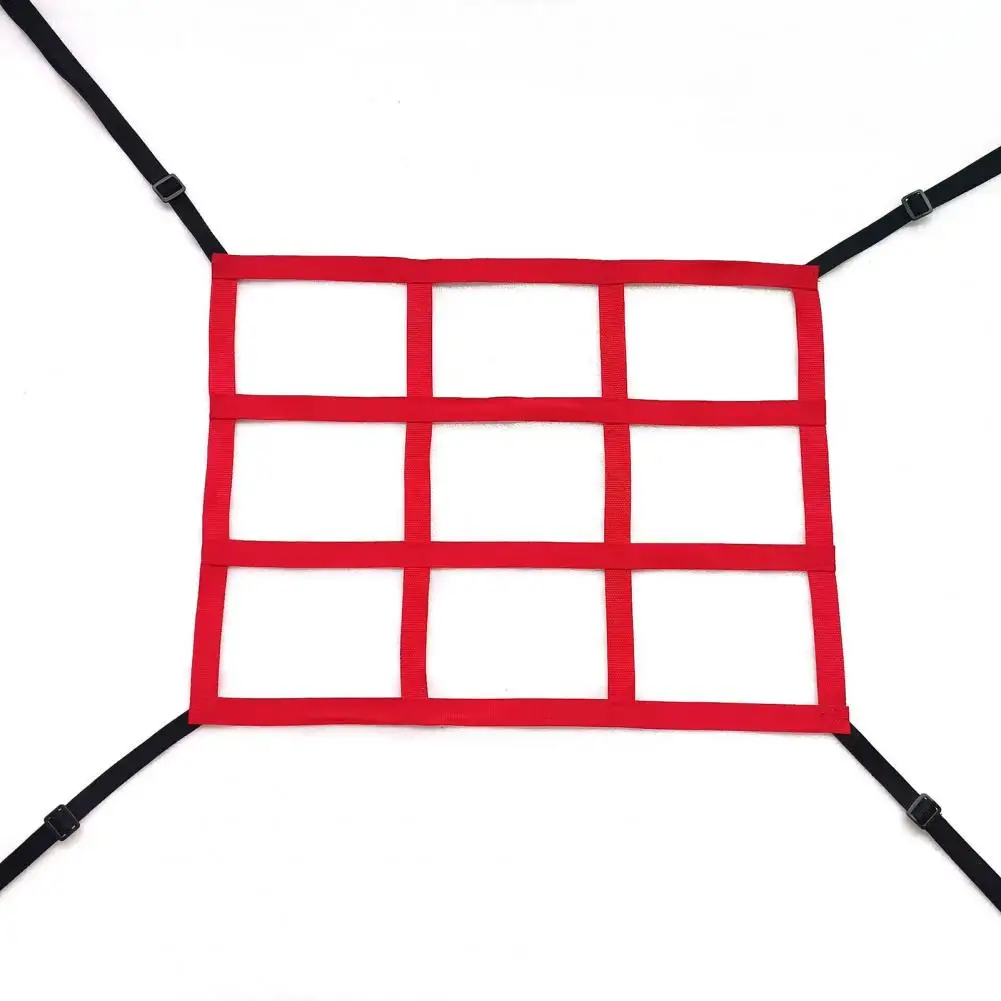
Pitching Targets
One of the best ways to develop command is throwing at a target. Whether using a catcher or practice net, aiming at a specific spot ingrains muscle memory essential to hitting locations consistently.
Portable strike zone targets offer an excellent solution for solo practice. These durable catcher-style targets provide a string grid or visual zones to throw toward. Targets allow pitchers to choose different corners, edges, and quadrants to sharpen their location and expand their arsenal.
Targets that indicate ball velocity and movement also provide helpful feedback. Visualizing how pitches hit the target helps pitchers make small adjustments and lock in their commanded locations during training.
Smart Pitching Trainers
Technology has produced some impressive pitching aids that almost feel like cheating. Smart trainers use radar, video analysis, and app connectivity to provide detailed data on each pitch.
These devices measure critical metrics like ball velocity, spin rate, spin axis, and release point. Data is displayed instantly after each pitch on a connected smartphone or tablet. Video can even be captured to analyze throwing mechanics in slow motion.
Seeing objective data and video after throws is an invaluable training tool. Pitchers gain insight into exactly how their body is functioning, and what factors influence command and movement. This information allows them to develop tremendous feel by coordinating mechanics with athletic motion.
Platemate is an example of a popular smart trainer. It boasts 99% accuracy and measures a mind-boggling array of data points to help tweak technique and performance.
Command Conclusion
Command is crucial to pitching success at all levels. Dialing in locations consistently baffles batters and takes pressure off fielders. A variety of excellent training aids are available to help pitchers gain command by honing mechanics, strengthening the arm, targeting practice, and utilizing technology.
Lightweight and weighted balls, portable strike zone targets, and smart trainers with comprehensive data and video provide the feedback necessary to develop precision. Pitchers who devote focused practice to hitting their spots will keep batters guessing and increase their dominance on the mound.
Long Toss Nets: Practice Full Throws with Safety
One of the most important yet overlooked aspects of pitching development is training the arm to make long, full-effort throws. Long toss builds arm strength, endurance, and feel for repeatable mechanics over distance.
Unfortunately, finding adequate space for long toss can be a challenge. Pitchers are often relegated to short, crow-hop style throwing that does not replicate in-game demands. This is where long toss nets come in – they allow pitchers to practice full throwing motion and aggressive arm extension safely in limited space.
Long toss nets are a pitching aid essential for pitchers of all ages and skill levels. Let’s examine the benefits of long toss, and how nets facilitate this crucial throwing program.
The Power of Long Toss Throwing
Long toss is exactly what it sounds like – making extended, full-effort throws of 120 feet or more. It trains the arm’s physical ability as well as mental approach to cut it loose over distance.
The long arc of the throw allows the arm to fully extend toward release point and whip through deceleration. This builds tremendous strength in muscles and connective tissue while ingraining feel for attacking from the mound.
Long toss also keeps the arm resilient by training it to bounce back from aggressive throwing. It conditions the rotator cuff and scapular muscles to maintain stability when firing at max effort.
From a mental perspective, long toss teaches pitchers to trust their mechanics and cut the ball loose. Restricted crow-hop throwing actually reinforces subconscious fear of extended effort. Long toss flips the script for mental and physical confidence.
The Space Problem and Net Solution
While long toss is essential, it requires a lot of free space to execute full throwing motion safely. Parks, fields, and gyms often cannot accommodate aggressive throws beyond 60 feet without risking damage from errant throws.
Nets solve this problem by containing long tosses in a compact area. They allow pitchers to throw as hard as possible from up to 150 feet away without worrying about stray balls.
Long toss nets are designed specifically to handle high-speed throws from any angle. Durable interwoven fibers absorb ball impact without ripping. Quality nets provide years of consistent use for long toss practice.
Nets are available in various sizes depending on space available. Compact 10 x 10 foot portable nets can be used in tight spaces, while larger permanent installations provide more flexibility.
Additional Long Toss Tips
Here are some quick tips to maximize the benefits of contained long toss sessions:
- Use progressive throwing distances – start at 60 feet and work back to max distance.
- Throw on a line and at gradual upward angles to simulate in-game mechanics.
- Use lob throws and crow hops to loosen the arm between max effort throws.
- Focus on consistent arm slot, release point, and finish to groove mechanics.
- Allow the body to pull the arm and let the ball rip don’t decelerate early.
Following these form pointers will develop arm strength, command of pitches, and confidence in your throwing program.
Additional Uses for Pitching Nets
Nets for long toss are versatile tools with multiple training uses including:
- Protective screen for live batting practice
- Backstop for playing catch and bullpens
- Dead stop for short toss and rehab throwing
- Portable strike zone for honing command
- Deflecting errant throws to keep fielders safe
With so many applications, a quality long toss net is one of the most useful investments for any pitching trainer or program.
Let it Fly!
In summary, long toss nets provide pitchers the freedom to throw aggressively while protecting people and property. There is simply no better way to build arm strength and endurance than with regular long toss.
Nets allow pitchers to incorporate this essential training into tight spaces. By removing barriers to long toss, pitchers can unlock safely gains in velocity, precision, and confidence.
Pitching Simulators: Master Technique from Any Location
Ask any pitcher – there is no substitute for live bullpen sessions when it comes to honing your craft. Standing on the mound, coming set, and delivering pitches simulates the sights, motions, and feelings of game situations.
Unfortunately, pitchers don’t always have access to a mound or pitching partner for regular work. This is where pitching simulators come in handy – they provide key elements of live bullpens in a portable, simple package.
Let’s look at how pitching simulators help develop muscle memory and consistency by bringing the mound anywhere your practice takes you.
The Power of Repetition
Legendary basketball coach John Wooden once said, “Repetition is the key to learning.” Nowhere is this more true than pitching.
Throwing a baseball is an intricate sequence of finely tuned motions. Mastering timing, efficiency, and precision of delivery takes countless repetitions ingraining muscle memory.
High-level pitchers build their skills through years of bullpen and live practice. Simulators allow efficient, focused reps anytime, anywhere to develop mechanical consistency.
Portable Mounds
One of the biggest challenges to consistent pitching work is access to a mound. Mounds place the body on a downward slope and solidify essential foot placements.
Portable pitching simulators provide a stable mound platform in a lightweight, collapsible frame. Rubber foot plates angle downward to simulate slope.
Compact simulators like the Go Mound fit in a baseball bag for use at home, travel, or practice. Staking down the frame creates realism for mechanics work wherever needed.
Pitching Targets
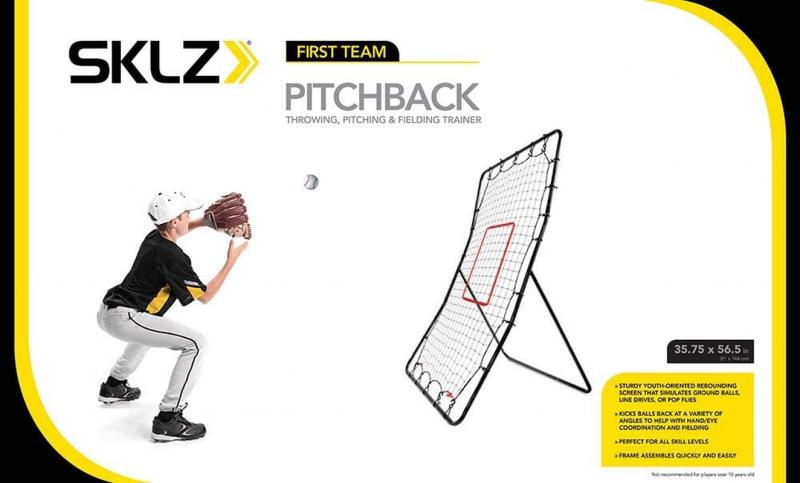
Target trainers like Pitchback combine a portable mound with visual targets to develop command and accuracy. Some models mount a net or padded frame on a durable steel home plate.
Throwing on a plane toward a visible target ingrains release point and extension. Variable target placements train different pitch locations and trajectories.
Target simulators provide pitchable strike zones for solo work on hitting spots. They help build the hand-eye coordination needed to command sequences.
Data Feedback Systems
Technology has produced sophisticated simulators that measure and analyze delivery. Radar-based machines like Rapsodo track metrics like velocity, spin rate, spin axis, and location.
Video capture allows reviewing mechanics in slow motion after pitches. Seeing timing and evaluating release point helps make subtle fixes.
Instant data feedback creates focused, purposeful practice. Pitchers train motions to produce measurable outcomes instead of just throwing blindly.
Maximizing Portability
Here are some ways to get the most out of portable pitching simulators:
- Make it gamified – set goals each session like location or rep counts.
- Mix pitches – throw full arsenals during sessions.
- Use video – record and watch yourself to identify adjustments.
- Create game scenarios – visualize situations like pitching with runners on base.
- Go mobile – take it traveling, to hotels, or outdoor workouts.
Applying some strategy and effort toward creative simulator training yields big dividends.
Simulate Success
Pitching excellence is rooted in mechanics repetition. Simulators condense elements like mounds, targets, and feedback for convenient skill development.
Portable pitching machines empower pitchers to simulate game environments anywhere. Focused simulator training builds the flawless technique, command, and consistency required for pitching domination.
Bats: Perfect Release Point and Follow Through
For pitchers, having proper throwing mechanics is vital to success on the mound. From little league to the major leagues, pitchers are constantly working to improve their pitching motion and increase velocity while maintaining control. This is why implementing the right throwing aids as part of a pitcher’s training regimen can make a significant difference in their performance. The key throwing aids that can really give pitchers an edge cover three critical areas: enhancing release point, perfecting follow through, and building arm strength and resilience. Let’s explore some of the top throwing aids in each category.
Improving Release Point
Having consistency in your release point as a pitcher is crucial for both control and deception. An inconsistent release point will cause pitches to end up all over the place instead of on target in the strike zone. The right training tools can help ingrain the proper release point into your mechanics.
One excellent throwing aid for honing release point is a target ring. These circular rings attach to nets or backstops and provide a clear visual marker for pitchers to hit with each throw. The small opening of the ring challenges pitchers to dial in their release point in order to thread the needle on every rep. Start close to build confidence and work your way back to increase difficulty.
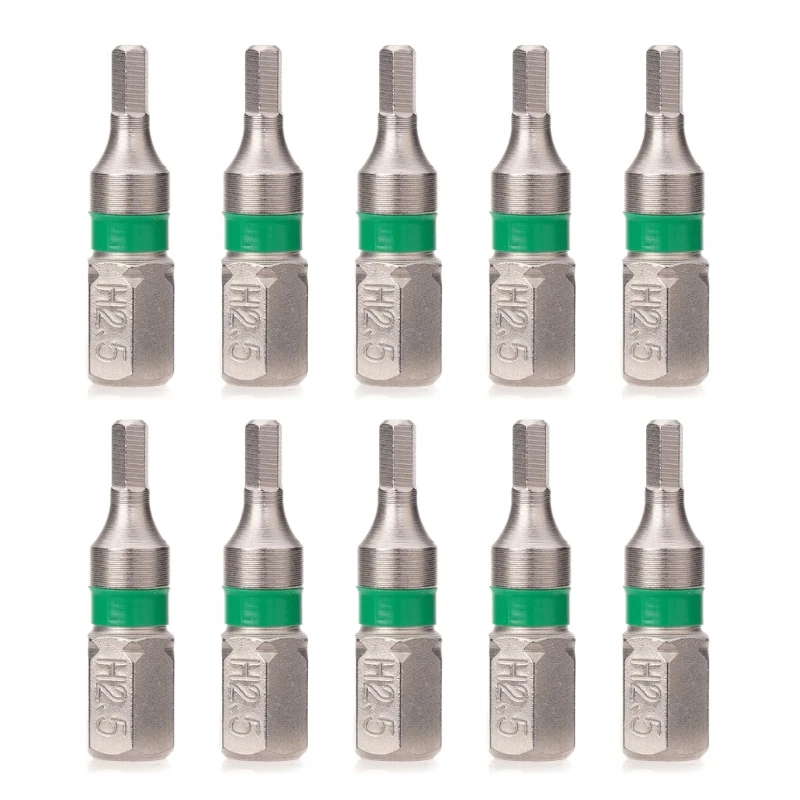
Another handy item is a release point trainer. This attaches directly to the wrist and uses adjustable cords to ensure the throwing motion follows the precise optimal path on every rep, cementing in the ideal release point. This lightweight aid does not restrict movement but instead guides the throwing motion through positive reinforcement when the release is correct.
Lastly, a finger trainer can pay dividends for release point. By strengthening finger, hand and forearm muscles, pitchers enhance their ability to grip and snap off breaking balls with a consistent release. This trainer attaches to the fingers and wrist and provides adjustable resistance during throwing motions to build finger strength.
Perfecting Follow Through
The proper follow through after release is a vital component for pitching success. A strong throwing motion does not end when the ball leaves the hand, but continues with a balanced, directed follow through. This not only increases power and control, but also decreases stress on the arm. Throwing aids can ingrain an ideal follow through.
Weighted balls are an excellent way to build arm strength while practicing good follow through mechanics. The light overload forces pitchers to push all the way through the motion to deliver the ball with accuracy. Start with lower weights to learn the motion then progress to heavier balls. Use a mirror to check your follow through position after release and make corrections.
Another useful throwing aid is an arm band that attaches near the elbow. An adjustable strap connects from the arm band to a waist belt. This device forces the arm to stay straight after release, prohibiting short-arming and emphasizing proper follow through on every pitch.
Tubing trainers are a third effective throwing aid for developing an optimal follow through. The tension of the tubing provides resistance against deceleration of the arm after release, encouraging finish through the motion. Tubing also helps build shoulder and elbow strength to enhance velocity.
Building Arm Strength and Resilience
While proper mechanics are imperative, a pitcher also needs a strong, resilient arm to endure the demands of throwing. Implementing throwing aids to increase arm strength helps contribute to power and precision while also reducing injury risk. Here are some top options.
A weighted baseball is one of the most traditional and effective tools for building arm strength. The light overload forces muscles to work harder to deliver the ball. Start with a manageable weight and make gradual increases to apply just the right amount of extra stress to spur gains. Remember to still focus on mechanics and not just muscle the ball.
Throwing against resistance bands also helps develop arm strength by forcing muscles to activate more to overcome the tension. Bands attached to a fixed object allow you to throw full speed while creating extra workload on the arm. Focus on maintaining proper mechanics despite the resistance.
A flexbar is an excellent throwing aid for building strength and resilience in the elbow and shoulder. These bars have vibration technology that activates muscles in the arm and wrist through rapid oscillation when twisted. Regular use can strengthen muscles, tendons and ligaments to help resist injury.
Implementing the right mix of throwing aids tailor-made to your needs is crucial for pitchers striving to enhance performance. Dialing in your release point, perfecting your follow through and building arm strength can help propel you to the next level on the mound.
Protective Gear: Prevent Injury for Consistent Training
Pitching a baseball at high velocity repeatedly places tremendous strain on the arm. Without proper precautions, a pitcher risks developing serious overuse injuries that can sideline them for a season or longer. Protective gear helps absorb stress, reduce injury risk, and enable consistent throwing practice critical for improvement.
What essential protective equipment should be part of every pitcher’s training kit? Let’s explore some of the top options:
Compression Sleeves
These snug-fitting sleeve wraps provide gentle, graduated compression up and down the arm. This helps improve circulation and reduce muscle vibration during throwing motions. Regular use of compression sleeves can aid recovery between throwing sessions. Pitchers may wear a sleeve on their throwing arm even during games.
Elbow Brace
Braces immobilize and protect the elbow joint while allowing full mobility. They help stabilize the arm, reducing strain on tendons and ligaments. For pitchers with a history of elbow issues or recovering from Tommy John surgery, a brace can enable safer throwing. However, don’t wear one constantly as that can weaken arm muscles.
Shoulder Tube
Much like elbow braces, shoulder tubes stabilize the shoulder joint while permitting a full range of motion. Made of neoprene or other flexible material, they fit snugly over the shoulder and upper arm. Shoulder tubes enhance proprioception, which is awareness of the arm’s positioning. For pitchers with shoulder weaknesses, these tubes support injury-free throwing sessions.
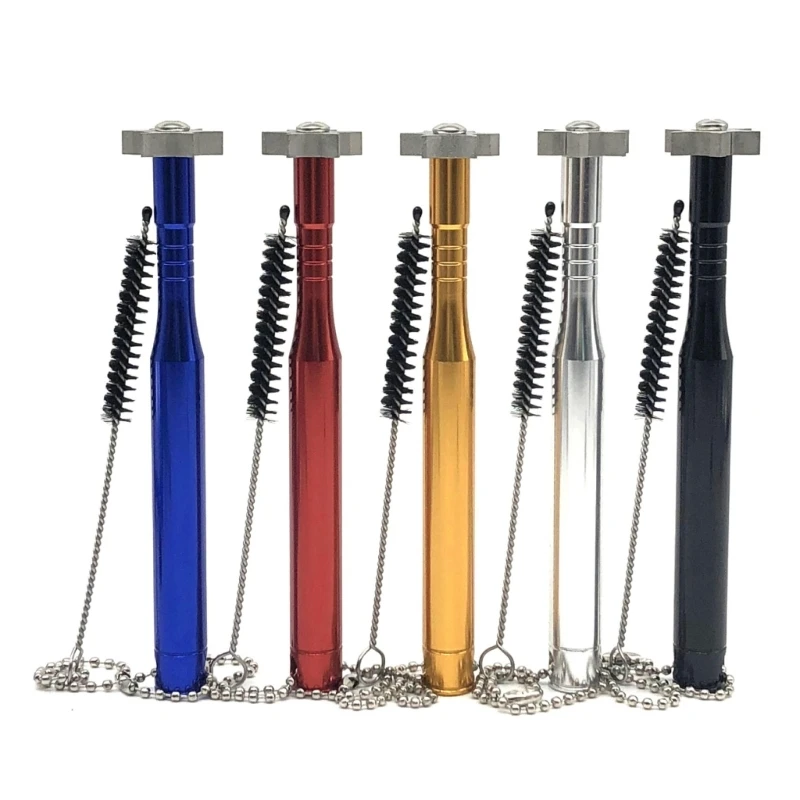
Wrist Weights
Strengthening the wrists boosts throwing power and control. Wrist weights add adjustable resistance during throwing practice to build arm and shoulder muscle. Start with one-pound weights, throwing 10-15 times per session. Slowly increase weight amounts as wrists strengthen. Stronger wrists prevent injury while enhancing feel for various pitch grips.
Batting Helmet
Even during solo pitching practice, wearing a helmet protects from occasional wild throws or ball deflections. Newer helmet designs are lightweight and comfortable, enabling full head mobility. Safety is essential during pitching workouts. A helmet provides peace of mind to focus fully on mechanics rather than self-preservation!
The right protective gear helps pitchers push their limits safely during throwing workouts. A comprehensive pitching training kit should include compression sleeves, elbow/shoulder stabilizers, wrist weights, and a helmet. With the confidence of injury prevention, pitchers can consistently hone velocity and command.
Essential Throwing Aids for Pitchers: Discover the Top Baseball Training Tools to Boost Velocity and Control
Developing pinpoint command, increasing velocity, improving mechanics – mastering these pitching skills takes repetition. But raw throwing alone won’t unlock a pitcher’s full potential. Sophisticated throwing aids provide focused feedback to ingrain proper technique. Let’s explore some of the top training tools every pitcher should consider.
Weighted Training Balls
Throwing balls weighing from 4-16 ounces trains arm strength, speed, and stamina. The extra resistance engages muscles unlike normal baseballs. Weighted balls promote proper throwing mechanics that maximize velocity. Many pro pitchers routinely incorporate them into workouts. Start with lower weights focusing on form before progressing heavier.
Resistance Bands
Attaching flexible bands to a pitcher’s wrist adds tension during throwing motions. This builds arm strength and teaches the body to throw against higher stresses. Bands come in varying resistance levels to accommodate beginner to pro. They can be used while playing catch to mirror game intensity. Bands train velocity and boost conditioning.
Velocity Trackers
Radar guns instantly measure pitch speeds, but convenient wearable trackers now exist. These devices attach to the wrist or forearm to detect throwing motion analytics like velocity, acceleration, and release angle. The data can chart progress over time and quantify if adjustments help. Seeing tangible results is powerful motivation.
Video Analysis
Recording throwing sessions from multiple angles helps identify mechanical flaws invisible to the naked eye. Apps can overlay ideal throwing motion graphics for comparison. Seeing objective feedback of release point, arm slot, stride length etc. gives concrete ways to improve. Turn throwing practice into a numbers and video science!
Accuracy Targets
Targets promoting command include uprights with strike zone grids or nets with target points. Landing accurate throws repeatedly ingrains muscle memory for precision pitches. Targets work for all pitcher types from hard throwing power pitchers to crafty specialists relying on location. Accuracy is a skill requiring dedicated improvement.
Incorporating these innovative throwing aids into regular practice unlocks a pitcher’s true potential. Weighted balls, resistance bands, motion trackers, video analysis, and accuracy targets provide measurable feedback. The data quantifies throwing weaknesses to correct and strengths to refine. Technical tools accelerate pitching mastery.
Pitching Grips: Find the Right Feel for Pitches

A pitcher’s repertoire is only as good as their ability to command each pitch. Grips determine the spin, movement, and control. Optimizing finger pressure points and seams takes experimentation to find the right feel. Let’s explore pitching grip tips to master the bread-and-butter pitches.
Four-Seam Fastball
The four-seam grips looks simple but requires fine-tuning. Place fingers straight across the horseshoe seam with thumb underneath. Apply light, even pressure with fingertips. Too much tension or uneven grip impedes velocity and causes wobbling. Find the grip sweet spot for maximum speed and straight trajectory.
Two-Seam Fastball
Grip this one along just two seams with the horseshoe seam perpendicular to fingers. The index finger’s pressure tilts the ball releasing off the middle finger. This induces strong tailing action from the arm side. Vary finger pressure to control sink and horizontal run.
Circle Changeup
Use a basic three-finger circle grip around the wide seams with palm facing out. This kills spin and velocity. For max deception, use the same arm speed as the fastball. Let the bulky grip do the work slowing it down. Play with finger pressure and positioning to vary sinking action.
Slider
Place index and middle finger across the seam with thumb beneath or along the bottom seam. Maintain firm, steady pressure through release to create sharp, quick break. Too loose causes hanging sliders. Adjust finger position to tweak tilt and bite direction.
Curveball
Grip this with index or middle finger directly on the bottom seam, digging in hard with the fingernail. Support underneath with thumb. Snap the wrist sharply downward at release for big looping arc. Spin direction and tilt depend on finger placement and snapping motion.
Split-Finger
Nestle the ball deep between index and middle fingers spread wide apart with tips on the seams. Keep palm facing glove side. Throwing motion should pry fingers down at release, creating that diving drop. Take care not to strain fingers with this risky pitch.
A pitcher must experiment endlessly to discover their optimal grip feel for each go-to pitch. Make incremental finger position and pressure adjustments, then test results in live throwing or bullpen sessions. Grip nuances influence all ball behavior. Dial in the unique grips unleashing your full arsenal.
Essential Throwing Aids for Pitchers: Discover the Top Baseball Training Tools to Boost Velocity and Control

Elevating your pitching game requires more than just raw throwing practice. Incorporating targeted training aids into your routine provides the feedback and resistance needed to develop next-level skills. Let’s explore some of the top tech tools every pitcher should consider.
Weighted Baseballs
Heavier balls from 4-16 ounces challenge muscles to work harder, building arm speed and power. The weight overload engages muscles differently than normal balls. Throwing weighted balls a few times per week enhances velocity and endurance gains.
Resistance Bands
Attaching adjustable tension bands to your wrist loads the arm against resistance when throwing. This builds strength through the entire motion. Bands come in varying resistance levels, allowing progressive overload as you improve. They also help ingrain proper throwing mechanics.
Pitch Tracking
Wearable sensors or video analysis apps measure key pitching metrics like velocity, arm slot, and spin rate. Objective data quantifies progress over time and pinpoints areas needing improvement. Numbers don’t lie – tracking provides motivation to keep pushing higher.
Command Trainers

Targets like nets or strike zone grids hone command through repetition. Hitting targets forces focus on consistency and precision. Dialing in accuracy ingrains muscle memory for painting corners in games when it counts. Command is a skill requiring dedicated practice.
Recovery Tools
Pitching taxes the arm and body. Recovery aids like compression sleeves, massage guns, and percussion massagers ease soreness, reduce inflammation, and improve circulation. Proper recovery optimizes the workload from throwing sessions.
Don’t settle for just going through the motions in practice. Include training aids for motivation, feedback, and technique. Weighted balls, resistance bands, pitch tracking, command trainers, and recovery tools will unlock your pitching potential.
Mechanical Trainers: Fix Flaws for Efficient Mechanics
Proper pitching mechanics optimize velocity and control while reducing injury risk. But ingraining ideal motion patterns requires targeted mechanical trainers. Let’s explore devices that provide feedback to identify and correct flaws.
Video Analysis
Record bullpen sessions from multiple angles, then review in slow motion. Compare to footage of elite pitchers to spot issues. Frontal view checks balance and direction. Side view evaluates arm slot and release point. Rear view catches collapsed back leg. Video doesn’t lie.
Pitching Targets
Targets like strike zone nets or grids challenge mechanics to throw accurate, repeatable pitches. Missing targets illuminates subtle inconsistencies. Dialing in precision forces efficient, synchronized motion. Targets provide immediate feedback each pitch.
Resistance Bands
Bands attached to wrists or torso add tension to throwing. This challenges mechanics to remain efficient against resistance. Any flaws like poor timing or leaking energy will be exposed. Bands quickly identify weak points.
Weighted Balls
Heavier balls from 4-16 ounces overload muscles, testing mechanics under duress. Throwing weighted balls reveals inefficiencies like poor posture, muscling throws, or improper sequencing. Weight strains and exposes kinks.
Arm Path Trainers

Tubes guide proper pitching arm paths for consistency. Devices like Sidewinders control hand movement to reinforce correct upper body mechanics. Repeated reps ingrain ideal motions from windup to follow through.
These mechanical trainers highlight flaws from minor to major. Get instant, tangible feedback compared to “feeling it out.” Precisely identify issues impeding velocity, control, and health using video, targets, resistance, overload balls, and path trainers. Fix mechanics for pitching success.
Essential Throwing Aids for Pitchers: Discover the Top Baseball Training Tools to Boost Velocity and Control
Unlocking a pitcher’s full potential requires focused, specialized training. Let’s explore essential tech aids that provide key feedback and overload to develop pitching prowess.
Weighted Baseballs
Throwing heavier 4-16 ounce balls builds arm and shoulder strength better than normal balls alone. The weight isolates muscles through an extreme but safe range of motion for injury-free gains.
Resistance Bands
Wearing adjustable tension bands around wrists or torso during throwing adds a progressive workload on muscles as you improve. Resistance training boosts strength, power, and efficiency.
Pitch Tracking
Radar guns, wrist sensors, or video analysis apps precisely measure key metrics like velocity, spin rate, and release point for tangible data.
Arm Path Trainers
Tubes or poles guide proper pitching arm slot and movement for muscle memory. Repeated correct motion ingrains efficiency over time.
Recovery Devices
Pitching taxes the body, so recovery aids like percussion massagers ease soreness and reduce injury risk. Optimize throwing workload while staying healthy.
Serious pitching training involves more than just raw throwing. Employing weighted balls, resistance bands, motion tracking, arm path trainers, and recovery tools unlocks a pitcher’s true potential. Take the guesswork out of improvement with tech feedback.
Recovery Tools: Relieve Soreness for Durability
Pitching taxes the arm and body unlike other positions. Throwing max effort repeatedly causes inflammation and strain. Recovery is just as vital as training for health and performance. Let’s explore essential rehab tools to relieve soreness.
Ice Wraps
Wrapping ice packs around the shoulder and elbow reduces pain and swelling after pitching. The cold constricts blood vessels, slowing circulation and tissue breakdown. Use for 15-20 minutes to minimize inflammation.
Compression Sleeves
Snug compression sleeves worn after sessions improve circulation and oxygen flow, transporting nutrients while removing lactic acid buildup. This speeds muscle recovery between throwing days.
Massage Guns
These powerful percussive massagers drive strong pulses deep into muscles and tissues. Breaking up adhesions and increasing blood flow, massage guns enhance range of motion and flexibility of throwing muscles.
Foam Rollers
Rolling back and forth over a muscle with body weight provides myofascial release. This self-massage loosens tissues, reduces tightness and trigger points, and improves joint mobility critical for pitching.
Resistance Bands
Performing light arm and shoulder exercises with bands keeps muscles active while restoring strength between starts. Maintain strength gains without overtaxing the arm during recovery days.
Don’t neglect recovery when pushing pitching limits. Ice wraps, compression sleeves, massage guns, foam rollers, and resistance bands relieve soreness, reduce inflammation, and maintain health for a durable arm.
Essential Throwing Aids for Pitchers: Discover the Top Baseball Training Tools to Boost Velocity and Control
A pitcher is only as good as their training tools. Targeted aids provide key feedback and resistance to develop skills. Let’s explore the essential tech to elevate your game.
Weighted Baseballs
Throwing heavier balls isolates arm muscles through a fuller range of motion, building strength better than normal balls. Gradually increase weight for progressive overload.
Resistance Bands
Train against incremental band resistance across the throwing motion. Bands build arm strength and power for velocity gains.
Video Analysis
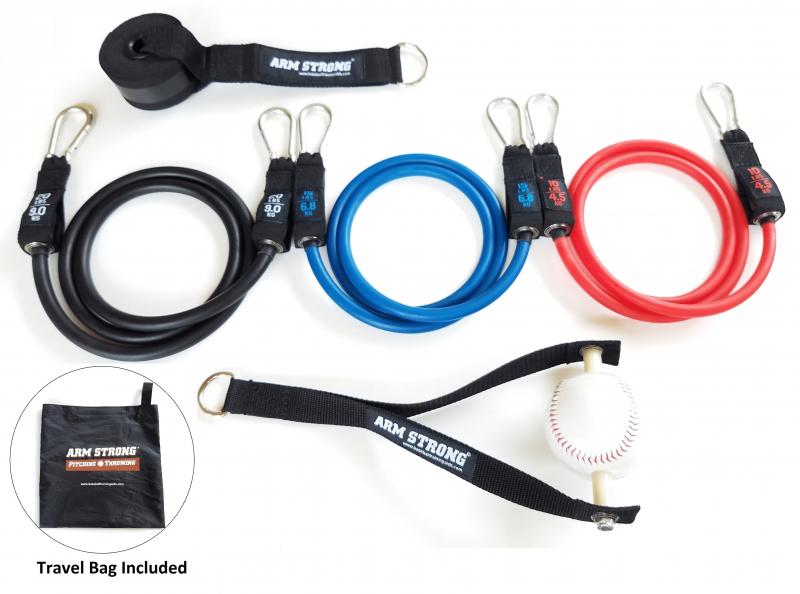
Compare recording of your throwing motion to elite pitchers. Analyze differences in mechanics for improvement.
Command Trainers
Practice hitting targets like strike zone grids to ingrain precision and consistency.
Recovery Devices
Massage guns, percussion massagers, and rollers optimize throwing workload while preventing injury and soreness.
Serious pitching training requires more than just throwing. Employing weighted balls, resistance bands, video analysis, command trainers, and recovery devices provides measurable feedback for rapid gains. Unlock your potential with tech aids!
Video Analysis: Identify Areas for Refinement
Even elite pitchers have room for improvement. But identifying mechanical flaws, inefficient movement, and poor timing is virtually impossible by feel alone. Video analysis provides the visual evidence and feedback to take pitching to the next level.
Front View
A camera angle from the catcher’s perspective highlights issues like balance, posture, landing direction, and release point. For example, consistently falling away to the glove side upon landing signals poor balance. Front video reveals a great deal.
Side View
The side angle captures stride length, arm slot, elbow positioning, and hip/shoulder separation. Side video is crucial for assessing efficient body mechanics during the wind up, stride, and delivery. Vary camera height to see all angles.
Rear View
Problems like improper back leg drive, spine tilt, hip torque, and shoulder alignment are best viewed from behind. Additionally, the rear view visualizes arm circle action and hand break that may be difficult to feel during throwing.
Slow Motion
Analyzing video in slow motion helps identify subtle issues invisible at full throwing speed. Break down the frame-by-frame throwing sequence to pinpoint timing problems or periods of wasted motion during delivery.
Step-by-Step
Divide video into clips isolating each phase: wind up, stride, foot strike, rotation, release, follow through. Assess each step individually, making minor adjustments until the complete motion synchronizes. Build pitching mechanics step-by-step.
Video yourself frequently from multiple angles in high resolution slow motion. Break down and analyze your throwing motion piece by piece. Visual evidence doesn’t lie – use it to precisely identify refinement areas for improved pitching.
Essential Throwing Aids for Pitchers: Discover the Top Baseball Training Tools to Boost Velocity and Control
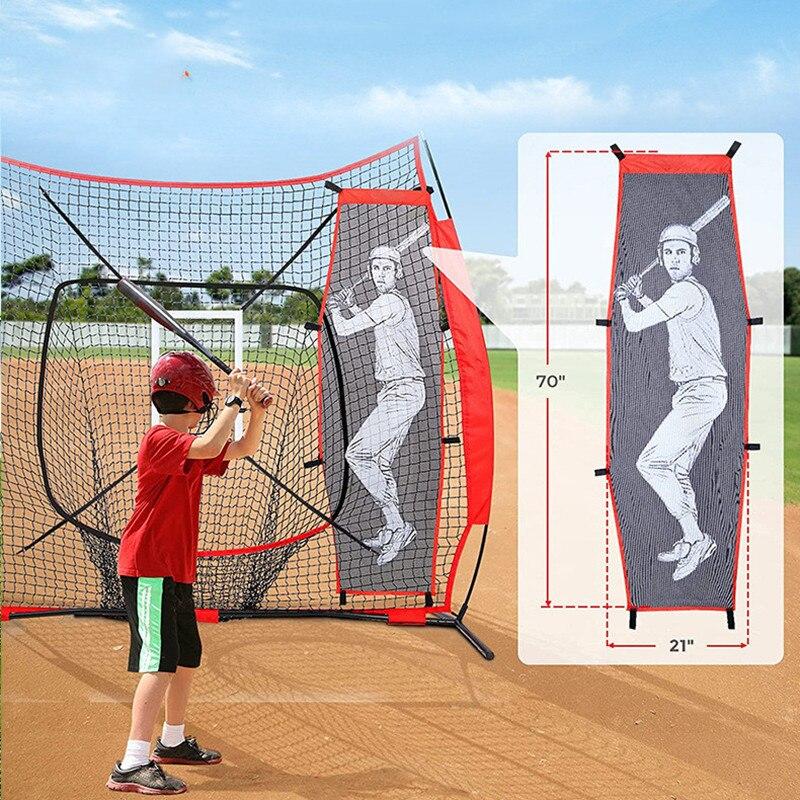
Reaching your pitching potential requires specialized training tools. Let’s explore the key tech aids providing targeted mechanical feedback, strength gains, and command development.
Slow Motion Video Analysis
High frame rate video captures throwing motion intricacies invisible to the eye. Analyze mechanics frame-by-frame to identify improvements.
Weighted Baseballs
Heavier balls from 4-16 ounces build arm strength and power better than regular balls alone. Weight isolates muscles through fuller motion.
Resistance Bands
Progressive band resistance across throwing motion improves strength, velocity, and efficiency. Bands overload muscles safely.
Command Trainers
Targets like nets with strike zones ingrain precision and consistency through repetition. Develop pinpoint command.
Arm Path Trainers
Guided tubes ensure proper arm slot and movement pattern. Ingrain muscle memory for efficient mechanics.
Take pitching to the highest level by employing video analysis, weighted balls, resistance bands, command trainers, and path trainers. Meticulously develop your mechanics and skills with cutting-edge tech aids.


