How to make stunning cosplay headgear at home. What materials do you need for DIY headpieces. How to create character-specific headgear for popular cosplays. What techniques can you use to craft professional-looking cosplay accessories.
Essential Materials for DIY Cosplay Headgear
Creating your own cosplay headgear can be an exciting and rewarding project. To get started, you’ll need to gather some essential materials. Here’s a list of commonly used items:
- Headbands or hair clips as a base
- Cardboard for structure and shaping
- Acrylic paint (silver, black, and other colors as needed)
- Hot glue gun and glue sticks
- Craft foam for detailing
- Wire for support and shaping
- Fabric or felt for covering
- Scissors
- Decorative elements (gems, feathers, etc.)
Many of these materials can be found at dollar stores or craft shops, making DIY headgear an affordable option for cosplayers on a budget.
Step-by-Step Guide to Creating Basic Cosplay Headgear
Ready to dive into your first headgear project? Follow these steps to create a basic yet impressive piece:
- Choose a headband or hair clip as your base.
- Cut cardboard into the desired shape for your headgear.
- Attach the cardboard to the base using hot glue.
- Paint the cardboard structure with acrylic paint.
- Add details and embellishments with craft foam or additional materials.
- Secure all elements with hot glue.
- Allow the paint and glue to dry completely before wearing.
Remember, the key to a successful DIY project is patience and attention to detail. Take your time with each step to ensure a polished final product.
Character-Specific Headgear Tutorials
Galatea Claude from Identity V
For fans of the game Identity V, creating Galatea Claude’s distinctive headgear can be an exciting project. Here’s a simplified tutorial based on a TikTok user’s experience:
- Use a dollar store headband as the base
- Create the main structure with cardboard
- Paint the cardboard silver and black
- Use hot glue to secure all elements
- Add details with a boba straw for unique texture
The creator mentioned that the process took about 1.5 to 2 hours, not including paint drying time. This shows that even complex-looking headgear can be created relatively quickly with the right approach.

Rebecca’s Headgear from Cyberpunk: Edgerunners
Fans of Cyberpunk: Edgerunners can recreate Rebecca’s iconic headgear with some creativity and basic materials. While specific details weren’t provided, the process likely involves:
- Creating a base structure with foam or lightweight plastic
- Adding electronic components or LED lights for authenticity
- Painting with vibrant colors to match the cyberpunk aesthetic
- Incorporating adjustable straps for a comfortable fit
This type of headgear might require more advanced skills, but it’s an excellent project for those looking to challenge themselves.
Techniques for Professional-Looking Finishes
To elevate your DIY headgear from homemade to professional-looking, consider these techniques:
- Smooth edges: Sand or file rough edges for a polished look
- Layering: Use multiple layers of paint or materials for depth and texture
- Weathering: Add realistic wear and tear for certain character styles
- Sealing: Apply a clear coat to protect paint and add shine
- Fabric wrapping: Cover cardboard or foam structures with fabric for a clean finish
These techniques can significantly improve the overall appearance of your headgear, making it stand out at conventions and photoshoots.
Incorporating Electronics and Special Effects
For those looking to take their cosplay headgear to the next level, incorporating electronics can create stunning effects. Consider these ideas:
- LED lights for glowing elements
- Small motors for moving parts
- Sound modules for audio effects
- EL wire for flexible, glowing lines
When working with electronics, always prioritize safety. Ensure proper insulation and use low-voltage components when possible. If you’re new to electronics, start with simple LED installations before moving on to more complex projects.
Cultural and Traditional Headgear in Cosplay
Cosplay often draws inspiration from various cultures and traditions. When creating headgear inspired by specific cultural elements, it’s important to approach the project with respect and understanding. Here are some considerations:
- Research the cultural significance of the headgear you’re recreating
- Use traditional techniques and materials when possible
- Acknowledge the source of inspiration in your cosplay presentation
- Be open to learning about the cultural context of the headgear
For example, the TikTok video showcasing the creation of a traditional bridal “gele” headgear demonstrates the intricate process involved in crafting culturally significant pieces. These projects can be an opportunity to appreciate and learn about diverse cultural expressions through cosplay.
Troubleshooting Common DIY Headgear Issues
Even experienced cosplayers encounter challenges when creating headgear. Here are some common issues and solutions:
Unstable Structure
If your headgear feels wobbly or unstable, try reinforcing it with additional support. Use wire, extra layers of cardboard, or sturdy foam to create a more solid base.
Paint Chipping
To prevent paint from chipping, sand the surface before painting and apply a primer. After painting, seal the surface with a clear coat for added durability.
Uncomfortable Fit
Adjust the fit by adding padding to areas that contact your head. Use foam or felt to create a comfortable barrier between your skin and the headgear structure.
Uneven Paint Coverage
Apply multiple thin layers of paint rather than one thick layer. This approach helps achieve even coverage and reduces the risk of drips or uneven texture.
Remember, practice makes perfect. Don’t be discouraged if your first attempt isn’t flawless. Each project is an opportunity to improve your skills and techniques.
Sustainable and Eco-Friendly Cosplay Headgear
As awareness of environmental issues grows, many cosplayers are seeking ways to create more sustainable costumes and accessories. Here are some eco-friendly approaches to making cosplay headgear:
- Use recycled materials like cardboard boxes or plastic containers
- Opt for water-based, non-toxic paints
- Repurpose old clothing or fabrics for covering and details
- Choose biodegradable materials when possible
- Create modular designs that can be reused for multiple cosplays
By adopting these practices, cosplayers can reduce their environmental impact while still creating impressive headgear. It’s a creative challenge that often leads to unique and innovative designs.
Photographing and Showcasing Your DIY Headgear
Once you’ve created your masterpiece, it’s time to show it off! Here are tips for capturing and sharing your cosplay headgear:
Photography Tips
- Use good lighting to highlight details
- Experiment with angles to showcase different aspects of the headgear
- Consider both close-up shots and full costume photos
- Use a plain background to make the headgear stand out
Sharing on Social Media
- Use relevant hashtags to reach fellow cosplayers and fans
- Share progress photos or videos to engage your audience
- Provide information about materials and techniques used
- Encourage questions and interact with your followers
Remember to credit any tutorials or inspirations you used in your project. The cosplay community thrives on sharing knowledge and supporting each other’s creativity.

Adapting Headgear for Different Body Types and Abilities
Cosplay is for everyone, and headgear should be adaptable to suit different needs. Consider these points when designing and creating inclusive cosplay headgear:
- Adjustable straps or closures to fit various head sizes
- Lightweight materials for those who may have difficulty with heavier pieces
- Alternative attachment methods (e.g., clips, combs, or headbands) for different hair types or head coverings
- Removable elements for easier storage and transport
- Consideration of sensory needs, such as using soft fabrics for comfort
By thinking inclusively, you can create headgear that allows more people to enjoy and participate in cosplay. It’s an opportunity to innovate and make your designs accessible to a wider audience.
Maintaining and Storing Your Cosplay Headgear
Proper care and storage of your DIY headgear can extend its lifespan and keep it looking great for multiple uses. Follow these tips to maintain your creations:
Cleaning
- Dust regularly with a soft brush or cloth
- Spot clean with a damp cloth for minor stains
- Use appropriate cleaning products for different materials (e.g., fabric cleaner for cloth elements)
Storage
- Store in a cool, dry place away from direct sunlight
- Use a dedicated box or bag to protect from dust and damage
- Add support inside hollow pieces to maintain shape
- Avoid stacking heavy items on top of delicate headgear
Repairs
- Keep extra materials on hand for quick fixes
- Address any damage promptly to prevent further issues
- Consider reinforcing high-stress areas before wear and tear occurs
With proper care, your DIY cosplay headgear can last for many conventions and photoshoots, allowing you to enjoy your creations for years to come.
Evolving Your Cosplay Headgear Skills
As you gain experience in creating cosplay headgear, you may want to challenge yourself with more complex projects. Here are some ways to evolve your skills:
- Experiment with new materials like thermoplastics or 3D printing
- Learn advanced painting techniques such as airbrushing or weathering
- Incorporate moving parts or articulated elements
- Study professional prop-making techniques and adapt them to your projects
- Collaborate with other cosplayers to tackle larger or more intricate designs
Remember that every project is a learning opportunity. Don’t be afraid to try new techniques or materials, even if they seem challenging at first. The cosplay community is often supportive and full of resources for those looking to improve their craft.
Legal and Ethical Considerations in Cosplay Headgear Creation
While cosplay is a celebration of creativity and fandom, it’s important to be aware of legal and ethical considerations when creating and wearing headgear. Keep these points in mind:
Copyright and Intellectual Property
- Understand the difference between fan creations and commercial products
- Be cautious when selling cosplay items based on copyrighted characters
- Consider creating original designs inspired by, rather than directly copying, existing properties
Safety Considerations
- Ensure your headgear doesn’t obstruct vision or hearing
- Use fire-resistant materials, especially if incorporating electronics
- Be mindful of sharp edges or protruding elements that could cause injury
Cultural Sensitivity
- Research the cultural significance of any traditional elements you incorporate
- Avoid using sacred or religiously significant symbols inappropriately
- Be open to dialogue and willing to learn if concerns are raised
By considering these aspects, you can create cosplay headgear that not only looks great but also respects intellectual property rights, ensures safety, and shows cultural awareness.
how to make headgear|TikTok Search
TikTok
Upload
xiaobies
𝐱𝐢𝐚𝐨
Replying to @:) || Here is how I made my headgear for #GalateaClaude !
I’m still an amateur at making cosplay stuff but I’m so proud of how this turned out!
Special thanks to @astra 💘 for helping me!! || #galateaclaudecosplay #galateacosplay #identityv #idv #identityvcosplay #idvcosplay #homemadecosplay
369 Likes, TikTok video from 𝐱𝐢𝐚𝐨 (@xiaobies): “Replying to @:) || Here is how I made my headgear for #GalateaClaude ! I’m still an amateur at making cosplay stuff but I’m so proud of how this turned out! Special thanks to @astra 💘 for helping me!! || #galateaclaudecosplay #galateacosplay #identityv #idv #identityvcosplay #idvcosplay #homemadecosplay”. process time: 1h 30 – 2h (paint drying💔💔) | What I used:
dollar store headband
cardboard
silver & black paint (I used acrylic paint)
hot glue & hot glue gun
boba straw Coconut Mall (From “Mario Kart Wii”) – Arcade Player.
3945 views|
Coconut Mall (From “Mario Kart Wii”) – Arcade Player
kikicasualcos
Kiki Casual Cos✨
Becca headgear tutorial🎧 #propmakersoftiktok #cosplaytutorial #cyberpunk2077 #cyberpunkedgerunners #rebeccacyberpunk #rebeccacyberpunkcosplay #animecosplay #videogamecosplay
147 Likes, TikTok video from Kiki Casual Cos✨ (@kikicasualcos): “Becca headgear tutorial🎧 #propmakersoftiktok #cosplaytutorial #cyberpunk2077 #cyberpunkedgerunners #rebeccacyberpunk #rebeccacyberpunkcosplay #animecosplay #videogamecosplay”. Make Rebecca’s Headgear with me SynthWave Blade Runner – 21bff51528b0485e8f0fed49572d930a.png.
2578 views|
SynthWave Blade Runner – 21bff51528b0485e8f0fed49572d930a.png
callmemonadarlling
Mona shrestha
DIY #headgear
Concept and styled by me..
#stylist
86 Likes, TikTok video from Mona shrestha (@callmemonadarlling): “DIY #headgear Concept and styled by me.. #stylist”. A Cup of Coffee – Muspace.
1149 views|
A Cup of Coffee – Muspace
queen_regal
Queen Agaba
Minimal headgear tutorial #headwraptutorial
313 Likes, TikTok video from Queen Agaba (@queen_regal): “Minimal headgear tutorial #headwraptutorial”. How Are You (My Friend) – Johnny Drille.
6262 views|
How Are You (My Friend) – Johnny Drille
shuichis_hatt
Shuichis_hat
Replying to @▄︻デѕσυтн ραяк══━一💨💥 theres your tutorial if you got any questions yoh can ask me #turorialheadgearshelleycosplay #tutorial #headgeartut #southpark #shelleycosplay #shelleymarsh #southpark
100 Likes, TikTok video from Shuichis_hat (@shuichis_hatt): “Replying to @▄︻デѕσυтн ραяк══━一💨💥 theres your tutorial if you got any questions yoh can ask me #turorialheadgearshelleycosplay #tutorial #headgeartut #southpark #shelleycosplay #shelleymarsh #southpark”. Wire from hobby craft [ garden wire ]
Sissors I stole them off school 🫢Shelley headgear tutorial original sound – Shuichis_hat.
4599 views|
original sound – Shuichis_hat
beautybliss_1
@beautybliss_1
Mini tutorial on our signature headgear👌Ratio:45/55% using Asoke #beautybliss_1 #fypシ #fypage
896 Likes, TikTok video from @beautybliss_1 (@beautybliss_1): “Mini tutorial on our signature headgear👌Ratio:45/55% using Asoke #beautybliss_1 #fypシ #fypage”. How Are You (My Friend) – Johnny Drille.
10.6K views|
How Are You (My Friend) – Johnny Drille
chikadibia04
Chika O.
Replying to @user765922173617 here you go #diy #tutorial #chikadibia04 #fyp #headgear #headwraptutorial
223 Likes, TikTok video from Chika O. (@chikadibia04): “Replying to @user765922173617 here you go #diy #tutorial #chikadibia04 #fyp #headgear #headwraptutorial”. 1 | DIY Extra – Extra Musica.
12.8K views|
Extra – Extra Musica
annaosadd
Anna
Blackgirl headscarf tutorial for bad or good hairdays 🧏🏽♀️#blackhairtutorial #blackhairtiktok #scarftutorial
104 Likes, TikTok video from Anna (@annaosadd): “Blackgirl headscarf tutorial for bad or good hairdays 🧏🏽♀️#blackhairtutorial #blackhairtiktok #scarftutorial”. Quick Headgear Tutorial | Headgear | Scarfs | … original sound – Anna.
1867 views|
original sound – Anna
meestudios
Mee Asooke
Just dropping this right here… I hope you enjoy and learn from it!!! #diyvideos #tutorial #handfanvideos #crafts #handmade #headpiece #headgear
233 Likes, TikTok video from Mee Asooke (@meestudios): “Just dropping this right here… I hope you enjoy and learn from it!!! #diyvideos #tutorial #handfanvideos #crafts #handmade #headpiece #headgear”.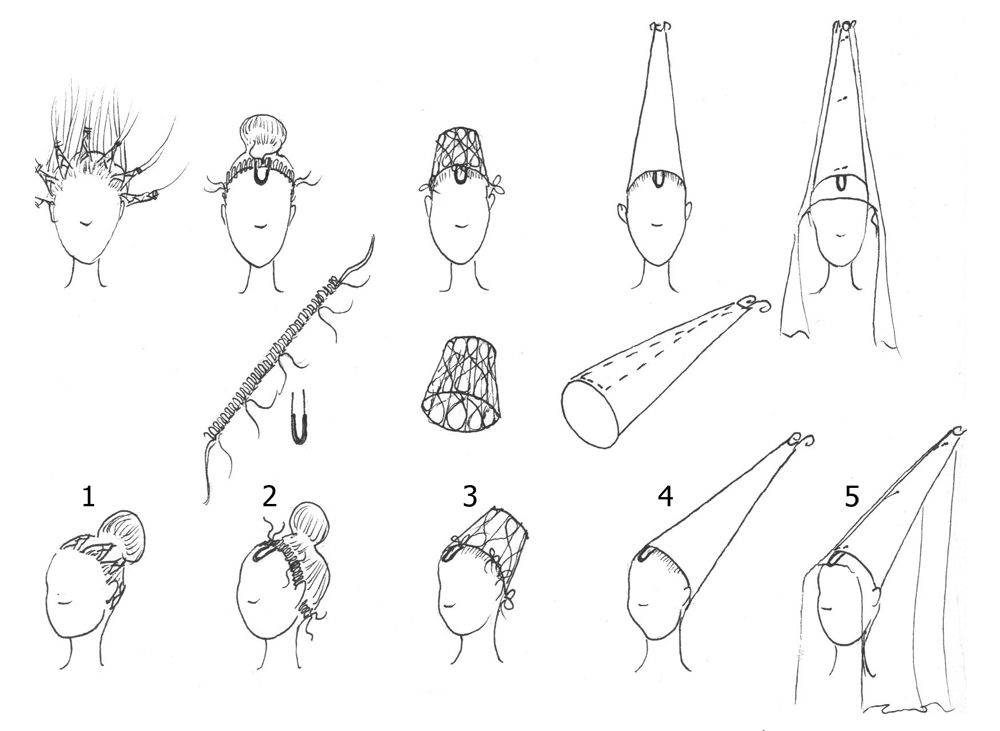 Ku Lo Sa Speed Up – Peroostx.
8899 views|
Ku Lo Sa Speed Up – Peroostx
gele_by_kelv
TOP GELE STYLIST IN NIGERIA
Enjoy the procees of creating a traditional bridal headgear!
Sego gele is unique and it requires attention details for a clean finish.
Follow for more tutorials #geletutorial #geletutorials #bridalgele
270 Likes, TikTok video from TOP GELE STYLIST IN NIGERIA (@gele_by_kelv): “Enjoy the procees of creating a traditional bridal headgear! Sego gele is unique and it requires attention details for a clean finish. Follow for more tutorials #geletutorial #geletutorials #bridalgele”. How to pick pleats with sego GeleHOW TO PICK PLEATS WITH SEGO GELE original sound – mercychinwo.
6228 views|
original sound – mercychinwo
What is Orthodontic Headgear? – The Village Orthodontics
May 31, 2022
During your orthodontic treatment in Kyle, you may be required to use a variety of appliances. In limited situations, this could also include headgear. These special devices, in addition to the standard orthodontic archwires and brackets, help your teeth and jaw move into their ideal position, giving you the best possible orthodontic results.
While rarely used, orthodontic headgear plays an important role in the treatment of some types of growth irregularities. Sometimes “reverse” headgear encourages the lower jaw to grow forward if your child has an overbite. It also promotes proper growth and relationship with the upper jaw. Other types of headgear work by slowing the growth of the lower jaw in the instances of an underbite.
Headgear is beneficial when used on growing children with irregular jaw growth patterns. Primarily because it helps eliminate the need for surgical reconstruction at a later point in time.
When needed, headgear is typically worn for a set period of time each day, for several months, depending on the child.
Does My Child Need Headgear?
Early intervention in orthodontics can make a massive difference in your child’s growth patterns.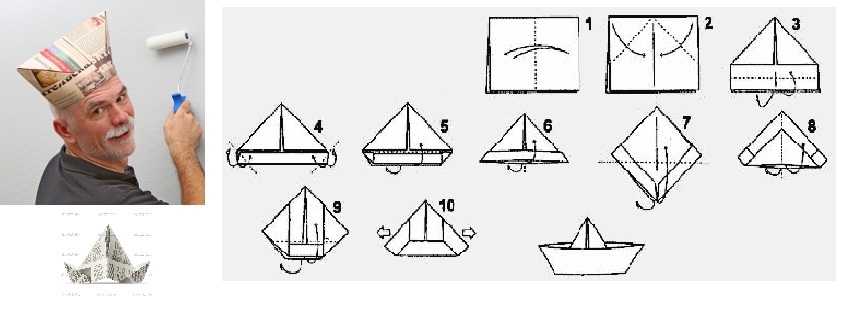 For example, if we diagnose your young child with a severe bite problem caused by jaw position, we can use orthognathic corrective devices—like headgear—to be proactive about correcting this problem. This device may save your child from having to have invasive jaw surgery later in life.
There are various types of orthodontic headgear. The cervical design type is a very common one. This appliance consists of a U-shaped wire that runs along the front of your child’s face and is held in place by rubber bands on the back teeth. A strap is also included to go just above the nape of the neck. Another device is the high-pull headgear, which is similar to the cervical pull headgear but has a strap that goes over and behind the crown of your child’s head.
The reverse-pull or “facemask” type of headgear, which is typically used to correct an underbite, is the third type. The device is made up of two pads, one for your forehead and one for your chin. The two pads are joined together by a vertical metal frame.
Rubber elastics or wires attached to the frame hook onto your teeth and move your jaw into the correct position.
Who Needs Orthodontic Headgear?
In our pediatric or teen patients who have an overbite or underbite, headgear is an effective orthodontic appliance that can gently “pull” the jaws to encourage more appropriate growth and development without surgery.
Does Headgear Work?
In rare cases, oral surgery may still be required to realign the jaws if headgear appliances are not appropriate. Alternatively, it corrects jaw growth patterns in older teens who have already matured or growth patterns that cannot be corrected.
Schedule Your Consultation
There is only one way to determine if you will require headgear while wearing braces. To schedule a consultation at our Kyle, please contact us. The Village Orthodontics’s board-certified orthodontist, Dr. Taylor & Dr. Hill will be happy to answer any questions you have about headgear and other orthodontic appliances.
Don’t trust just anyone with complex orthodontic treatment. Call the professional team at The Village Orthodontics for a consultation!
Hats – how to make them in different ways and everything is very simple
You have a wedding coming up and you can’t find a headpiece to match your dress? Well, don’t worry, because now you can make them yourself and for less money than it would cost to buy already made. The headdress They are part of the image of our guests, so we always try to match the color or style of the costume we wear.
But it’s not always easy, when we’ve already said costume, to get a headdress. There are several styles, among which we will see pamela or, headband and jewelry . Whatever you prefer, there are always a few simple steps to follow. You will see that it is much easier than you could imagine!
Index
- 1 What do I need to make hats?
- 2 How to make a fancy bridal headpiece
- 3 Floral headband for a wedding
- 4 Pamela’s headpieces, they always matter
What do I need to make headpieces?
First of all we have to decide which head piece we like it, or does it go better with the dress and suit we have chosen for the occasion. We will consider if we want something simple like headbands or hats, or a small design that we will wear on the side. When you have decided, the next step is to choose the headgear base . If you want a hat, then in this form you will have to buy a wide base. But remember that there are other more discreet round or rectangular bases. The main materials are usually shinamai, natural or synthetic straw.
We already have the type of headgear and the basis for making it. Now we have the means of fastening. If it’s a headband, then we all know that it fits at the top of the head and fits perfectly. Otherwise, we can always choose a comb, which we will stick on the base, or hairpins. You can buy all these materials in haberdashery and online stores at very low prices.
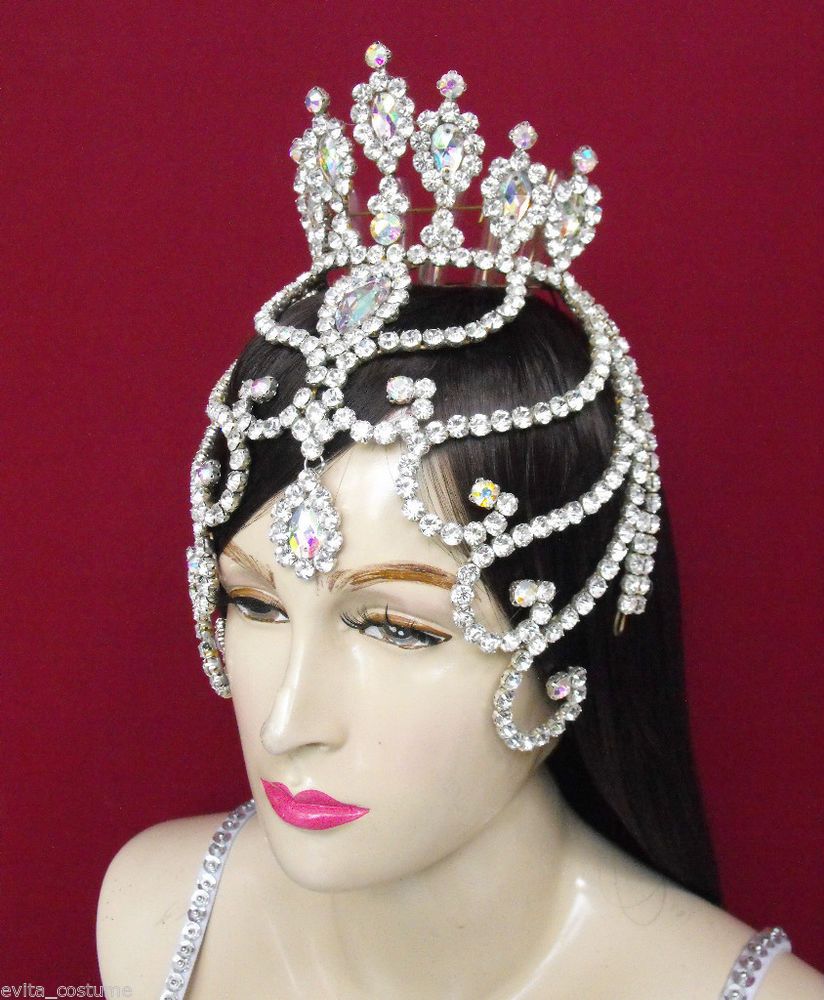
How to make an elegant wedding headdress
Thanks to the fact that we can buy accessories, the creation of our headdress will be individual and unique. Therefore, in addition to the mentioned bases, it does not hurt to buy a few more details. Details that can be flowers or feathers that will be paired with some buttons or rhinestones, and mesh fabrics that always add elegance to this type of complement. This is a very simple step as shown in the video above. First of all, attach the nozzle to the headgear. Then we will add details until we leave it to our own discretion. What is simple?
Floral headband for wedding
In this case we are talking about wearing a crown or flower headband . This is a style that goes very well with flowy dresses, as well as loose updos and boho styles. For maximum head support, perhaps the basis of our headgear can be a thin headband. You can cover it with fabric and stick artificial flowers, which you can find in cheap stores. Of course, as you can see in the video, they can also be twisted if these flowers have a hard stem. Remember that you can wear flowers at the top of your head or that they are more sideways. This is always worth thinking about before gluing or tying them.
Pamela’s hats, they always matter
Perhaps we think the hat would be more difficult. Nothing is further from the truth! Again there is simplicity. In this case, they choose pamela base , which will be covered with a thin velvet fabric, a flower and two metal sheets. You can always choose the color of accessories to match the color of your dress. As we can see in the video, we only need to glue on the silicone and we will have a new headpiece that can be worn in daytime weddings. Wouldn’t it be nice to have some headgear?
How to make an Indian headdress with your own hands
So, I will tell you in detail about how this headdress was created. The whole process took a day and a half, mostly due to the fact that you had to wait for the glue to dry. Didn’t want to mess around.
Complete list of what we need:
- 1 sheet of A4 paper
- 2 sheets of A4 polypropylene fabric
- Scissors
- Adhesive (quick setting and strong)
- Hole Punch
- Eyelet installation tool
- Black felt
- Approximately 60 feathers
- Neck thread
- Several wooden canape sticks
- Pliers to break wooden sticks
- Colorful turkey feathers
- Stapler
- Volume paints
- Red thread (decorated with inclusions here)
- Feather boa
1. Prepare the base of the headgear
We will need
- 1 sheet of A4 paper
- 2 sheets of A4 polypropylene fabric
- Scissors
- Adhesive (quick setting and strong)
- Hole Punch
- Eyelet installation tool
- Black felt
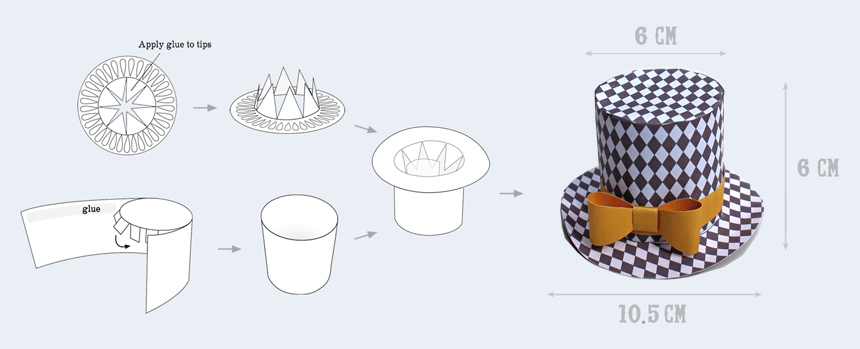
1. Fold an A4 piece of paper in half and draw the following shape on it (similar to a shark’s fin, only more strongly curved). Cut out this shape and you will get something like a crescent moon.
2. Try on this half moon. I think this size will fit most heads, it should go around your head and its ends will be in the area of your temples.
3. If the size suits you, place the cut out shape on a sheet of polypropylene fabric, and cut out the shape already from it. If you need a larger size, you should use sheets of paper and fabrics in other sizes. Do this procedure twice so that you get two sheets of fabric in the shape of a crescent. Don’t worry if the outfit is a little too big for you.
4. Use a hole puncher to make holes in each corner and insert the eyelets. Lay the sheets on top of each other and make sure the holes match up.
5. Cut out two rectangles of felt and glue them to the sides of ONE half moon. This is necessary in order to slightly increase the size of the base. We’ll need another crescent later.
6. Try on the resulting design on your head and cut off 5-6 centimeters from the top, as a result it will no longer be a crescent.
2. Preparing the feathers
You will need:
- Approximately 60 feathers
- Black felt
- Neck thread
- Adhesive
- Scissors
- Several wooden canape sticks
- Pliers to break wooden sticks
1. (Optional, this step was done to make the final piece look bigger) Take canapé sticks and put some glue on their “sharp” tip. After that, insert them into the base of the feathers (you may have to trim the feathers a little from the bottom to make the entry hole larger). Do this for all feathers.
2. Set the feathers aside. Cut out small rectangles of felt, approximately 8×12 cm according to the number of feathers used.
3. Apply a decent amount of glue to one side of each rectangle (as in the photo below) and wrap the fabric around the feather. After that, apply glue to the other side of the fabric and thus fix the fabric.
4. Hold the fabric and wrap the thread tightly around it. You will need to make a knot at the base first, leaving enough thread to wrap around the surface and make a second knot at the other end of the fabric.
3. Making the main frame
You will need:
- Both previously made figures in polypropylene fabric
- Prepared feathers
- Adhesive
- Needle and thread
- Small turkey feathers
- Stapler
1. Place the feathers (made in step 2) on the base (made in step 1), evenly spaced. Ideally, the highest feathers should be in the center, and the feathers shorter on the sides, to form the correct shape of the Indian headdress. The elements of felt glued to the feathers must adjoin tightly from above to the base.
2. Glue the feathers to the base, in this case the glue was applied with a brush.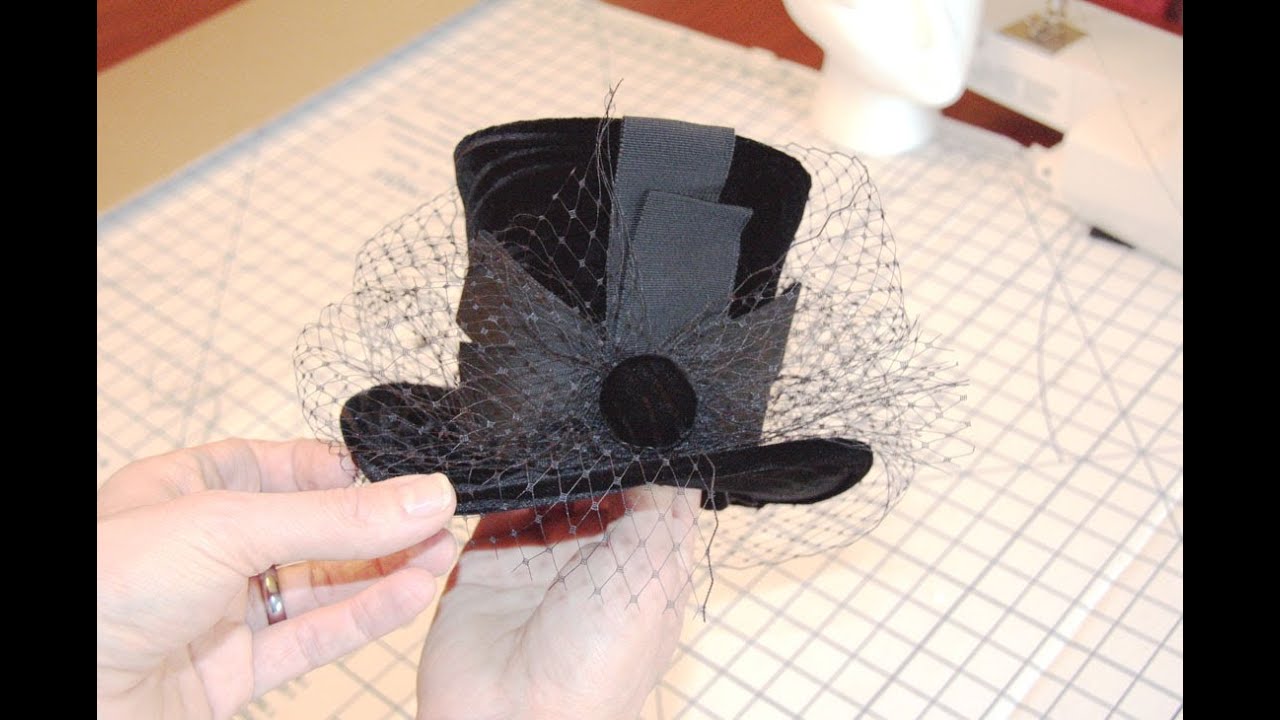 Also, the feathers were wrapped with thread for additional fixation. Pay attention to how the feathers are located – they are directed to the left and right, each in its own direction. You will have to carefully arrange them in the right directions.
3. Glue all the feathers and cut off the sticks sticking out from the bottom.
4. Add more glue and add a few extra, shorter feathers to the side felt rectangles that we glued in step 1 to secure the construction. These feathers do not require wooden sticks.
6. Add more glue, and cover the resulting construction with a second sheet of polypropylene fabric. Let it dry for a couple of hours, for a secure fit, put weights on top of them, such as books.
7. After the glue has dried, place the small turkey feathers on the top side, arrange them as you like. Only white and black feathers were available, so it was decided to place the white ones on the bottom and the black ones on top. By the same principle, long feathers were located in the center, and short ones at the edges. They can be glued, can be attached with a stapler.
8. Go through the feathers with scissors to shape the base.
4. Create a decorative bandage
Needed:
- Scissors
- Adhesive
- Black felt
- Neck thread
- Volume paints
- Red thread (decorated here)
- Feather boa
1. At this step, the headpiece is almost finished. Pass the threads through the eyelet hole, pull them off on your head, and look in the mirror. The empty space between the headpiece and your forehead (this depends on the size of your forehead and how high you plan to wear the headband) will form the required bandage size.
2. Cut off a small piece of felt. I got a size of 6 centimeters in height and 50 cm in length.
3. Measure two centimeters from the top and bottom and draw triangles
4. Create the desired design using bulk paints and let dry overnight. Use a hair dryer to make the colors even more voluminous and create the illusion of beads.
5. For the round pieces on the sides, cut out 4 circles of felt, slightly larger than the width of the headband.
6. On one side of the two circles, sew on feathers or anything else you find appropriate. In this case, decorative threads are sewn to give some flavor. The main task now is to create some chaos here. Don’t worry if it looks messy, but reinforce everything with glue.
7. On the remaining two circles, draw 4 intersecting lines (as in the photo above) and connect the dots to make a star.
8. You can use 3D paint or thread to decorate the star. Due to lack of time, thread was used in this case.
5. Attach the headband to the headband
1. Attach the headband to the front frame of the headband with glue and thread
2.