How does Mueller No Glare Eye Black Stick reduce glare from lights and sun. What makes it easy to apply and remove. Why is it considered a must-have for game day. How does it improve athletic performance.
The Science Behind Mueller No Glare Eye Black Stick
Mueller No Glare Eye Black Stick is a revolutionary product designed to enhance athletic performance by reducing glare from both artificial lights and sunlight. This innovative stick utilizes advanced light-absorbing pigments to minimize reflections that can impair an athlete’s vision during crucial moments of play.
The science behind the Mueller No Glare Eye Black Stick is based on the principle of light absorption. The specially formulated black pigment in the stick effectively absorbs a significant portion of incoming light, preventing it from reflecting into the athlete’s eyes. This reduction in glare allows for improved visual acuity, enabling athletes to track moving objects more effectively and react with greater precision.

Key Features of Mueller No Glare Eye Black Stick
- Advanced light-absorbing pigments
- Easy application and removal
- Sweat-resistant formula
- Non-toxic and skin-friendly ingredients
- Compact and portable design
Application Techniques for Optimal Performance
Proper application of the Mueller No Glare Eye Black Stick is crucial for maximizing its effectiveness. To achieve optimal results, follow these steps:
- Ensure your face is clean and dry before application
- Twist the base of the stick to expose the product
- Apply a thin, even layer beneath each eye, extending from the inner corner to the outer edge
- Allow the product to dry for 30-60 seconds before engaging in physical activity
- Reapply as needed throughout the game or practice session
By following these application techniques, athletes can ensure that they are getting the most out of their Mueller No Glare Eye Black Stick, maximizing its glare-reducing properties and enhancing their overall performance on the field or court.
Benefits for Various Sports and Athletic Activities
The Mueller No Glare Eye Black Stick offers significant advantages across a wide range of sports and athletic activities. Its versatility makes it an essential tool for athletes competing in both outdoor and indoor environments.
Outdoor Sports
In outdoor sports such as baseball, softball, football, and soccer, the Mueller No Glare Eye Black Stick proves particularly beneficial. It helps athletes combat the harsh glare of sunlight, which can be especially challenging during daytime games or when the sun is low on the horizon. By reducing this glare, players can maintain better focus on crucial elements like tracking fly balls, reading field positions, or following the trajectory of a soccer ball in mid-air.
Indoor Sports
Even in indoor settings, the Mueller No Glare Eye Black Stick offers valuable benefits. Sports like basketball, volleyball, and indoor track events often involve bright overhead lighting that can create distracting reflections. By applying the eye black, athletes can minimize these reflections, allowing for improved concentration and performance during critical moments of play.
Comparing Mueller No Glare Eye Black Stick to Traditional Methods
While the concept of using eye black to reduce glare is not new, the Mueller No Glare Eye Black Stick represents a significant advancement over traditional methods. Let’s examine how it compares to other common glare-reduction techniques:
| Feature | Mueller No Glare Eye Black Stick | Traditional Grease-Based Eye Black | Eye Black Stickers |
|---|---|---|---|
| Ease of Application | Very easy, twist-up stick | Messy, requires careful application | Easy, but can be finicky to position |
| Durability | Long-lasting, sweat-resistant | Can smear or run with sweat | May peel off during intense activity |
| Removal | Simple, washes off easily | Often requires makeup remover | Peels off, may leave residue |
| Customization | Can adjust thickness and coverage | Highly customizable | Limited to pre-cut shapes |
| Skin-Friendly | Non-toxic, gentle formula | May clog pores or irritate skin | Generally skin-safe, but adhesive may irritate |
As evident from the comparison, the Mueller No Glare Eye Black Stick offers a superior combination of ease of use, performance, and skin-friendliness compared to traditional methods. Its innovative design addresses many of the shortcomings of older glare-reduction techniques, making it a preferred choice for athletes across various sports.
Impact on Athletic Performance and Visual Acuity
The use of Mueller No Glare Eye Black Stick can have a significant impact on an athlete’s performance by enhancing visual acuity and reducing eye strain. By minimizing glare, athletes can experience several performance-related benefits:

- Improved depth perception
- Enhanced ability to track fast-moving objects
- Reduced eye fatigue during long games or practices
- Increased confidence in visually demanding situations
- Better overall focus and concentration
These improvements in visual performance can translate to tangible benefits in an athlete’s game. For example, a baseball player might react more quickly to a fastball, or a football receiver could better judge the trajectory of a long pass. The reduction in eye strain can also contribute to sustained performance over the course of a long game or tournament.
Skin Care Considerations and Proper Removal Techniques
While the Mueller No Glare Eye Black Stick is designed to be gentle on the skin, proper care and removal are essential to maintain skin health and prevent any potential issues. Here are some key considerations and removal techniques:
Skin Care Tips
- Always apply the product to clean, dry skin
- Avoid applying to irritated or sensitive areas
- Remove the product promptly after use
- Moisturize the application area after removal to maintain skin hydration
Removal Techniques
- Use a gentle, oil-free makeup remover or micellar water
- Apply the remover to a soft cloth or cotton pad
- Gently wipe the eye black area, being careful not to rub too harshly
- Rinse the area with lukewarm water and pat dry
- Follow up with a mild, non-comedogenic moisturizer
By following these skin care and removal guidelines, athletes can enjoy the benefits of the Mueller No Glare Eye Black Stick while maintaining healthy, irritation-free skin.

Incorporating Mueller No Glare Eye Black Stick into Training Routines
To maximize the benefits of the Mueller No Glare Eye Black Stick, athletes should consider incorporating it into their regular training routines, not just during game day situations. This approach offers several advantages:
Consistency in Visual Environment
By using the eye black stick during practice sessions, athletes create a consistent visual environment between training and competition. This consistency can help in developing muscle memory and visual tracking skills that directly translate to game-day performance.
Adaptation Period
Regular use during training allows athletes to adapt to the sensation of wearing eye black and fine-tune their application technique. This familiarity can prevent any distractions or adjustments needed during crucial competitive moments.
Performance Tracking
Incorporating the Mueller No Glare Eye Black Stick into training routines provides an opportunity to track performance improvements over time. Athletes can compare their visual acuity and reaction times with and without the product, helping to quantify its impact on their performance.
Weather Condition Simulation
For outdoor sports, using the eye black stick during training in various weather conditions (sunny, overcast, twilight) helps athletes prepare for different lighting scenarios they might encounter during competitions.
By making the Mueller No Glare Eye Black Stick a regular part of their training gear, athletes can fully harness its benefits and be well-prepared for optimal performance during competitions.
Expert Opinions and Athlete Testimonials
The effectiveness of the Mueller No Glare Eye Black Stick is not just anecdotal; it has garnered support from sports vision experts and received praise from professional athletes across various disciplines. Let’s explore some expert opinions and athlete testimonials:
Sports Vision Expert Perspective
Dr. Amanda Rodriguez, a leading sports optometrist, shares her thoughts: “The Mueller No Glare Eye Black Stick represents a significant advancement in glare reduction technology for athletes. Its ability to absorb light effectively while remaining comfortable and easy to apply makes it a valuable tool for enhancing visual performance in sports.”
Professional Athlete Testimonials
- Mike Johnson, MLB outfielder: “I’ve tried various eye black products throughout my career, but the Mueller stick is by far the best. It stays put during intense games and really helps me track those high fly balls, especially during day games.”
- Sarah Thompson, Olympic soccer player: “The Mueller No Glare stick has become an essential part of my game-day routine. It gives me an edge by reducing glare from stadium lights, allowing me to read the field more clearly during night matches.”
- Chris Baker, NFL wide receiver: “What I love about the Mueller stick is how easy it is to apply and how long it lasts. I don’t have to worry about it smearing or wearing off, even during the most intense games.”
These expert opinions and athlete testimonials underscore the real-world effectiveness of the Mueller No Glare Eye Black Stick in enhancing athletic performance across various sports and competition levels.
Future Innovations and Potential Advancements
As technology continues to advance, the future of glare-reducing products like the Mueller No Glare Eye Black Stick looks promising. Several potential innovations and advancements may further enhance its effectiveness and usability:
Smart Pigment Technology
Future versions of the eye black stick might incorporate smart pigments that can dynamically adjust their light-absorbing properties based on the intensity of ambient light. This could provide optimal glare reduction in varying lighting conditions without the need for reapplication.
Integration with Sports Eyewear
We may see collaborations between eye black manufacturers and sports eyewear companies to create integrated solutions. This could result in specially designed goggles or glasses with built-in glare-reducing properties, combining the benefits of eye black with protective eyewear.
Personalized Formulations
Advancements in skin analysis technology could lead to personalized eye black formulations. These custom products would be tailored to an individual athlete’s skin type, sport-specific needs, and environmental conditions, maximizing effectiveness while minimizing the risk of skin irritation.
Extended-Wear Formulas
Research into long-lasting, sweat-proof formulas may result in eye black products that can remain effective for extended periods. This would be particularly beneficial for endurance athletes or those participating in multi-day events.
Biodegradable and Eco-Friendly Options
As environmental concerns continue to grow, we may see the development of biodegradable eye black products. These eco-friendly alternatives would offer the same performance benefits while reducing environmental impact.
These potential innovations highlight the ongoing commitment to improving athletic performance through advanced glare-reduction technologies. As these advancements materialize, athletes can look forward to even more effective tools for enhancing their visual acuity and overall performance on the field.
Mueller No Glare Eye Black Stick 440403A
Fast & Free EXPEDITED SHIPPING on orders over $60!* (including shipments to Alaska &
Hawaii!)
$6.95 Flat Rate EXPEDITED SHIPPING on orders under $60!* (including shipments to Alaska
& Hawaii)
Orders over $250 require a customer signature to receive package
Free Shipping Exclusions:
Overweight or Oversized products are excluded from free shipping, but we will still ship them fast and at the lowest cost possible! Custom products do not ship Same Day. Examples of free shipping products exclusions include but not limited to:
Baseballs & softballs, wheeled equipment bags, rebounders and backstops, pitching machines, some team eligible orders, special orders or other items considered to be overweight or oversize.
FREE NEXT DAY DELIVERY FOR CALIFORNIA & NEVADA RESIDENTS ON ORDERS OVER $60 Just
Select “Free Next Day CA or NV” As Your Shipping Method and You Will Get it The Next Day
All Orders Ship Same Day When Received By 3PM (Monday-Friday) Saturday & Sunday Delivery Not Available.
Some zip codes in NV are not eligible for free next day but you will still get it fast!
FREE 2 DAY DELIVERY FOR ARIZONA, COLORADO, IDAHO, OREGON, UTAH, WASHINGTON RESIDENTS ON ORDERS OVER $35 Just Select “Free 2 Day AZ, CO, ID, OR, UT, WA” As Your Shipping Method
FOR FREE 2 DAY!
All Orders Ship Same Day When Received By 3PM (Monday-Friday) Saturday & Sunday Delivery Not Available.
Some zip codes are not eligible for free 2 day but you will still get it fast!
We will provide you with a shipping tracking number when your order is shipped. That way you can track up
to the minute where your package is! Our Expedited Shipping should arrive within 1 to 5 business days
depending on your location.
Customer Satisfaction is our number 1 priority!
At Bases Loaded we want you to be 100% satisfied with your order.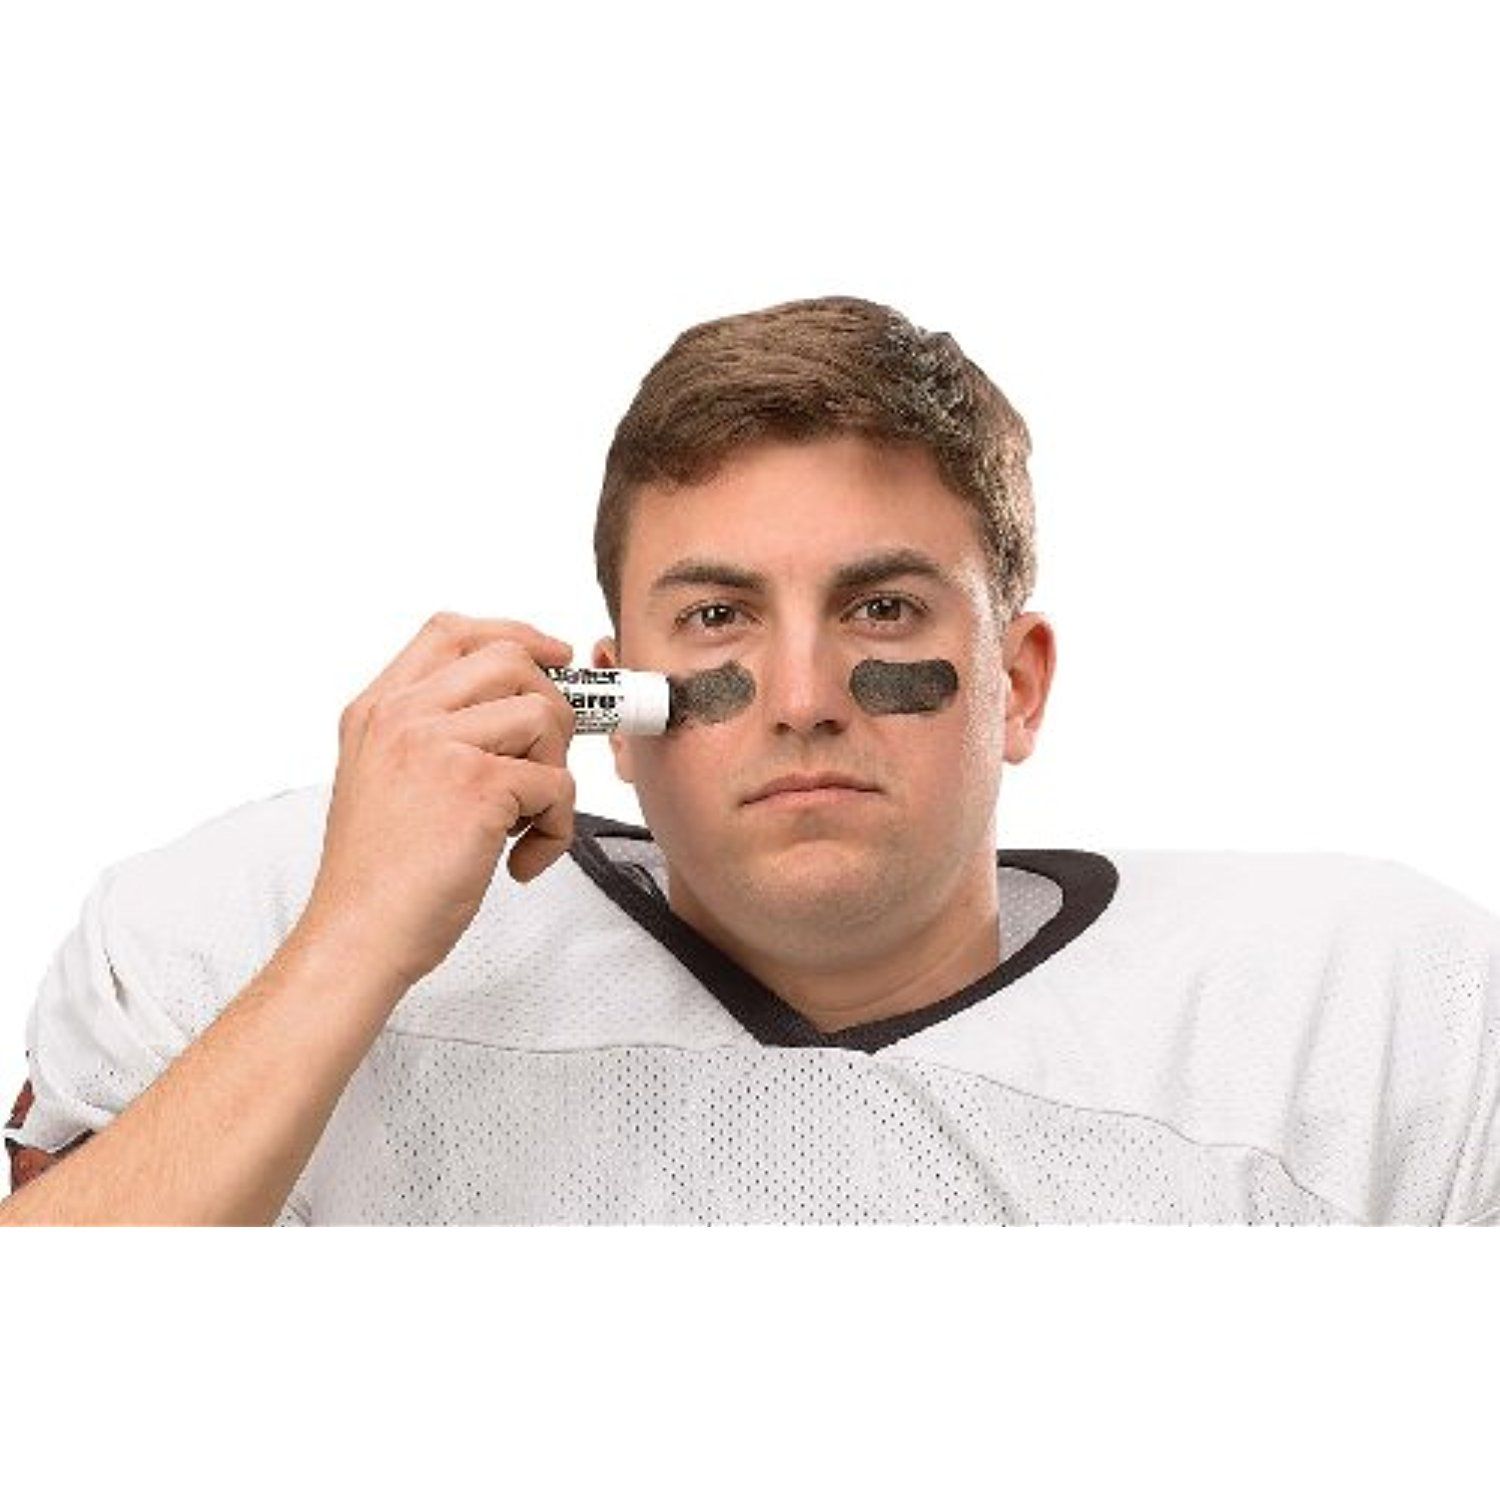 If for any reason you are not happy please give us a call or email us for assistance. Toll free (866) 983-0633 or [email protected]
Thank you to our Men & Women Serving around the world in the Armed Forces!
APO/FPO Shipping All orders over $60 include shipping at no charge orders under $60 have a flat rate of
$4.95 shipping: We ship to APO or FPO military addresses worldwide. All APO/FPO orders will be shipped
via Priority Mail. You should receive your order within 7 to 14 days.
For APO/FPO shipments, please include the following at check out:
- Address 1: Grade/Rank/Rating and full name including middle initial.
- Address 2: Unit and Unit number, Consolidated Mail Room Number, PSC Number, or Ship.
- City: Enter APO or FPO as appropriate.

- State: AA, AE, AP, or FP.
- Country: United States.
Exchanges & Returns
Not happy? Need something a little different? No Problem! Exchanges or Returns may be made within 60 days
from the date it was shipped. The item must be unused and in the original packaging. Customers are
responsible for any return shipping fees. Please write your order number on the outside of the return
package and include the order number or the original packing slip inside your return package. This
allows us to keep track of what is coming and going so we can provide you with refunds or exchanges
fast. Shipping charges(if any) will be deducted from your refund. No Warranty on Wood Bats unless
provided by Manufacturer. Bats not in original packaging and unused cannot be returned or exchanged.
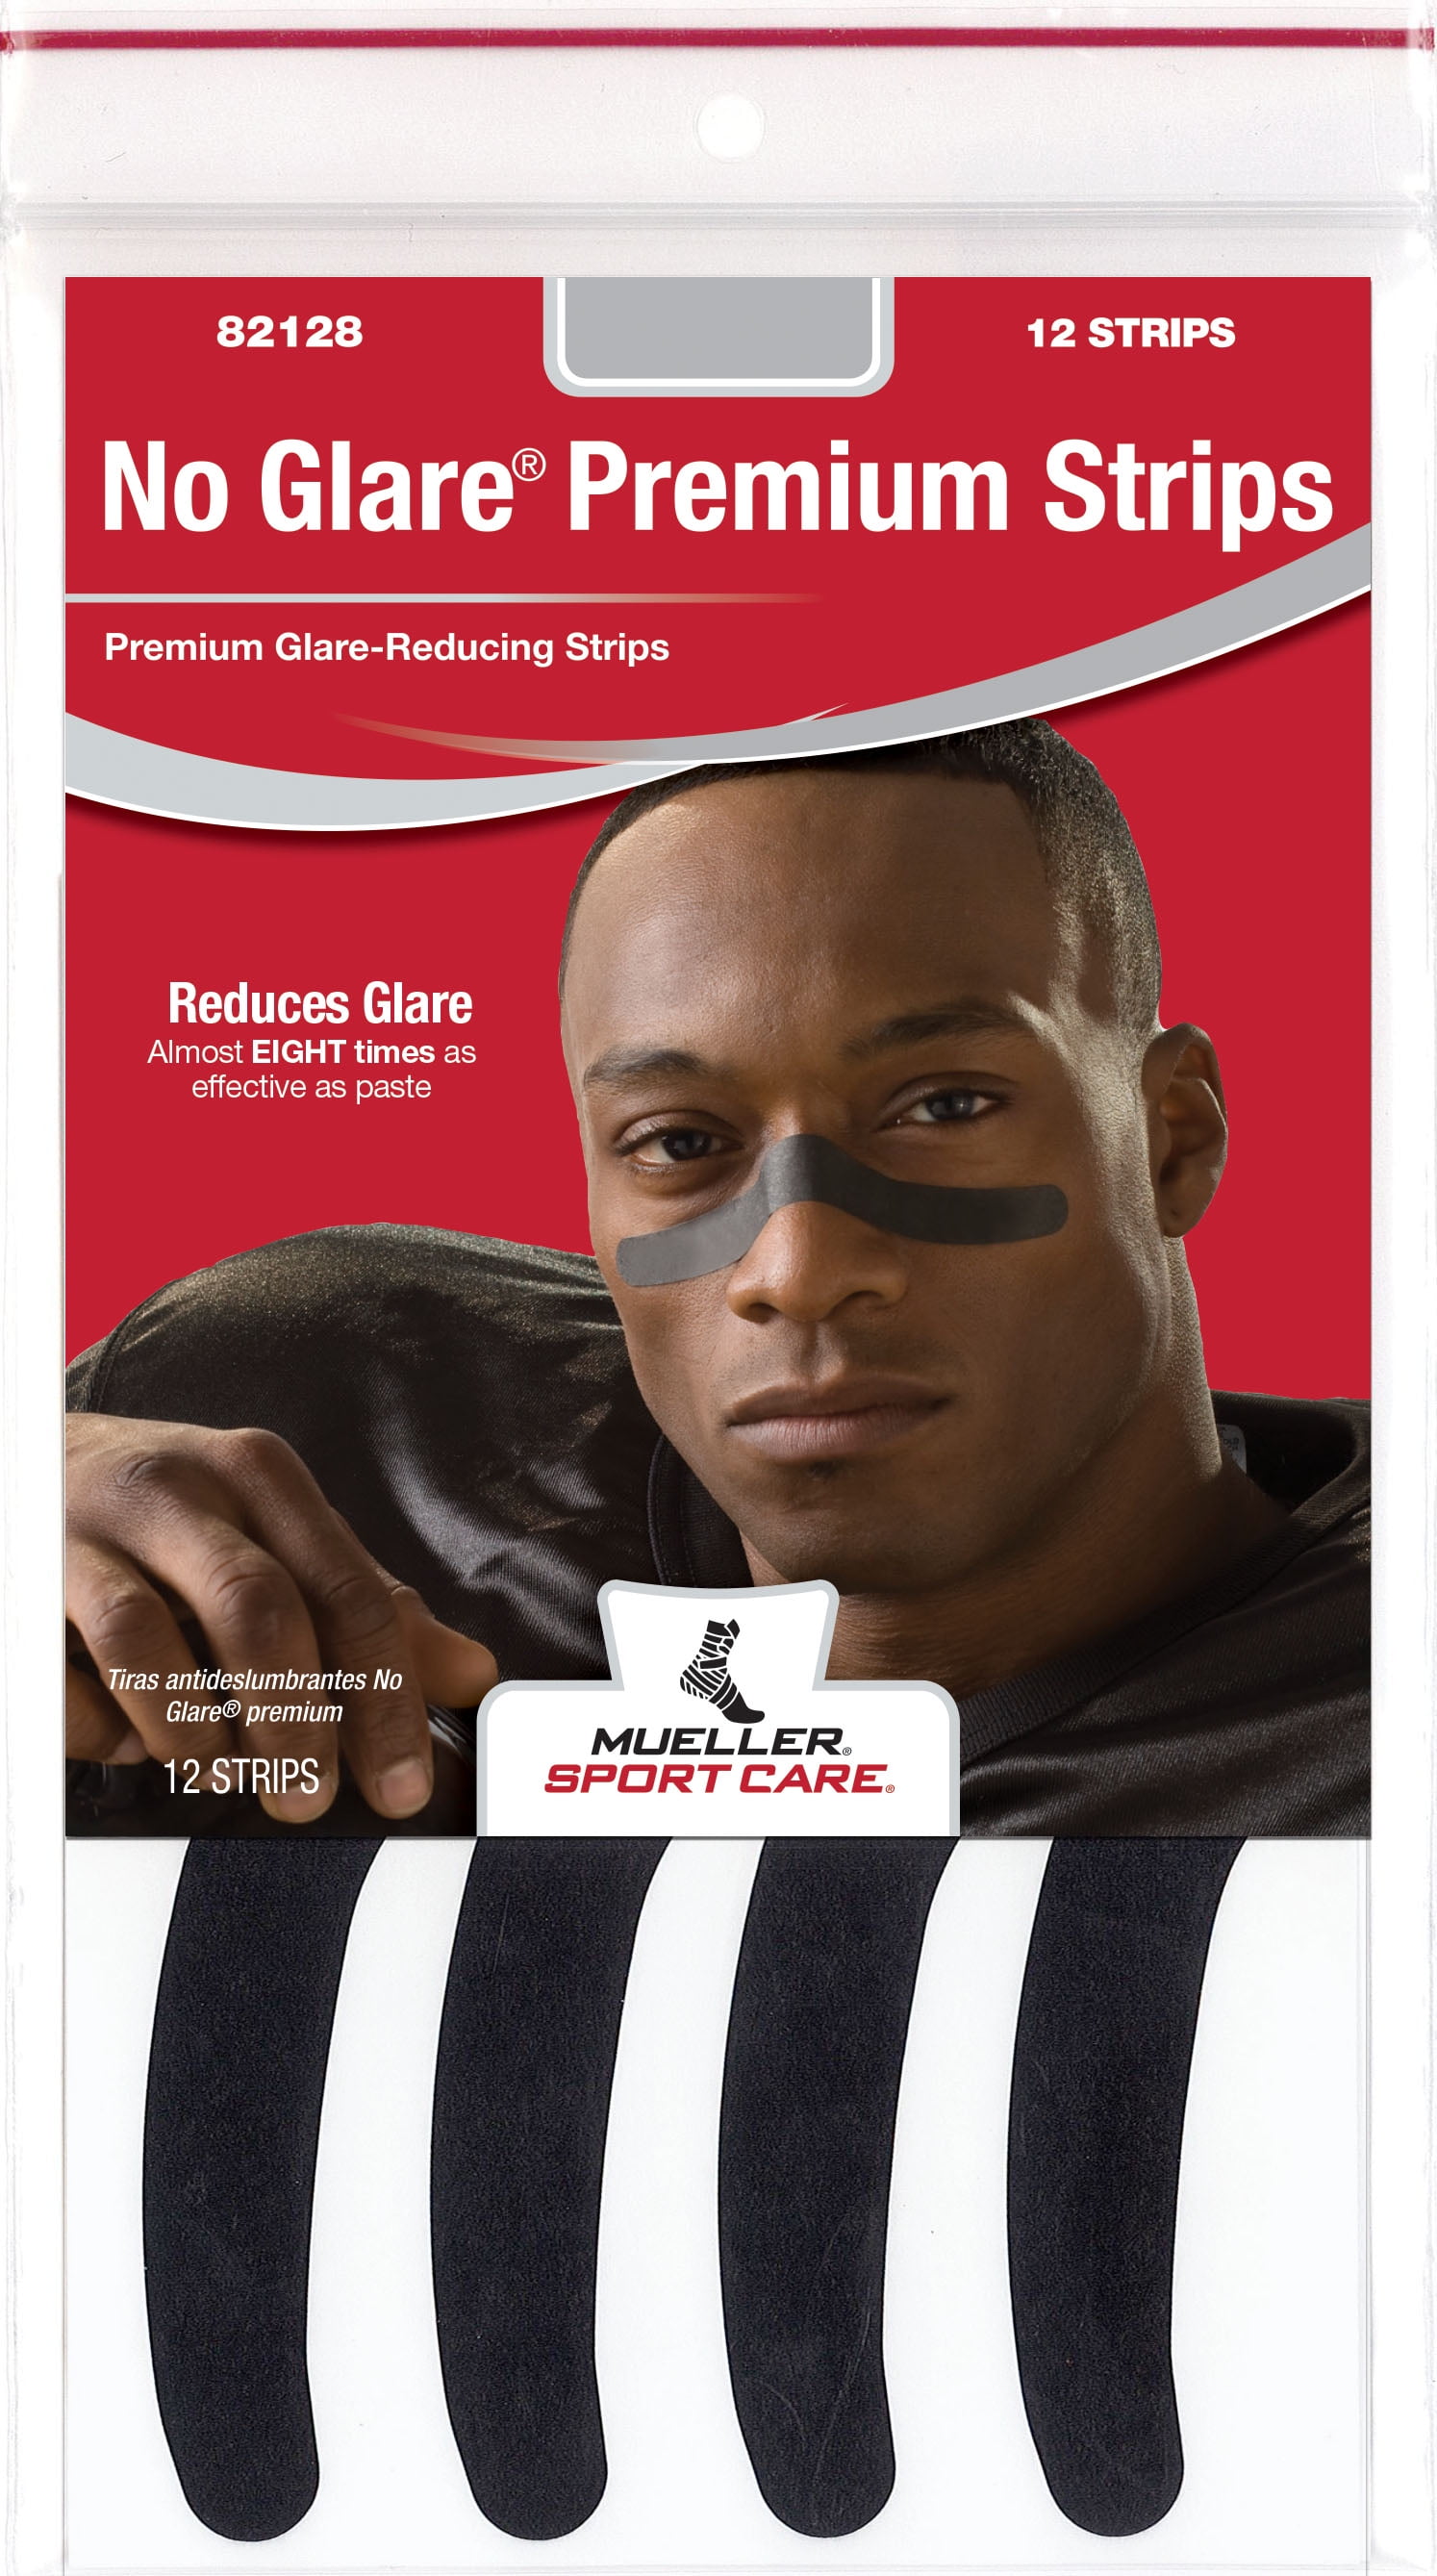
Mueller No Glare Stick | Lax Zone
{“id”:279989420055,”title”:”Mueller No Glare Stick”,”handle”:”mueller-no-glare-stick”,”description”:”\u003cp\u003eMueller no glare stick is a must for game day. The glare stick reduces glare from lights and the sun.\u003c\/p\u003e\n\u003cul\u003e\n\u003cli\u003eEasy to apply and remove\u003c\/li\u003e\n\u003cli\u003eReduces Glare\u003c\/li\u003e\n\u003c\/ul\u003e”,”published_at”:”2022-01-02T10:08:07″,”created_at”:”2017-10-31T15:25:21″,”vendor”:”Mueller”,”type”:”Eye Black”,”tags”:[“Color_Black”,”MAP_Product_No”,”Price_$1-$24.99″,”Product Type_Eye Black”],”price”:799,”price_min”:799,”price_max”:799,”price_varies”:false,”compare_at_price”:null,”compare_at_price_min”:0,”compare_at_price_max”:0,”compare_at_price_varies”:true,”all_variant_ids”:[2968425857047],”variants”:[{“id”:2968425857047,”product_id”:279989420055,”product_handle”:”mueller-no-glare-stick”,”title”:”.15 OZ”,”option1″:”. 15 OZ”,”option2″:null,”option3″:null,”sku”:”30881″,”requires_shipping”:true,”taxable”:true,”featured_image”:{“created_at”:”T”,”id”:1165327433751,”position”:1,”product_id”:279989420055,”src”:”\/\/cdn.shopify.com\/s\/files\/1\/2372\/6917\/products\/mueller-no-glare-stick-15-oz-eye-black-lax-zone_768.jpg?v=1511887070″,”updated_at”:”T”},”image_id”:1165327433751,”available”:false,”name”:”Mueller No Glare Stick – .15 OZ”,”options”:[“.15 OZ”],”price”:799,”weight”:0,”compare_at_price”:null,”inventory_quantity”:0,”inventory_management”:”shopify”,”inventory_policy”:”deny”,”inventory_in_cart”:0,”inventory_remaining”:0,”incoming”:false,”next_incoming_date”:null,”taxable”:true,”barcode”:”074676144139″}],”available”:false,”images”:[“\/\/cdn.shopify.com\/s\/files\/1\/2372\/6917\/products\/mueller-no-glare-stick-15-oz-eye-black-lax-zone_768.jpg?v=1511887070″],”featured_image”:”\/\/cdn.shopify.com\/s\/files\/1\/2372\/6917\/products\/mueller-no-glare-stick-15-oz-eye-black-lax-zone_768.jpg?v=1511887070″,”options”:[“Size”],”url”:”\/products\/mueller-no-glare-stick”}
- Home
- Mueller No Glare Stick
 shopify.com/s/files/1/2372/6917/products/mueller-no-glare-stick-15-oz-eye-black-lax-zone_768_800x.jpg?v=1511887070″ data-title=”Mueller No Glare Stick .15 Oz Eye Black”>
Related Products
Sold Out
36″ Tipped Sidewall String
From $1.25
Sold Out
ECD Hero Strings
$11.99
Sold Out
Hockey Lace Shooting String
$2.00
Tape
$3.99
NOCSAE Lacrosse Balls
From $2.99
Sold Out
36″ Tipped Topstring
$1.75
Sold Out
hero 2.0 blackstriker
$19.99
Sold Out
ECD Hero 3.0 Mesh Semi-Soft
$24.99
Sold Out
ECD Hero 2.0 Striker Mesh – Semi-Soft
$19.99
Leather Thong
$2.50
Sold Out
STX 1″ End Cap 2 Pack
$6.99
Lax Zone Straw Water Bottle
$6.99
4 ways to create spectacular highlights in portrait photography
It can be argued that the eyes are the most important part of a portrait. For the most part, it is the eyes that are the focus of the portrait, they immediately attract the viewer’s eye.
The photographer needs to be able to correctly focus on the eyes of the person depicted in the photograph. One of the main ways to do this is to use highlights, reflections of light sources in the eyes.
Why are highlights so important, how to use them and how to control them for artistic purposes?
What is glare?
Glare is the reflection of a light source, natural light or flash, on the shiny surface of the eye.
From a photographic perspective, the presence of flare in portraiture means that details in the subject’s eyes will be visible in the final images. If there is no detail in the eyes, it will be much more difficult for viewers to interact with the object. You’ve probably heard of the term “dead eyes” before. This is exactly what is meant.
Make sure you have highlights
Make sure highlights are a prominent feature in your subject’s eyes, this will help you create more memorable portraits. Canon 5D Mark III|Canon EF 50mm f / 2.5 Macro|50mm|1/125 sec|f/5|ISO 100
To create bright highlights in your portraits, it’s easiest to aim your main light directly at the subject’s eyes. Since this main light will be the brightest light, this will help to maximize the brightness of the highlights.
If you are using natural light or studio lighting with modeling light, you will be able to see the glare in your subject’s eyes before you even take the picture. All you have to do is turn the person so that the bright light is directed at them. If you are using a light source without a modeling light, be careful. Take a test shot to correct the subject’s pose if necessary.
Highlight placement
A good starting point is where the main light hits the top of the subject’s eye. This is a natural spot for highlights, leaving most of the eye unshaded. Canon 5D Mark III|Canon EF 50mm f / 2.5 Macro|50mm|1/60 sec|f/5.0|ISO 100
You can light the subject from above for more natural results. This method has several effects. The first of these is that it places highlights at the top of the subject’s eye, as if the person were outdoors and lit by the sun from above. In addition, the glare at the top of the eyes helps to better see the eye in the frame.
If you want to use several highlights, the position of the rest doesn’t really matter, it’s important to place the main highlight exactly at the top of the eye.
Large or small flare
The size of the flare will depend on the light source you choose and how far that light source is from the subject. If you are shooting in the middle of a clear day, the light source will be the unclouded sun, and the flare will look like a small ray of light in the eyes.
If you shoot on an overcast day, the whole sky becomes your light source. Often the highlights look massive, like a reflection of everything that appears above the horizon.
If you are in the studio and using a large softbox close to the subject, the flare will be huge and take up most of the eye.
This way you can control the size of highlights. Often photographers prefer highlights to be medium. Too small will be barely visible and not expressive, especially in close-ups. Highlights that are too big take up a lot of space and dominate one of the most important parts of your image.
But there are no rules here, use highlights of any size.
Bright or dim
Another aspect of flare in portraiture that is dictated by the size of the light source is the brightness of the flare. Highlights created by smaller lights, such as the sun or small studio modifiers, will appear brighter than those made by larger lights, such as overcast skies or large studio modifiers.
Large lights close to the subject will produce dimmer highlights. Smaller light sources will result in brighter highlights. You should keep this in mind0003
Again, how you use this is entirely up to you. In a close-up portrait, when the eyes take up a significant part of the frame, the brightness of the highlights does not matter much. However, in a three-quarter or full-length shot, where the eyes make up a much smaller part of the image, you may want to brighten the highlights to make the eyes stand out more.
Of course, you always have the option to lighten highlights in post, but making the right choice while shooting can save you a lot of computer time.
More ways to use lens flare in portrait photography
Besides simply placing lens flare in the subject’s eyes, there are other ways to use lens flare in portrait photography that can be quite fun and rewarding.
- Add more lights
Adding more lights that reflect in your subject’s eyes is one easy way to change the highlights in portraits. Canon 5D Mark III|Canon EF 16-35mm f / 4L IS USM|35mm|1/125 sec|f/5.6|ISO 100
Perhaps the easiest way to make the highlights in the eyes more interesting is to simply add a couple of extra lights. Any additional light that is in your subject’s field of view usually appears as a second flare in their eyes.
The two fill lights appear as two extra highlights.
But here you have to be careful not to overdo it. If your subject’s entire eye is filled with many large highlights, it will probably confuse the viewer.
- Use a reflector
A plain white reflector is a great way to add a second faint highlight that brightens up your subject’s eyes. Canon 5D Mark III|Canon EF 16-35mm f / 4L IS USM|35mm|1/125 sec|f/14|ISO 100
Adding a simple white reflector as a fill can help highlight your subject’s eyes with flare. This usually produces a subtle effect, but can result in brighter, more vibrant human eyes in your images.
Reflector effect
- Try different lighting schemes
Some lighting schemes, such as shell lighting, create really interesting highlights. Canon 5D Mark III|Canon EF 50mm f/2.5 Macro|50mm|1/100 sec|f/9|ISO 100
Using lighting schemes that require multiple light sources can also produce unusual highlights. Cross lighting and clamshell lighting create interesting effects. Both of these configurations require only two light sources.
Here you can see the effect shell lighting has on the subject’s eyes.
- Use new light sources.
Ring lamps and other new light sources create unique highlights. Canon 5D Mark III|Canon EF 50mm f/2.5 Macro|50mm|1/60 sec|f/8|ISO 1000
There are a number of interesting lighting options on the market that provide unique highlights. The most notable of these is the ring light. When using a ring lamp, you shoot through this ring and the flare appears in the subject’s eyes in the same ring shape.
Here you can see the distinct ring shape of the highlights created by the continuous ring light
But while many people really like the effect of new and unusual light sources, there are quite a few who are negative about their use. Focus here on your goals and on your customers.
Conclusion
Flare control helps the photographer get the most out of portraiture. Finding interesting highlights can lead you to a lot of interesting lighting configurations and settings.
what is it and how to reduce it?
The lens creates flare when light that is not related to the formed image enters the optical system and reaches the film or digital sensor. Often it appears in the form of a characteristic polygon, the number of sides of which depends on the shape of the diaphragm. Flare can significantly reduce the overall contrast of an image and are often unwanted blemishes, although some types of flare can even add to the artistry of a photo. Understanding the nature of highlights will help you make the best use of—or avoid—in your final image.
What it looks like
The shot above shows telltale signs of glare in the upper right, caused by the bright sun out of frame. They take the form of bright polygons (usually having 5-8 sides), in addition to bright banding and a general decrease in contrast (see below). The polygons can vary in size and are sometimes so large that they take up a significant portion of the image.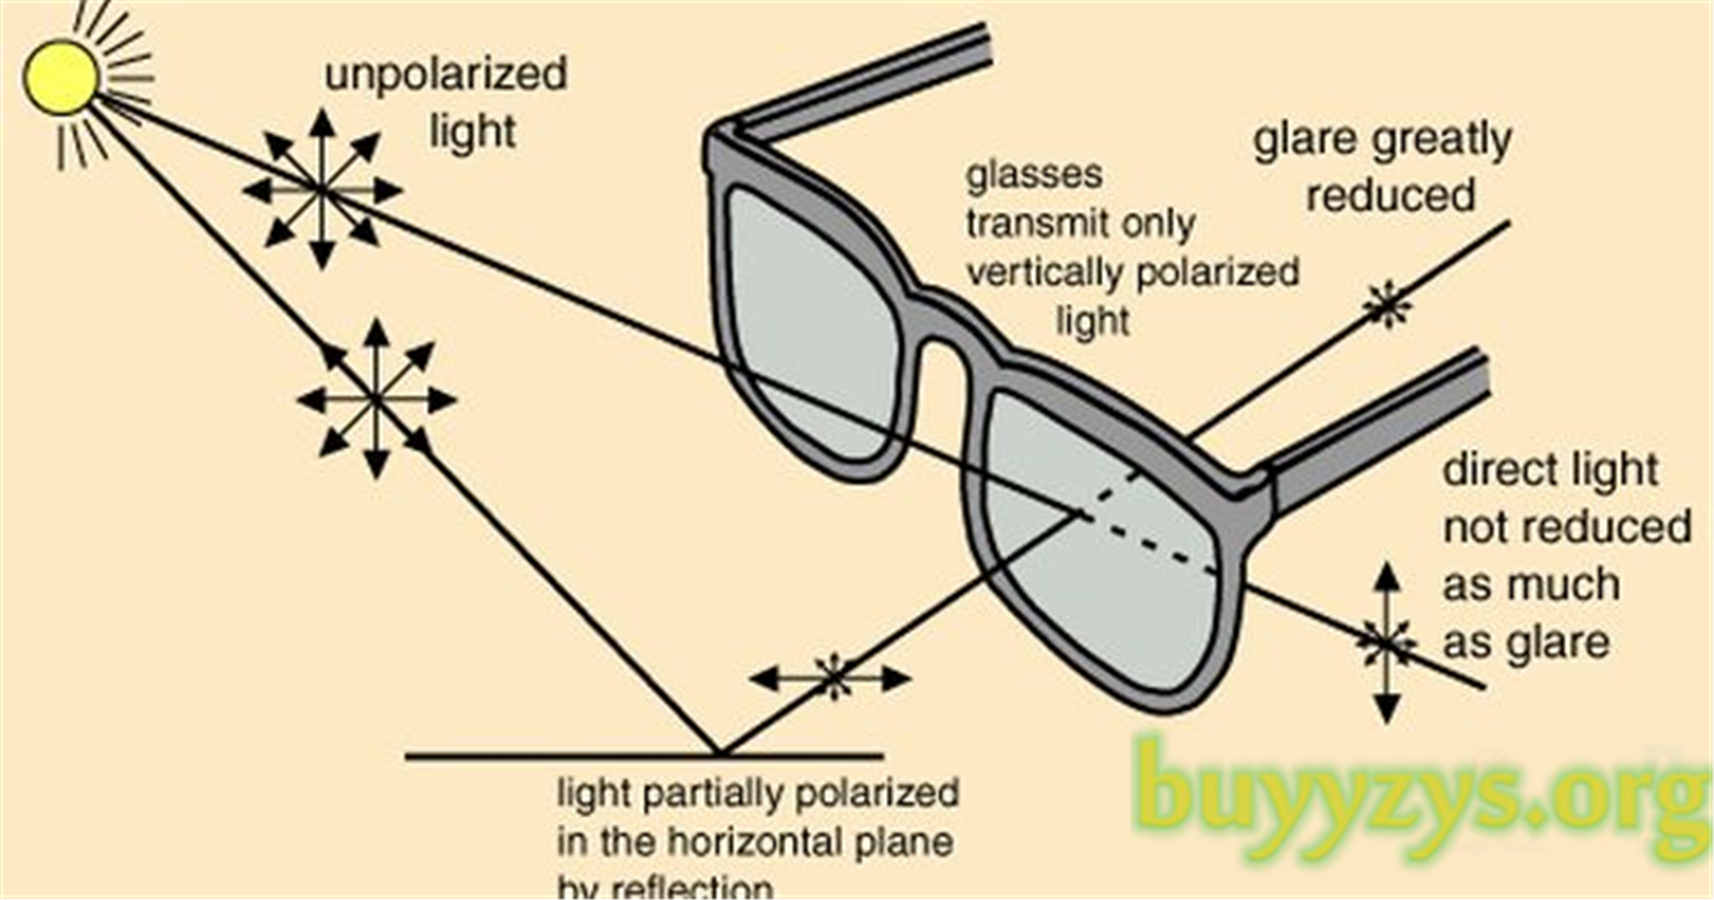 Glare is created by objects of high brightness, and the objects themselves may not enter the frame, and the glare from them can stretch over the entire image.
Flares can take many forms, including polygons, bright streaks, and a general blur (veil), as shown in the example above.
The Insight: How It Happens
Nearly all but the simplest lenses are made up of several “optical elements”. Glare generates light outside of the image, which instead of passing through the provided optical path is reflected from the optical elements inside an arbitrary number of times before reaching the film or digital sensor.
Note: as shown above, the iris is behind several optical elements.
Optics often feature various anti-reflective coatings to minimize flare, but no multi-lens lens can completely eliminate flare. Light sources will still reflect a small fraction of their light, and this reflected light will be visible as glare in areas where it is comparable in intensity to the light reflected from the image being captured. Polygon shaped flare is caused by light bouncing off the inner surfaces of the lens, as shown above.
Although flare is technically caused by internal reflections, high intensity light sources are often needed for it to appear. These sources can be the sun, artificial light, or even a full moon. Even if there are no intense light sources in the image itself, stray light can enter the lens if it reaches its front lens. Normally, light outside the angle of view does not affect the final image, but if this light is reflected, it can travel in an unintended path and hit the film/sensor. In the visual example with flowers, the sun was not in the frame, but caused serious flare nonetheless.
Reducing glare with lens hood
A good lens hood can virtually eliminate glare from stray light from outside the angle of view. The inside of a good lens hood is made of a completely absorbent material such as felt and has no folds. Although using a lens hood seems like a simple solution, in reality most lens hoods are not big enough to block out all the stray light. This is especially problematic when using 35mm lenses on “crop factor” DSLRs, as lens hoods are then made for a wider angle of view. In addition, lens hoods for zoom lenses can only block out all stray light at the smallest focal length.
petal hoods are often better protection than solid (round) hoods, because petal hoods take into account the aspect ratio of the film or digital camera sensor, which causes the horizontal and vertical viewing angles to differ.
If the hood is not enough, you can use some simple, but less convenient methods. A hand or piece of paper on the side of the lens on the flare side of the lens can simulate the effect of the corresponding lens hood. On the other hand, it is difficult to estimate at what point this pseudo-hood will accidentally enter the frame. A more expensive solution used by many pros is adjustable tubes . These are special hoods that are able to change their size to achieve an exact match to the angle of view at a given focal length.
Another solution when using lenses and 35mm lens hoods on a crop factor DSLR is to purchase an alternative lens hood. Find a lens hood designed for a lens with a narrower angle of view and matching mount. One common example of this approach is using the EW-83DII lens hood with a Canon 17-40 f/4L lens instead of the one supplied. The EW-83DII hood works in both 1.6 crop factor and (unexpectedly) 1.3 as it was designed for a 24mm lens on a 35mm full frame camera. Although it improves protection against stray light, however, at zooms, this is only true for the widest angle of view.
Despite all the above measures, there is no perfect solution. In reality, hoods cannot completely eliminate stray light, since an ideal hood would have to extend all the way to a distant object, strictly in terms of the angle of view.
Unfortunately, the bigger the hood, the better – at least in terms of blocking light. When doing this, you need to make sure that the lens hood does not block the light from the actual image.
Effect of lens type
Overall primes or prime lenses (fixed focal length) are less prone to flare than zooms or zoom lenses. In addition to the need for different lens hoods for different focal lengths, more complex zoom lenses are often required to have more optical elements. Thus, they have more internal surfaces from which light can be reflected.
Wide-angle lenses are often designed to be more resistant to glare from bright light sources, mainly because the manufacturer is aware that the sun has a good chance of being in or near the edge of the lens’ field of view.
Modern high-end lenses usually use the best anti-reflective coatings. Some older Leica and Hasselblad lenses don’t have any special coatings and can therefore flare quite a bit even in soft light.
Minimizing flare by composition
Flare is completely under the photographer’s control as it depends on where the lens is pointing and what is in the frame.
While photographers never like to sacrifice their artistic intent for technical reasons, there are certain compositional considerations that can be quite effective in minimizing flare. The best solutions are those that combine artistic intent with technical quality.
One effective technique is to position objects in the frame so that they partially or completely block out any glare light sources. The image on the right shows how a tree trunk partially obscured a street lamp during the long exposure. Even if the problematic light source is not in the frame, shooting from a position where it is blocked can also reduce flare.
The best solution is of course to leave the problematic light behind, although this is usually either too restrictive or impossible. Even a slight change in the direction of the lens can at least change the position and amount of flare.
Visualization of highlights in depth of field preview
The position and general appearance of highlights changes depending on the degree of aperture opening.
