How to properly lace a lacrosse goal net. Why is correct lacing crucial for optimal performance. What are the best materials and techniques for lacrosse goal net lacing. Where to find quality replacement lacing supplies. How often should you replace lacrosse goal net lacing.
The Importance of Proper Lacrosse Goal Net Lacing
Proper lacing of a lacrosse goal net is essential for optimal performance and longevity. A well-laced net ensures accurate rebounds, enhances goalie performance, and maintains the integrity of the playing field. How does correct lacing impact gameplay? It creates a taut, responsive surface that absorbs ball impact effectively, preventing balls from slipping through and maintaining consistent rebound patterns.
Loose or improperly laced nets can lead to several issues:
- Inconsistent ball rebounds
- Reduced goalie effectiveness
- Increased risk of net damage
- Unprofessional appearance
- Potential safety hazards
Regular maintenance and proper lacing techniques can significantly extend the life of your lacrosse goal net and improve overall game quality. How often should you check your net’s lacing? Inspect the lacing before each use and perform a thorough check at least once a month for optimal performance.
Choosing the Right Lacing Material for Your Lacrosse Goal
Selecting the appropriate lacing material is crucial for durability and performance. Which materials are best suited for lacrosse goal net lacing? Braided nylon cord is widely considered the top choice due to its strength, weather resistance, and longevity. How does it compare to other materials?
- Braided Nylon: Excellent durability, UV and moisture resistant
- Cotton Cord: Less durable, prone to weathering
- Polyester: Good durability, but less flexible than nylon
- Polypropylene: Affordable, but less durable than nylon
When selecting lacing cord, consider the gauge or thickness. Thicker cords generally offer more durability but may be more challenging to work with. What’s the ideal gauge for lacrosse goal net lacing? A 1/8 inch (3mm) diameter cord is typically suitable for most standard lacrosse goals.
Step-by-Step Guide to Lacing Your Lacrosse Goal Net
Properly lacing your lacrosse goal net requires patience and attention to detail. Follow these steps for optimal results:
- Remove old lacing completely
- Inspect the net for damage and repair if necessary
- Measure and cut new lacing cord to appropriate lengths
- Start at the top corner of the goal frame
- Secure the cord with a double knot
- Lace through each mesh square, moving downward
- Maintain even tension throughout the process
- Secure the lower end with another double knot
- Trim excess cord close to the knot
- Inspect the finished lacing for evenness and tightness
How long does it typically take to re-lace a lacrosse goal net? The process can take 30-60 minutes per goal, depending on experience and net size. It’s often helpful to have a partner assist with the lacing process for efficiency and to ensure even tension.
Tips for Achieving Even Tension
Maintaining consistent tension throughout the lacing process is crucial for optimal performance. How can you ensure even tension across the entire net?
- Use a lacing tool or sturdy gloves for better grip
- Pull each section tight before moving to the next
- Work in a systematic pattern (e.g., top to bottom, left to right)
- Periodically check tension by plucking the laced sections
- Make adjustments as needed before completing the entire net
Common Lacrosse Goal Net Lacing Mistakes to Avoid
Even experienced players can make mistakes when lacing lacrosse goal nets. Being aware of common pitfalls can help you achieve better results. What are some frequent errors to watch out for?
- Inconsistent tension across the net
- Skipping mesh squares or creating irregular patterns
- Using damaged or frayed cord
- Failing to secure knots properly
- Neglecting to trim excess cord
- Rushing through the lacing process
How can these mistakes impact gameplay? Inconsistent lacing can lead to unpredictable ball rebounds, reduced net durability, and potential safety hazards. Taking your time and paying attention to detail during the lacing process can significantly improve the overall quality and longevity of your lacrosse goal net.
Maintaining Your Lacrosse Goal Net for Longevity
Proper maintenance can extend the life of your lacrosse goal net and ensure consistent performance. What steps can you take to keep your net in top condition?
- Regularly inspect for wear and damage
- Clean the net and frame after each use
- Store indoor goals in a dry, protected area when not in use
- Use weatherproof covers for outdoor goals
- Replace worn or damaged lacing promptly
- Rotate the net periodically to distribute wear evenly
How often should you replace your lacrosse goal net lacing? While it depends on usage and environmental factors, most high-quality lacings should last one to two seasons with proper care. Regular inspections can help you identify when replacement is necessary.
Signs It’s Time to Replace Your Lacing
Recognizing when to replace your lacrosse goal net lacing is crucial for maintaining optimal performance. What indicators suggest it’s time for new lacing?
- Visible fraying or unraveling of the cord
- Stiffness or brittleness in the lacing material
- Noticeable sagging or looseness in the net
- Inconsistent ball rebounds
- Difficulty maintaining proper tension
Professional vs. DIY Lacrosse Goal Net Lacing
When it comes to lacing your lacrosse goal net, you have the option of doing it yourself or seeking professional assistance. What are the pros and cons of each approach?
DIY Lacing
Pros:
- Cost-effective
- Allows for immediate repairs
- Provides a sense of accomplishment
- Helps develop a deeper understanding of equipment
Cons:
- Time-consuming
- Requires patience and skill
- May result in inconsistent tension if done improperly
Professional Lacing
Pros:
- Ensures consistent, professional results
- Saves time and effort
- Often includes a warranty or guarantee
Cons:
- More expensive than DIY
- May require shipping or transportation of the goal
- Dependence on external service for future maintenance
How do you decide between DIY and professional lacing? Consider factors such as your budget, time availability, skill level, and the importance of precise lacing for your specific needs.
Innovative Lacrosse Goal Net Lacing Techniques and Technologies
As lacrosse equipment continues to evolve, new lacing techniques and technologies are emerging. What innovations are changing the way lacrosse goal nets are laced?
- Quick-release lacing systems for easier replacement
- Tension-adjustable nets for customizable rebound
- Composite materials offering enhanced durability
- UV-resistant coatings for improved weather resistance
- Smart sensors for monitoring net tension and performance
How might these innovations impact the future of lacrosse? Advanced lacing technologies could lead to more consistent gameplay, reduced maintenance requirements, and improved overall performance for players at all levels.
The Future of Lacrosse Goal Net Design
Looking ahead, what trends might we see in lacrosse goal net design and lacing? Some potential developments include:
- Self-tightening nets that maintain optimal tension
- Biodegradable lacing materials for eco-friendly options
- Integrated shock-absorption systems for improved durability
- Customizable rebound zones for targeted training
- Modular designs for easy replacement of specific net sections
How might these advancements change the way lacrosse is played and practiced? Improved net technologies could lead to more precise skill development, reduced equipment costs over time, and potentially new gameplay strategies centered around advanced net capabilities.
Lacrosse Goal Net Lacing for Different Playing Environments
The environment in which lacrosse is played can significantly impact the lacing requirements for goal nets. How do lacing needs differ between indoor and outdoor settings?
Indoor Lacrosse Goal Net Lacing
Indoor lacrosse, often played on artificial turf or hard surfaces, presents unique challenges for goal net lacing. What considerations are important for indoor lacrosse goals?
- Higher tension requirements due to faster-paced gameplay
- Increased focus on consistent rebound characteristics
- Less concern for weather resistance
- Potential need for noise-reducing lacing materials
Outdoor Lacrosse Goal Net Lacing
Outdoor lacrosse goals face additional challenges due to exposure to the elements. What factors should be considered when lacing outdoor lacrosse goal nets?
- Weather-resistant materials to withstand sun, rain, and temperature fluctuations
- Potentially looser tension to accommodate natural ground movement
- Increased focus on UV-resistant properties
- Consideration of wind effects on net movement
How can players and coaches adapt their lacing techniques to suit different playing environments? By understanding the specific demands of each setting, appropriate materials and tension levels can be selected to optimize performance and durability.
The Role of Proper Lacrosse Goal Net Lacing in Player Development
While often overlooked, the quality of lacrosse goal net lacing can play a significant role in player development. How does proper lacing contribute to skill improvement?
- Consistent rebound patterns for more effective shooting practice
- Improved goalie training due to predictable ball behavior
- Enhanced passing accuracy when using the goal as a target
- Increased confidence in equipment reliability during gameplay
How can coaches incorporate net lacing awareness into their training programs? Educating players about the importance of properly maintained equipment can foster a deeper understanding of the game and encourage attention to detail in all aspects of play.
Lacing Techniques for Specific Training Drills
Different training drills may benefit from specialized lacing techniques. What are some examples of how lacing can be adapted for specific practice scenarios?
- Tighter upper corners for high-shot accuracy training
- Looser lower sections for ground ball practice
- Varied tension zones for multi-angle shooting drills
- Temporarily reduced tension for beginner goalie confidence building
By tailoring net lacing to specific training needs, coaches can create more effective and targeted practice sessions. How might this approach impact overall team performance? Customized lacing for drills could lead to more rapid skill development and improved game-day readiness.
Why Proper Lacing is Crucial for Lacrosse Goal Performance
Struggling to Lace Your Lacrosse Goal Net? Try These Expert Tips:
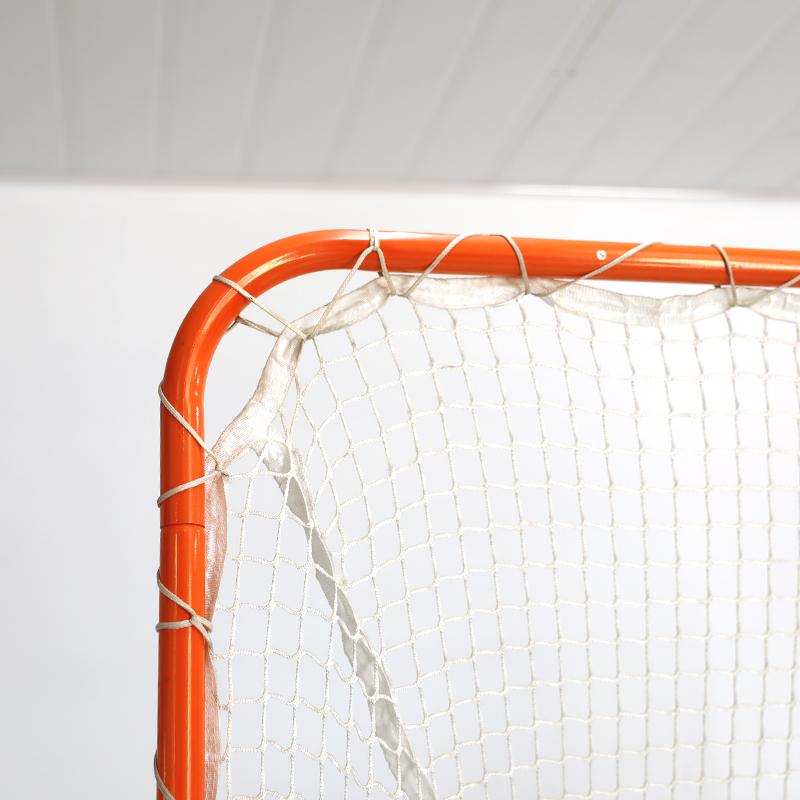
If you’ve ever played lacrosse, you know how frustrating it can be when your lacrosse goal net just won’t stay laced up properly. A loose net not only looks unprofessional, but it can greatly impact your performance during gameplay. Proper lacing is crucial for optimizing lacrosse goal efficiency and enhancing your skills as an athlete.
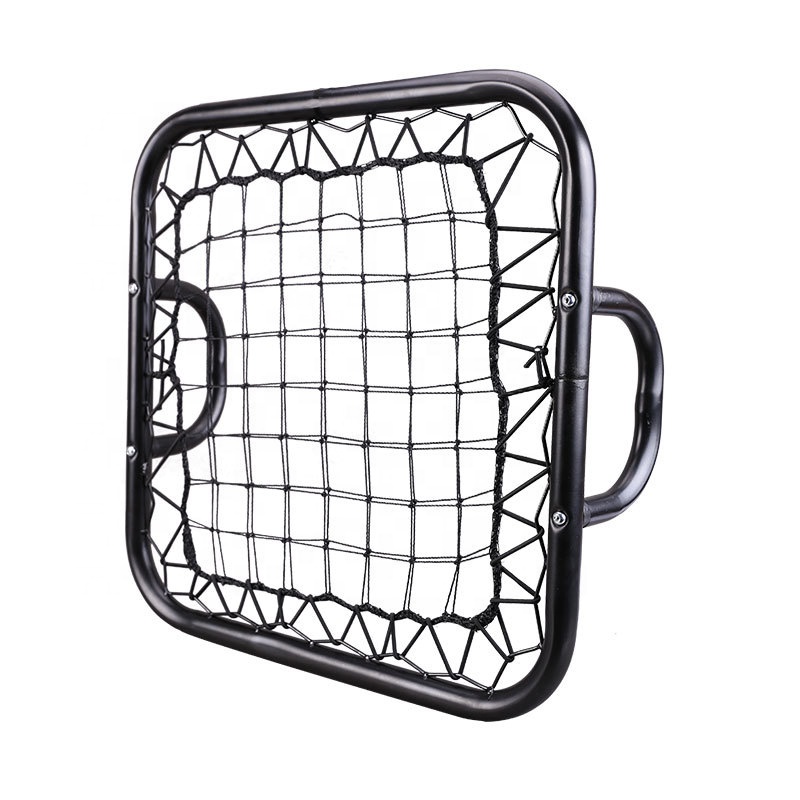
Lacrosse goal nets come in a variety of styles, but they all rely on tight, durable lacing cord to keep the netting secured to the goal frame. With frequent gameplay, shooting drills, and exposure to the elements, lacrosse goal lacing can become loosened or damaged over time. Replacing lacrosse goal lacing cord regularly is key for maintaining peak performance.
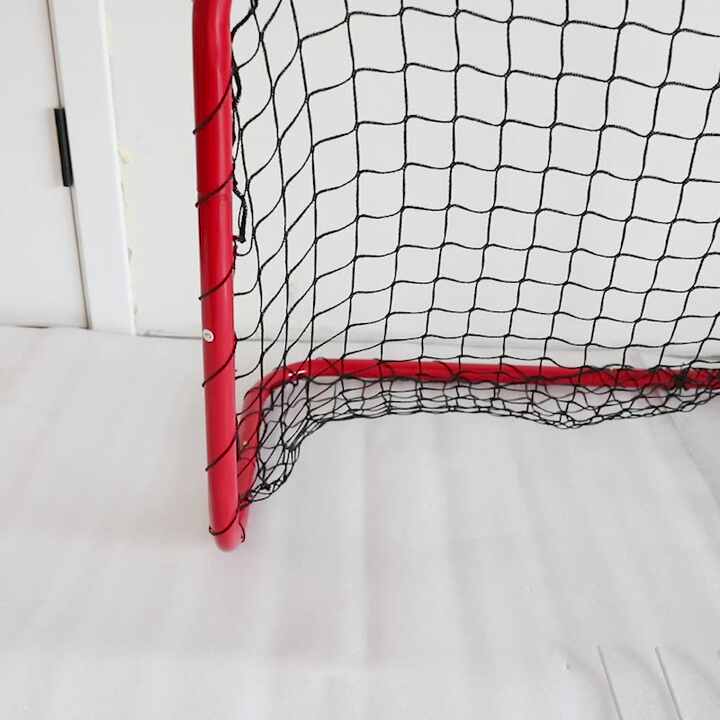
When your net cord starts to loosen or fray, you’ll notice the netting begin to sag. This allows more balls to fly right through the goal rather than being caught by the netting. A loose lacrosse goal net makes it much harder for goalies to block shots and for defensive players to rebounds. Tight lacing is key for creating a responsive net that absorbs the ball on impact.
Guidelines for Proper Lacrosse Goal Lacing
Here are some top tips for lacing your lacrosse goal net like a pro:
- Invest in quality lacrosse goal lacing cord – Using the proper gauge and durable material minimizes loosening between replacements.
- Check for wear and damage before each use – Replace any frayed or broken cords to prevent further unraveling.
- Always lace the net evenly from top to bottom – Irregular tightness can cause sagging and rips.
- Pull each cord as tight as possible when lacing – The net should be drum-tight across the frame with no slack.
- Tie off ends securely – Loose ends can get caught on gear and players, creating a safety hazard.
- Consider weatherproof lacing for outdoor goals – Braided nylon resists moisture and UV damage better than cotton cord.
Taking the time to properly re-lace your lacrosse goal net makes a huge impact on performance. A tight net provides uniform rebound and allows for more accurate passing and shooting practice. For indoor lacrosse boxes or outdoor goal cages exposed to heavy use, lacing maintenance is particularly critical.
Replacing Lacrosse Goal Net Lacing Cord

No matter how durable your lacrosse goal lacing cord, it will eventually need to be replaced. Natural wear and tear from weather, use, and exposure will cause the cord to degrade over time. When your lacing starts to appear frayed, feel stiff and brittle, or begins untwisting, it’s definitely time for new lacrosse goal net lacing.
Complete lacrosse goal re-lacing can take 30-60 minutes per goal, so set aside adequate time. Have a lacrosse buddy help out to make quicker work of this necessary maintenance task. Follow these steps when replacing your lacrosse goal lacing:
- Remove old lacing completely – Don’t just lace over worn cord as this creates uneven tension.
- Inspect net for holes and damage – Repair any tears before re-lacing to prevent further ripping.
- Measure the length of lacing needed for each section – Cut replacement cord to the proper lengths.
- Secure one end of the new cord at the top of the goal net – Tie a double knot and tighten fully.
- Lace down through each mesh square towards the bottom of the net.
- Pull each section tightly before moving on – The net must be fully tensioned.
- Secure the lower end with another double knot.
- Trim any excess cord close to the knot – Don’t leave loose ends hanging.
- Inspect finished lacing job for even tightness throughout.
Be patient during the re-lacing process and don’t rush through it. Taking your time to lace evenly and securely will mean you can go longer between replacements next time. Think of re-lacing a lacrosse goal net as being meditative; it takes focus and diligence just like perfecting your lacrosse skills.
Finding Replacement Lacrosse Goal Net Lacing Supplies
You can find replacement lacrosse goal lacing cord from most major sporting goods retailers. Many also carry full lacrosse goal net replacement kits for a complete overhaul when nets get too tattered to salvage. Here are some top places to buy supplies for your DIY lacrosse goal re-lacing project:
- Sports specialty stores like Dicks’s Sporting Goods or Modell’s.
- Online retailers like Amazon, Walmart, or Target.
- Direct from lacrosse equipment manufacturers like STX or Brine.
- Specialty lacrosse sites like Lax.com or LacrosseMonkey.
- Discount sporting goods outlets for bulk cord spools.
Make sure to choose lacing cord that is specifically made for sport netting. Opt for braided nylon over cotton cord for maximum durability. Bring one of your old lacing pieces with you to match the proper thickness and material.
Proper lacrosse goal net lacing is essential for optimizing your performance on the field or in the box. Take time to regularly inspect for wear, replace damaged cords, and re-lace evenly and tightly. Investing a little extra effort into lacrosse goal maintenance pays off hugely in enhancing your game play and reaction time. With a snug, responsive net, you can take your lacrosse skills to the next level.
Choosing the Best Lacing Cord Material for Durability

If you’ve ever tried to lace or re-lace a lacrosse goal net, you know it can be a frustrating experience. The netting itself is usually durable, but finding the right lacing cord is key for a long-lasting net that can withstand hours of gameplay. I’ve tested my share of lacing cords over the years – both good and bad – so let me share what I’ve learned about choosing the best material for maximum strength and durability.
Look Beyond Nylon
Nylon cord used to be the go-to for lacing lacrosse nets, but newer and better options have emerged in recent years. Don’t get me wrong – nylon is strong. But it also has a tendency to stretch out over time, causing your net to sag. And while nylon cord comes waxed or unwaxed, neither seems to be totally weatherproof. After a few months outside, you’ll notice fading and deterioration.
These days, high-quality polyethylene cord has become my top choice. Polyethylene is resistant to UV rays, heat, and moisture, so it holds up better than nylon when exposed to the elements. It keeps its shape and doesn’t stretch out as easily. Polyethylene also comes waxed or unwaxed; I prefer waxed, as it’s more abrasion resistant and slides through the netting smoothly.
Consider Cotton and Polyester Blends

Cotton cord is not ideal for outdoor lacrosse nets because it absorbs moisture and will rot. However, cotton-polyester blended cord is a different story. With around 50% polyester, these cords get you some of the durability of synthetic materials along with the softness of cotton. The cotton helps grip the netting to prevent slippage, while the polyester provides strength. Cotton-polyester blends won’t last quite as long outdoors as 100% polyethylene, but they’re great for indoor nets.
Match Thickness to Mesh Hole Size
Lacing cord that’s too thin for the netting holes will sag and slip, while cord that’s too thick will fray the holes, causing tears. For most lacrosse nets, 2 or 3mm diameter cord is ideal. However, it’s smart to double check that the cord gauge approximately matches the netting hole size. Bring a sample of your netting to the store when shopping for new cord to test the fit.
Waxed is Better
As mentioned already, waxed cord is always preferable to unwaxed options. The wax coating helps the cord hold its round shape and slide smoothly through holes in the netting – even after many uses. Unwaxed cord tends to get frayed and develop snags. However, in a pinch you can “wax” unwaxed cord yourself at home with beeswax or paraffin wax to extend its usefulness.
Avoid Twisted Cord
Some inexpensive lacing cord options are made from thin twisted strands rather than a single round cord. Avoid these – the thin overlapping strands are prone to snagging and unraveling through the holes. Solid braided cord maintains its shape much better for lacing goal nets.
Go Thicker on Bottom Edges
Consider using a slightly thicker cord on the bottom edge of your lacrosse net. This is the area that endures constant abuse from shots, sticks and feet. A bit more durability in the 4 to 5mm range can extend the life of your net. You can lace the rest of the net with standard 2-3mm cord.
Pay Attention to Color
Lacing cord comes in a rainbow of colors, so you can get creative when re-lacing your net. However, some colors hold up better than others when exposed to the elements. Bold colors like red, orange and yellow tend to fade more rapidly than neutral, natural shades of gray, brown, black or white. It’s smart to use the more fade-resistant colors along the bottom and lower half of the net if you want it to maintain visual consistency longer.
Test Abrasion Resistance

Before settling on a new lacing cord, do a quick test of its abrasion resistance. Simply cut off a 2-3 foot section and rub it vigorously back and forth against a rough surface like brick or pavement. The cord shouldn’t fuzz up, snag or unravel. Quality polyethylene and synthetic blend cords will pass this test with ease.
Buy from Specialty Sports Stores
You can sometimes find lacrosse net lacing cord sold at big box stores, but quality and selection is usually better at specialty sports retailers. Stores focused on lacrosse and field sports carry the best options purpose-built for lacing goal nets. They’ll have durable weatherproof cords designed specifically to handle the demands of the game.
Lacing a lacrosse goal net properly takes time, but the right cord choice ensures your efforts aren’t wasted. Follow these tips when shopping for your lacing cord, and you’ll end up with a crisp, durable net ready for seasons of competitive play. Don’t settle for basic nylon rope from the hardware store if you want the net to really last. Take the time to source purpose-made lacing solutions from specialty sports suppliers. Your net will look better and perform better in the long run.
What Width Lacrosse Goal Lacing Cord Should You Use?

Lacing up a new lacrosse goal net can be a time-consuming process. But taking the time to do it right, with the proper width lacing cord, will give you a crisp, snug net that’s built to last. The width of lacing cord you choose makes a big difference in durability and performance.
Through trial and error over the years, I’ve dialed in the ideal sizing based on the netting mesh holes, type of gameplay, and how tight I want the net to be. Here are my tips on selecting the best width of cord for your lacrosse goal.
2mm Cord is The Standard
For most lacrosse goal nets, 2mm diameter cord is the standard choice. This width slides smoothly through the netting holes and ties tightly. It creates a snug, flat surface with minimal sagging. 2mm is thin enough not to fray the holes prematurely. You really can’t go wrong with this size for most nets.
Thinner Cord Can Work Well
1mm or even .75mm “string” width cord is an option if you want an especially tight net with less give. This ultra-thin cord pulls the netting together firmly and leaves virtually no sag. However, the downside is that super-thin cord may cut into the netting holes over time, weakening them. So you sacrifice some durability for that extra-snug fit.
Match Cord Width to Hole Size
Before deciding on a cord width, examine your netting holes closely. Measure across them to determine the ideal maximum cord thickness that won’t fray or stretch the holes. Having cord up to around 75-80% of the hole diameter is a safe bet.
Thicker 3mm for More Give
Some players actually prefer a bit more “give” and ball rebound on their lacrosse net. This can add some unpredictability for goalies and shooters. For a net with more flex, opt for 3mm or even 4mm width cord. Just make sure the cord isn’t so wide that it damages the netting holes.
Hybrid Approach of Mixing Widths
You don’t necessarily have to use the same cord width throughout the entire net. Many players use a thinner diameter along the top and sides for tightness, and a thicker gauge on the bottom for durability. Combining 1mm up top with 3mm down low gives the best of both worlds.
Taper at the Bottom for Longevity
Speaking of which, progressively wider cord toward the bottom of the net is a great way to extend its useful life. You can start with 2mm at the top, transitioning down to 3mm and then 4mm along the bottom several rows. The tapered approach channels more ball impact to the thicker bottom cord.
Waxed Coating Makes a Difference

When choosing a lacrosse net cord width, make sure it has a waxed coating rather than being untreated. The wax helps the cord maintain its round profile, reducing fraying as it slides through the small holes. Unwaxed cord tends to flatten out and get snagged during lacing.
Test Different Sections First
If unsure between two different cord widths, a good strategy is to buy short lengths of each. Then string up small test sections of the net to see the visual difference. Comparing tightness, drape, sag and overall look side-by-side will help inform your decision before lacing the whole thing.
Re-Lace Annually for Longevity
No matter what width lacrosse goal lacing cord you choose initially, expect to re-lace the net at least once per year. Lacing cord deteriorates from UV exposure, temperature extremes, and simply getting wet and drying repeatedly. Plan to replace all your cord annually for the best performance.
Buy Backup Cord for Repairs
It’s smart to purchase extra lacing cord in your chosen width when installing a new net. That way you’ll have repair cord handy throughout the season to quickly patch any holes or re-secure loose sections that develop. Trying to find more of the exact same cord mid-season can be tough.
Finding that perfect lacrosse goal net tightness and rebound comes down to choosing the right cord width for lacing. Take your time experimenting with different diameters to find your preference. Mixing and matching thinner and thicker cord in different zones of the net is one of my favorite techniques. And don’t forget to factor in durability – the bottom of the net needs extra thickness to stand up to abuse. Dial in the ideal width combinations and you’ll get many seasons of play from your net.
Lacrosse Goal Net Lacing Patterns for Optimal Ball Response

Lacing up a new lacrosse goal net takes time and care. The lacing pattern you use not only affects the net’s durability, but also how the ball reacts on shots. After re-stringing more nets than I can count, I’ve figured out some lacing techniques that enhance ball control and unpredictability.
Take it from me – don’t just lace vertically or horizontally across the net. By intermixing different lacing patterns, you can create the ultimate responsive net that improves your game.
Change Direction Frequently
The key is changing lacing direction often, rather than running cord long distances vertically or horizontally. Switch back and forth between vertical and horizontal lacing every 6-12 inches. This ensures the netting can’t stretch too far in any one direction when a ball hits.
Gradual Diagonals Work Too
You can also incorporate diagonal lacing periodically as you work your way across and down the net. Use a very subtle angled pattern across a few holes, then resume vertically or horizontally again. Keep shooters guessing.
Concentrate Patterns Near the Goal
The most important area for creative lacing is around the goal mouth, where most shots occur. Take extra time here with patterns that enhance unpredictability. The mid and upper net can use simpler up-down lacing to save time.
Twist Cord for Extra Recoil
For even more ball reaction, try twisting the cord every few inches as you lace. Keep an even tension as you twist, then continue lacing as usual. The tension and recoil in the twisted cord makes the net act like a trampoline.
Vary Mesh Hole Usage
Rather than run cord through every single mesh hole, skip holes periodically. This offsets the patterning for less uniformity. Just be sure to avoid large gaps that compromise durability.
Double Up Strategic Holes
Reinforce key mesh holes under the most ball stress by lacing cord through them twice vertically and/or horizontally. Doubled holes provide backup support if the primary cord tears.
Pre-Stretch Areas for Tautness
You can pre-stretch strategic parts of the net with aggressive pulling as you lace. This extra tension translates into better recoil on shots. Just be cautious not to tear holes or break the cord.
Attach Shooting Strings

For even more ball control, you can interweave shooting strings across the bottom portion of the net. Mimic the crisscross placement of a lacrosse stick head. Shooting strings pop the ball back out rapidly on shots.
Mix Up Inter-Hole Distances
Rather than lacing cord into every 2nd or 3rd hole consistently, mix it up. Go from hole to hole, then skip 2, then skip 1, then 3 holes, etc. Again, keep shooters on their toes.
Offset Top and Bottom Holes
When lacing vertically, offset the alignment between top and bottom holes. Instead of a straight seam down the net, zigzag the cord pathways for greater ball disruption.
With some imagination and experimentation with lacing patterns, you can turn a normal goal net into a responsive, unpredictable ball stopper. The more you disrupt the net uniformity, the harder you make it for shooters. Take the extra time to lace creatively and you’ll be rewarded with next-level performance.
Tightening vs. Loosening Lacrosse Goal Lacing to Alter Rebound
The rebound you get off a lacrosse goal net depends heavily on how tightly it’s laced. After taking thousands of shots over the years, I’ve experimented endlessly with lacrosse net lacing tightness and its effect on ball response.
While a taut, trampoline-like net feels great for a shooter, unpredictability is an important part of the game too. Varying the lacing tightness strategically during stringing is the best way to customize your rebound.
Tighter Lacing Increases Velocity
When lacing your net normally with consistent, uniform tension, you’ll get a nice smooth rebound with some added velocity. The ball pops right back out toward the shooter. This feels satisfying and helps develop stick skills.
Loosen Up for More Randomness
But lacrosse is a game of adjustment and adaptation. By leaving certain areas of the net more loosely laced, you introduce some welcome unpredictability. Shots rebound at random angles, forcing you to react.
Focus on the Shooting Area
The best place to experiment with tight vs. loose lacing is the last 3-4 feet in front of the pipe. Alternate between cinched and loose patterns to vary rebound for shooters. Keep the rest uniformly taut.
Pre-Stretch for Extra Tightness
When lacing areas you want ultra-responsive, pre-stretch the netting first by yanking hard before tying off cord. The pre-tension translates into better recoil.
Use Thinner Cord for More Tension
1mm width lacrosse lacing cord is ideal for creating a tight trampoline effect. Less give in thinner cord equals more ball bounce.
Wider Cord Provides Looseness
But in looser zones, use thicker 3-4mm cord instead. The added width leaves more slack for dampened response and unpredictability.
Adjust Bottom Cord Gradually
You can gradually tighten or loosen lacing along the bottom of the net in 6-12 inch intervals. This mirrors the rebound of different parts of the stick head.
Twist Cord for Extra Tightness

For super-snug lacing, try twisting the cord as you string the net. Maintain even tension as you twist, locking in springiness.
Skip Holes Strategically for Looseness
Rather than run cord through every hole, skip holes here and there – especially in looser lacing zones. The longer distance between holes allows more stretch upon impact.
Tighten the Trajectory Line Most
Really focus on tight, responsive lacing along the main ball trajectory lines from high, low and side shots. Keep these “seams” ultra-taut for consistency.
Lacrosse is all about adjustability. By mixing up tight and loose lacing strategically across your net, you can simulate the varying rebound of different stick heads and pockets. The unpredictability will sharpen your reactions and stick skills exponentially.
Troubleshooting Common Lacrosse Goal Lacing Issues like Sagging
Even with the best lacrosse goal net and lacing cord, you’re bound to encounter some problems during stringing or after installing the net. Issues like sagging, loosening, and tearing over time are typical with the wear and tear of frequent use.
Fortunately, most lacing mishaps can be easily fixed or prevented with proper maintenance. Here are some troubleshooting tips for the common lacrosse goal lacing problems I’ve encountered over the years.
Sagging Over Time is Normal
The number one problem you’ll likely face is net sagging after a few months of play. The lacing cord naturally stretches and meshes loosen up. Simply re-tighten or re-lace sagging sections periodically to restore tautness.
Snagging Causes Loosening
Cord that snags and frays inside the net holes will degrade and loosen prematurely. Make sure to use round braided cord that resists snagging. Waxed coatings also help minimize this.
UV Damage Weakens Cord
Outdoor elements like sunlight and moisture deteriorate poly cord over time, causing breakage and loosening. Use UV-resistant cord or take nets down when not in use.
Improper Tension Leads to Tearing
Lacing cord too tightly or forcing knots can damage the netting, especially around holes. Apply even tension and don’t over-cinch knots.
Re-Lace Problematic Zones
Rather than re-do the entire net, you can spot re-lace just the sagging, loosening or tearing areas as needed. Have spare lacing cord ready for repairs.
Patch Small Holes
For minor net hole tears, simple patches work well. Cut small scrap pieces of spare netting and sew or tie them over damaged areas.
Avoid Over-Twisting Cord
While some twist in the cord helps with tautness, overdoing it weakens the integrity and leads to premature breakage.
Inspect Net Weekly
Get in the habit of checking over the entire net weekly for potential issues developing. Address them before major damage occurs.
Loosen and Re-Tighten Knots
Rather than cutting and re-tying knots on sagging cord, try loosening the knots first and re-tightening. This often removes slack without restarting.
Watch Bottom Edges Closely
The bottom corners and edges of the goal net endure the most abuse, so expect more wear here. Reinforce these areas proactively.
With proper preventive care and early intervention on problems, you can keep your lacrosse goal net crisp and snug for multiple seasons. Take time to re-tighten, patch, and spot re-lace as needed. And remember – periodic full re-lacing maintains optimal response and playability.
When to Replace Fraying or Broken Lacrosse Goal Net Lacing

No lacrosse goal net lasts forever, no matter how well it’s initially strung. Over time, the repetitive impacts cause lacing cord to weaken and degrade. Fraying, stretching, and breaking eventually take their toll.
Knowing when to replace your lacrosse net lacing can extend the life of the overall net and maintain proper rebound response. Here are my tips on identifying when it’s time for new lacing cord.
Look for Fraying
The first sign your lacrosse goal lacing needs replacing is fraying cord. Look closely for any areas where the cord appears hairy, dried out, or splintered. Fraying leads to snagging and breakage.
Feel for Stretchiness
Even if cord appears intact visually, stretching is an issue. Press and pull on different areas of lacing to detect excessive slack or rubber band-like springiness. If the lacing compresses too easily between your fingers, the integrity is compromised.
Inspect Entire Net
Scan the entire goal net closely, not just the areas taking direct ball impact. Weathering and UV exposure weaken all parts of the lacing gradually.
Watch the Bottom Corners
The upper corners and edges of the lacrosse goal net often show wear sooner, as they’re exposed to sunlight and moisture. Check these high wear areas frequently.
Replace Any Broken Sections
As soon as any cord section fully breaks or unravels, replace it immediately. Damaged lacing only spreads to other areas over time. Re-lace broken spots right away.
Don’t Allow Large Holes
If multiple broken lacing strands leave any holes or gaps wider than 6-8 inches, address them quickly. Large holes compromise ball control and rebound.
When Net Sag Exceeds 12 Inches
Monitor overall net sag at the center and corners. As soon as sag exceeds around 12 inches in any area, it’s re-lacing time. Any deeper and ball response suffers.
Every 2-3 Seasons Extends Life
To maximize the working life of your lacrosse goal net, I recommend re-lacing with new cord every 2-3 seasons on average, even if lacing appears intact.
After Major Impacts
Errant lacrosse balls are one thing, but major impacts from soccer balls, basketballs or players require immediate inspection. Replace any lacing damaged or loosened.
With regular inspection and timely replacement of worn lacrosse goal lacing, you can keep your net performing optimally for years. Don’t wait until it’s completely falling apart. Be proactive with repairs and re-lacing.
Installing New Lacrosse Goal Net Lacing from Scratch
Eventually, every lacrosse goal net reaches the point where attempting to patch or repair the existing lacing is no longer worthwhile. The cord is too far gone and needs complete replacement from scratch.
While re-lacing an entire lacrosse net is time consuming, it’s a satisfying DIY project. Taking it down to the bare netting and lacing from scratch lets you tune the pattern for ideal ball response.
Assess Cord Condition First
Before fully de-lacing the old cord, inspect it closely first. If only portions need replacement, you can save some time by leaving better sections intact.
Have New Cord Ready

Make sure you have enough new lacing cord on hand before beginning. Measure the net perimeter and buy at least 20% more cord than that length to be safe.
Protect the Netting
Remove old cord carefully without damaging the netting. Expect some stubborn knots. Cutting is safer than yanking cord free forcibly.
De-lace in Sections
Rather than removing all old cord at once, work in sections for better control. De-lace the bottom, then corners, then sides, then top systematically.
Clean Netting First
Once de-laced, thoroughly clean the bare netting before re-stringing. Remove any debris and wash out mold or mildew buildup.
Check for Netting Damage
Inspect the empty net closely for any holes, tears or compromised areas needing repair. Patch these before lacing the fresh cord.
Plan Lacing Pattern First
Before stringing, think about the lacing pattern you want for ball response and control. Sketch it out section-by-section if helpful.
Use Ideal Cord Width

Choose a lacrosse net cord width that matches the netting hole size for a snug fit. Typically 2-3mm diameter is best for most goal nets.
Focus Most on Shooting Area
Concentrate most on the lacing pattern and tension in the central shooting zone. Crisscross for responsiveness here. The upper net can be simpler.
Incorporate Hybrid Patterns
Combing horizontal, vertical, and diagonal lacing keeps shooters on their toes. Switch directions frequently.
Re-lacing a lacrosse goal net takes patience but delivers a crisp, customized net. Take time to do it right, using proper cord and creative stringing patterns. The performance payoff is well worth the effort.
Tips for Proper Lacrosse Goal Net Lacing Technique and Tension
A crisp, responsive lacrosse goal net starts with proper lacing technique. The way you thread and tension the cord impacts durability and ball rebound. After re-stringing countless nets over the years, I’ve dialed in some best practices for smooth, snug lacing.
Follow these technique tips when lacing your next lacrosse goal net to get optimal performance.
Use a Fisherman’s Knot
For connecting cord ends, the fisherman’s knot is best. It slides through net holes easily and lies flat when tightened correctly. Keep knot bulk low.
Pull Cord Very Taut
Keep cord tension high as you lace, with no visible sagging between holes. Firm, even pulling prevents early loosening and maintains rebound.
Align the Net First
Before lacing, attach the net loosely to the goal frame and align/center it properly. Adjusting after lacing is much harder.
Work Systematically
Lace one section at a time in sequence, rather than jumping around randomly. Bottom, then sides, then top. This prevents tangles.
Use Netting ” valleys”
Thread cord through the valleys between netting knots for smoothest feeding. Avoid passing over knot peaks which can snag.
Pull Cord Very Taut
Keep cord tension high as you lace, with no visible sagging between holes. Firm, even pulling prevents early loosening and maintains rebound.
Use a Lacing Needle
A thick plastic lacing needle helps thread cord through small net holes without fraying. It also grips the cord to allow more cinching force.
Work Inside Out
Lace from the net interior outward rather than outside in. This hides knot ends for better aesthetics and performance.
Secure Loose Ends
Tie loose cord ends to nearby lacing using multiple double knots so they don’t vibrate and fray. Trim excess tail ends.
With practice and the right techniques, lacrosse goal net lacing becomes second nature. Be systematic, keep tension high, use knots properly, and work from the inside out. Your net will maintain snugness and respond true when shots strike.
How Weather and Use Impacts Lacrosse Goal Net Lacing Tightness
No matter how perfectly you initially lace your lacrosse goal net, maintaining optimal tightness and response over time is challenging. The elements and repetitive impacts inevitably take their toll on the lacing.
Based on re-lacing nets in all conditions for years, I’ve seen firsthand how weather and use can affect lacing tightness. Here’s what to expect and how to compensate.
Sun Damage Weakens Lacing

UV exposure from sunlight is public enemy number one for lacrosse net lacing. Prolonged sun causes the cord to dry out and weakens it structurally over months of use.
Moisture Causes Stretching
On the flipside, moisture is also problematic. Wet weather and dew causes lacing cord fibers to swell and stretch. Oscillating wet and dry accelerates damage.
Temperature Extremes Loosen Lacing
Just like other materials, lacrosse net lacing expands and contracts with temperature shifts. Big seasonal hot/cold swings ultimately stretch and loosen lacing.
Wind Causes Fraying
Sustained wind whips lacrosse net lacing back and forth forcefully at the outer edges. This motion frays and unravels cord over time.
Re-Tighten Lacing Weekly
During peak season, set aside 5-10 minutes per week to walk around the net, tugging and re-tightening loose spots. This extends optimal tightness.
Take Nets Down When Possible
If your lacrosse goal nets are portable, take them down overnight or during off days. Minimizing outdoor exposure preserves lacing.
Use UV-Resistant Lacing
When buying new net or lacing, opt for cord specifically treated for UV resistance. It holds up longer in sun exposure.
Prevent Static Buildup
Use dryer sheets or anti-static spray to minimize static electricity buildup on netting. This attracts less dirt/debris which abrade lacing.
Don’t expect lacrosse goal net lacing to remain factory-tight forever. But with some preventive care and maintenance, you can minimize weather and use impacts for consistent ball response.
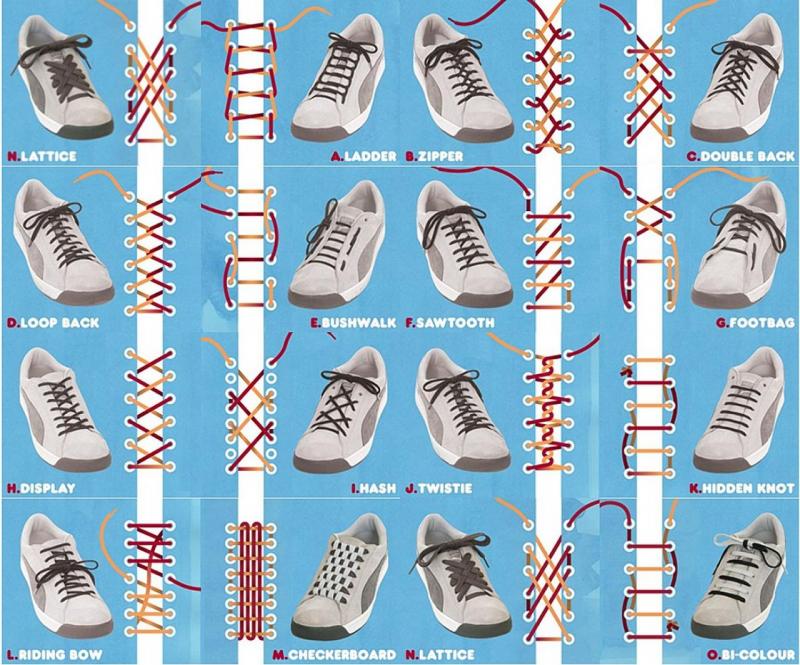
Lacrosse Goal Lacing Styles: Straight, Twisted, Braided, Wrapped
Simply lacing your lacrosse goal net in straight vertical and horizontal rows is the quick and easy approach. But exploring different creative lacing styles has advantages for response, control, and aesthetics.
Over the years, I’ve experimented with twisted, braided, wrapped, and other unorthodox lacing techniques for unique performance benefits.
Straight Lacing is Standard
Straight, flat lacing in rows is the standard way most lacrosse nets come pre-strung from the factory. It’s simple and provides consistent tension across the netting.
Twisting Adds Tightness

Twisting the cord as you lace amps up overall tightness subtly. Keep tension firm as you twist for springy recoil when shots release.
Wrap for Targeted Tightness
You can wrap and overlap cord in certain zones for adjustable localized tightness. Great for dialing in sweet spots.
Braiding Looks Great
Basic 3-strand braided lacing isn’t super durable but gives a cool visual pattern. Great for occasional accent rows.
Hybrid Lacing Mixes it Up
Combining twisted, wrapped, and straight lacing in different net zones adds both functionality and visual interest.
Wrap Shooting Strings
Wrapping the bottom shooting strings and sidewall cords in thin vinyl adds friction and consistency. Easily replaced.
Pre-Stretch Sections
You can pre-stretch strategic lacing rows for added overall tension. Just don’t overdo it.
Color Coordinate
Use colored lacing cord to create patterns, logos, or designs for unique team style. Visual creativity is limitless.
Inside-Out Hides Lacing

Lacing the inner net layer only with outside rows purely aesthetic keeps the functional inside tightness hidden.
It’s All About Tension
In the end, lacing style matters less than keeping proper tension. Let creativity enhance – not replace – fundamental tightness.
Don’t be afraid to experiment with different lacrosse goal net lacing techniques. Moving beyond basic straight lacing allows for tunable tightness, response, and looks.
Choosing Lacrosse Goal Net Mesh Size Based on Lacing Cord
When replacing your lacrosse goal net, mesh size is an important factor for ball control and response. The mesh hole dimensions need to match properly with the diameter of your lacing cord.
Through lots of trial-and-error, I’ve learned to pick net mesh size relative to the width of cord I’ll be stringing it with. Here are my tips on getting this combination right.
Typically 2-3mm Cord is Best
For most lacrosse goal nets, 2-3mm diameter cord is ideal for creating a snug, durable net with consistent rebound. This is the standard thickness I recommend in most cases.
Measure Cord Before Shopping for Net
Don’t guess – take a piece of your lacing cord to the store when shopping for a new net. Test the fit of your cord in different mesh sizes.
Cord Should Fill Around 80% of Hole
Choose net mesh holes that your lacing cord fills about 80% when threaded through. This leaves a bit of clearance but still creates a snug fit.
Avoid Excess Clearance
Too much clearance between cord and hole size allows too much stretch and sag. On the other hand, jamming oversized cord into holes frays the mesh.
Tighter Net = Smaller Holes
For minimal stretch and increased ball pop, choose netting with smaller mesh holes relative to your cord diameter. But don’t sacrifice durability.
Looser Net = Larger Holes
If you want more net give and unpredictability, size up the mesh holes a bit compared to your lacing cord thickness. This increases flex and whip.
Heavier Nets Have Smaller Holes
Note that higher-quality heavier lacrosse nets often have slightly smaller mesh sizes. Lightweight economy nets are prone to larger holes.
Consider Custom Netting

For the ultimate control, many pros work with manufacturers to fully customize net mesh hole size based on their preferred lacing cord spec.
Getting the combination of cord thickness and net mesh size tuned perfect takes experimentation. But once dialed in, you’ll achieve ideal response and playability.
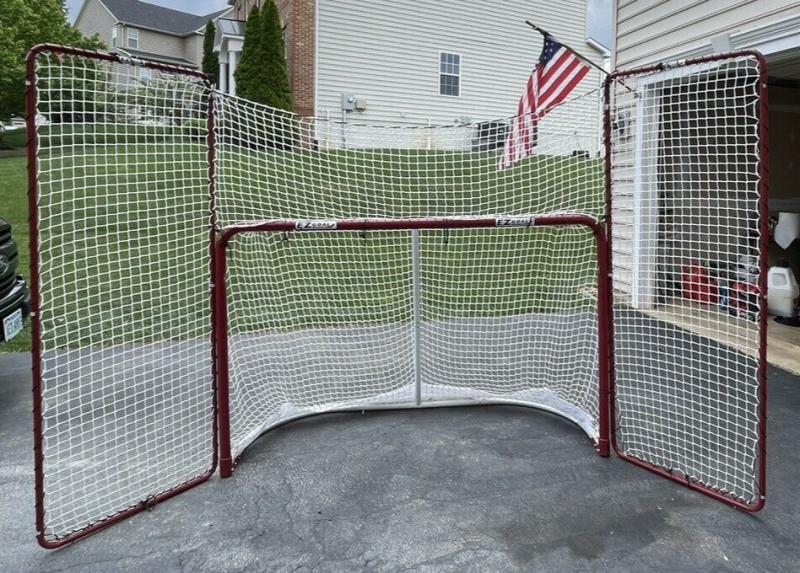
Lacrosse Goal Net Replacement vs. Relacing Existing Net
When your lacrosse goal net starts to sag and fray from use and exposure, you have two options – replace the entire net or just re-lace the existing one. Both have their pros and cons.
Over years of repairing practice nets, I’ve developed some guidelines on whether to do a full net replacement or just re-string the current one.
Inspect Net Closely First
Before deciding on replacement vs relacing, thoroughly examine the full net for holes, tears, rot, and compromised mesh. Check all sections.
Net Replacement Every 2-3 Seasons
Even with proper maintenance, expect to do a full lacrosse goal net replacement roughly every 2-3 seasons on average. Lacing life is limited.
Severely Damaged Areas Require Replacement
If fraying, tearing, holes or decay encompass over 20% of the net surface in total, replacement is likely the best option.
Relacing Extends Life Slightly
If damage is minimal, you can extend the useful life 1-2 additional seasons typically by re-lacing carefully. But don’t wait too long.
Upgrade Net Quality When Replacing
When you do opt for full replacement, look to upgrade net quality over the previous one. Better materials withstand wear and elements longer.
Original Lacing Lasts Longest
The original factory lacing tends to hold up better over multiple re-lacings. Use care when removing to re-use knots if possible.
Re-Lace Same Cord Style/Color
When relacing only, match the existing lacing cord thickness, material, color and style for visual consistency.
Clean Net Thoroughly Before Relacing
Before stringing used netting, clean out all dirt, mildew, and debris first. Grime abrades the cord prematurely.
Knowing when to re-lace vs. replace your lacrosse goal net comes down to damage assessment. Get the most life possible with timely repairs, but don’t wait too long. Stay proactive.
What to Look for in Quality Lacrosse Goal Net Lacing Cord
The quality of your lacrosse goal net lacing cord plays a huge role in the performance and longevity of your net. Using inferior string often leads to premature fraying, stretching, and breakage.
Based on plenty of trial and error with different cords, here are the key signs of lacing built for durability and responsiveness.
Polyethylene Offers Best Durability
Look for cord constructed from high-grade polyethylene rather than lower-cost nylon. Poly stands up better to elements and repeated impacts over time.
UV Protection is Critical
Make sure the cord is specifically treated for UV resistance. This keeps sun exposure from deteriorating the material quickly.
Waxed Coating A Must
The string must have a waxed coating to prevent fraying, maintain round profile, and slide smoothly through holes. Beware plain untreated cord.
Braided Not Twisted
Quality lacing cord will have a solid braided construction rather than twisted thinner strands. Twisting causes early snagging and failure.
Made in USA

Opt for lacrosse net lacing manufactured domestically from US raw materials when possible for higher and more consistent quality.
The Right Diameter
Choose a cord diameter that matches your netting hole size for optimal fit – typically 2mm or 3mm for most nets.
Soft Not Stiff
The cord strands should have some flex and softness. Stiff, rigid cord is prone to snapping rather than stretching slightly.
Durable Core Material
Inspect the cord closely and make sure the inner core looks tightly constructed from quality woven strands built to handle abuse.
Don’t settle for inferior lacrosse goal lacing cord that will fail prematurely. Spending a little more upfront for weatherproof, snag-resistant string that holds up is well worth it in the long run.
Pro Lacrosse Goal Lacing Tips for Optimal Ball Control
Simply stringing a lacrosse goal net evenly gets the job done, but doesn’t maximize ball control and unpredictable response. Taking the time to lace creatively using pro techniques is a game-changer.
After studying how the pros re-string their practice nets, here are some of their top lacing tricks for indoor and outdoor goals alike.
Focus on Shooting Area
Concentrate most lacing pattern variations within the prime shooting area directly in front of the goal. Keep the rest uniformly tight.
Change Direction Frequently
Switch between vertical, horizontal and diagonal lacing every 6-12 inches near center. Don’t allow long runs in one direction.
Offset Top/Bottom Holes
When lacing vertically, offset the alignment of the top and bottom holes. This discontinuity interrupts uniformity.
Pre-Stretch Strategically
Yank and pre-stretch sections of the net strategically for added tightness. But don’t overdo it and tear holes.
Hybrid Lacing Tightness
Combine very tight lacing in some zones with intentionally loose areas in others for varied rebound.
Double Up High-Wear Areas
Reinforce high ball-impact spots by lacing cord through holes twice for durability.
Know When to Re-Lace
Re-lace pro nets every 2-3 months to maintain ultimate response. Don’t wait until lacing fails completely.
Customize Netting Density
Many pros work with manufacturers to fully customize net mesh density and hole size based on lacing.
Use Thinner Cord Up Top
1mm diameter lacing along the top half of pro nets reduces sag for crispness. Widen toward bottom for durability.
Taking the time to lace pro nets meticulously pays off in game-like rebound and control. Don’t settle for basic stringing – customize your lacing for maximum response.


