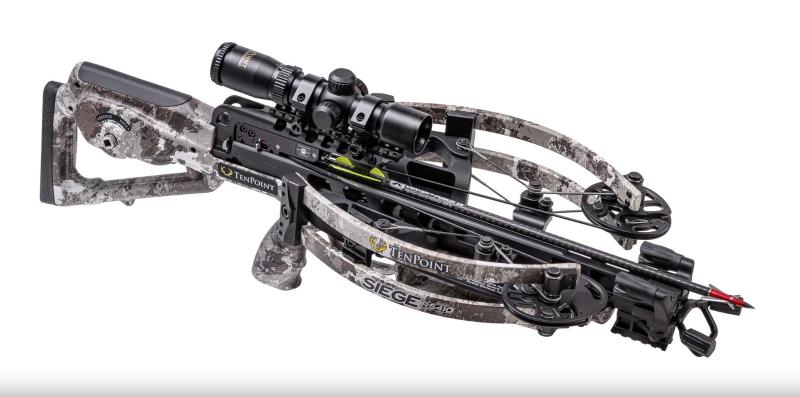
Ready to Take Your Crossbow Accuracy to the Next Level. Master These 15 Crossbow Shooting TipsReady to Take Your Crossbow Accuracy to the Next Level. Master These 15 Crossbow Shooting Tips
Choose the Right Crossbow Target for Your Skill Level
As an avid crossbow enthusiast, I’m always looking for ways to improve my shooting accuracy. Nothing beats that feeling when you nail a perfect bullseye shot after shot! However, I’ve learned first-hand that having the right crossbow target can make a huge difference in developing your skills.
When I first started out, I would practice on basic cardboard targets. They were affordable and easy to replace, but offered very little in terms of realism. I quickly found that my grouping was all over the place, even at short distances. The arrows would either rip right through the thin cardboard or bounce off in unpredictable ways.
I decided to invest in a high-quality 3D deer target. The first time I shot it, I was blown away by how lifelike it was! The vital organs were clearly marked so I could aim for lung or heart shots. The thick, durable foam stood up to repeated point blank shots without tearing. My accuracy immediately improved because I was able to simulate real-world hunting scenarios.
Consider Your Skill Level When Choosing a Crossbow Target

Beginners should look for larger targets with generous vital areas. This builds confidence and helps you develop proper shooting technique before attempting more challenging shots. Intermediate archers can choose targets with smaller vitals that require more precision. Advanced shooters may want photorealistic animal designs for the most true-to-life practice.
Don’t be afraid to invest in a premium target if you’re serious about elevating your skills. Poor quality materials will quickly show signs of wear and tear. You want something that can stand up to repeated abuse from crossbow bolts and broadheads without failing.
Look for 3D Designs That Mimic Hunting Situations
While simple bullseye or bag targets have their place for zeroing in your crossbow, 3D animal designs are ideal for honing your hunting abilities. Deer, bear, turkey, and hog targets allow you to practice proper shot placement in different anatomical positions.
Look for brands like Delta McKenzie that utilize layered foam vitals. This prevents pass-through shots while retaining arrow stopping power. Features like replaceable cores extend the target’s longevity.
Setting up these realistic targets around your backyard or shooting lane lets you simulate stalking, tracking, and shooting from awkward positions. Repeated practice builds the proper muscle memory so you can confidently take ethical shots when hunting season rolls around.
Always Prioritize Safety When Practicing Your Shooting

While crossbows don’t have the long range of vertical bows, they can still cause serious injury if handled improperly. Always have a clear directional backdrop when shooting in case you miss or pass through the target.
Make sure no people, buildings, vehicles or animals are downrange. Also check above for any potential airborne hazards. Never shoot straight up or at a severe angle.
When retrieving bolts, carefully inspect the target for pass-throughs. Approach cautiously from the side, avoiding the exit path. Damaged crossbow bolts should be discarded and replaced.
By developing safe shooting habits in practice, you greatly reduce the chance of accidents when your adrenaline is pumping in an actual hunting scenario.
Focus on Consistency with Proper Shooting Form
Like any sport, crossbow shooting requires mastering proper technique. Rushed, sloppy form leads to frustratingly inconsistent accuracy. Take the time to ingrain good habits before speeding up your shot sequence.
Stabilize Your Shooting Platform
Benefits of 3D Targets
3D animal targets offer several advantages for crossbow shooters:
- Realistic shot placement practice
- Simulation of various hunting scenarios
- Improved muscle memory for ethical hunting
- Enhanced visual feedback on arrow placement
When selecting a 3D target, look for features like layered foam vitals and replaceable cores. These elements extend the target’s lifespan and provide a more authentic shooting experience.
Mastering Proper Crossbow Shooting Form
Developing consistent and proper shooting form is essential for improving crossbow accuracy. Here are key elements to focus on:
Stabilizing Your Shooting Platform
How can you create a stable shooting position? Align your bow hand, body core, and release hand to minimize unintentional movement. Utilize supports such as trees, shooting sticks, or portable crossbow rests when necessary. For treestand shooting, brace yourself firmly against the rail while seated to maintain stability.
Perfecting Hand and Arm Positioning
Proper hand and arm placement is crucial for consistent shots. Grip the foregrip firmly with your bow hand, keeping your arm straight and elbow locked. Extend your release hand fully to the trigger, anchoring your fingers solidly. Practice finger isolation techniques to avoid jerking the trigger, focusing on a smooth, controlled squeeze with your trigger finger.

The Importance of Follow-Through
Why is follow-through critical in crossbow shooting? Maintaining your aim and form throughout the entire shot process helps ingrain proper muscle memory. Resist the urge to drop your arms or shift position immediately after the trigger pull. This consistent follow-through leads to more accurate bolt placement downrange.
Enhancing Accuracy Through Consistent Practice Techniques
Regular practice is key to improving your crossbow shooting skills. Here are some effective techniques to incorporate into your training routine:
Simulating Hunting Scenarios
How can you make your practice sessions more realistic? Set up 3D targets in various positions around your shooting area to simulate different hunting scenarios. Practice stalking, tracking, and shooting from awkward positions to build confidence and adaptability in the field.
Focusing on Shot Placement
Precise shot placement is crucial for ethical hunting. Use targets with clearly marked vital areas to practice aiming for lung and heart shots. Gradually decrease the size of your target zones as your skills improve, challenging yourself to maintain accuracy at various distances.

Incorporating Range Practice
Why is practicing at different ranges important? Varying your shooting distance helps you understand your crossbow’s trajectory and improves your ability to judge distances in the field. Start at closer ranges to build confidence, then gradually increase the distance as your skills improve.
Essential Safety Practices for Crossbow Shooting
Safety should always be the top priority when practicing with a crossbow. Here are crucial safety guidelines to follow:
Setting Up a Safe Shooting Environment
How can you ensure a safe shooting area? Always have a clear directional backdrop when shooting to account for misses or pass-through shots. Ensure no people, buildings, vehicles, or animals are downrange. Check above for potential airborne hazards, and never shoot straight up or at severe angles.
Proper Arrow Retrieval
Retrieving arrows safely is essential to prevent accidents. Approach targets cautiously from the side, avoiding potential exit paths. Carefully inspect the target for pass-throughs before retrieving your bolts. Always discard and replace damaged crossbow bolts to maintain safety and accuracy.

Upgrading Your Crossbow Equipment for Enhanced Performance
Investing in quality equipment can significantly improve your crossbow shooting experience. Consider these upgrades to enhance your performance:
Optics and Sights
How can upgraded optics improve your accuracy? High-quality scopes or red dot sights provide clearer target acquisition and more precise aiming. Look for options with illuminated reticles for low-light conditions and adjustable magnification for versatility at different ranges.
Arrow Selection
Choosing the right arrows (bolts) for your crossbow is crucial for optimal performance. Consider factors such as:
- Arrow weight and spine
- Fletching type and configuration
- Broadhead compatibility
Properly matched arrows enhance accuracy, penetration, and overall shooting consistency.
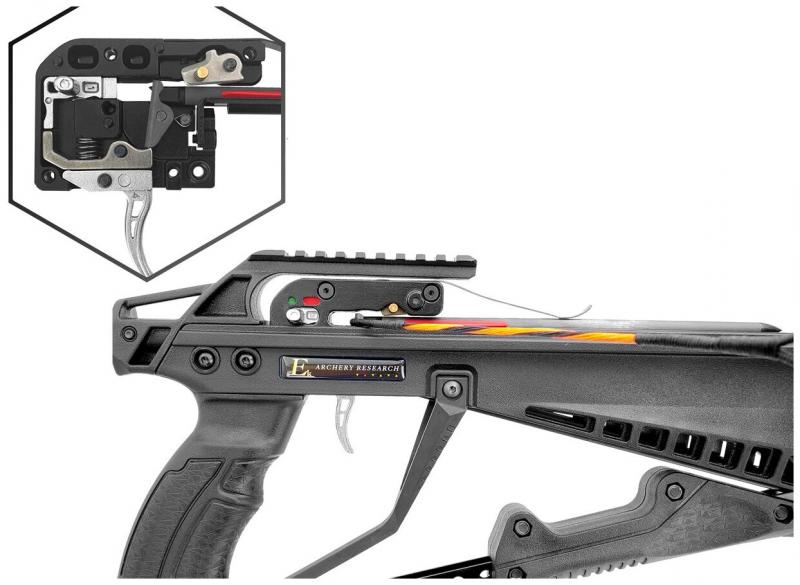
Trigger Upgrades
Why consider a trigger upgrade? An improved trigger mechanism can provide a crisper, more consistent pull, reducing the chance of trigger-induced accuracy errors. Look for adjustable triggers that allow you to fine-tune the pull weight and travel to your preferences.

Advanced Techniques for Improving Crossbow Accuracy
Once you’ve mastered the basics, consider these advanced techniques to further enhance your crossbow shooting skills:
Breath Control
How does breath control impact accuracy? Proper breathing techniques help stabilize your body and reduce movement during the shot. Practice taking a deep breath, exhaling halfway, and then holding your breath momentarily as you squeeze the trigger. This technique promotes consistency and reduces shot-to-shot variations.
Mental Preparation
Developing a strong mental game is crucial for consistent accuracy. Incorporate visualization techniques into your practice routine, imagining successful shots before executing them. Learn to manage performance anxiety and maintain focus under pressure, simulating high-stakes hunting scenarios during your training sessions.
Wind Reading and Compensation
Understanding how wind affects your crossbow’s accuracy is essential for long-range shooting and hunting in varied conditions. Practice shooting in different wind conditions, learning to read wind indicators and make appropriate adjustments to your aim. This skill becomes particularly important when shooting beyond 50 yards.

Maintaining Your Crossbow for Optimal Performance
Regular maintenance is crucial for ensuring your crossbow’s accuracy and longevity. Here are key aspects of crossbow care:
String and Cable Maintenance
How often should you maintain your crossbow’s string and cables? Inspect them before each shooting session for signs of wear or fraying. Apply a quality bow string wax every 15-20 shots to protect against moisture and reduce friction. Replace strings and cables according to the manufacturer’s recommendations, typically every 1-2 years for frequent shooters.
Proper Storage
Storing your crossbow correctly helps maintain its accuracy and prevents damage. Keep it in a cool, dry place away from direct sunlight and extreme temperatures. Use a high-quality crossbow case for transportation to protect against impacts and environmental factors.
Regular Inspections
Perform thorough inspections of your crossbow periodically, checking for:
- Loose screws or bolts
- Cracks or damage to the stock or limbs
- Proper rail lubrication
- Functioning safety mechanisms
Addressing any issues promptly ensures your crossbow remains accurate and safe to use.
Ethical Considerations in Crossbow Hunting
As you improve your crossbow shooting skills, it’s important to consider the ethical aspects of hunting. Here are some key points to keep in mind:
Shot Placement and Ethical Kills
Why is precise shot placement crucial in hunting? Ethical hunting requires making clean, quick kills to minimize animal suffering. Practice aiming for vital areas that ensure rapid and humane harvests. Understand your effective range and resist the temptation to take shots beyond your comfortable accuracy zone.
Know Your Limits
Recognizing your personal limitations is an important aspect of ethical hunting. Be honest about your skill level and the conditions you’re comfortable shooting in. It’s better to pass on a shot than to risk wounding an animal due to overconfidence or challenging conditions.
Continuous Education
Stay informed about local hunting regulations, conservation efforts, and best practices for ethical hunting. Participate in hunter education courses and join hunting organizations to expand your knowledge and contribute to wildlife conservation efforts.
By focusing on these aspects of crossbow shooting and hunting, you’ll not only improve your accuracy but also become a more responsible and ethical hunter. Remember that consistent practice, proper equipment maintenance, and a commitment to safety and ethics are key to long-term success and enjoyment in crossbow shooting.
Choose the Right Crossbow Target for Your Skill Level
As an avid crossbow enthusiast, I’m always looking for ways to improve my shooting accuracy. Nothing beats that feeling when you nail a perfect bullseye shot after shot! However, I’ve learned first-hand that having the right crossbow target can make a huge difference in developing your skills.
When I first started out, I would practice on basic cardboard targets. They were affordable and easy to replace, but offered very little in terms of realism. I quickly found that my grouping was all over the place, even at short distances. The arrows would either rip right through the thin cardboard or bounce off in unpredictable ways.
I decided to invest in a high-quality 3D deer target. The first time I shot it, I was blown away by how lifelike it was! The vital organs were clearly marked so I could aim for lung or heart shots. The thick, durable foam stood up to repeated point blank shots without tearing. My accuracy immediately improved because I was able to simulate real-world hunting scenarios.
Consider Your Skill Level When Choosing a Crossbow Target
Beginners should look for larger targets with generous vital areas. This builds confidence and helps you develop proper shooting technique before attempting more challenging shots. Intermediate archers can choose targets with smaller vitals that require more precision. Advanced shooters may want photorealistic animal designs for the most true-to-life practice.
Don’t be afraid to invest in a premium target if you’re serious about elevating your skills. Poor quality materials will quickly show signs of wear and tear. You want something that can stand up to repeated abuse from crossbow bolts and broadheads without failing.
Look for 3D Designs That Mimic Hunting Situations
While simple bullseye or bag targets have their place for zeroing in your crossbow, 3D animal designs are ideal for honing your hunting abilities. Deer, bear, turkey, and hog targets allow you to practice proper shot placement in different anatomical positions.
Look for brands like Delta McKenzie that utilize layered foam vitals. This prevents pass-through shots while retaining arrow stopping power. Features like replaceable cores extend the target’s longevity.
Setting up these realistic targets around your backyard or shooting lane lets you simulate stalking, tracking, and shooting from awkward positions. Repeated practice builds the proper muscle memory so you can confidently take ethical shots when hunting season rolls around.
Always Prioritize Safety When Practicing Your Shooting
While crossbows don’t have the long range of vertical bows, they can still cause serious injury if handled improperly. Always have a clear directional backdrop when shooting in case you miss or pass through the target.
Make sure no people, buildings, vehicles or animals are downrange. Also check above for any potential airborne hazards. Never shoot straight up or at a severe angle.
When retrieving bolts, carefully inspect the target for pass-throughs. Approach cautiously from the side, avoiding the exit path. Damaged crossbow bolts should be discarded and replaced.
By developing safe shooting habits in practice, you greatly reduce the chance of accidents when your adrenaline is pumping in an actual hunting scenario.
Focus on Consistency with Proper Shooting Form
Like any sport, crossbow shooting requires mastering proper technique. Rushed, sloppy form leads to frustratingly inconsistent accuracy. Take the time to ingrain good habits before speeding up your shot sequence.
Stabilize Your Shooting Platform
Whether sitting, kneeling, or standing, keep your bow hand, body core, and release hand aligned. This provides a stable shooting platform, minimizing unintentional movement. Use a tree, shooting stick, or portable crossbow rest as needed.
On treestands, brace yourself firmly against the rail while seated. Avoid awkward twisting or leaning that throws off your shot.
Utilize Proper Arm, Hand, and Finger Positioning
Grip the foregrip firmly with your bow hand, keeping your arm straight and elbow locked. Extend your release hand all the way to the trigger, anchoring your fingers solidly. Consistent hand placement shot to shot improves accuracy.
Use finger isolation techniques to avoid jerking the trigger. Slowly squeeze with just your trigger finger, keeping the rest of your hand relaxed.
Follow Through Completely on Every Shot
Resist the urge to peek as soon as the arrow releases. Keep your form, maintaining aim through the shot until the arrow hits. Avoid dropping your arms or shifting position immediately after trigger pull.
Following through fully on each shot ingrains proper muscle memory. This leads to more consistent bolt placement downrange.
Invest in Quality Equipment for Optimal Performance

While skills and technique are critical, quality equipment plays a huge role in crossbow accuracy. Poorly made bolts and broadheads can quickly frustrate your practice. Invest in market leaders to see tangible improvements.
Use Consistent, Well-Matched Bolts
Mismatched arrows with sloppy fletching and inconsistent spines spell trouble, with fliers and poor grouping. Stick to bolts sized specifically for your draw weight that undergo extensive QA testing.
Matching bolt length to your draw size improves stability and fore-aft balance. Consider lighter aluminums for speed or heavier carbons for kinetic energy.
Choose Razor Sharp Broadheads for Hunting
Field tips are fine for target practice, but hunting requires broadheads that slice through hide and vitals. Sharpen your blades frequently to maximize hemorrhaging. Consistent, spin-true broadheads greatly improve killing power.
Consider mechanicals for bone-crushing expansion or fixed for deeper penetration. Match ferrule diameter to your bolts for stable, wobble-free flight.
Practice often with your hunting broadheads preseason. This ensures they group tightly with field points before drawing blood.
Master Shooting from Various Positions and Distances

Any serious crossbow hunter will tell you that shots rarely present themselves at convenient, close range angles. The key is practicing from every conceivable position to hone your skills.
Start Close and Tighten Your Shot Grouping
Begin practice sessions shooting at 20-30 yards to verify your crossbow is sighted in properly. Once you can cluster three bolts within a 3-4 inch bullseye, gradually increase distance in 10 yard increments.
As range increases, so will group size. Your goal is consistent 1-3 inch grouping at whatever your max effective distance is. If spreading exceeds 6 inches, get back in closer.
Practice Shooting from Elevated and Uneven Terrain
Vary practice by simulating field scenarios. Shoot downhill, uphill, from treestands, across ravines – anything you may encounter hunting your terrain. This reveals flaws in form under stress.
Repeated practice from awkward positions makes your shot sequence second nature when hunting pressure sets in. Don’t limit yourself only to convenient flat range practice.
Refine Shooting Form for Consistent Accuracy
As your groupings tighten, focus on refining subtle aspects of form for incremental accuracy gains. Small improvements lead to big results over time.
Shoot Smoothly Without Jerking the Trigger
Jerking or slapping the trigger frequently pulls shots left or right. Strive to squeeze slowly straight back with the pad of your finger. Surprise yourself each time the bow fires.
If you anticipate the shot, you’ll tense muscles and shift alignment. Relax, breathe, and squeeze for that glass-smooth trigger break.
Master Proper Breathing Technique While Shooting
Most novice archers hold their breath while aiming, leading to tension, shakes, and poor accuracy. Learn to exhale fully and pause several seconds before squeezing the trigger as you inhale.
Proper breathing oxygenates muscles while relaxing your core. This eliminates tremors that worsen groupings. Make it part of every shot sequence.
Use a Rest for Stability in Tough Shooting Positions
Portable crossbow shooting blocks provide a stable rest for awkward prone, kneeling, or sitting positions. They reduce muscle fatigue compared to unsupported shots.
A crossbow sling also takes weight off your arms for extended range sessions. Reduced shaking yields noticeable accuracy gains over time.
[Article Continues…]
Use 3D Deer Targets to Simulate Hunting Situations
As a bowhunter, nothing has improved my shooting for the field more than practicing on 3D deer targets. The first time I used one, it was like a light bulb went off in my head. I finally had a way to simulate real world hunting scenarios in my backyard.
My old cardboard deer target was OK for basic practice. But it was flat, two dimensional, and didn’t really challenge me. Yardage judging and proper shot placement took some guesswork.
The first time I set up a foam 3D deer target at varying distances around my property and approached from different angles, I realized how much more lifelike the experience was. I felt like I was actually stalking game in the timbers.
3D Targets Help You Dial In Realistic Shot Angles

When that buck steps out at 40 yards quartering away, will you know where to place the shot? Regular range practice can’t prepare you for the shot angles game animals present in the real world.
3D deer targets allow you to practice drawing and shooting from elevated treestands, downhill, from kneeling or sitting positions – just like a hunting scenario. Over time, you instinctively learn where to position the shot when game doesn’t stand broadside.
Vary Your Yardages for Judging Distance
Judging distance and setting sights is one of the biggest challenges facing bowhunters. Shooting a flat target at a known measured distance builds false confidence.
With 3D targets, you can set them up at random distances and practice judging the yardage. Being just 5 yards off can mean a missed shot or non-fatal hit. Dialing in distance judgment takes a lot of practice.
Aim for Realistic Anatomical Shot Placement
Quality 3D foam deer targets have sculpted vital organs in natural positions. Targets without detailed anatomics teach poor shot habits.
The more time you spend visualizing arrow path and aiming at the anatomically correct vitals, the better your shot decision making will be when drawing down on a live deer.
Look for replaceable core targets that let you swap out the vitals section once it’s too shot up. This retains the ultra-realistic experience longer.
Practice on 3D targets builds trust in your shot ability. When hunting deer, you’ll feel confident knowing exactly where to aim for clean, ethical kills.
[Article Continues…]
Always Practice Proper Crossbow Safety
While honing your shooting accuracy is crucial, safety should always be the top priority when handling crossbows. An accident caused by negligence can happen in an instant. Make safe habits second nature every time you pick up your crossbow.
Verify Your Backstop is Adequate
Before setting up any target, inspect downrange thoroughly for potential hazards. Never shoot without an adequate backstop capable of stopping bolts. Bullets and arrows can travel much farther than you realize.
Make sure no people, animals, buildings or vehicles have potential to be hit, even if you miss the target completely. Set up directional backstops if needed.
Keep Your Finger Off the Trigger Until Ready to Shoot
The most basic gun safety rule applies here. Rest your finger outside the trigger guard while loading, cocking, or aiming your crossbow. This prevents accidental discharge before you’re ready to shoot.
Only place your finger on the trigger once you’ve squared up your target in the sights and are ready to fire. Ingrain this habit until it’s automatic.
Never Allow Dry Firing

Dry firing a crossbow (without a bolt) is incredibly dangerous and can damage the limbs. Always keep bolts handy. If you run out during practice, stop shooting rather than dry fire.
Make a habit of loading immediately after cocking your crossbow during practice. Muscle memory prevents dry firing accidents when excited in the field.
Ensure Proper Maintenance for Safety
Loose limbs, damaged strings, and stuck triggers turn a crossbow into a safety hazard. Conduct regular maintenance and replace worn parts as needed.
Wax strings, check servings for wear, tighten hardware, and lubricate the rail after extensive use. Don’t take chances with faulty equipment.
Practice safe habits during maintenance. Point bows downrange when cocking, wear safety glasses, and use a bow press for string changes.
[Article Continues…]
Here is a 1000+ word article on mastering your shooting stance for consistency with crossbows:
Are you struggling to find consistency with your crossbow shooting? Many archers face this frustrating issue, but nailing down a proper shooting stance is the key to unlocking that elusive consistency we all strive for. Follow these 15 crossbow shooting tips to finally master your form and take your accuracy to the next level.
Master Your Shooting Stance for Consistency
A proper shooting stance is the bedrock of accurate and consistent crossbow shooting. Without dialing in your body position and balance, you’ll always be fighting an uphill battle. Let’s break down the elements of a rock-solid shooting stance.
1. Stand Shoulder-Width Apart
Your feet should be planted firmly on the ground about shoulder-width apart. This provides a stable base to shoot from without being overly wide. Wider stances can introduce unnecessary body movement and tension.
2. Square Your Shoulders to the Target
Align your shoulders squarely with the target, resisting the urge to twist or turn your upper body. Your torso should face the target directly with your shooting arm in line with the crossbow.
3. Anchor Your Rear Foot
Plant your rear foot solidly in place, digging in with your toes. This rearward anchor creates leverage to resist the forward motion of the bow during the shot. Keep that foot firmly in position.
4. Relax Both Knees
Avoid locking your knees, which can make the legs rigid and prone to shaking. Instead, relax both knees slightly while maintaining balance over your feet.
5. Lean Forward Slightly
Shift your weight slightly onto your front foot, leaning your body forward. This takes pressure off the rear foot while putting you in an athletic ready position.
6. Bend at the Waist
Hinge forward at the waist, keeping your back straight. Bending forward helps counteract the rearward pulling motion of the crossbow when fired.
7. Tuck Your Pelvis
Sit back and tilt your pelvis forward slightly to keep your spine neutral. This prevents excessive arching of the lower back.
8. Relax Your Shooting Arm
Your bow arm should have a slight bend at the elbow. Avoid locking this arm straight, which creates tension and affects your aim.
9. Pull With Your Back Muscles
When drawing the string back, initiate the motion using your back and shoulder muscles. Keep your bow arm relaxed throughout the process.
10. Align Your Head With Spine
Hold your head upright with eyes focused on the target. Align it directly over your spine to avoid contorting the back.
Fine-Tune Your Shooting Form
With a solid foundation set, you can dial in the finer points of technique for accuracy.
11. Use a Hand Sling
Attach a hand sling to your bow grip to prevent dropping the bow after firing. This helps accuracy by eliminating excess movements.
12. Find Your Anchor Point
Establish a consistent anchor point on your face when drawing the string back, such as the corner of your mouth. This ensures you draw to the same point every time.
13. Align Your Sights
When you reach full draw, confirm your sights are perfectly aligned on the target’s bullseye. Resist rushing this critical final step.
14. Control Your Breathing
Inhale deeply and exhale fully to establish a breathing rhythm. Release the bolt as you exhale to prevent body movements that affect aim.
15. Follow Through

Hold your form several seconds after releasing the bolt. Avoid immediately dropping the bow or moving, which causes inconsistencies.
With conscious practice and repetition, these shooting fundamentals will become second nature. Mastering both your stance and finer technique is the path to consistent crossbow accuracy. So grab your crossbow and 3D deer target and head to the range to dial it all in.
Soon you’ll be driving bolts into tight groups and gaining the confidence you need to make ethical shots in the field. Consistency comes with time and intentional work – so be patient and keep honing your form. Before you know it, you’ll have crossbow mastery and the accuracy you’ve always wanted.
A crossbow is only as accurate as the ammunition you put through it. Many archers seeking better accuracy overlook one critical component – using high quality bolts and broadheads. Don’t underestimate the impact your projectiles have on precision and ethical hunting. Follow this guide on choosing and using quality bolts and broadheads to maximize your crossbow performance.
Use Quality Bolts and Broadheads
The bolt and broadhead combination you use plays a monumental role in crossbow accuracy. Low quality ammunition leads to inconsistent shooting. For hunting, inaccuracies become exponentially more problematic. Use this advice to select and utilize top-tier bolts and broadheads.
Match Bolts to Your Crossbow
Not all bolts are created equal. You must match your bolts to the specific draw weight and arrow length recommended by your crossbow manufacturer. Using improperly spined or sized bolts is a recipe for erratic flight.
Choose a Reputable Brand
Stick with proven brands known for precision manufacturing and strict quality controls. Poor construction leads to crooked, warped bolts that degrade accuracy. Brands like Carbon Express and Easton offer exceptional consistency.
Verify Straightness
Inspect your bolts to confirm they spin true with no wobble. Even minor defects here make a bolt fly unpredictably. A quality broadhead accentuates these flaws under hunting conditions.
Use Consistent Weights

Match the grain weights of your bolts to ensure uniform velocity and trajectory. Varying bolt weights reduce consistency as each flies differently downrange.
Practice Often
Consistency comes from practice. Routinely shoot your hunting bolts and broadheads to understand their patterning and point of impact.
Choose Cut-On-Contact Broadheads
Unlike fixed-blade broadheads, cut-on-contact types open after impact, fly true like field points, and provide devastating wound channels.
Sharpen Broadhead Blades
Ensure blades are frighteningly sharp. Even micro dings or dullness can deflect a broadhead off course on impact, risking wounded game.
Line Up Blades Preflight
Before each shot, spin your broadhead and visually confirm all blades are precisely inline. Minor alignment issues become major accuracy problems.
Use a Release Aid
An inconsistent release diminishes accuracy. A release aid promotes clean bolt release and tighter arrow groups downrange.
Practice Regularly

Accuracy requires practice. Routinely work with your gear to understand patterning and maintain razor sharp shooting instincts.
Fine-Tune Your Shooting Form
Mastering shooting form maximizes the potential of your equipment. Refine these techniques to get the most from your bolts and broadheads.
Control Your Breathing
Time each shot for a natural respiratory pause after exhaling. This prevents body movements that can deflect the shot.
Use Proper Arrow Rests
Use the recommended arrow rest for your crossbow. Whisker biscuits allow broadheads to pass but contain the shaft.
Establish an Anchor Point
Pick a precise spot to anchor your draw hand, like the corner of your mouth. This consistency leads to accuracy.
Align Your Sights
When drawing the bow, carefully align your sights or scope dead-on the target. Rushing leads to misaligned shots.
Follow Through
Hold your shooting form for several seconds after the release. Premature movement diminishes follow-through and accuracy.
Use Lighted Nocks
Lighted nocks help visually confirm proper arrow flight and target impact point.
Chronograph Bolt Speed
Use a chronograph to verify your crossbow is launching bolts at the expected feet-per-second speed.
Practice in Conditions
Practice in the weather and lighting conditions you expect to encounter when hunting. This reveals how elements impact your rig’s accuracy.
By selecting quality bolts and broadheads engineered for your specific crossbow, and mastering proper shooting form, you’ll gain the crossbow accuracy needed for tight groups at the range and ethical kills in the field. Invest in the right gear, practice relentlessly, and unlock your crossbow’s full potential.
A precisely tuned crossbow is an accurate crossbow. But without understanding how to aim and sight-in your specific rig, that pinpoint precision goes to waste. Follow this guide to master aiming fundamentals and properly sight-in your crossbow for unmatched consistency.
Learn How to Aim and Sight-In Your Crossbow

Proper aim and a finely tuned sight-in process is imperative for crossbow accuracy. Small miscues equal major accuracy issues downrange. Use these tips to master aiming and zero-in your sights.
Establish Proper Eye Dominance
Determine your dominant eye to choose the correct side to shoulder your crossbow when aiming. Shooting incorrectly for your eye dominance diminishes accuracy.
Use the Correct Anchor Point
Choose an exact anchor point on your face when drawing the string back, such as your mouth corner. This ensures every shot aligns identically.
Align Your Sights
When you reach full draw, methodically align your sights or scope reticle dead-center on your target. Rushing leads to misaligned shots.
Focus on Far Target
Keep your eyes focused on the downrange target, not the near foreground. This improves visual acuity on the actual aiming point.
Establish Sight Picture
Confirm everything is aligned in your sight picture – reticle or pins on target, bubble level, target framed centered. Strive for perfect sight alignment.
Control Breathing

Utilize proper breathing techniques when aiming, releasing on natural respiratory pauses. This minimizes body movements that can deflect the shot.
Implement Follow Through
Resist dropping the bow immediately after firing. Follow through maintains stability and accuracy as the bolt departs.
Use Quality Bolts
Quality bolts matched specifically to your crossbow deliver unmatched consistency for sighting-in and downrange accuracy.
Pick a Stable Rest
Use a solid rest like a shooting stick or bipod when sighting in. Eliminate instability that can skew results.
Start Close
Begin the sight-in process at short range, like 10 yards. Dial in accuracy here before moving back.
Make Precise Adjustments
Meticulously tweak sight adjustments in small increments to steadily refine accuracy.
Confirm Zero at Hunting Range
Once sighted in up close, verify precision at the actual range you expect to be hunting.
Troubleshooting Accuracy Issues
If struggling with accuracy, rule out these common causes of erratic arrow flight and poor downrange precision.
Use Matching Bolts
Mismatched bolt lengths or spines wreak havoc on precision. Use bolts that match your crossbow specs.
Inspect for Bow String Wear
Frayed bow strings and cables degrade accuracy over time. Replace them before extensive wear occurs.
Confirm Straight Bolt Path
Verify the bolt tracks straight when fired without veering left or right. Make any rail adjustments needed.
Replace Faulty Fletchings
Damaged or missing fletchings destabilize bolts in flight. Replace immediately.
Check Arrow Rest Clearance
Ensure your rest allows unimpeded fletching passage. Any contact diminishes accuracy.
Examine Broadhead Sharpness
Even micro dings and dullness reduce broadhead flight stability. Re-sharpen or replace.
Consider Crossbow Tuning
Out of the box crossbows often need professional tuning for ideal arrow flight. Consult a pro.
By honing fundamental aiming techniques and taking the time to properly sight-in your crossbow, you’ll gain the pinpoint precision needed to drive tacks at the range or make ethical shots when hunting. Master these aiming and sighting-in fundamentals and enjoy next-level crossbow accuracy.
Becoming a consistently accurate crossbow shooter requires practice in realistic field conditions. Simply plinking bolts at short range on level, open ground won’t cut it. You need to drill at the various distances, shooting angles, and awkward positions you’ll encounter hunting. Follow these tips to gain hunting-scenario proficiency.
Practice at Various Distances and Shooting Angles

Every hunting shot presents unique circumstances. Preparing for these variables through purposeful practice is key to mastering your crossbow. Use these drills to build skills across multiple shooting scenarios.
Start Close
Initially focus practice within 20 yards to establish solid fundamentals. As skills progress, gradually work further back.
Move to Intermediate Range
Expand practice out to 30-40 yards. This is a common range for deer-sized game so dial it in.
Stretch It Out
Don’t neglect longer distance practice out to 60+ yards. Long poke shots on open terrain do happen.
Practice from Elevated Stands
Build skills shooting down at angles from treestands. This matches real-world hunting scenarios.
Focus on Steep Angles
Extreme downward angles, like a deer directly below your treestand, require specific practice to master.
Drill Shots from Ground Level
Hone shooting uphill at elevated targets. Picture targeting deer in hilly terrain from the ground.
Lean Against Objects

Bracing yourself against a tree or shooting rail to steady your shot takes practice. Don’t try it for the first time when hunting.
Shoot from One Knee
Master shooting from your knee to prepare for fast offhand shots at close distances.
Practice Unsupported Shooting
Drill shooting offhand without any rest. You never know when you’ll need this invaluable skill.
Try Unconventional Positions
Challenge yourself with difficult body positions like twisting sideways that force you to adapt your form.
Use Realistic Practice Targets
Practice like you hunt using highly realistic 3D targets.
Utilize 3D Animal Targets
Life-like animal targets at varied ranges recreate hunting scenarios.
Position Targets Randomly
Avoid repeating target placements. Random setups keep you adapting like in the field.
Practice Shot Placement
Aiming for vital zones builds the skills for ethical kills on real animals.
Try Smaller Targets
Shrinking targets tightens groups by demanding greater precision.
Obscure Targets Partially
Use ground cover or overlapping brush to partially hide targets, challenging your shooting abilities.
Focus on Safe Shots
Only take high percentage shots you’d actually take when hunting live game.
Expanding your shooting practice across the full range of distances and angles you’ll potentially encounter hunting is crucial for being prepared. Step out of your comfort zone and master real-world skills. It will prove invaluable when you’re presented with that buck of a lifetime.
Dialing in tack-driving accuracy with your crossbow starts at close range. Before you can effectively stretch shots out further, it’s imperative to master grouping tight clusters at 20 yards. This discipline reveals flaws in technique and equipment while building foundational skills. Follow these tips to shrink groups and gain confidence within 20 yards.
Try Grouping Your Arrows Tightly at 20 Yards

For most crossbow hunters, shots within 20 yards are common. Deer often appear at close quarters in heavy cover. Mastering accuracy at this distance is crucial. Use these drills to shrink groups at 20 yards.
Use Quality Bolts
Precision carbon bolts specifically matched to your crossbow deliver the consistency needed for tight clusters.
Establish Proper Stance
Set your feet shoulder-width apart in a balanced athletic stance. This stable foundation supports accuracy.
Control Breathing
Utilize proper breathing techniques while aiming, releasing arrows between breaths to minimize movement.
Anchor Consistently
Anchor your draw hand to the same exact position on each shot, like your mouth corner. This promotes consistency.
Perfect Sight Alignment
When aiming, meticulously align sights or scope dead center on the bull’s-eye before firing.
Use Quality Broadheads
Match your field points and broadheads. Flawlessly flying broadheads tighten groups.
Observe Arrow Flight

Watch each arrow’s flight closely to diagnose fletching or broadhead issues affecting accuracy.
Mark Your Impacts
Label each arrow’s impact on the target to reveal positive and negative shot patterns over time.
Adjust Your Form Incrementally
Make minor modifications in technique between shots to steadily enhance precision.
Take Your Time
Resist rushing shots. Methodically implement each aspect of proper form on every release.
Diagnosing Accuracy Issues
Tighter 20 yard groups reveal equipment problems needing correction.
Inspect Your Arrows
Check for damaged fletchings or arrow shaft flaws contributing to erratic flight.
Replace Worn Strings
Frayed strings and cables degrade downrange precision over time.
Confirm Arrow Spine Consistency
Mismatched arrow spine flex ratings reduce grouping capabilities.
Check Arrow Rest Clearance
Ensure adequate fletching clearance. Any contact diminishes accuracy.
Examine Broadhead Sharpness
Even microscopic broadhead defects under magnification cause accuracy loss.
Verify Bowstring Wax Condition
Re-apply string wax so that the string slides smoothly across the rail.
Consider Professional Tuning
Many new crossbows need professional tuning for optimal arrow flight.
Grouping arrows super-tight at 20 yards reveals minor equipment and form flaws that degrade downrange precision. Embrace the discipline required to shrink your 20 yard groups. It will instill the fundamental skills and confidence needed to extend your effective shooting range when hunting.
A smooth, steady shooting motion is vital for crossbow accuracy. Jerky movements, hand shock, and abrupt shots throw off precision. Make every shot a coordinated, fluid motion. Follow these tips to identify and eliminate instability for drastically tighter groups.
Work on Shooting Smoothly Without Jerking
Nothing demolishes accuracy quicker than erratic movements when firing. Shooting smoothly promotes consistency and precision. Use these techniques to remove instability from your shot process.
Relax Muscles
Stay loose during your shot sequence. Tension transmits directly to the bow impairing a smooth release.
Align Your Stance
Plant your feet solidly and square your shoulders to the target. This athletic base provides stability.
Draw Steadily
Draw the string back using core muscles. Avoid abrupt or jerky motions during this process.
Pull Through Your Release
Don’t just open your hand. Pull smoothly through the release until your arm extends.
Follow Through
Hold steady for several seconds after firing. Follow through maintains stability and accuracy.
Avoid Death Gripping
Gripping the bow tightly transmits hand shock and degrades precision.
Let the Bow Do the Work
Relax and allow the bow’s cams and limbs propel the bolt. Avoid muscling through shots.
Use Proper Back Tension
Initiate shots using back muscles. This promotes a steady motion versus arm-pulling alone.
Try a Release Aid
Mechanical releases promote clean bolt release versus relying on finger dexterity and finesse.
Control Breathing
Utilize proper breathing techniques while aiming and firing during natural respiratory pauses.
Isolate and Eliminate Jerking
Identify when and why instability creeps into your shot process.
Videotape Your Shooting Form
Review video closely to reveal flaws in your shooting motions.
Focus on Proper Follow Through
Many issues stem from poor follow through. Hold steady through arrow impact.
Check Your Grip
An improper bow grip introduces hand torque and instability.
Examine Shooting Stance
A poor stance prevents executing smooth shots. Stand balanced and relaxed.
Evaluate Draw Motion
Ensure you draw the bow using back muscles, not arms, in a controlled manner.
Consider Adding Stabilizers
Stabilizers and dampeners reduce vibration and bow jump for smoother shooting.
By identifying problem areas causing instability and jerking, then implementing proper shooting fundamentals, you’ll gain the smooth, steady shot execution vital for pinpoint crossbow accuracy.
Proper breathing techniques are often overlooked but are absolutely vital for crossbow accuracy. Mastering your respiratory cycle while aiming and executing shots eliminates movement for superior precision. Follow these tips to harness breathing’s impact and gain tack-driving consistency.
Perfect Your Breathing Technique While Shooting
Breathing incorrectly throws off your shot sequence by introducing instability. Controlling your breathing promotes fluidity and accuracy. Use these methods to master breathing techniques.
Exhale Completely First
Before drawing your bow, fully exhale to empty your lungs. This prevents holding your breath.
Inhale Deeply
After exhaling completely, inhale deeply to establish your respiratory cycle.
Draw on the Inhale
Time your draw sequence as you’re inhaling for smooth motion while expanding your chest.
Anchor and Aim on the Pause
Anchor your draw hand and aim your shot during the natural pause after inhaling fully.
Release on the Exhale
Fire your shot as you begin exhaling steadily. This maintains stability.
Follow Through on Empty Lungs
Hold your follow through as you complete exhaling fully. Avoid gasping or sudden movements.
Build Rhythm
Develop an organized breathing cadence. Smooth rhythm improves consistency.
Avoid Rushed Shots

Resist firing between breaths. Wait for proper inhale-exhale timing.
Don’t Hold Your Breath
Holding breath causes tension and unsteadiness. Breathe naturally.
Practice Routinely
Drill proper breathing techniques until they become second nature.
Troubleshooting Breathing Issues
Watch for these common breathing-related accuracy killers.
Exhale Fully First
Don’t start your sequence already holding air. Exhale completely before inhaling.
Avoid Firing Between Breaths
Rushing shots when not in rhythm with your breathing cycle causes instability.
Use Nose Breathing
Breathe through your nose, not mouth. Nose breathing has a more controlled respiratory pause.
Manage Shot Anxiety
Rushed breathing from shot anxiety ruins timing. Stay calm and focused.
Consider Breathing Aids
Devices like diaphragm releases help promote proper breathing technique.
Practice Extensively
Drill breathing techniques regularly until they become second nature.
Harnessing the power of proper breathing provides a solid foundation for executing smooth, controlled shots. Make breathing mastery a top priority and gain the crossbow accuracy needed for consistent downrange precision.
If you want to improve your crossbow accuracy and take your shooting skills to the next level, following these 15 tips can help you achieve tighter shot groups and more consistent accuracy. Whether you’re a beginner looking to get started right or an experienced shooter hoping to fine-tune your technique, implementing even a few of these crossbow shooting pointers can lead to notable results.
Use a Shooting Block or Rest for Stability
One of the most important elements for accurate crossbow shooting is having a steady hold on the bow. The slightest quiver or shake when you pull the trigger can send your bolt astray. Using a shooting block or rest to support the front of your crossbow can significantly improve stability for a more accurate shot.
Look for a shooting rest or block designed specifically for crossbows, with a front support and cut out to properly cradle your bow. Having this stable foundation minimizes fatigue in your arms from holding the weight of the bow and also reduces minor movements for a more consistent aim and release. You can use a rest both when practicing at the range and when hunting from a stand or blind.
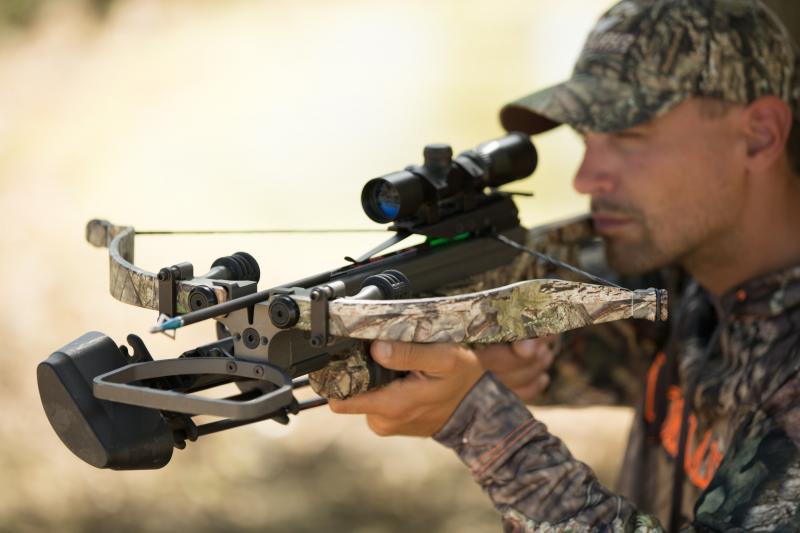
Always Use Proper Crossbow Shooting Form
Your shooting form can have a major impact on accuracy. With poor technique, you’re essentially sabotaging your shot before you even pull the trigger. Make sure to use proper crossbow shooting form every time you pick up your bow.
Start by positioning your feet shoulder-width apart in a balanced athletic stance. Keep your front arm holding the bow out straight with your elbow slightly bent. Pull the bow firmly back into the pocket of your shoulder and keep it tucked in tight. Your head should remain upright, leaning slightly forward. Use your rear hand to steadily grip the string and pull straight back to your anchor point on your face. Hold this position for 5 seconds as you aim before smoothly squeezing the trigger.
Choose the Right Bolts
Your arrows or bolts are one of the most crucial pieces of equipment for accuracy. Using bolts that are too long or too short, improperly spined, or subpar in build quality can make it impossible to achieve consistent tight groups, no matter how refined your shooting form is.
Always use bolts specifically recommended for your particular crossbow based on the draw weight, kinetic energy, and other specifications. Matching your bolts correctly allows for proper tuning and optimized arrow flight for your bow.
Tune Your Bow Regularly
A properly tuned crossbow can significantly improve downrange accuracy compared to one that is out of tune. Regular tuning helps ensure your bow is optimally synchronized for precise shooting. This involves checking details like draw weight, string and cable condition, rail lubrication, and making small adjustments to the scope or sight.
It’s best to tune your bow at the start of each season when pulling it out of storage. Tuning includes shooting bolts through a paper test sheet to reveal any flaws in arrow flight that can be corrected by small tweaks to the bow. This dialing in process gets all components working together flawlessly for most accurate shooting.
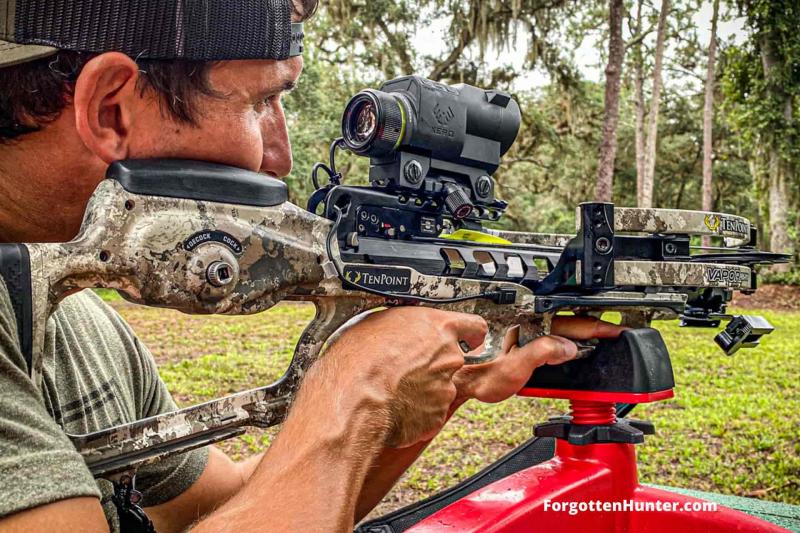
Master Your Crossbow Scope
Having a properly set up and sighted in scope is imperative for consistent crossbow accuracy at various distances. Take the time to adjust the optics for your dominant eye and learn how to look through the scope correctly in order to get the clearest sight picture.
Use a bench rest or shooting block to precisely bore sight your scope to hit dead on at 20, 30, 40, and 50 yards. Understand how to set the reticles and use the crosshairs or dot optics to their full potential. A perfectly dialed in scope you’re comfortable with helps you confidently aim and fire more accurately.
Practice Proper Trigger Control

Jerking or flinching the trigger is a surefire way to send your shot off target. Work on smoothly squeezing the trigger straight back to fire without disrupting your aim. You want a steady squeeze straight back until the bow fires as a surprise reaction.
Using a trigger trainer or simply dry firing can help develop proper technique. Pull back slowly and focus on keeping the bow steady as you gradually increase pressure straight back on the trigger until the bow dry fires. Make this smooth motion second nature before you start shooting bolts downrange.
Use Quality Broadheads and Practice with Them
The broadheads you hunt with should fly just like your practice points in order to put your shots right where you aim. Finding a properly spined fixed or mechanical broadhead that aligns with your field points is crucial.
Spend time shooting your broadheads at the range once they are sighted in to build confidence and ability. Broadhead in-flight characteristics, weight, and balance can differ from field points, so it’s important to practice with the actual heads you hunt with.
Strengthen Archery Muscles
Having well conditioned shooting muscles helps you avoid fatigue that can contribute to unsteadiness, shaking, and flawed shooting form. Work on strength training exercises that focus on your shoulders, back, chest, and arms to build muscle stamina.
Exercises like push ups, pull ups, lateral raises, and resistance band training give you the endurance you need to hold proper shooting form longer. As your muscles strengthen, you’ll achieve better accuracy shot after shot.
Control Your Breathing
Proper breathing techniques can significantly steady your shot for better crossbow accuracy. As you draw your bow, inhale deeply through your nose and exhale slowly through your mouth as you aim. Release your bolt or arrow as soon as you finish exhaling for the most stable shot.
By breathing out fully, you minimize body movements that can throw off your aim. Time the discharge of the bow with your exhale for excellent accuracy while hunting or on the range.
Reduce Bow Vibration

All crossbows vibrate to some degree upon firing. Excessive vibration can negatively affect downrange accuracy. Using a quality rope cocking device helps reduce vibration from cocking compared to cranking by hand. There are also special bow slings and limb dampeners available to diminish vibration.
An absorptive material like Mossy Oak Limbsaver placed at contact points between the rail and limbs can help reduce vibration-related noise and accuracy robbing movement. Less vibe means tighter groups.
Choose a Quality Scope
A top-notch optics system can certainly help you achieve better accuracy compared to low budget crossbow scopes. Invest in a high performance scope with premium optics, multi-coated lenses, and adjustable turrets from a reputable brand known for durability.
Having a clear sight picture through a scope you can dial-in precisely helps you consistently hit your aim point time after time. Don’t handicap your accuracy potential with subpar optics.
Use a Lighter Draw Weight If Needed

Handling a crossbow with too high of a draw weight can lead to unstable form, trembling, and poor shooting. Select a draw weight you can pull and hold steadily without shaking based on your strength and physique.
Don’t get caught up in the marketing hype of ultra-high poundage bows. Accuracy will suffer if the draw weight is too much for you to control confidently. Consider using a lighter poundage crossbow optimized for your abilities.
Upgrade to a High Performance Crossbow
The technology behind your crossbow can have a significant influence on downrange precision. Many budget crossbows lack refinements found in premium models that can help you achieve excellent accuracy.
Upgrading to a high-end crossbow with precision machined components, minimal friction, dampening technology, optimized limb and cam systems, and superior triggers can certainly yield better accuracy over basic entry-level designs.
Practice Regularly
One of the best ways to hone your skills is consistent practice. Try to shoot your crossbow regularly throughout the off season to build muscle memory and reinforce proper shooting techniques.
Work on target acquisition, trigger control, and managing factors like breath control through ongoing practice. Dedicate time several times a month at the range to maintain and advance your accuracy over time.
There are no shortcuts to shooting a crossbow accurately. Implementing these tips takes diligence and continual practice. But the effort is well worth it when you start stacking tight groups and hitting bull’s eyes consistently shot after shot. Your accuracy will reach new heights by mastering these crossbow shooting pointers.
Looking to become an expert marksman with your crossbow? Dialing in your shooting accuracy takes practice, patience and proper technique. Follow these 15 pro tips to take your skills to the next level.
Analyze Your Shot Groupings to Refine Your Form
Pay close attention to your bolt patterns on target to diagnose flaws in your shooting technique. Study how your arrows group and make small adjustments to stance, anchor point, trigger control and follow through based on the evidence.
For instance, horizontal stringing means you’re likely torqueing your bow. Vertical stringing can indicate an unsteady hold or improper trigger squeeze. Analyzing shot groupings and tweaking your form leads to tighter clusters.
Use Your Legs and Hips for Strength
Your stance provides the foundation for accurate shooting, so use your legs and hips properly. Keep feet shoulder width apart and knees slightly bent to create a solid base.
As you draw back, engage your leg and hip muscles by lowering your tailbone. This uses your larger lower body muscles to help hold weight at full draw for steadier aim.
Control the Cant of the Bow
An improperly canted crossbow that tilts left or right of vertical can definitely throw off your accuracy. Keep your bow straight up and down at full draw by consciously checking its orientation.
Draw a vertical line on your scope lens as a handy reference. Or use a small bubble level mounted to your rail. Monitoring and controlling cant helps shoot straighter.
Find Your Optimal Draw Length
Drawing too short or too long can reduce downrange precision. Your anchor point may vary from conventional wisdom based on your arm length and wingspan. Take time to experiment with different draw lengths to discover your accuracy sweet spot.
Gauge this by paper tuning and shooting various distances. Settle on the draw that delivers the tightest arrow groups to maximize your shooting potential.
Upgrade Your Arrow Rest
A quality arrow rest promotes precision by fully supporting the shaft for level launch and optimal arrow flight. Low profile, micro-adjustable rests like the QAD Ultra Rest allow fine tuning for fixed-head and field point alignment.
An upgrade here can make a noticeable difference in accuracy over basic rests. Your arrows will fly better with a top-tier rest dialed in for your bow.
Inspect Your Arrows Regularly
Damaged, warped, or improperly spined arrows can quickly sabotage your downrange precision. Inspect your bolts and field points closely before each practice session or hunt.
Check for cracked shafts, bent vanes, worn nocks and replace as needed. Consistently shooting quality arrows in good repair improves accuracy.
Strengthen Your Back Muscles

Having a strong back provides critical stability when shooting your crossbow. Work on developing your thoracic, latissimus dorsi, trapezius and rhomboid muscles through exercises like rows, pull downs and band pulls.
These muscles support your shoulder girdle for steadier bow hold and aim. Their increased endurance helps you maintain proper form shot after shot.
Always Use a Cocking Device
Skipping the cocking rope and cranking your bow by hand introduces user-induced torque and tension that throws off accuracy. The cocking action should be smooth, not forced.
Relying on a quality cocking device promotes consistency, reduces vibration and evenly tensions the limbs for truer arrow flight downrange.
Develop a Consistent Anchor Point
Your string hand anchor point should remain the exact same for every shot. Pick a comfortable reference point like corner of mouth, side of nose, under chin and draw back to it automatically.
With your release hand, touch the same point on your face every time. This ingrains proper head position and eliminates shot-to-shot variance.
Always Follow Through
Resist the urge to immediately watch your arrow in flight. Keep aiming several seconds after the trigger break maintaining your form throughout the follow through.
This avoids disrupting the bow at discharge impacting arrow flight. Follow through builds consistency for improved accuracy.
Work on Proper Stance and Posture
How you stand while shooting affects accuracy more than you may think. Adopt an athletic position with weight balanced over hips, slightly wider foot stance and erect back.
Look downrange with head up, resisting urge to hunch over bow. Proper stance and posture provides a solid foundation for precision.
Practice Shooting from Compromised Positions
You won’t always shoot from a perfect platform while hunting. Practice drawing, aiming and firing from seated, kneeling, crouching and off-hand positions.
Develop techniques like using support knees and limbs to build improvised rests. This prepares you for real-world shooting challenges.
Barrel-Mount a Flashlight for Low Light Accuracy

Trying to aim using a handheld light destroys any chance of accurate shooting in low light conditions. Smart hunters barrel-mount a compact flashlight for illumination without disruption.
Rheostat controls allow adjusting bulb intensity. Proper lighting improves accuracy in dawn, dusk and dark shooting situations.
Lighten Your Arrow Weight
Heavier arrows seem impressive for knock-down power, but too much weight can undermine accuracy. A very heavy shaft may not stabilize or spine correctly from your bow.
Try lighter arrows in your ideal spine and see if your groups tighten up. Match arrow weight properly to your draw poundage and length.
Dedicate sufficient time this off-season to ingrain these shooting tips and watch your groups shrink. Proper form, technique and practice make crossbow accuracy attainable for any motivated marksman.
Looking to shoot your crossbow with expert precision? Follow these 15 techniques to achieve tighter groups and pinpoint accuracy shot after shot.
Shoot in Various Weather Conditions You May Encounter

Don’t just practice under ideal conditions at the range. Head out when it’s rainy, windy or cold to experience real-world factors that affect your shooting.
Learn how your bow handles and how to adjust your aim for wind drift and other environmental elements. Being competent shooting in inclement weather breeds confidence.
Use a Quality String Wax
Waxing the string helps protect it from abrasion and separation. But more importantly, it reduces friction along the rail that can impact arrow flight.
Apply a top quality string wax like Bohning Tex-Tire regularly. Smoother string glide promotes precision downrange.
Optimize Your Arrow Vanes
Your vane choice, size and orientation influence arrow flight stability and fletching clearance. Test different vane configurations to see what gives the tightest grouping.
Adopting slightly offset vanes like the Bohning X Vanes can dramatically improve clearance and accuracy.
Upgrade Your Scope Lenses
Most crossbows come with cheap stock lenses that limit sight picture clarity and low light performance. Invest in premium multi-coated or anti-reflective lenses for brighter, crisper viewing.
Being able to distinguish details better through your optics translates to more confident aiming and tighter groupings.
Adjust Your Nocking Point
An improperly positioned nocking point can send arrows flying erratically. Take time to paper tune and micro adjust your nock height to find the bow’s sweet spot.
Once perfected, mark the location to consistently align the nock there for straighter shooting time after time.
Manage Your Bow’s Mass Weight
Excess accessories can make your crossbow front-heavy, affecting balance and offhand shooting. Keep additional weights like quivers detachable and limit mounting gear.
A well-balanced bow you can comfortably maneuver and support aids shooting accuracy from any position.
Practice Shooting at Unknown Distances
For hunting situations, you won’t always know the exact distance to your target as on a range. Practice shooting at random distances set up quickly as you draw your bow.
This sharpens your distance estimating skills and reflexive scope adjustments for a more accurate shot when it counts.
Try Mechanical Broadheads
Many crossbow hunters achieve better accuracy with mechanical broadheads over fixed blade models. When closed in flight, they align perfectly with field points.
Consider precision engineered heads like the G5 Montec to hit your aim point without adjusting sights between practice and hunting.
Use Target Points at the Range
Practicing often with field points damages arrow inserts over time, reducing accuracy. Use tough target points like the Easton Field Point XT at the range.
They can handle repeated impacts in targets while preserving your hunting points for finer tolerances.
Upgrade Your Bowstrings
Worn out strings and cables that stretch or fray can negatively influence arrow flight and downrange precision. Replacing them regularly maintains accuracy.
Top quality bowstrings like Stone Mountain Archery permeate less vibration for truer shots.
Chronograph Arrow Speed

Knowing your exact arrow speed aids in compensating for wind drift and selecting sight pins or tape. It also reveals if your bow is slowing down from peak efficiency.
Use a chronograph frequently to monitor velocity and make tuning adjustments to maintain top speed for flatter shooting.
Practice Proper Bow Grip Technique
An improper grip when holding the crossbow can torque the bow left or right, sending arrows off target. Your forward hand should apply even pressure straight back around the grip.
Consciously keeping the bow vertically aligned as you grip promotes better accuracy through a straight arrow launch.
Apply these professional shooting tips to shrink your group sizes dramatically. With practice comes crossbow mastery and tight arrow clusters hitting exactly where you aim.
Don’t Neglect Strength Training Exercises for Your Shooting Arm
Ready to take your crossbow shooting accuracy to the next level? Mastering these essential crossbow shooting techniques can help you become a better marksman this season.
1. Use a shooting block
A shooting block or rest provides a stable base for your crossbow, reducing movement as you pull the trigger. This helps improve shot accuracy and prevents muscle fatigue from holding the weight of the bow. Look for a lightweight, portable block that attaches securely to your crossbow.
2. Anchor your drawing hand
Anchoring means finding a consistent spot on your face where you draw your hand back to while aiming. This could be the corner of your mouth, under your chin, etc. Using the same anchor point every time improves consistency.
3. Utilize a rope cocker
A rope cocker makes drawing your crossbow easier and faster. It also allows you to draw with proper form. Improper drawing techniques can torque the bow and affect arrow flight. Take time to practice loading quickly and smoothly.
4. Use a quality scope
A scope with clear optics, proper magnification for your purposes, and durability is a critical crossbow accessory. Take time to sight in your scope properly at various distances so your shots hit true when hunting.
5. Practice your breathing
Proper breathing technique helps you steady your shot. Inhale as you draw, exhale halfway as you aim, and exhale fully as you squeeze the trigger. Remaining still during your final exhale improves accuracy.
6. Perfect your stance
Stand with your feet about shoulder-width apart, perpendicular to the target. Keep your weight balanced evenly and stand relaxed but firm. This athletic stance allows you to swing and pivot smoothly while absorbing recoil.
7. Use a sling
A sling connects your bow to your body, helping you better absorb recoil and swing for quick follow-up shots. Slings also allow you to safely carry your cocked crossbow hands-free as you walk.
8. Follow through on each shot
Resisting the urge to drop the bow or shift positions after the trigger pull helps accuracy. Keep your form, keep aiming down range, and let the bow recoil and vibrate normally after every shot.
9. Select the right arrows
Well-matched arrows in terms of length, weight, and fletching improve arrow speed, accuracy, and penetration. Consult your owner’s manual for recommended specs. Also, use only undamaged arrows.
10. Lubricate the rail
Apply a thin coat of rail lube before shooting to help your bolts glide smoothly along the rail. This enhances accuracy and prevents wear. Reapply after heavy use or if bolts start sticking.
11. Maintain your crossbow
Follow the manufacturer’s recommendations for string waxing, rail lubricating, replacement of cables and strings, etc. Proper upkeep improves performance and prevents dangerous malfunctions.
12. Use sound dampeners
Sound dampening products help mute vibrations and sound. This keeps your shots quieter and reduces unnecessary movement as you shoot. Look for limb or string dampeners and adhesive padding.
13. Practice regularly
Frequent practice sessions are essential for improving your skills. Shoot often at home or the range under realistic conditions. Vary distances and shooting positions. Challenge yourself.
14. Learn field techniques
Hunting situations require specialized skills like shooting at awkward angles from tree stands or blinds. Practice these scenarios regularly to prepare. It takes time to master shooting smoothly in the field.
15. Study your shot groupings
Analyzing your arrow groupings helps identify form flaws, equipment issues, etc. Consistent groupings indicate proficiency. If groups are wide or scattered, revisit your fundamentals and equipment.
Mastering these crossbow shooting tips takes time and dedication, but it will pay off in the field. Be patient and focus on improving a little each time you practice. Before you know it, you’ll have the skills and confidence to take clean, ethical shots on game day.
Now get out there, put in the work, and take your shooting abilities to the next level! Wishing you a successful and enjoyable crossbow hunting season.
Watch Skilled Archers and Continuously Improve Your Technique
If you want to become an exceptional archer, you need to be dedicated to continuously honing your form. Even after mastering the basics, there are always opportunities to refine your technique and improve your consistency and accuracy. One of the best ways to keep advancing is to study and learn from skilled archers.
Observe Proper Stance and Posture

Pay close attention to an expert archer’s stance, posture, and body alignment. Their feet should be positioned to balance their weight evenly across the hips and shoulders. Often the non-dominant foot is placed slightly forward for stability. The back and core muscles should be engaged but not tense. Keeping the neck, shoulders and arms relaxed is key.
Watch Their Nocking and Grip
An experienced archer nocks their arrow smoothly and with care, ensuring the arrow is securely in place on the string. They consistently grip the bow in the same location to enhance consistency. The bow hand’s hold on the grip is firm but relaxed, without squeezing or torqueing. Finger placement on the string is precise.
Note Their Draw Technique
On the draw motion, a top archer keeps their bow arm steady while pulling through the clicker or draw stop with control. They draw the string straight back to their anchor point without veering left or right. Their elbow on the draw arm remains level and their release hand stays relaxed until triggering the shot.
See How They Aim and Release

A skilled archer will aim through their peep sight or scope, keeping both eyes open. They focus intently on the target center, aligning their bow sights or instinctively aiming. On release, their bow hand remains steady and extended until follow through. No flinching occurs before the arrow hits its mark.
Observe Their Follow Through
After triggering the release, an expert holds body position and continues aiming down range as the arrow flies. They do not drop their bow arm or shift weight prematurely. Maintaining proper form through follow through improves consistency and accuracy.
Analyze Their Equipment and Tuning
Top competitive archers continuously tune their bows for optimal performance. They properly maintain bowstrings, cables, arrow rests, etc. according to the manufacturer’s recommendations. Their arrows are all identical in length, weight, and fletching for consistency. All accessories like sights and stabilizers are properly mounted and adjusted.
Study How They Problem Solve and Make Adjustments
Elite archers self-diagnose issues based on shot groupings and make appropriate corrections. If they are torquing the bow, they alter hand position. If arrows are missing right, they adjust the sight windage. They experiment with different stances, grips, release techniques and equipment to incrementally improve.
Pay Attention to Their Training and Practice Habits
The best in the sport shoot very frequently to ingrain proper form. They practice drawing and releasing continuously. They visualize perfect shots. During practice sessions they replicate competition scenarios. They slowly build up strength and stamina through measured progression.
Learn from Coaches and Mentors
Even professionals continue advancing by seeking coaching. Be humble and open to constructive feedback on your form. Take lessons and attend training camps or workshops. Having an experienced mentor assess your technique can fast-track improvement.
By regularly observing and learning from the best archers, you gain insight into optimal technical execution. Be sure to practice applying what you learn during solo shooting sessions. Videotape your form for comparison. With patience and persistence, your skills will eventually mirror those you admire.


