Perfect Lacrosse Stick. How to Tape Your Stick for Optimal GripPerfect Lacrosse Stick. How to Tape Your Stick for Optimal Grip
Proper Taping Techniques Prevent Slipping
As any lacrosse player knows, having a properly taped stick is absolutely essential for success on the field. A good taping job enhances your control, grip, and feel for the ball in a way that no other piece of equipment can. So if you want to elevate your game, it’s crucial to learn the proper techniques for taping your lacrosse stick.
I’ve been playing lacrosse since I was 5 years old, and over the years I’ve learned a thing or two about the art and science of taping sticks. In this article, I’ll share everything I know to help you tape your lacrosse stick like a pro. From materials and prep work to specialized taping patterns, you’ll learn all my secrets to creating the perfect grip for any position or skill level.
Start With Quality Tape Designed for Lacrosse
Not all tapes are created equal when it comes to lacrosse. Using a tape specifically designed for lacrosse sticks is crucial for getting the right blend of grip, cushioning, and durability. The last thing you want is for your tape to lose its stickiness or start peeling off mid-game.
My top tape recommendations include Warrior Lacrosse Grip and STX Gel Grip. Both offer excellent grip and shock absorption thanks to their specialized rubber-based adhesives. For extremely damp or rainy conditions, go for a heavy-duty outdoor lacrosse tape like Gecko or XTack. The all-weather adhesive provides rock-solid performance come rain or shine.
Prep the Stick to Maximize Tape Adhesion
Before applying any tape, take the time to thoroughly clean and prep the shaft and head of your stick. This helps the tape grip better and extends its life. I like to wipe down the shaft with isopropyl alcohol to remove any dirt, oils or old tape residue. If your head has a smooth plastic finish, lightly scuff it up with fine grit sandpaper so the tape can get a better hold.
It’s also important to tape up any cracks or chips in your shaft. Use a thin strip of heavy duty hockey tape to cover any problem areas before putting on your main lacrosse grip tape. This prevents further damage and helps keep the layers unified.
Strategically Tape the Shaft for Improved Control
Once prepped, it’s time to start applying tape to the shaft. Don’t just thoughtlessly wrap tape up and down the length. With strategic placement, you can amplify feel, grip, and ball control.
Start by firmly taping around the very bottom of the shaft near the butt end. This anchors the tape job and prevents slipping. Next, wrap a strip of tape where your bottom hand grips the shaft. Focus pressure here for maximum friction and surface area.
Gradually wrap additional strips up the shaft using about 50% overlap with each pass. Applying light tension as you wrap prevents air bubbles while maintaining just the right amount of compressions. Leave gaps between the wraps rather than creating one long piece from butt to head. This segmented taping allows some flex in the shaft and makes it easy to retape one section at a time.
Lock In Your Stick’s Structure with Reinforcing Tape
Unless you want a floppy noodle of a stick, strategic reinforcement is key. Wrap additional strips where the shaft meets the head to bolster that vulnerable joint. I also put an extra 2 pieces along the length of the shaft perpendicular to the main tape job.
This crisscross pattern really locks down the flex profile and structure of your stick. It also reinforces against damage if you take any hard slashes. I’ve had sticks last entire seasons thanks to strategic reinforcement taping!
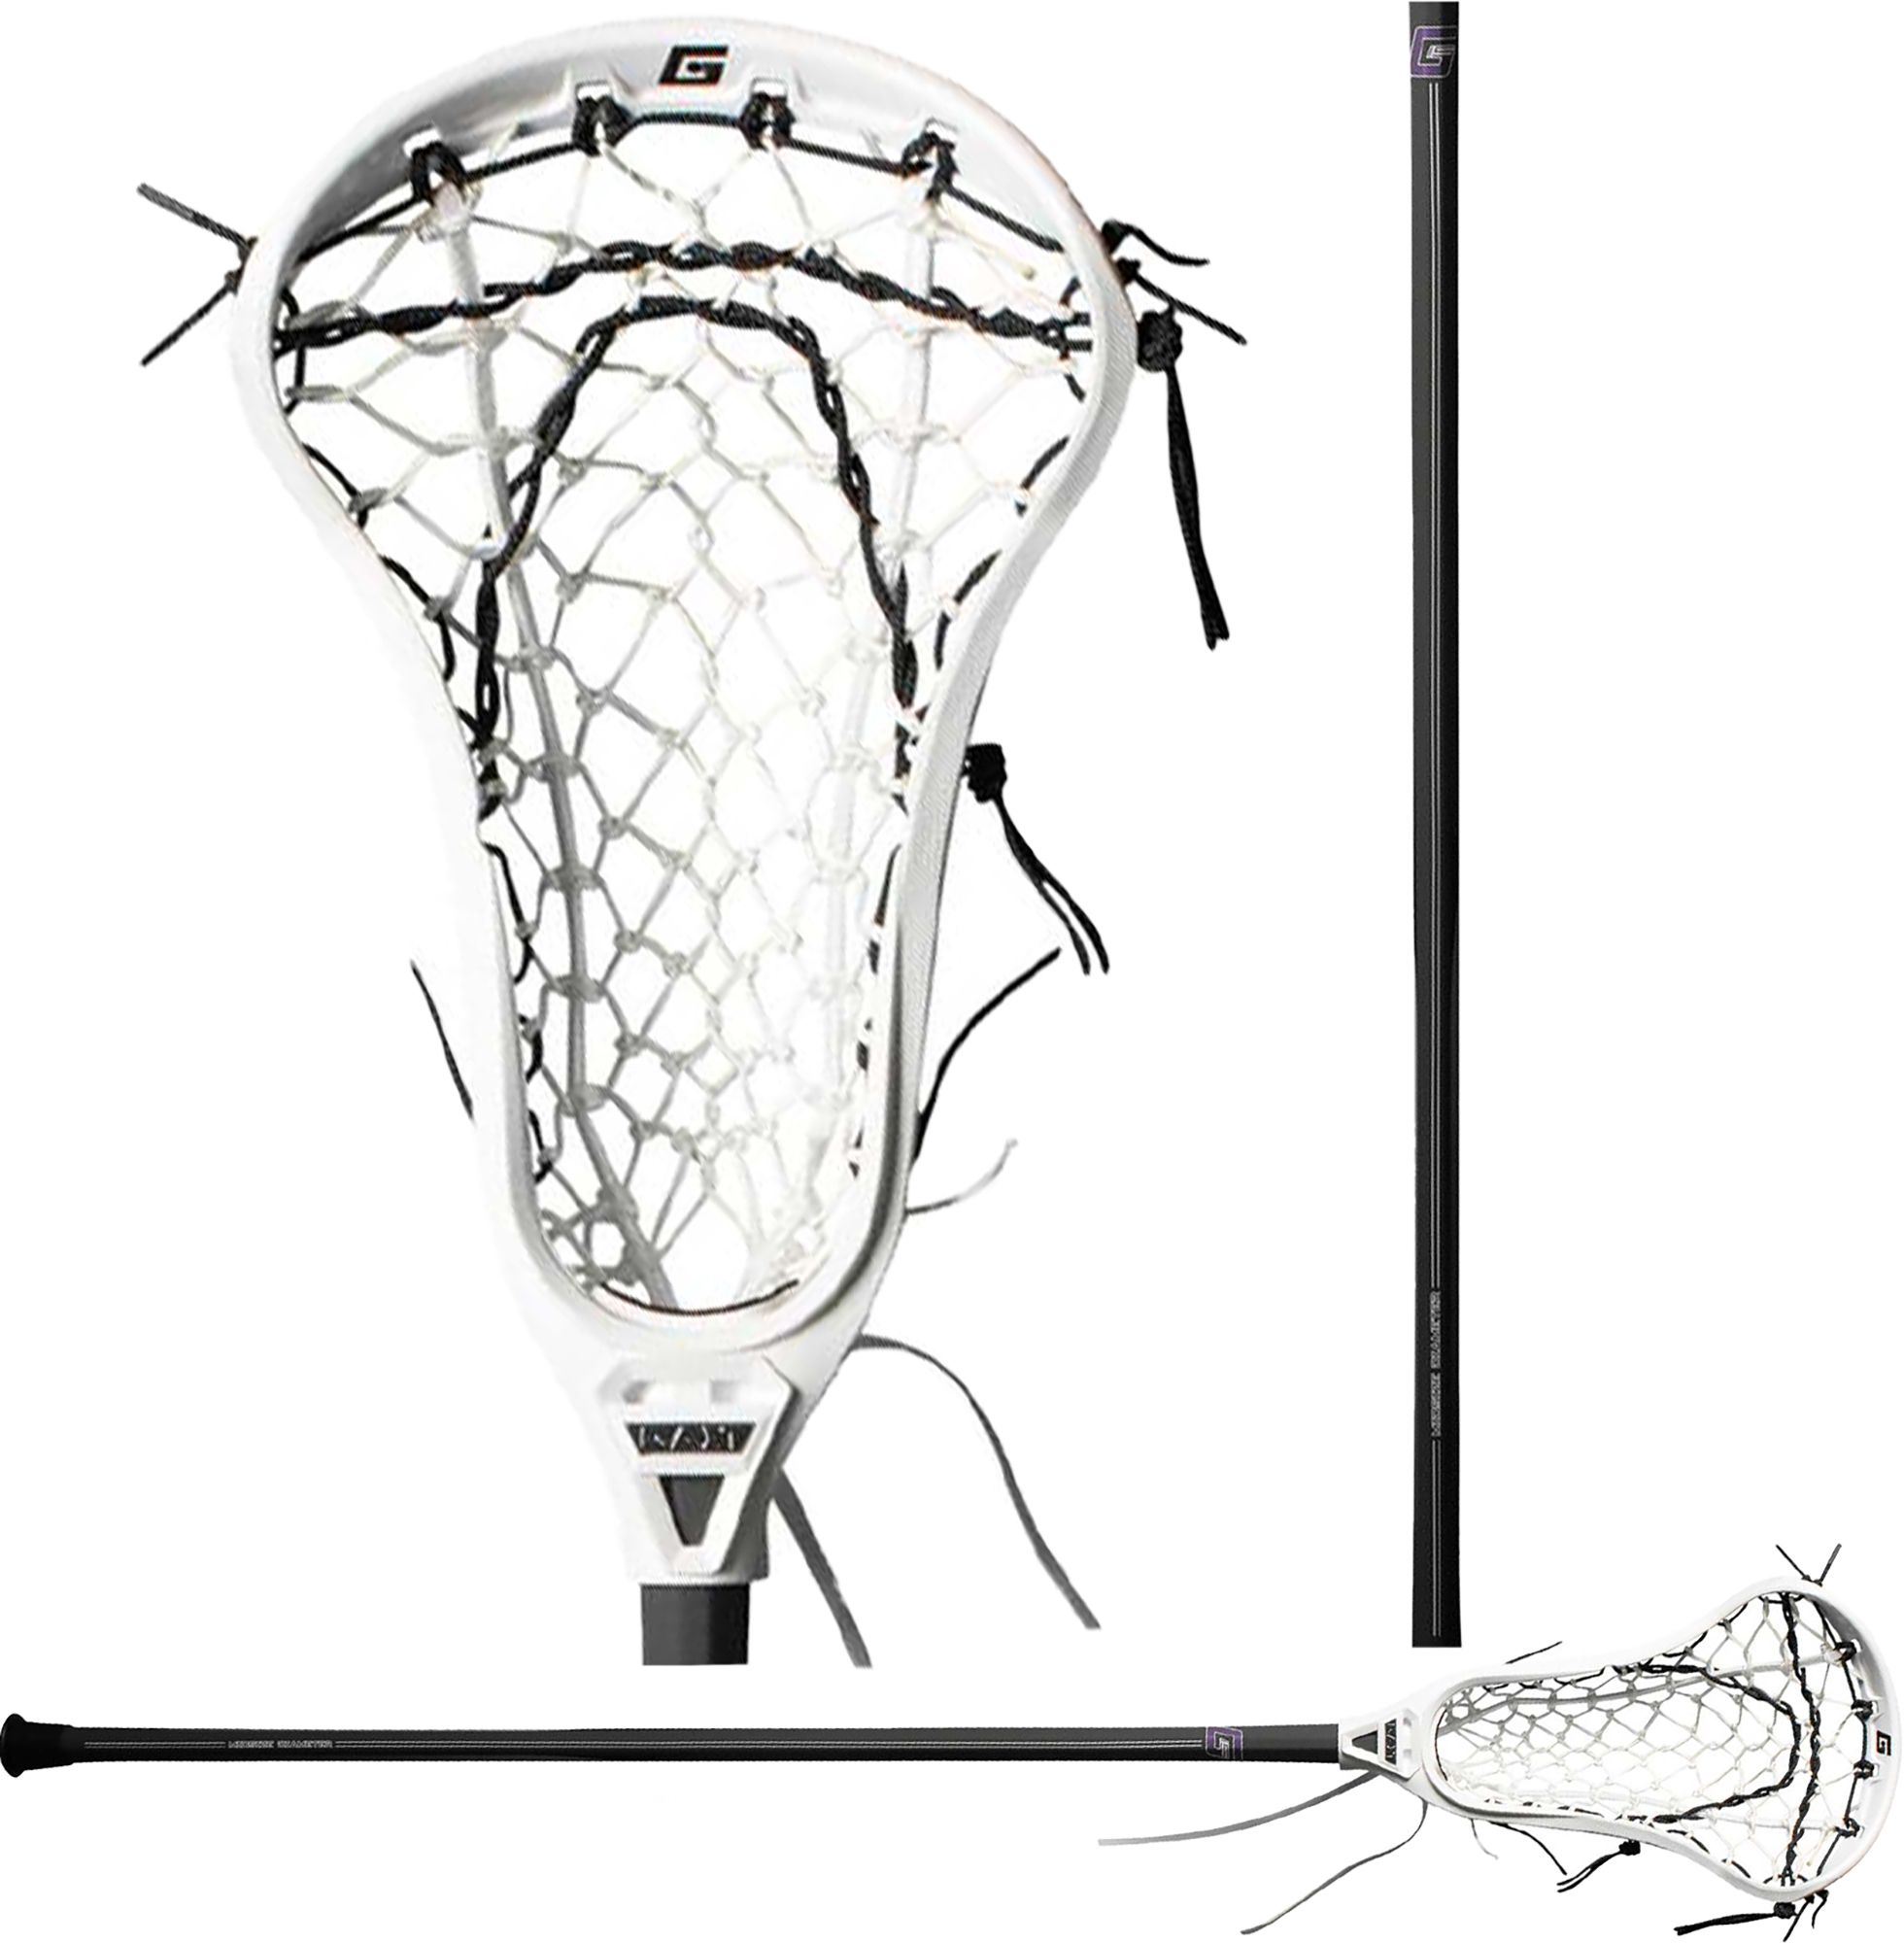
Tape the Scoop and Sidewalls for Superior Ball Control
For players looking to elevate their game via taping, extending the tape job onto the scoop and sidewalls of the head can make a dramatic difference.
Taping the scoop improves ball retention on ground balls, catches, and faceoff play. Wrap a strip around the front edge for extra grip as you rake and clamp down on ground balls. Just be sure to leave most of the scoop open so you can channel the ball into the pocket with control.
Taping along the sidewalls boosts ball control and handling, especially on tight cradle movements across your stick. Wrap a few strips along each sidewall, covering the shooting strings and cross-lacing midway up. This adds grip and structure while minimizing rattle inside the head.
Get Creative with Custom Taping Patterns and Textures
Essential Preparation Steps for Optimal Tape Adhesion
Proper preparation of your lacrosse stick is vital for ensuring the tape adheres effectively and lasts longer. Follow these steps to maximize tape adhesion:
- Clean the shaft thoroughly with isopropyl alcohol to remove dirt, oils, and old tape residue.
- If the head has a smooth plastic finish, lightly scuff it with fine-grit sandpaper to improve tape grip.
- Cover any cracks or chips in the shaft with thin strips of heavy-duty hockey tape before applying the main grip tape.
Taking the time to properly prep your stick will result in a more durable and effective tape job, enhancing your overall performance on the field.
How does proper preparation affect tape longevity?
Thorough cleaning and preparation of your lacrosse stick create an ideal surface for tape adhesion. By removing contaminants and providing a slightly textured surface, you allow the tape to form a stronger bond with the stick. This improved adhesion translates to a longer-lasting tape job that can withstand the rigors of intense gameplay without peeling or losing its grip.
Strategic Shaft Taping Techniques for Enhanced Control
Proper shaft taping is crucial for achieving optimal grip and control. Follow these strategic taping techniques to improve your handling:
- Start by firmly taping around the bottom of the shaft near the butt end to anchor the tape job.
- Wrap a strip of tape where your bottom hand grips the shaft, focusing pressure for maximum friction.
- Gradually wrap additional strips up the shaft, using about 50% overlap with each pass.
- Apply light tension while wrapping to prevent air bubbles and maintain proper compression.
- Leave gaps between wraps to allow for shaft flexibility and easy retaping of specific sections.
This segmented taping approach provides the right balance of grip and flexibility, allowing you to customize the feel of your stick to your preferences.
How does segmented taping benefit stick performance?
Segmented taping offers several advantages over a continuous tape job. It allows the shaft to maintain some of its natural flex, which can be crucial for certain shooting and passing techniques. Additionally, this method makes it easier to replace worn sections of tape without having to redo the entire stick. The strategic placement of tape also helps create targeted grip zones, enhancing your control in key areas of the stick.
Reinforcing Your Lacrosse Stick for Durability and Structure
Proper reinforcement taping can significantly extend the life of your lacrosse stick and maintain its structural integrity. Consider these reinforcement techniques:
- Wrap additional strips where the shaft meets the head to strengthen this vulnerable joint.
- Apply two extra pieces along the length of the shaft perpendicular to the main tape job, creating a crisscross pattern.
- Use reinforcement taping to customize the flex profile of your stick.
These reinforcement techniques not only protect against damage from hard slashes but also help maintain the stick’s structure and performance characteristics throughout the season.
How does reinforcement taping affect stick longevity?
Strategic reinforcement taping distributes impact forces more evenly across the stick, reducing the likelihood of cracks or breaks in high-stress areas. By stabilizing the shaft-head connection and providing additional structure along the length of the stick, you can significantly extend its lifespan. This extra durability allows you to maintain consistent performance throughout the season without worrying about premature equipment failure.
Enhancing Ball Control with Head and Scoop Taping
Extending your tape job to the head and scoop of your lacrosse stick can dramatically improve ball control and handling. Consider these techniques:
- Tape the scoop to improve ball retention on ground balls, catches, and faceoffs.
- Wrap a strip around the front edge of the scoop for extra grip when raking and clamping down on ground balls.
- Leave most of the scoop open to maintain proper ball channeling into the pocket.
- Apply tape along the sidewalls to boost ball control, especially during tight cradle movements.
- Cover shooting strings and cross-lacing midway up the sidewalls to add grip and structure while minimizing rattle.
These advanced taping techniques can give you a significant edge in ball control and handling, especially in crucial game situations.
How does head and scoop taping impact ball retention?
Taping the scoop and sidewalls of your lacrosse stick head creates additional friction points that help secure the ball during various maneuvers. The extra grip on the scoop improves your ability to scoop up ground balls quickly and securely, while sidewall taping enhances ball retention during cradling and dodging. These improvements in ball control can lead to fewer turnovers and more successful possessions, ultimately contributing to better overall performance on the field.
Customizing Your Lacrosse Stick with Creative Taping Patterns
Once you’ve mastered the basics of functional taping, you can explore creative patterns and textures to personalize your stick and fine-tune its feel. Consider these creative taping ideas:
- Alternate smooth and gritty tapes for varied texture along the shaft.
- Weave different colored tapes to create unique patterns.
- Use stickers or stencils when wrapping to add designs or logos.
- Incorporate small personalized trinkets under the main tape layer as hidden good luck charms.
- Experiment with grip tape waffle patterns on specific sections of the stick.
These custom taping techniques allow you to express your personality while potentially enhancing your stick’s performance characteristics.
How can creative taping patterns improve stick feel?
Custom taping patterns do more than just add visual appeal to your lacrosse stick. By strategically combining different tape textures and thicknesses, you can create a truly personalized grip that perfectly suits your playing style. For example, using a waffle pattern in certain areas can provide extra traction for crucial stick movements, while smoother sections might allow for quicker hand adjustments. This level of customization can lead to improved confidence and performance on the field.
Maintaining Your Taped Lacrosse Stick for Consistent Performance
Proper maintenance of your taped lacrosse stick is essential for maintaining its performance and extending the life of your tape job. Follow these maintenance tips:
- Regularly inspect your tape job for signs of wear or peeling.
- Clean your stick after each use to remove dirt and sweat that can degrade the tape.
- Replace worn sections of tape promptly to maintain optimal grip.
- Store your stick in a cool, dry place to prevent tape degradation.
- Consider using a stick bag to protect your tape job during transport.
By incorporating these maintenance practices into your routine, you can ensure that your taped lacrosse stick continues to perform at its best throughout the season.
How often should you replace your lacrosse stick tape?
The frequency of tape replacement depends on various factors, including your playing style, practice intensity, and environmental conditions. As a general rule, inspect your tape job before each game or practice session. If you notice significant wear, peeling, or loss of grip, it’s time to replace the affected sections. Many players find that retaping their stick every 2-4 weeks during the active season helps maintain optimal performance. However, high-intensity players or those in particularly challenging environments may need to retape more frequently.

Mastering the art of taping your lacrosse stick is a crucial skill for any player looking to elevate their game. By selecting the right tape, preparing your stick properly, and employing strategic taping techniques, you can significantly enhance your grip, control, and overall performance on the field. Remember that finding the perfect tape job often requires experimentation and personal preference, so don’t be afraid to try different methods until you find what works best for you. With practice and attention to detail, you’ll soon be taping your lacrosse stick like a pro, giving yourself a competitive edge in every game.
Proper Taping Techniques Prevent Slipping
As any lacrosse player knows, having a properly taped stick is absolutely essential for success on the field. A good taping job enhances your control, grip, and feel for the ball in a way that no other piece of equipment can. So if you want to elevate your game, it’s crucial to learn the proper techniques for taping your lacrosse stick.
I’ve been playing lacrosse since I was 5 years old, and over the years I’ve learned a thing or two about the art and science of taping sticks. In this article, I’ll share everything I know to help you tape your lacrosse stick like a pro. From materials and prep work to specialized taping patterns, you’ll learn all my secrets to creating the perfect grip for any position or skill level.
Start With Quality Tape Designed for Lacrosse
Not all tapes are created equal when it comes to lacrosse. Using a tape specifically designed for lacrosse sticks is crucial for getting the right blend of grip, cushioning, and durability. The last thing you want is for your tape to lose its stickiness or start peeling off mid-game.
My top tape recommendations include Warrior Lacrosse Grip and STX Gel Grip. Both offer excellent grip and shock absorption thanks to their specialized rubber-based adhesives. For extremely damp or rainy conditions, go for a heavy-duty outdoor lacrosse tape like Gecko or XTack. The all-weather adhesive provides rock-solid performance come rain or shine.
Prep the Stick to Maximize Tape Adhesion
Before applying any tape, take the time to thoroughly clean and prep the shaft and head of your stick. This helps the tape grip better and extends its life. I like to wipe down the shaft with isopropyl alcohol to remove any dirt, oils or old tape residue. If your head has a smooth plastic finish, lightly scuff it up with fine grit sandpaper so the tape can get a better hold.
It’s also important to tape up any cracks or chips in your shaft. Use a thin strip of heavy duty hockey tape to cover any problem areas before putting on your main lacrosse grip tape. This prevents further damage and helps keep the layers unified.
Strategically Tape the Shaft for Improved Control
Once prepped, it’s time to start applying tape to the shaft. Don’t just thoughtlessly wrap tape up and down the length. With strategic placement, you can amplify feel, grip, and ball control.
Start by firmly taping around the very bottom of the shaft near the butt end. This anchors the tape job and prevents slipping. Next, wrap a strip of tape where your bottom hand grips the shaft. Focus pressure here for maximum friction and surface area.
Gradually wrap additional strips up the shaft using about 50% overlap with each pass. Applying light tension as you wrap prevents air bubbles while maintaining just the right amount of compressions. Leave gaps between the wraps rather than creating one long piece from butt to head. This segmented taping allows some flex in the shaft and makes it easy to retape one section at a time.
Lock In Your Stick’s Structure with Reinforcing Tape
Unless you want a floppy noodle of a stick, strategic reinforcement is key. Wrap additional strips where the shaft meets the head to bolster that vulnerable joint. I also put an extra 2 pieces along the length of the shaft perpendicular to the main tape job.
This crisscross pattern really locks down the flex profile and structure of your stick. It also reinforces against damage if you take any hard slashes. I’ve had sticks last entire seasons thanks to strategic reinforcement taping!
Tape the Scoop and Sidewalls for Superior Ball Control
For players looking to elevate their game via taping, extending the tape job onto the scoop and sidewalls of the head can make a dramatic difference.
Taping the scoop improves ball retention on ground balls, catches, and faceoff play. Wrap a strip around the front edge for extra grip as you rake and clamp down on ground balls. Just be sure to leave most of the scoop open so you can channel the ball into the pocket with control.
Taping along the sidewalls boosts ball control and handling, especially on tight cradle movements across your stick. Wrap a few strips along each sidewall, covering the shooting strings and cross-lacing midway up. This adds grip and structure while minimizing rattle inside the head.
Get Creative with Custom Taping Patterns and Textures
Once you’ve mastered the basics, it’s fun to get creative with custom taping styles that match your personal style and feel preferences.
Change the texture and thickness by alternating smooth and gritty tapes for sections of the shaft. Weave different colors into cool patterns along the shaft or head. Use stickers and stencils when wrapping to make unique designs. Or tape small personalized trinkets under the main layer as easter eggs!
On my stick, I love using a grip tape waffle pattern on my lower handle for ultimate control. And I weave a metallic gold tape into my sidewalls because it looks slick against the black mesh.
Don’t be afraid to experiment and make it your own. Just be sure any customizations don’t impact key functions like grip, cushioning, and flex.
Maintain Your Tape Job for Consistent Excellence
Like any lacrosse gear, tape requires proper maintenance to keep performing its best. Make it a habit to rewrap any sections showing wear after each game or practice. I keep spare tape in my bag for quick touch ups as needed.
For ideal adhesion each time you tape, use a bit of rubbing alcohol to clean the old surface first. And peel off and fully replace entire sections at least every 2-3 weeks, or whenever you notice degraded grip and cushioning.
With some strategic placement, the right materials, and consistent maintenance, you can tape your lacrosse stick like a pro. Employing these techniques, you’ll reach new levels of ball control and handling. Just be prepared to share your secrets as your teammates start asking how you got your stick so perfectly dialed in!
Types of Lacrosse Stick Tape for Control
When it comes to taping a lacrosse stick, the tape itself makes all the difference. With so many types and brands of stick tape out there, it can be tricky finding the right one that gives you the perfect blend of grip, cushioning, and responsiveness.
Through much trial and error over my years playing lacrosse, I’ve tested just about every tape on the market. And I’ve identified the top options that I rely on for optimized performance and control out on the field.
Cloth-Based Tapes For Shock Absorption
Many top lacrosse tapes use a specialized cloth backing rather than standard plastic film found in basic athletic tapes. The fabric foundation provides excellent shock absorption as the ball makes contact with your stick.
My go-to cloth tape is Warrior Lacrosse Grip. The grippy textured surface gives your hands plenty of traction, while the elastic fabric conforms to the shape of your stick for a personalized feel.
For extreme cushioning, STX Soft Hands Tape can’t be beat. It uses multiple layers of fabric, foam, and adhesive to create a super soft and flexible grip. Just be aware that the extra padding can dampen sensitivity and feedback on passes, catches, and shots.
All-Weather Hold From Rubber-Based Formulas
For reliable grip even in the rain, specialized rubber adhesives found in many lacrosse tapes keep them stickier than traditional athletic tape.
My top outdoor pick is Gecko Grip Tape. The 100% waterproof formula maintains its tackiness through any playing conditions. I’ve played full games in pouring rain with Gecko Grip holding strong throughout.
XTack Lacrosse Tape is another all-weather option, using a thick rubber adhesive to essentially glue the tape to your stick. Though be warned, XTack can be a pain to remove so it may not be ideal if you re-tape frequently.
Waxing and Hybrid Tapes for Fast Release
While stickier tapes excel for control, waxed lacrosse tapes create a smoother release when passing and shooting. The wax coating helps the ball slide off the tape’s surface more cleanly.
StringKing Wax Mesh Tape is my pick for lightweight wax-based grip. A thin layer of beeswax lets the ball move fluidly from stick to net. Re-wax occasionally with StringKing Wax to maintain the slick surface.
Hybrid options like East Coast Dyes Combo Tape provide the best of both worlds. The cloth side grips for control while the smoother plastic side aids release. Simply rotate the roll during wrapping to put the right side facing out where needed.
Dense Hockey Tape For Reinforcing Vulnerable Areas
Though not for full taping jobs, super-thick hockey tape comes in handy for reinforcing high wear areas. The dense, waterproof backing resists moisture, UV damage, and abrasion much longer than standard lacrosse tapes.
I wrap extra layers of Renfrew Pro Hockey Tape around the bottom of my shaft and up where it meets the head. This keeps those vulnerable spots protected through endless ground ball scoops and checks.
With the right tape for the job, you gain an advantage in ball control, handling, and responsiveness. Don’t settle for basic athletic tape that won’t withstand lacrosse-level performance and abuse. Treat your stick to one of these specialized lacrosse grip tapes, and feel the difference in your game.
Prepare Stick Before Taping for Best Results
They say proper preparation prevents poor performance. That old adage definitely applies when it comes to taping your lacrosse stick. Taking the time to properly prep the shaft and head before applying tape makes a dramatic difference in adhesion, longevity, and overall quality of the taping job.
In my early lacrosse days, I would just wrap new tape directly over my old worn out tape in a rush to get back on the field. It would start peeling off in a matter of minutes. Finally wisening up on proper pre-taping procedures revolutionized my tape’s grip and durability.
Cleaning Eliminates Surface Contaminants
The first key step is thoroughly cleaning your shaft and head first. This removes any built-up dirt, grease, and oils that prevent the new tape from properly bonding.
For plastic and metal shafts, I scrub them down with isopropyl alcohol wipes. The alcohol quickly dissolves and evaporates away any contaminants. Make sure to wipe down the full length of the shaft as well as inside the throat and around the sides of the scoop.
On wooden shafts, instead use a multi-surface cleaner and soft rag to gently clean while avoiding damaging the wood. You want to eliminate any slick accumulated stick substances without stripping the shaft’s finish.
Scuffing the Plastic Promotes Grip
If your head has a hard, slick plastic finish it’s important to scuff it up so tape can properly adhere. I use 150 grit sandpaper to lightly scratch the surface, especially along the scoop and sidewalls where I tape.
Don’t overdo it to the point of gouging deep grooves. Just some light scuffing to give the tape something to grab onto. This keeps the tape job locked on tight through those high-velocity catches, cradles, and one-timers.
Seal Any Cracks to Prevent Further Damage
In the battle-scarred life of a lacrosse stick, cracks and chips in the shaft are inevitable. But leaving them open leads to more problems down the road.
Inspect your shaft and use razor-thin strips of heavy duty hockey tape to tightly seal any fractures or splintered areas. This prevents dirt and moisture from penetrating deeper and causing more extensive damage.
Reinforce major cracks by wrapping over them diagonally in an X pattern with 2 crossed strips of tape. This adds structural strength from multiple directions.
Remove All Old Tape For Maximum Adhesion
Finally, peel off any old tape remaining on your stick before applying fresh tape. Even if just rewrapping a small section, remove the old tape first. The new tape bonds much better to the bare shaft or head surface than if layered on top of existing tape.
Taking just a few extra minutes to properly clean, scuff, seal, and remove old tape makes such a huge difference in grip, smoothness, and longevity of your lacrosse stick’s tape job. Do it right from the start and both your stick and performance will benefit.
Taping the Butt End for Added Stability
A properly taped butt end is a foundational element of any great lacrosse stick tape job. Taking the time to firmly anchor the tape at the base gives stability to the entire taping that follows up the shaft. It also prevents slipping and abrasion damage from ground ball scoops and checks thrown your way.
In my early playing days, I’d only tape a few inches down from the head and call it good. But I quickly learned the hard way that a loose, untaped butt end leads to ripped tape, slipped hands, and reduced ball control.
Use Extra Tension for Durability
Start by tightly wrapping a strip of tape around the very base of the shaft near the plastic end cap. Pull the tape taut as you make the first revolution to avoid any bumps, ridges, or air pockets.
The added tension increases adhesion and smoothes the tape surface for an optimal grip. It also compresses the tape fibers together to make it more resistant to fraying from scooping and checking impacts.
Overlap 75% for Strong Adhesion
Maintain that smooth, tight wrap as you work your way up the shaft, using at least a 75% overlap with each pass. This ensures maximum contact between the adhesive backing and shaft surface underneath.
Lesser overlap risks the formation of ridges that lead to peeling. While 100% overlap wastes tape and makes for bulky, misshapened wraps. I’ve found that 75% overlap hits the tape adhesion sweet spot.
Wrap Above End Cap to Prevent Slippage
Don’t stop the butt end tape at the top edge of the end cap. Wrap an inch or two past it up the shaft. This provides grip where you need it most as the lower hand naturally slides during play.
Otherwise, your hand will simply slide off the smooth end cap onto the bare shaft. By taping just above it, you create a sticky surface to grip when transitioning on and off the plastic.
Reinforce With Sidewall Tape for Durability
To further bulletproof the butt end, add a strip of heavy duty sidewall tape like ECD Hero over the lacrosse tape.
The rugged synthetic material protects your grip tape from premature wear and tear. No more shredded tape and slippery shafts after scooping ground ball after ground ball!
With a firmly anchored base and reinforced sidewalls, you eliminate two common weak points for tape jobs. Take those extra steps securing the butt end and you’ll notice the increased control and consistency in every cradle, pass, and shot.
Wrapping the Shaft Helps Reinforce Structure
Simply wrapping tape up and down the shaft may seem sufficient for some players. But strategic reinforcement wrapping takes your tape job to the next level for amplified control and ball handling.
Through trial and error dealing with floppy, misshaped sticks early on, I’ve learned how to leverage tape to build a perfectly tuned stick with ideal flex and responsiveness.
Crisscross Tape Adds Structural Support
Once I’ve taped a comfortable grip area for my bottom hand, I’ll wrap a strip of hockey tape perpendicular across the shaft about a third of the way up. Then I’ll add another strip crossed over that one to form an X.
This crisscross pattern compresses the shaft from multiple angles, creating a more rigid feel overall. It also reinforces the shaft against damage from checks that land in that area.
Tape Above and Below the Head
The vulnerable joint where the head meets shaft also benefits from strategic reinforcement. I wrap several strips of hockey tape tightly around the throat of the head as well as an inch or two down the shaft.
This extra rigidity ensures the head doesn’t develop annoying rattle or start wobbling around weakly on ground balls. Reinforced throats also better withstand those nasty checks that like to target your hands and wrists.
Add Strips Along the Length to Fine-Tune Flex
Placing individual strips of stiffer tape intermittently along the full shaft length allows for precision flex tuning.
I put down a strip about halfway up at the pinch point I use for shooting and passing. This firms up my shooting mechanics and accuracy. Another strip 3/4 up locks in the upper hand while cradling.
This custom reinforcement taping really optimizes my pocket, hold, and mechanics for every type of play situation.
Avoid Mummifying the Stick in One Endless Wrap
While reinforcing strategic areas is great, be careful not to overdo it by wrapping one single endless piece of tape up and down the full shaft length.
This mummified tape job robs all responsiveness, flex and feel from your shaft. It also promotes bubbling as you flex the stick.
Stick to reinforcing just critical zones to get the control of strategic taping without sacrificing too much bending and feel.
Dialing in the ideal structure, flex points, and strength with tailored reinforcement tape gives you an extension of your hands that performs exactly how you need it to. You gain all the benefits of a perfectly broken-in pocket right when you step on the field.
Techniques to Tape Around the Head for Control
For next-level lacrosse stick taping, extending the tape onto the scoop and sidewalls of the head provides game-changing improvements in ball control and handling.
As a developing player, I’d only tape the shaft thinking the head could take care of itself. But once I mastered taping the full stick, it elevated every aspect of my play.
Taping the Scoop Amplifies Ground Ball Performance
Applying grip tape along the front edge of the scoop enhances how cleanly you can pick up ground balls. Wrap two strips of tape, covering about 1/3 of the total width of the scoop.
This extra stickiness lets you really clamp down and “grip it and rip it” on tough ground ball battles. The added traction also improves quick hand positioning adjustments when floating the stick underneath rocket grounders.
Cover Shooting Strings to Strengthen Passing
Taping directly over the shooting strings and sidewall knots gives you more control over ball movement up and down the head.
The tape creates a smooth ramp over the uneven strings, allowing for quicker, no-bounce passing through the zone needed for fast-break possessions.
Reinforce Sidewalls for Superior Control
Wrapping grip tape up and down the sidewalls of the head allows you to hang onto the ball better during tight, close cradles across your stick.
This extra friction keeps the ball glued into your pocket on the run rather than rattling around and bouncing out. I also tape a bit lower on my dominant-hand side for an advantage clamping down on one-handed cradles.
Less is More to Avoid Deadening Feel
While taping the head provides a ton of added control, don’t overdo it. Excess tape, especially with thicker cushioned varieties, can deaden the feel and feedback needed for developing a naturally quick stick.
Use thin tape in minimal layers focused just on the scoop edge, shooting strings, and midway up the sidewalls. You want the head to still be responsive, not mummified in tape.
Following these techniques for taping your lacrosse stick head as well as shaft gives you 360 degrees of optimized grip. You gain an advantage controlling ground balls, cradling in traffic, and passing on the run – all without sacrificing any feel or touch.
Taping the Scoop for Improved Ball Retention
Having the ball bounce out of your stick’s scoop at a critical moment can cost you a goal. Taking the time to properly tape your scoop locks in ball retention for improved performance all over the field.
As a developing player, I often fumbled passes and lost control of ground balls as the ball rattled around in an untaped scoop. But taping the scoop gave me the ultimate advantage controlling possession.
Reinforce Just the Front Edge
When taping the scoop, you don’t want to cover the entire width. Just applying tape along the front 2-3 inches is ideal for ball retention.
This reinforced edge lets you get under ground balls and clamp down for superior control. But you still have an open pocket to channel the ball into off scoops.
Wrap Outward for Extended Tape Life
Anchor the tape at the base of the scoop, but wrap outwards rather than down into the pocket. This prevents the leading edge from catching on the field surface as you scoop and fraying prematurely.
If you do tape into the pocket, use a more durable tape like hockey tape to handle the abrasion. And trim off any frayed ends after each use.
Add Gritty Texture for Extra Grip
Using a grippy, textured tape rather than a super slick option provides tenacious traction along the scoop edge.
I like adding little crossover strips of grittier tape like Gecko lacrosse grip or hockey tape sporadically as I wrap along the scoop. The varying texture gives you ultimate hold of ground balls.
Re-Tape Before Each Use
While taping the full shaft may only need rewrapping every few weeks, re-tape the scoop before every game or practice.
The scoop edge takes a beating from field contact on ground balls, so tape wear and tear happens fast. Even little gaps or frayed edges reduce retention.
Get in the habit of refreshing the scoop tape every time for flawless ball control you can rely on in those pressure moments reading ground balls.
With a strapped-down scoop, you gain an enormous advantage scooping, trapping, and retaining possession off errant passes and ground balls. Don’t give up that extra edge to the opposition and make scoop taping part of your pre-game ritual.
Taping the Sidewalls Maximizes Ball Control
Applying grip tape along the sidewalls of your stick head gives you superior control cradling, passing, and shooting in tight spaces where ball handling matters most.
As a developing midfielder, I’d often lose possession from checks when trying to cradle through traffic across the middle. But once I started reinforcing my sidewalls with tape, I could clamp down on the rock through the tightest gaps.
Target the Midsection for Reinforced Control
For the optimal boost in ball control, tape just the middle region of the sidewalls about 4-6 inches up from the scoop.
This area gives you the most enhanced handling for quick sticks, tight dodges, and keeping it in the box on wraps. Don’t cover the full length, as you want some pocket freedom.
Cover Shooting Strings for Smooth Releases
Make sure to wrap the tape directly over the shooting strings on the sidewall so they don’t impede ball movement up the channel.
The tape creates a smooth ramp over the uneven strings, allowing crisper passes and shots as you move the ball through the zone.
Reinforce Both Sidewalls Evenly
It may be tempting to tape just your dominant hand’s sidewall more for cradling control. But uneven tape can make your stick feel off-balance.
I like to tape both walls evenly not only for stick symmetry, but also for maximizing two-handed ball control.
Avoid Excessive Tape to Retain Feel
While taping the sidewalls boosts grip, wrapping too much tape can deaden feel for the ball and pocket.
Use thin tape in minimal layers focused just around the midsection shooting strings. You want enhanced control but still have touch passing and catching on the run.
Dialing in sidewall taping gives you an enormous advantage in traffic situations where ball handling really matters. Take control of possessions and punish teams throwing lazy checks with perfectly taped sidewalls.
Covering Shooting Strings Aids Passing Accuracy
Applying grip tape directly over the shooting strings and sidewall knots smooths out ball movement for enhanced passing control and accuracy.
Early on as a developing player, my passing suffered from the uneven shooting strings impeding smooth ball movement up and down the head. But taping over them made a world of difference.
Create a Consistent Ramp Up the Sidewalls
Wrapping tape aligned with and just barely covering the shooting strings forms a consistent ramp that lets the ball roll true.
This negates the rattling and deflection that can happen when passing over bumpy shooting strings. Your feeds upfield hit their mark instead of bouncing astray.
Avoid Catching Strings in the Wrap
Be careful not to catch any shooting strings under the tape as you wrap over them on the sidewalls. Any depressions or gaps will ruin the smooth ball ramp.
Use thin tape and keep tension to firmly adhere over the surface consistently. Pinch and crease the tape at intersections to avoid catching strings underneath.
Reinforce Both Sidewalls for Balance
Make sure to tape over the shooting strings on both sidewalls, even if you primarily pass from one side. This keeps the head balanced and your passes shooting straight.
The last thing you want is passes tailing off-target because one sidewall has more friction than the other.
Refresh Frequently as Tape Wears
Unlike shaft tape, refresh the shooting string tape after every few practices or games as it shows wear. Even small gaps or peeled edges disrupt your passing precision.
Get in the habit of retaping over strings before each time you take the field, and enjoy noticeably crisper feeds each game.
With shooting strings smoothed over, you gain an advantage placing passes exactly where your teammates expect them on the run. Tape over those pesky strings and watch your assists take a sharp turn upward.
Custom Taping Styles for Personalized Feel
Choosing the Right Tape
The Standard Overlap Method
The Striping Technique
Basket and Chevron Weave Patterns
Personalized Taping for Optimal Grip
Proper Taping Allows Adjusting Stick Flexibility
Start With a Quality Tape
Focus Taping Where You Grip
Build Up Layers – But Not Too Much
Reinforce High-Wear Areas
Weave For Extra Grip and Style
Work With Your Stick’s Flex Point
Cutting Weight? Strategic Taping Helps
Dial In Your Ideal Tape Tension
Taping for Durability Without Adding Excess Weight
Pick the Right Tape for Your Needs
Strategically Tape High-Wear Areas
Overlap Layers For Grip and Cushion
Combine With Striping For Max Durability
Weaving Adds Protection and Grip Styling
Work With Your Stick’s Flex Point
Consider Tape Width to Add Protection
Change Up Taping Tension For Flex Control
Check Wear Spots and Re-Tape As Needed
Evaluate Different Tapes for Weather Conditions
Every lacrosse player knows the importance of properly taping their stick. The right taping method can be the difference between stellar ball control and the ball rattling around in the pocket. However, the “perfect” taping method can vary drastically depending on the weather conditions you’re playing in.
In cold weather, you’ll want a tape that stays grippy despite the chill. Meanwhile, in wet conditions, the goal is maintaining traction on a slippery shaft. And of course, in extreme heat, preventing sweaty hands is a must. Choosing the ideal tape for the current climate can elevate your game.
So let’s break down how weather impacts taping strategy, and do a run-through of tapes optimized for different environments.
Cold Weather Lacrosse Tape
Frigid temperatures can turn an ordinarily grippy tape slick. As your hands cool, your grip loosens while the tape’s adhesiveness declines. This is a recipe for the dreaded slip and drop.
To combat cold hands, use a more aggressively sticky tape like Gecko Grip of Gorilla Grip. The heavy-duty adhesives on these tapes maintain tackiness even when cold. They stick like glue to frozen metal and bitter hands alike.
You can also employ the classic hockey method by wrapping the bottom portion of your shaft with cloth friction tape. The soft, grippy cloth helps compensate for numb fingers. Then apply your regular lacrosse tape on top.
Lastly, consider carrying a roll of tape in your pocket on chilly days. Rewrapping between points keeps the tape fresh and sticky.
Wet Weather Lacrosse Tape
Damp playing conditions are a tape’s worst enemy. Moisture permeates through the exterior, dissolving adhesives and causing the tape to slide. On a wet lacrosse shaft, maintaining grip and ball control can be impossible.
For monsoon games, wax-based tapes like Gait Spider Grip are elite performers. The embedded wax resists water infiltration, while the rough, tacky texture provides a confident grip. Waxy tapes retain maximum traction when soaked.
Alternatively, mesh tapes like Nike Vapor or Warrior Burn Mesh have rain-defeating properties. Water seeps through the porous mesh exterior rather than destroying adhesives. The grid pattern also supplies enhanced traction on slick shafts.
And as always, keep extra tape on hand if conditions are especially sloppy. You’ll likely need to re-tape at halftime to replace moisture-logged tape.
Hot Weather Lacrosse Tape
Sweaty hands are an inevitable reality in sweltering weather. As perspiration accumulates on your gloves and shaft, maintaining a decent grip on your stick becomes challenging.
The best hot weather tapes feature moisture-wicking properties to combat slick hands. Gait Vapor Tack is a top-tier choice, with a porous mesh construction that absorbs sweat. This prevents puddling moisture from interfering with your grip.
lizard Skins Lacrosse DuraSoft is another sweat-eating option. The grippy cloth exterior absorbs perspiration before it can make handles slippery. The fabric also stays comfortably dry against wet palms.
Lastly, remember to re-tape your handle a few times each game on scorchers. Letting tape become too moisture-laden is asking for trouble.
Ideal All-Purpose Lacrosse Tape
While specialized tapes exist for various conditions, most players need an all-purpose tape as well. This is your trusty tape for typical sunny practices and moderate weather games. All-purpose tape performs respectably across conditions while excelling at none.
For versatile taping, standard cloth tapes like Warrior Ritual or Maverik Havoc are safe bets. These offer decent grip, moderate moisture resistance, and reliable durability. They handle most situations adequately without breaking the bank.
Mesh tapes like Warrior Burn also make excellent crossover options. The fused grid pattern supplies excellent feel while repelling a fair amount of moisture. And the lightness decreases hand fatigue on hot days.
Premium all-purpose picks like Throne Mesh provide elite multifaceted performance. But at $15 a roll, the value may not justify the incremental improvements over budget options.
Don’t Forget Technique!
Even the world’s grippiest tape can’t compensate for poor technique. No matter the conditions, adhere to lacrosse taping fundamentals:
- Overwrap handle for cushioning
- Butt end on bottom to prevent slippage
- 50% overlap for optimal grip and tension
- Proper pocket anchoring to pocket
- Smooth finish on throat
Pair sound technique with the ideal tape for conditions, and you’ll be catching and throwing rain or shine!
Care and Maintenance Keeps Tape Intact
A perfectly taped lacrosse stick is a beautiful thing. The grip feels sublime, the ball flies true, and your game excels. But over time, wear and tear takes a toll on even the best taping jobs.
Exposure to sun, moisture, and abrasion all degrade lacrosse tape. Discoloration, slipping, and fraying result. Before you know it, your once flawless tape job resembles a sloppy mess.
Fortunately, with proper care and maintenance, you can keep tape fresh and optimized far longer. Let’s explore lacrosse stick tape preservation techniques to maintain that new tape feel.
Shield From Sunlight
The sun’s ultraviolet rays are tape’s number one enemy. UV exposure dries adhesives, fades colors, and promotes cracking. A few weeks in the sun can transform supple new tape into a brittle, peeling mess.
Shield your tape from solar radiation whenever possible. Keep sticks in a bag or the shade instead of baking on the dashboard. Hang sticks indoors pointing away from windows. And replace faded tape promptly.
When playtime sun is unavoidable, go with UV-resistant tapes like Throne Mesh or Gait Vapor Flow. These withstand sunlight degradation better than standard options.
Keep Away From Moisture
Moisture also swiftly deteriorates lacrosse tape. Water, humidity, and sweat seep below the surface, dissolving adhesives and stretching materials.
Letting tape soak in the rain or pool is asking for trouble. Be diligent about keeping sticks dry and covered. If caught in downpours, thoroughly dry sticks afterwards.
For high sweat games, re-wrap handles at halftime to replace moisture-saturated tape. And opt for hydrophobic tapes like East Coast Mesh or Gait Vapor Tack.
Minimize Mechanical Wear
Constant rubbing against gear, pavement, and playing surfaces abrade tape over time. The more cumulative abrasion, the faster tape frays and loses function.
When not in use, keep sticks safely in bags and racks away from rubbing hazards. Be gentle placing sticks down rather than tossing haphazardly.
During games, use stick covers on the sidelines. Friction from constantly sitting down damages tape. And pick durable tapes like R6 Mesh or Warrior Burn Mesh to better withstand abrasion stress.
Re-Wrap Strategically
Even babied tape eventually requires replacing. Rather than waiting for a complete fail, re-wrap proactively.
Periodically inspect tape for wear. At first signs of deterioration like fraying, re-wrap immediately before performance suffers. This preserves good taping longer.
Also re-tape handles before each season. Offseason humidity and storage wear necessitates annual refreshing. New tape gives that season debut some extra pop.
Remove Glove Residue
Glove leavings like dirt, salt, and wax accumulate on tape from constant contact. This residue gums up adhesives, attracts abrasive particles, and promotes slippage.
Frequently hand wash gloves to minimize sticky buildup. And wipe sticks down before re-wrapping to clean away glove residue.
Uncoated mesh tapes like StringKing Mesh resist glove gunk adherence better than standard cloth tapes. Or use coated options like Nike Vapor if glove funk persists.
Consider Storage Conditions
Improper storage promotes premature tape aging. Excess heat, humidity, and sunlight during storage multiplies wear.
Climate control stick storage when possible. If stuck storing in non-conditioned areas like garages, cover sticks and periodically refresh tape.
Also avoid leaning sticks against moist walls and surfaces. Stick racks, hangers, and cases keep shafts safely separated.
With vigilance, you can keep lacrosse tape ship-shape year-round. Then enjoy optimized feel all season long!
Retaping Schedule for Consistent Performance
Ask any lacrosse veteran – keeping fresh tape on your stick is a must for peak play. As tape ages, grip and ball control decline. Developing a strategic retaping schedule preserves quality stick feel all season long.
But how often should you actually rewrap handles? Daily, weekly, monthly? Finding the ideal retaping frequency for your game ensures you extract max life from tape jobs.
Let’s explore retaping best practices to balance performance, efficiency, and costs through the year.
In-Season Retaping Frequency
During peak season, rewrap sticks at least every 2-3 weeks. The constant wear of games and practice deteriorates tape quickly. Letting it go too long results in slippery handles and poor ball control.
For heavy use like tournaments, rewrap every week. The additional playing time accelerates tape degradation. Renewing weekly prevents any mid-tournament slippage issues.
And don’t forget pre-game maintenance too. Always re-tape the top few inches of handles before each game day. Frequent glove contact destroys tape here fastest.
Offseason Retaping Strategies
In the offseason, you can relax rewrapping frequency slightly. With less usage, tape stays fresher month-to-month.
Every 4-6 weeks is reasonable for offseason re-taping. Monitor wear and rewrap earlier if needed. Though don’t exceed 2 months even if tape looks good – invisible interior breakdown still diminishes performance.
Also rewrap at least once right before next season ramps up. Even untouched offseason sticks need refreshening after months of storage.
Consider Tape Properties
Tape composition also impacts retaping timetables. More durable tapes maintain quality longer between wrappings.
High-strength cloth tapes like Warrior Burn and STX Precision last over double the time of basic options before rewrapping needs. Their reinforced construction better resists breakdown.
Conversely, lightweight tapes like Gait Vapor Flow require more frequent replacement. Their minimalist materials sacrifice longevity for reduced mass.
Know your tape’s lifespan and adjust retaping frequency accordingly. Or choose a tougher tape if you dislike constant rewrapping.
Keep Extras On Hand
To enable proactive rewrapping, always keep backup tape on hand. You never know when your current tape job will unexpectedly need replaced mid-season.
Carry extra rolls in your bag for quick on-the-go rewrapping as needed. Having tape on hand prevents being forced to play with worn, dangerous handles.
It’s also smart to buy tape in bulk when possible. Stocking up when sales hit ensures you have ample extra rolls for the full season.
Rewrap Strategically
Just as important as retaping frequency is rewrapping at strategic points in time. Be preemptive rather than reactive.
Rewrap proactively when you notice wear rather than waiting for total failure. Don’t risk mid-game slippage.
Also retape handles before each season and tournament. Flawless tape maximizes your performance in crunch time games when it matters most.
Consider Glove Usage
For players wearing the same gloves all season, accelerate retaping schedules. The consistent glove friction rapidly wears tape.
If rotating multiple glove pairs, you can extend time between rewrappings slightly. Varying friction patterns reduce localized wear.
Just ensure any gloves used have fresh, tacky palms. Glove slime ruins tape in a flash.
Dialing in the ideal retaping regimen takes trial and error. But with fresh tape waiting in the wings, you can attack each game with optimal grip.
Custom Taping Styles for Personalized Feel
When taping lacrosse sticks, most players default to the standard overlapping wrap technique. While this checks all the functional boxes, it produces a largely generic grip feel shared by countless other sticks.
However, by exploring creative taping methods, you can produce a truly unique handle texture personalized to your exact preferences. Custom taping provides next-level control over the tactile experience of your lacrosse stick.
Here are some innovative taping techniques to give your stick an exclusive feel all your own.
Two-Tone Tape
Alternating two separate tape colors gives sticks a sleek, stylish look along with enhanced ergonomics.
Try wrapping the upper handle in a thick, cushiony tape like lizard Skins for comfort. Then switch to a grippy, thin tape like Gait Vapor Tack lower down for control.
The two distinct grip textures provide superior overall ergonomics. Visually, the color change also screams customization.
Patterned Taping
With meticulous wrapping techniques, you can imprint patterns into tape for artistic flair. Geometric shapes, custom text, abstract prints – the possibilities are endless.
Try alternating two tape colors in an argyle plaid pattern. Or wrap white tape imprinted with your name or number in black marker. Get creative with the tape canvas.
Beyond aesthetics, patterned tape also uniquely impacts grip and feel in the palm. Bold lacrosse requires bold tape style.
Pre-wrap Accents
Pre-wrap, or underwrap, lays the adhesive foundation before taping. Strategically coloring this underlayer creates cool accents.
Try a bright green pre-wrap covered by basic black tape. Small sections of the green peeking through the overlaps make for subtle flair.
Or color code tape jobs to different stick functions. Red pre-wrap on game sticks, blue on practice sticks, and so on.
Personalized Wrap Jobs
Taping method heavily influences finished grip texture. Try these specialized techniques for luxuriously unique feels.
Candy Cane Wrap – Diagonally wrap tape in red and white stripes, like a candy cane.
Rope Wrap – Tightly wrap slick tape at steep angles mimicking braided rope.
Waffle Wrap – Use mesh tape and wrap tiny squares for a waffle texture.
Spiderweb Wrap – Wrap diagonally down then reverse and overlap, creating web patterns.
DIY Texture Add-Ons
With creativity, you can incorporate extra grip materials into tape for radical textures.
Sprinkle fine sand or salt crystals onto adhesive before wrapping for an abrasive feel. Or embed sections of grip cloth for changes in cushioning.
For extreme grip, add a strip of grip tape like Gecko Grip. The aggressive sticky texture completely transforms handling.
Maintain Functionality First
When pursuiting custom designs, don’t compromise functional taping tenets like proper anchoring and overlap. Artistic flair means nothing if the fundamentals are flawed.
Test out any unconventional techniques in practice first. Ensure unique grip features don’t introduce any unwanted handling issues.
A personalized tape job should accentuate, not detract from, stellar lacrosse stick performance. With thoughtful experimentation, you can create a truly one-of-a-kind grip deserving of your unique game.
Proper Taping Allows Adjusting Stick Flexibility
A lacrosse stick’s flex profile significantly impacts handling and shot power. The right flex promotes smooth catches, effortless releases, and maximized velocity.
Rather than being stuck with a factory-set stiffness, strategic taping techniques let you customize flex to your exact preferences. You can fine-tune both the location and degree of flex for performance gains.
Here’s how intelligent taping tension manipulation allows adjusting your lacrosse stick’s flexibility.
Loosen Shaft for More Flex
Wrapping tape too tightly constricts the shaft, limiting natural flex. This forces you to overexert on catches and shots.
For more whip, keep tape wraps loose with minimal stretching. The shaft can flex freely underneath without fighting tape tension.
Lightweight, low-stretch tapes like StringKing Mesh or Gait Vapor Flow also enable extra flex when tightly wrapped. Their materials constrain less than thicker tapes.
Stiffen With Tighter Tape
Alternatively, extra snug tape applies compressive forces, restricting flex. This adds rigidity for more powerful shots.
Stretch tape aggressively when wrapping to firm up the shaft. Use thicker, high-tensile tapes like Warrior Burn or Throne Mesh to maximize stiffness.
You can also wrap shafts tighter at the top for stability, then loosen towards the bottom to allow end flex.
Strategic Anchor Points
Where tape anchor points sit alters flex distribution. Anchoring too high or low throws off flex timing.
On sticks, anchor tape right at the bottom of the throat for a smooth flex point. Player preference fine-tunes height to sync flex with your release.
For Goalies, anchor higher up the throat for a stiffer stick through saves. Increased rigidity prevents unhappy flex surprises mid-save.
Pre-Wrap Boosts Adjustability
Pre-wrap underneath adds a slippery base layer, reducing tape’s grip on the shaft.
Pre-wrapped shafts flex more freely despite tight tape. The pre-wrap also lets you readjust tape tension mid-game by simply tightening or loosening outer wraps.
Watch for Cracking
Excessive tightening risks damaging shafts, especially low-flex varieties. Listen for cracking noises, inspect for cracks frequently, and stop immediately if any appear.
Gradually increase tensions in small increments, testing stability as you go. It’s better to max out too loose than wrap too tightly.
Test Different Setups
Optimizing flex through taping requires experimentation. Test different tape types, anchor points, pre-wrap use, and tensions in practice first.
Keep a detailed log to track how adjustments impact handling. Dial in the exact combination delivering your personal flex sweet spot.
With the right technique, tape transforms from simple grip aid to powerful tuning tool. Master flex control taping, and wield the stick of your dreams.
Taping for Durability Without Adding Excess Weight
Nothing ruins a season faster than a broken stick. Aggressive checks and misuse swiftly destroy poorly taped handles.
While extra tape protects against impacts, it also adds unwanted ounces. Too much weight reduces handling quickness and shot speed.
By taping smartly, you can maximize durability without burdening sticks with needless heft. Let’s explore taping techniques that balance protection and lightweight feel.
Avoid Excessive Layers
Stacking roll upon roll of tape overkill protects against damage but seriously bog down sticks.
Stick to 2-3 thin tape layers for lightweight protection. This reinforces handles against impacts without major weight gain.
Instead of more layers, simply rewrap fresh tape every few weeks before previous layers grow too thin from use.
Strategically Tape High-Wear Areas
Rather than heavily wrapping the entire shaft, target only high-wear zones.
Extra wraps on the throat and lower shaft prevent chipping where checks concentrate. Keep the rest of the handle lightly taped for balance.
Also tape small reinforcements around potential stress points like drilled holes. Prevent cracks before they start.
Consider Durability-Focused Tapes
Specialized defensive tapes provide extra impact protection without adding bulk.
Options like STX Defense or Maverik Rome deliver reinforced protection, yet maintain a thin, light profile. Their high-tech constructions prevent overbuilding handles.
Just beware excessively rigid tapes compromising your preferred flex profile. Seek lightweight security, not brick-wall rigidity.
Anchor Properly
Poor tape anchoring loosens quickly, exposing shafts to mid-game damage. Proper anchoring maintains protection despite hard use.
Fully wrap the end cap with a snug anchor strip before main overlapping. Then tear off, don’t cut, tape ends for extra adhesion.
Also ensure full 50% overlap on upper tape for slip resistance. Loose wrapping unravels fast with checks.
Pre-Wrap First
Pre-wrapping shafts before taping doubles up protection. The soft base layer cushions against bottom-out impacts.
Plus, pre-wrap’s grip lets you maintain light, agile tape wraps above without sacrificing security. It bolsters without bulking up.
Handle With Care
No tape scheme prevents damage from stick abuse. Careful handling protects stick investments better than any tape job.
Keep sticks safely stored when not in use. And execute controlled, tight checks by leading with your hands, not the stick.
With mindful taping and handling habits, you can play confidently all season with minimized rewrapping and replacements.


