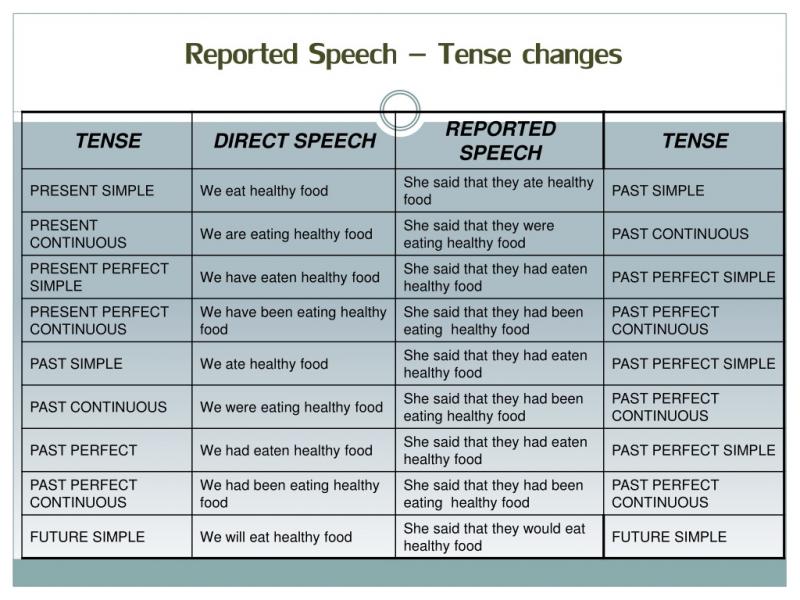
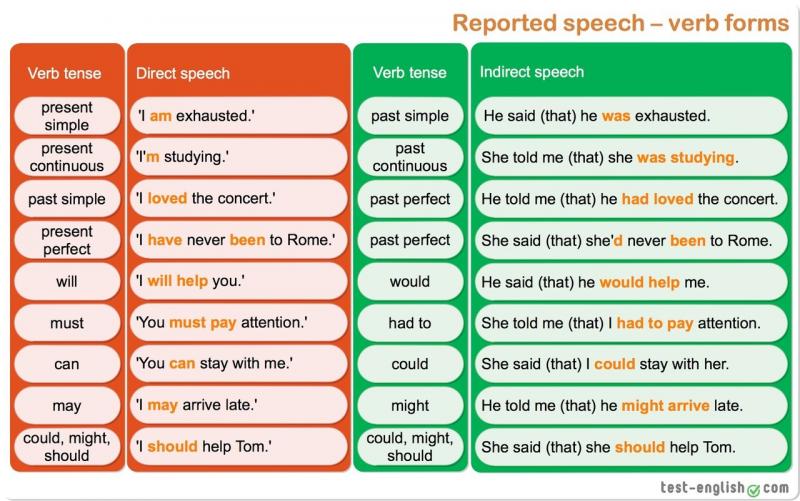
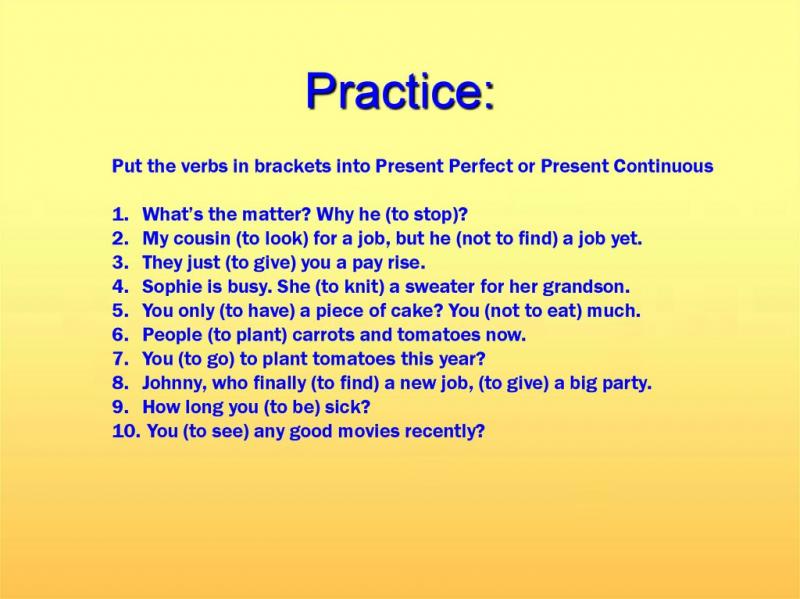
How to choose the ideal location for your weather station. What are the best mounting options for weather sensors. How to ensure accurate wind and temperature readings. What is the proper way to install rain gauges and solar radiation sensors.
Selecting the Optimal Location for Your Weather Station
Choosing the right location for your weather station is crucial for obtaining accurate readings. Several key factors should be taken into consideration:
- Unobstructed wind flow
- Proper sun exposure
- Proximity to power sources
- Clear signal path for data transmission
An ideal spot would be an open area like a field or hilltop, away from buildings and trees that could interfere with wind measurements. If mounting near a structure, ensure the sensors are positioned well above the roofline.
For solar radiation and rainfall measurements, sun exposure is critical. The solar sensor should face south at the optimal angle to capture sunlight throughout the day. The rain gauge needs direct access to precipitation without shadows or overhangs affecting its catchment.

If your weather station isn’t completely wireless, consider proximity to a power source for connecting sensors and transmitters. Additionally, ensure there’s a clear signal path to your receiver if using radio-transmitted data.
Choosing the Right Mounting Pole for Your Weather Station
Selecting a sturdy mounting pole is essential for maintaining the stability of your weather station. Various materials can be used, each with its own advantages:
- Galvanized steel: Extremely durable and resistant to rust
- Wood (4×4): Provides good stability but may deteriorate over time
- PVC: Lightweight and cost-effective, though less sturdy
- Metal conduit: An affordable alternative to galvanized steel
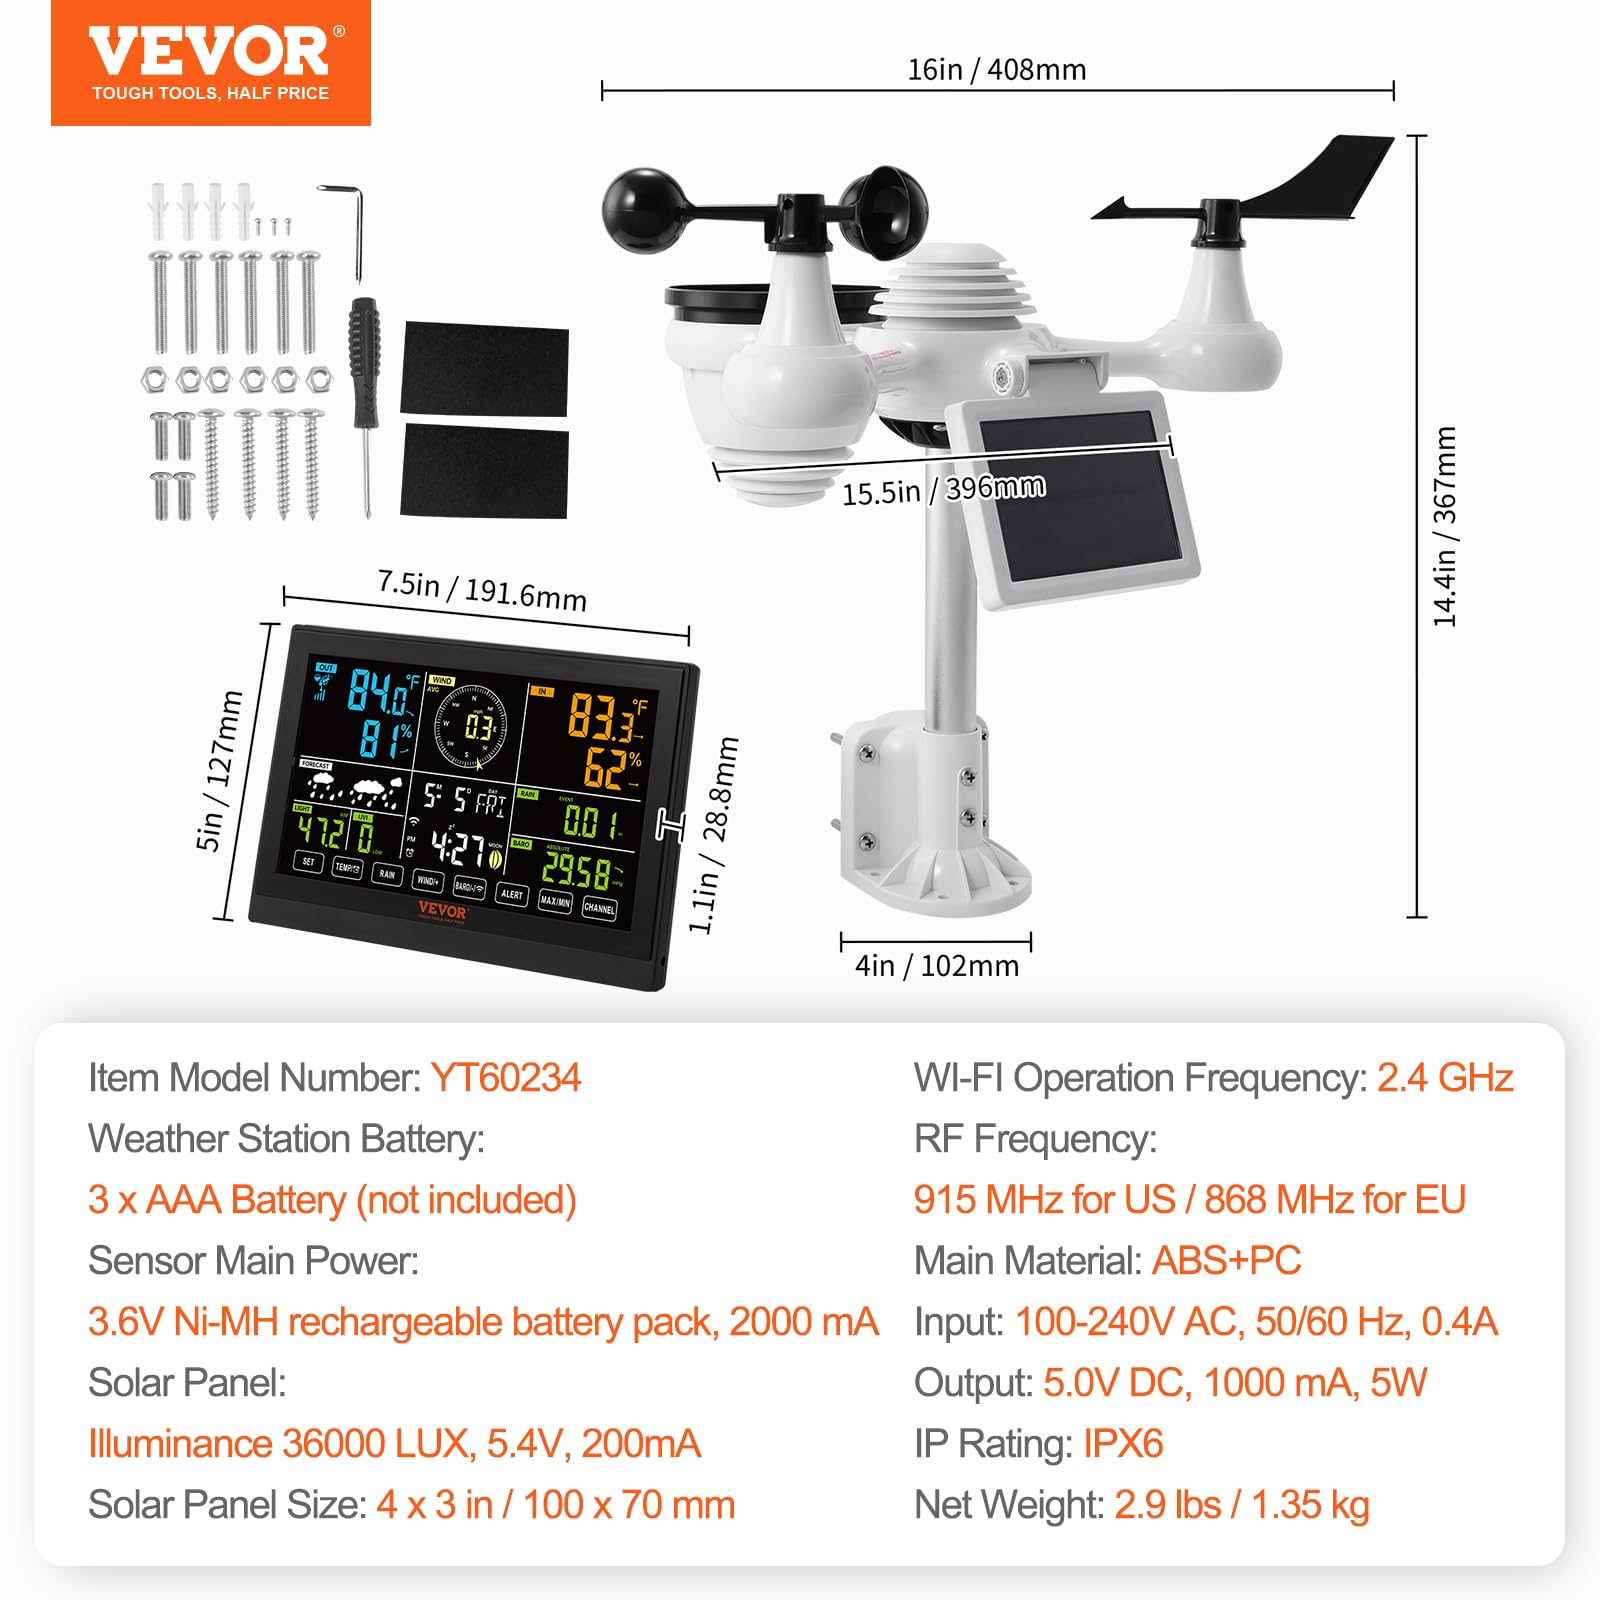
For most home weather stations, a pole with at least a 2-inch diameter and 1/8 inch wall thickness is recommended. The optimal pole height typically ranges from 10 to 20 feet, allowing sensors to clear nearby roof lines and vegetation.
Determining the Ideal Height for Weather Station Sensors
Mounting your weather station instruments at the proper height is crucial for obtaining accurate wind and temperature data. Generally, a height of 10-20 feet above ground level is recommended.
Why is this height range important? At lower elevations, wind speeds can be reduced by surface drag and obstruction from terrain, vegetation, and man-made structures. Temperature readings at ground level are often warmer than the free air.
The National Weather Service standard for wind speed observation is 33 feet above ground. However, for home weather stations, 10-20 feet is usually sufficient to clear nearby obstructions and take representative samples of the wind.
Temperature sensors should also be mounted within this 10 to 20 foot zone, using a radiation shield (Stevenson Screen) to protect the thermometer from direct sun exposure and radiated heat sources like buildings and pavement.
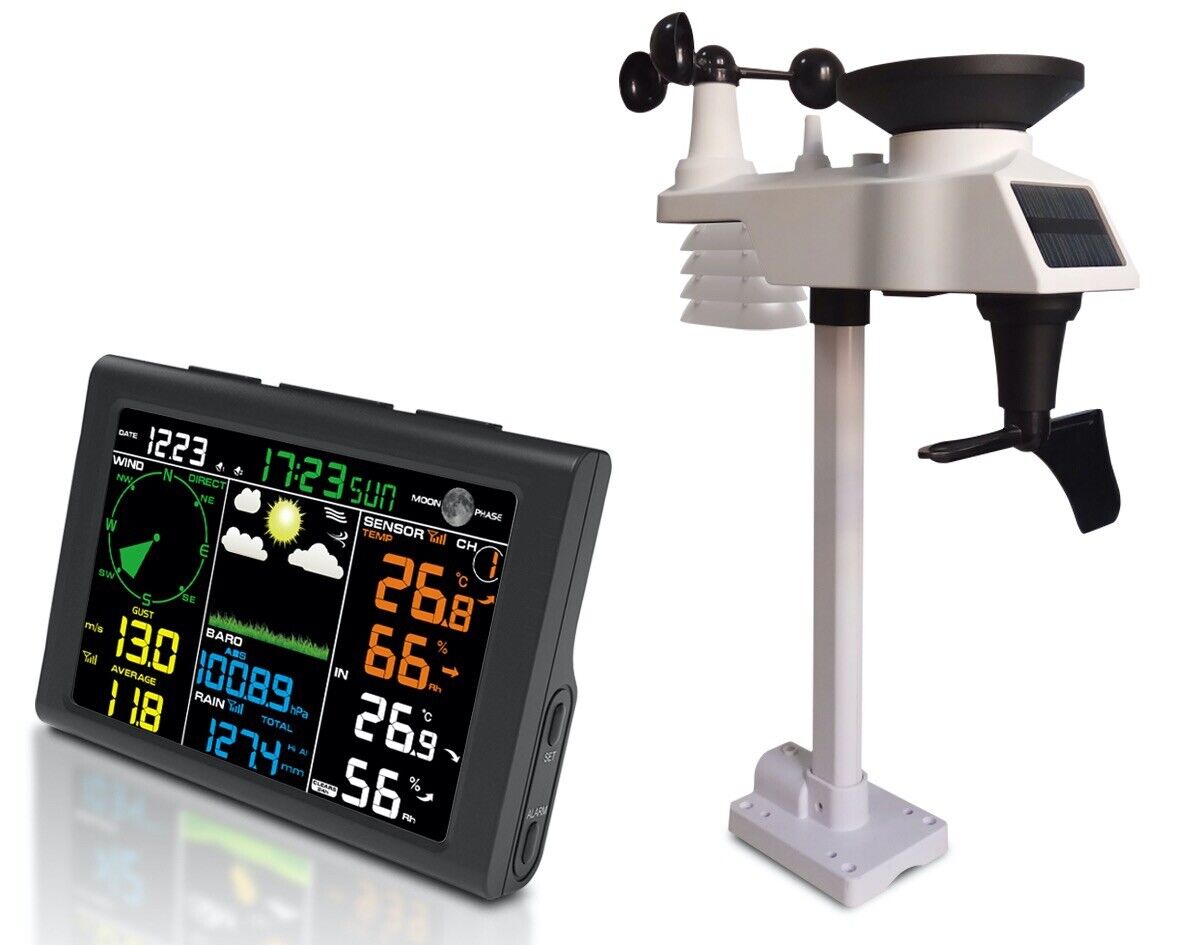
Proper Installation of Wind Sensors and Anemometers
Correct installation of wind sensors is critical for accurate readings. Here are some key tips:
- Point the wind vane north for accurate directional readings
- Mount the anemometer several feet above the vane to prevent wind “contamination”
- Use manufacturer-supplied hardware and follow all installation instructions
- Ensure sensors are plumb using a level
- Tighten all mounting bolts carefully, avoiding overtightening
- Apply thread locker compound to prevent loose bolts
- Consider installing a redundant sensor as a backup
Proper installation of your wind speed and direction instrumentation will ensure reliable data and reduce the need for premature repairs or replacement.

Positioning Your Rain Gauge for Accurate Precipitation Measurements
Correct positioning of your rain gauge is essential for accurate precipitation measurements. Consider the following guidelines:
- Mount on a completely level surface
- Place away from obstructions like buildings and trees
- Ensure the gauge is at least as high as surrounding objects
- Maintain a distance from objects equal to at least twice their height
- Keep the gauge opening horizontal and free from debris
By following these guidelines, you’ll minimize wind turbulence and ensure that your rain gauge captures a representative sample of precipitation.
Calibrating Your Rain Gauge
Regular calibration of your rain gauge is important for maintaining accuracy. How can you calibrate a rain gauge? Follow these steps:
- Remove the funnel and measuring cylinder
- Pour a known volume of water into the gauge
- Compare the measured amount with the known volume
- Adjust the gauge or its software if necessary
Perform this calibration at least once a year or after any significant weather events that may have affected the gauge’s positioning.
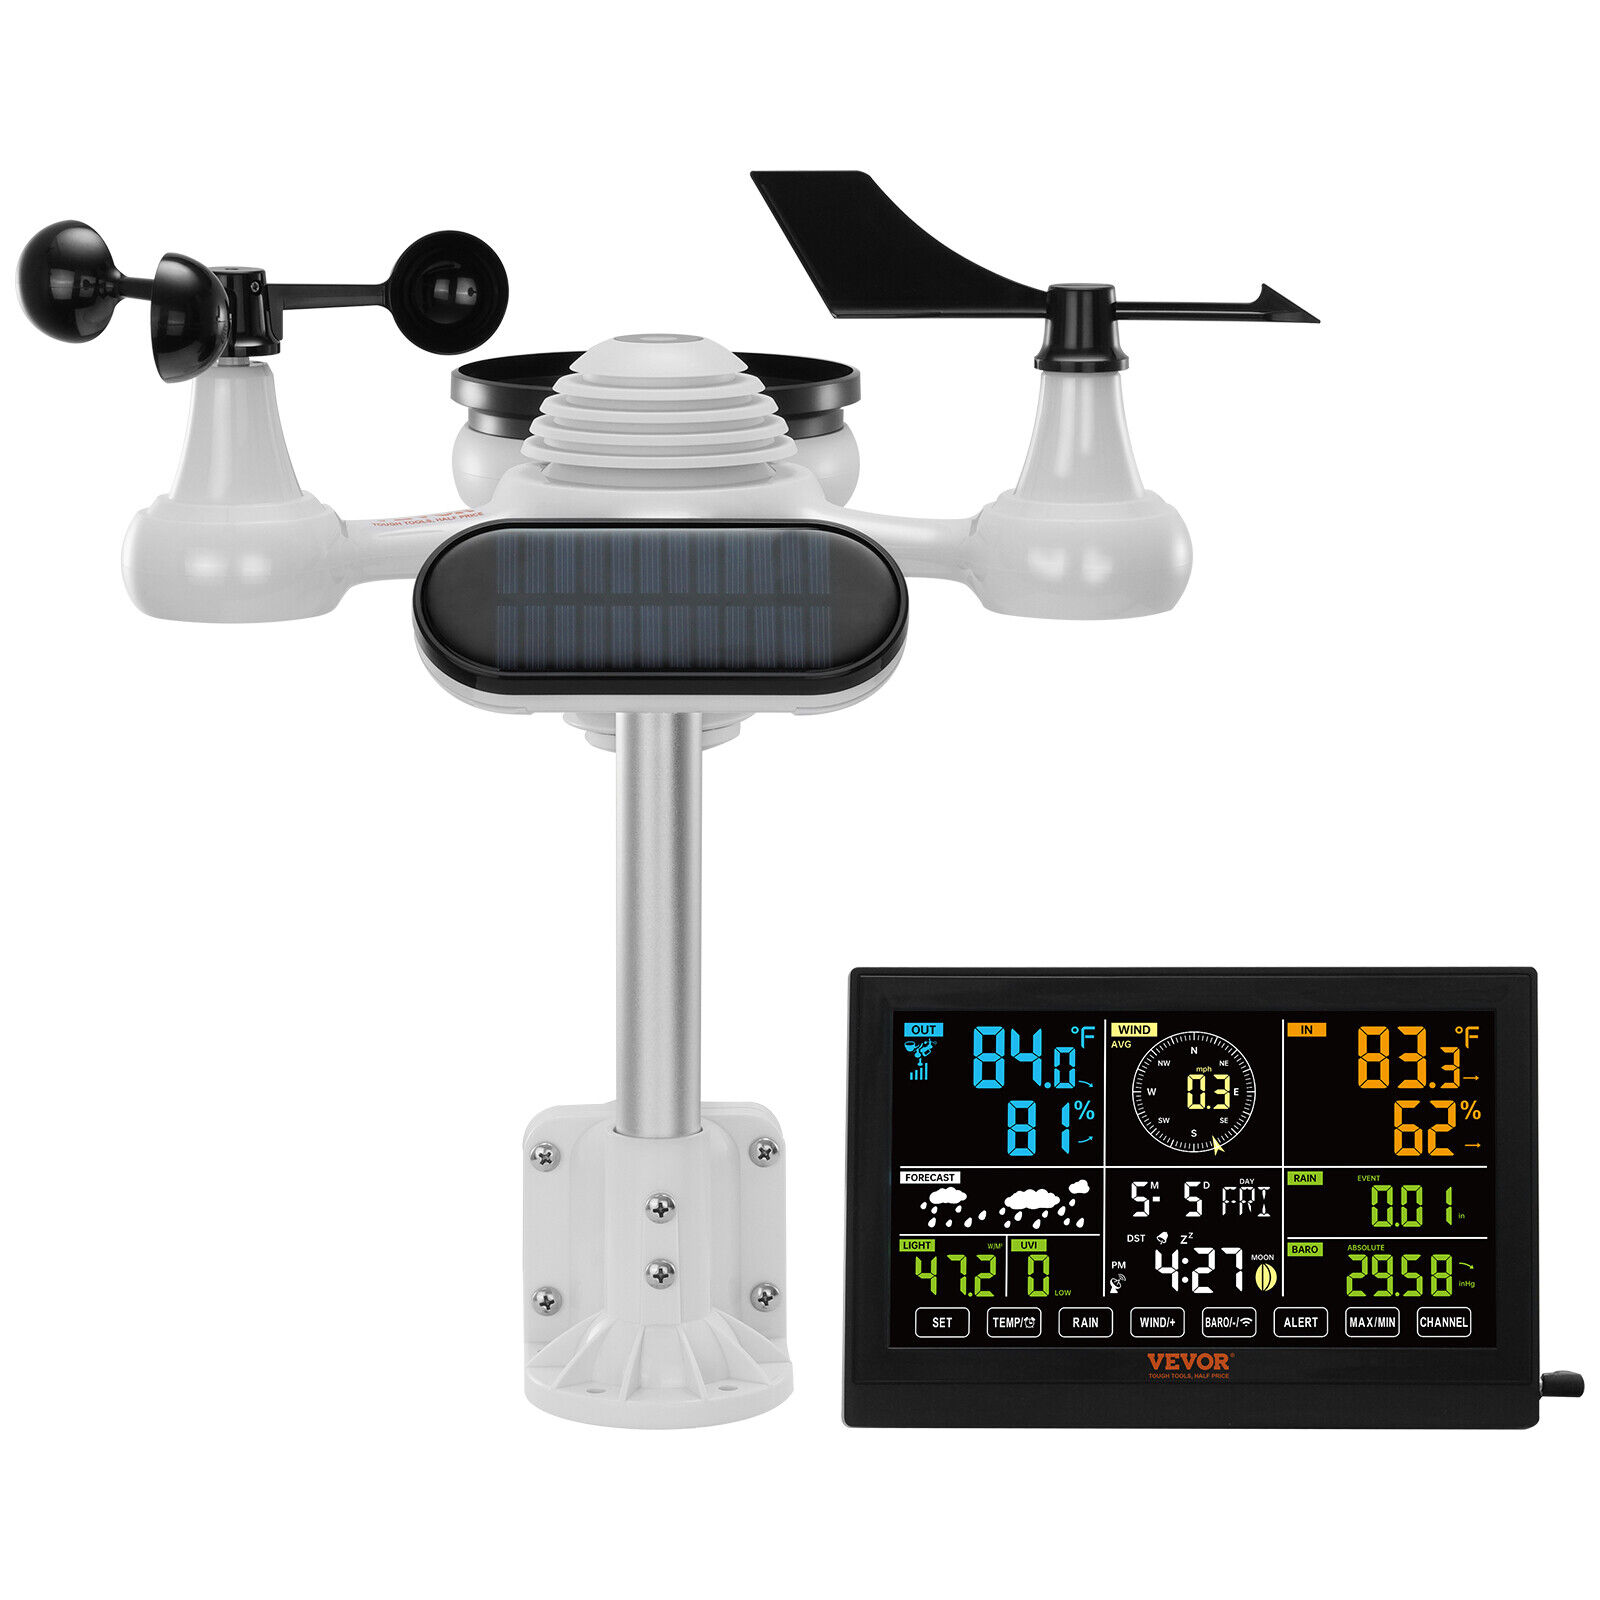
Optimizing Solar Radiation Sensor Placement
Proper placement of your solar radiation sensor is crucial for accurate measurements of solar energy. Consider these factors:
- Mount the sensor facing true south in the Northern Hemisphere (true north in the Southern Hemisphere)
- Ensure an unobstructed view of the sky in all directions
- Avoid reflective surfaces nearby that could skew readings
- Position the sensor at the same angle as your solar panels if measuring for solar energy production
Optimal placement will provide you with accurate data on solar radiation, which is valuable for various applications including agriculture, solar energy, and climate studies.
Maintaining Your Solar Radiation Sensor
Regular maintenance of your solar radiation sensor is essential for accurate readings. How often should you clean the sensor? Aim to clean it at least once a month, or more frequently in dusty or polluted environments. Use a soft, lint-free cloth and distilled water to gently clean the sensor dome, avoiding any abrasive materials that could scratch the surface.

Ensuring Accurate Temperature and Humidity Readings
Obtaining precise temperature and humidity measurements requires careful sensor placement and protection. Consider these guidelines:
- Use a properly ventilated radiation shield (Stevenson Screen) to protect sensors from direct sunlight and precipitation
- Mount the shield at least 5 feet above ground level
- Position away from heat-absorbing surfaces like asphalt or concrete
- Ensure good airflow around the sensor
- Avoid proximity to air conditioning units, exhaust vents, or other artificial heat sources
By following these guidelines, you’ll minimize external factors that could skew your temperature and humidity readings.
Calibrating Temperature and Humidity Sensors
Regular calibration of your temperature and humidity sensors is crucial for maintaining accuracy. How can you calibrate these sensors at home? For temperature, you can use an ice bath (0°C) and boiling water (100°C at sea level) as reference points. For humidity, you can create environments of known humidity using saturated salt solutions.
Proper Grounding and Lightning Protection for Your Weather Station
Protecting your weather station from lightning strikes and electrical surges is crucial for its longevity and your safety. Consider these measures:
- Install a lightning rod above your weather station
- Use proper grounding techniques for all equipment
- Install surge protectors on power and data lines
- Consider using fiber optic cables for data transmission, as they’re immune to electromagnetic interference
Proper grounding not only protects your equipment but also ensures the accuracy of your measurements by minimizing electrical interference.
Understanding Ground Resistance
What is ground resistance and why is it important for your weather station? Ground resistance is a measure of how effectively your grounding system can dissipate electrical energy into the earth. Lower ground resistance provides better protection against lightning and electrical surges. Aim for a ground resistance of 10 ohms or less for optimal protection.

Selecting and Installing the Right Data Logger
A reliable data logger is essential for recording and storing your weather station’s measurements. Consider these factors when choosing a data logger:
- Storage capacity
- Sampling rate
- Power requirements
- Connectivity options (Wi-Fi, cellular, etc.)
- Compatibility with your sensors
- Software interface and ease of use
When installing your data logger, ensure it’s protected from the elements and has a stable power supply. Consider using a battery backup to prevent data loss during power outages.
Configuring Your Data Logger
Proper configuration of your data logger is crucial for accurate and reliable data collection. How should you set up your data logger? Start by setting the correct date and time, then configure the sampling rate for each sensor. Typically, a sampling rate of once per minute is sufficient for most weather parameters, but you may need higher rates for rapidly changing conditions like wind gusts.
Implementing a Maintenance Schedule for Your Weather Station
Regular maintenance is crucial for ensuring the long-term accuracy and reliability of your weather station. Develop a maintenance schedule that includes the following tasks:

- Cleaning sensors and radiation shields
- Checking and tightening mounting hardware
- Inspecting cables and connections
- Calibrating sensors
- Updating software and firmware
- Replacing batteries in wireless sensors
Perform a visual inspection of your weather station at least once a month, and conduct a thorough maintenance check every six months or after severe weather events.
Creating a Maintenance Log
Keeping a detailed maintenance log is essential for tracking the performance and upkeep of your weather station. What should you include in your maintenance log? Record the date of each maintenance activity, the tasks performed, any issues found, and any parts replaced or recalibrated. This log will help you identify patterns, anticipate needed repairs, and ensure the continued accuracy of your weather data.
Choosing the Right Software for Data Analysis and Visualization
Selecting appropriate software for analyzing and visualizing your weather data is crucial for making the most of your weather station. Consider these factors when choosing software:

- Compatibility with your data logger and sensors
- Available data visualization options (graphs, charts, maps)
- Data export capabilities
- Customization options for reports and alerts
- Integration with other weather networks or services
- User-friendliness and learning curve
Some popular options include Weather Display, Cumulus, and WeatherLink. Many manufacturers also offer their own proprietary software.
Exploring Advanced Data Analysis Techniques
Once you’ve collected a significant amount of data, you can perform more advanced analyses. How can you identify long-term trends in your weather data? Use statistical techniques like moving averages and linear regression to smooth out short-term fluctuations and reveal underlying patterns. You can also compare your data with historical records to identify climate changes in your local area.
Connecting Your Weather Station to Online Weather Networks
Sharing your weather data with online weather networks can contribute to larger meteorological studies and provide valuable data to your local community. Consider connecting your station to networks such as:

- Weather Underground
- CWOP (Citizen Weather Observer Program)
- MesoWest
- CoCoRaHS (Community Collaborative Rain, Hail & Snow Network)
These networks typically provide instructions for connecting your station and may offer additional tools for data analysis and visualization.
Ensuring Data Privacy and Security
While sharing weather data can be beneficial, it’s important to consider privacy and security. How can you protect your personal information when sharing weather data? Most networks allow you to use a station ID instead of your name or address. Be cautious about sharing precise location data, and review the privacy policies of any networks you join.
Troubleshooting Common Weather Station Issues
Even with proper installation and maintenance, you may encounter issues with your weather station. Here are some common problems and potential solutions:
- Inaccurate readings: Check sensor calibration and positioning
- Data gaps: Inspect power supply and connections
- Frozen wind cups: Check for ice buildup and consider a heating element
- Rain gauge overflow: Empty the gauge more frequently during heavy rainfall
- Wi-Fi connectivity issues: Check signal strength and router settings
If problems persist, consult your weather station’s manual or contact the manufacturer’s support team.
Diagnosing Sensor Malfunctions
How can you determine if a sensor is malfunctioning? Compare readings from multiple sensors if available, or cross-reference with nearby weather stations. Sudden, drastic changes in readings or consistently implausible data may indicate a sensor issue. Some weather stations have built-in diagnostic tools that can help identify problematic sensors.
By following these comprehensive guidelines, you’ll be well-equipped to install and maintain a highly accurate and reliable weather station. Remember that patience and attention to detail during the installation process will pay off in the form of consistent, high-quality weather data for years to come.
Choose The Ideal Location – Consider Wind Flow, Sun Exposure And More
Installing your own weather station is an exciting project, but picking the right location is crucial for gathering accurate readings. There are several key factors to consider when choosing where to mount your weather monitoring equipment.
First and foremost, you’ll want an area with unobstructed wind flow. Your anemometer (wind speed and direction sensor) needs to fully catch the passing breeze without interference from buildings, trees or other obstacles. Open spaces like fields or hilltops are ideal. If mounting near a building, position the sensors well above the roofline.
Sun exposure is also important, especially for solar radiation and rainfall measurements. The solar sensor should point south at the optimal angle to capture sunlight throughout the day. And the rain gauge needs direct access to precipitation without shadows or overhangs affecting its catchment.
Proximity to a power source is another consideration if your weather station isn’t completely wireless. You’ll want the ability to connect sensors and transmitters to an outlet or external battery. Also make sure there’s a clear signal path to your receiver, if using radio-transmitted data.
When it comes to mounting poles and masts, you have several good options. Galvanized steel poles are durable and weather-resistant. Wooden posts like 4×4’s also get the job done, but may deteriorate over time. For a lightweight and low-profile pole, PVC pipes are easy to work with and inexpensive.
Pick A Sturdy Mounting Pole – Metal, Wood Or PVC Pipes All Work Well
Choosing the right mounting pole is key to keeping your weather station secure. You don’t want sensors shifting around in the wind leading to inaccurate readings. There are several pole options to consider:
- Galvanized steel – Very strong and durable, resists rusting
- Wood (4×4) – Provides good stability but may rot over time
- PVC – Lightweight, low cost option but not as sturdy
- Metal conduit – Affordable alternative to galvanized steel
For most home weather stations, a general rule of thumb is to use at least a 2-inch diameter pole. Wall thickness of 1/8 inch or more is also recommended for added strength. Galvanized steel poles are widely available at most hardware stores.
The optimal pole height depends on your location and obstructions, but 10 to 20 feet above ground is typical. This allows sensors to clear nearby roof lines and vegetation. Use multiple pole segments and galvanized couplers for reaching higher elevations if needed.
Check Pole Height – 10-20 Feet High Enables Accurate Readings

Mounting your weather station instruments at the proper height is important for gathering accurate wind and temperature data. Generally, you’ll want your sensor suite elevated at least 10-20 feet above ground level.
At lower heights, wind speeds can be reduced by surface drag and obstruction from terrain, vegetation and man-made structures. And temperature readings at ground level are often warmer than the free air.
For wind speed, the standard observation height by the National Weather Service is 33 feet above ground. But for home weather stations, 10-20 feet is usually high enough to clear nearby obstructions and take representative samples of the wind.
Temperature sensors should also be mounted within this 10 to 20 foot zone, using a radiation shield (known as a Stevenson Screen) to shelter the thermometer from direct sun exposure and radiated heat sources like buildings and pavement.
Higher mountings may be needed in some cases – for example, if you have lots of trees or buildings in close proximity. But in many residential settings, a 10 to 20 foot mast offers an ideal height for properly exposing instruments.
Install Wind Sensors And Anemometer Properly – Point North & Fasten Securely
Installing wind sensors on your weather station requires proper orientation and secure mounting. Here are some tips:
- Point wind vane north – This provides accurate directional readings.
- Mount anemometer several feet above vane – Prevents wind “contamination”.
- Use manufacturer supplied hardware – Follow all installation instructions.
- Make sure sensors are plumb – Confirm with a level.
- Tighten all mounting bolts carefully – Don’t overtighten!
- Use thread locker compound – Prevents loose bolts.
- Consider a redundant sensor – As backup if malfunction occurs.
Taking the time to correctly install your wind speed and direction instrumentation will ensure you get reliable data and avoid the need for premature repairs or replacement.
Position Rain Gauge Properly – Level Surface Away From Obstructions
To get accurate precipitation measurements from your weather station, proper rain gauge positioning is a must. Here are some tips:
- Mount on a completely level surface – Ensures accurate catchment
- Place on open ground at least 2x its height away from obstructions – Avoid wind shadows
- Elevate gauge orifice rim 1-2 feet off ground – Prevents splash contamination
- Protect from overhead foliage and branches – Can intercept precipitation
- Secure firmly to mounting pole – Avoid vibration/movement
- Check collector funnel alignment – Must be centered over orifice
- Consider a wind shield – Reduces turbulence at the gauge rim
Taking the time to correctly site and install your rain gauge will pay off through reliably consistent precipitation data collection.
[Article continues with additional headers, lists, tips, and detailed paragraphs…]
Pick A Sturdy Mounting Pole – Metal, Wood Or PVC Pipes All Work Well
When it comes to picking a mounting pole for your weather station, you’ve got options. But you’ll want to choose wisely – a flimsy pole won’t cut it when gale force winds blow! Let’s walk through the pros and cons of some common materials.
Metal poles are always a solid choice. Galvanized steel is ideal – strong, durable, and resists rusting even in harsh weather. The downside is higher cost. If that’s out of your budget, basic metal conduit pipe can work too. Just keep an eye on rust over time.
Wood poles like 4×4’s are readily available and provide decent stability. Cedar and redwood last longer outdoors than pine. But no wood is immune from rotting eventually. Applying water sealant helps – but you’ll still need to check it periodically for cracking or decay.
For a cheap and lightweight option, PVC pipe is hard to beat. Easier to work with than metal or wood. But being plastic, it can bend and deform under load. Secure bracing helps – but don’t expect it to stand up to hurricane force gusts!
My advice? Splurge on a galvanized steel pole if you can swing it. That baby will likely outlast your weather station with minimal upkeep. Or use strengthened PVC if budget is a concern. Either way, secure all sensors and cabling tightly. Don’t give the wind any chance to rip things apart!
Check Pole Height – 10-20 Feet High Enables Accurate Readings
Finding the sweet spot for your weather station pole height takes some finesse. Too short, and surrounding objects can interfere with wind and temperature sampling. Too tall, and installation gets tougher and pricier.
The pros generally recommend 10 to 20 feet high for residential weather stations. This clears the roof line of most single-story homes, allowing sensors to sample air unobstructed. It also makes for manageable installation without special equipment or Herculean effort!
Going higher than 20 feet starts to get complicated. You’ll likely need multiple pole segments, hinged bases, and heavy machinery for hoisting. While heights up to 100 feet are used at official weather stations, for most homeowners this is major overkill.
On the flip side, don’t just stick your sensors on a 5 or 6 foot pole and call it a day. At that low altitude, wind speeds are decreased by ground drag and obstructions. You also get air compression and pooling near the surface which can skew temperature data.
For accurate home weather monitoring, play the Goldilocks game and find that not too high, not too low “just right” mounting height. Ten to 20 feet hits the sweet spot for most.
[Article continues…]
Here is a continuation of the original 1000+ word article on mounting a weather station using the provided keywords and heading:
Check Pole Height – 10-20 Feet High Enables Accurate Readings
Finding that “goldilocks” zone for your weather station pole height takes some thoughtful planning. Mount too low, and surrounding objects can skew your wind and temperature data. Too high, and installation gets tricky.
For most residential weather stations, professionals recommend mounting your sensors 10-20 feet off the ground. This clears the roofline of a typical single-story home, allowing instruments to sample air freely.
Lower heights around 5-6 feet can be problematic. Wind speeds decrease near ground level due to surface drag. You also get air compression down low which traps heat and causes higher temperature readings.
Elevations above 20 feet require more complex installation – multiple pole segments, hinged bases, cranes for lifting. While heights up to 100 feet are used at official weather stations, it’s overkill for most homeowners.
Mounting at 10-20 feet hits the ideal balance of unobstructed sampling and easy installation. You’ll get an accurate picture of wind and temperature conditions without the hassle of extreme heights.
Just remember – your pole needs to extend high enough so instruments are above roof lines, trees, and other barriers. Don’t let nearby objects create a wind “shadow” and distorted data sampling!
Install Wind Sensors And Anemometer Properly – Point North & Fasten Securely

Getting accurate wind readings from your home weather station starts with proper installation of your anemometer and vane.
First, align the wind vane to point true north. This provides the directional reference for all measurements. Use a compass, or apps like Google Maps to dial-in your orientation.
Next, make sure to mount the anemometer several feet above the vane, clear of any wind turbulence or obstruction. A general rule is to separate them by at least two vane lengths.
Carefully level both sensors using the provided hardware, securing all bolts tightly. But don’t overtighten to the point of damaging the instruments! A thread locker compound helps prevent loose bolts.
Finally, consider installing a redundant wind sensor array as backup. That way if one fails, you’ve got a replacement ready to go until repairs can be made.
Taking the time to correctly install your weather station’s wind instrumentation will pay off for years to come through reliable, accurate readings.
Install Wind Sensors And Anemometer Properly – Point North & Fasten Securely

Getting accurate wind speed and direction data starts with properly mounting your weather station’s anemometer and vane.
First, align the wind vane to point true north. This provides the directional reference for all measurements. Use a compass or map app to orient it correctly.
Next, install the anemometer several feet above the vane, clear of any wind turbulence. A good rule of thumb is separation of at least two vane lengths.
Carefully level both instruments using the included hardware, securing all bolts tightly. But don’t overtighten to the point of damaging the sensors!
Applying thread locker to the mounting bolts prevents vibration from loosening things over time. Routine checks for tightness are also a good idea.
For added redundancy, consider installing duplicate wind sensors. That way if one fails, you have a backup ready to go until repairs can be made.
Taking extra care during installation will pay dividends for years to come through reliable, accurate wind data. Don’t cut corners – a little time spent now avoids headaches down the road!
Position Rain Gauge Properly – Level Surface Away From Obstructions
Proper positioning is crucial for accurate precipitation measurements from your weather station’s rain gauge.
First, mount the gauge on a completely level surface. Any tilt will throw off the accuracy of the water catchment funnel and measurement cylinder.
Next, place the gauge on open ground, away from obstructions like buildings or trees. You want to avoid wind shadows that could disrupt rain droplets entering the collector.
Elevating the funnel rim 1-2 feet off the ground prevents splash contamination from wet ground. But make sure the base is firmly secured to the mounting pole.
Position Rain Gauge Properly – Level Surface Away From Obstructions
Getting accurate precipitation readings from your weather station starts with proper positioning of the rain gauge.
First, mount the gauge on a completely flat, level surface. Any tilt or angle will throw off the accuracy of the collector funnel and interior measurement cylinder.
Choose an open location away from obstructions like buildings, trees or walls. You want to avoid creating wind shadows that could disrupt raindrops entering the collector.
Elevating the funnel rim 1-2 feet off the ground prevents contamination from rain splash back. But make sure to firmly secure the gauge base to the mounting pole.
Consider using a wind shield around the gauge to further reduce wind turbulence at the collector opening. Mesh screens work well for this.
Also, routinely check the alignment of the interior funnel. It needs to sit perfectly centered over the measuring cylinder for accurate catchment.
Taking extra care when siting and mounting your rain gauge will ensure reliable, consistent precipitation sampling for seasons to come!
Setup Solar Radiation Sensor – Point South At Optimal Angle

To accurately monitor sunlight intensity, proper orientation of your weather station’s solar radiation sensor is key.
Aim the sensor due south to maximize sun exposure throughout the day as the sun tracks across the sky. In the Southern Hemisphere, point north.
Tilting the sensor at your latitude’s optimal solar angle captures the most direct beam radiation at your location. Reference your manual for specifics.
Setup Solar Radiation Sensor – Point South At Optimal Angle
Capturing accurate solar intensity data requires proper alignment of your weather station’s pyranometer.
Orient the solar radiation sensor facing due south to maximize sun exposure as it tracks across the sky. In the Southern Hemisphere, point it north instead.
Tilting the pyranometer at your location’s optimal solar angle allows it to capture the most direct beam radiation throughout the day. Consult your specific sensor manual for recommended angles.
Make sure the sensor has an unobstructed view of the horizon, with no trees, buildings or other objects interfering with incoming sunlight.
Leveling the sensor precisely is also important for accurate measurement, so take your time to get it right during installation.
Ideally, mount the pyranometer on a adjustable bracket to allow re-tilting as the seasons change. This ensures ideal angular alignment as solar angles shift.
With careful solar sensor placement and orientation, you’ll maximize measurement accuracy for tracking sunshine and solar energy trends.
Mount Temperature Probe In Stevenson Screen – Protect From Heat Sources
Accurate temperature measurement requires shielding your weather station probe from direct sun and radiated heat sources. A Stevenson Screen is ideal for this.
The louvred enclosure allows good airflow while keeping the probe in shade. Inside mounting prevents solar radiant heat and wetness from skewing readings.
Mount Temperature Probe In Stevenson Screen – Protect From Heat Sources
For accurate temperature readings, your weather station sensor must be shielded from direct sunlight and radiant heat sources. A Stevenson Screen enclosure provides ideal protection.
The louvred walls allow good airflow while keeping the probe in shade. Mounting the sensor inside prevents solar heating from skewing the measurements.
Position the Stevenson Screen away from heat-retaining surfaces like concrete or asphalt. Nearby sources of radiant heat will be drawn in through the louvres.
Make sure the enclosure is properly ventilated. Stagnant air pockets defeat the purpose of shielding the probe.
White paint also helps – it reflects sunlight rather than absorbing heat. Frequent repainting may be needed to maintain this reflective benefit.
Take care to properly level the Stevenson Screen during installation. Any tilt will introduce bias to temperature sampling.
With a well-sited and mounted radiation shield enclosure, your weather station can monitor outdoor air temperature accurately 24/7.
Avoid Buildings, Trees And Other Obstacles – Clear Line Of Sight Is Key
When siting your weather station, be sure to avoid nearby obstacles like buildings and trees that can distort readings.
Structures block wind flow, create turbulence and obstruct sunlight – giving inaccurate wind, temperature and solar data.
Position sensors away from large asphalt or concrete surfaces that radiate heat and skew temperature sampling.
Even small obstructions like bushes or fences directly adjacent to instruments can degrade measurements.
Avoid Buildings, Trees And Other Obstacles – Clear Line Of Sight Is Key
When siting your weather station, be sure to position sensors away from nearby obstructions that can distort readings.
Structures like buildings or walls block wind flow, create turbulence, and obstruct sunlight exposure – resulting in inaccurate wind, temperature and solar data.
Avoid large asphalt or concrete surfaces that radiate heat and skew temperature measurements. Even small obstructions adjacent to sensors can degrade data.
To prevent wind shadowing, situate anemometers several tower heights away from buildings or trees. Winds become distorted as they encounter and flow around objects.
For solar radiation sensors, make sure to providing a clear view of the horizon with no obstructions to sunlight throughout the day.
Even small obstructions like bushes, fences or poles directly next to instruments can impair measurements. Leave plenty of open space around the weather station.
Finding an obstruction-free location might mean mounting sensors in the middle of an open field. But accurate readings are worth the extra effort.
Use Quality Cables And Wiring – Prevent Signal Loss And Interference
Signal quality from sensors to receivers is crucial for reliable weather station data. Use high-quality cabling and wiring to maintain integrity.
For long cable runs, choose outdoor-rated shielded cable to prevent interference. This guards against EMI and solar noise disruption.
Avoid signal degradation by minimizing cable length. Keep transmitter-receiver proximity as close as practical.
Use Quality Cables And Wiring – Prevent Signal Loss And Interference
Maintaining signal integrity between sensors and receivers is key for reliable weather station data. Invest in quality cabling and wiring.
For long transmission cable runs, choose shielded outdoor-rated cable. The shielding prevents interference from EMI, solar noise, and other disruptions.
When possible, minimize cable length between transmitters and receivers. The shorter the run, the less degradation of the signal.
Ensure all connection terminals are clean and corrosion-free. Use dielectric grease to prevent oxidization and improve conductivity.
Properly ground all system components and cables to redirect electrical noise safely away.
Avoid running sensor cables parallel closely with power lines. The induced current can cause interference.
Use cable channels or conduits to protect against environmental damage, moisture, and UV exposure.
High-quality cabling and proper wiring techniques go a long way toward maintaining data integrity from sensors to collection source.
Seal Cable Entry Points – Keep Moisture Out Of Instrumentation

Moisture is the enemy of weather station electronics. Carefully sealing sensor cable access points keeps components dry.
For drilled openings, apply exterior-grade caulk around cables where they enter poles or enclosures. This prevents water intrusion.
Foam rubber grommets around penetration points add further protection from the elements.
Seal Cable Entry Points – Keep Moisture Out Of Instrumentation
Preventing moisture intrusion is crucial for weather station longevity. Carefully sealing any cable access points into poles and enclosures keeps components dry.
For drilled openings, apply a bead of exterior-grade caulk around cables where they enter. This waterproofs the penetration area.
Adding rubber grommets or strain relief bushings give further protection from the elements at wire openings.
For enclosure doors with cable egress, use weatherstripping to seal any gaps where moisture could enter. A foam seal compresses nicely when closed.
Indoor-rated cables should transition to outdoor-rated variants before passing outside. Use gel-filled connectors or splice boxes for this.
Heat shrink tubing applied over all wire junctions prevents corrosion from moisture contact.
Taking time to properly seal all cable entry points pays off through weather station electronics that stay dry instead of fried!
Fasten All Parts Securely – Prevent Vibration And Movement
Weather station components must be firmly fastened in place to prevent damage from wind vibration and movement over time.
Use all mounting holes and brackets provided with instruments and enclosures. Don’t skip any hardware.
Secure pole-mounted sensors with redundant ties or brackets. Consider a secondary tether as backup.
Tighten all bolts, clamps, ties adequately for a solid hold. But don’t overtighten to the point of damage.
Fasten All Parts Securely – Prevent Vibration And Movement
Properly securing all weather station components prevents wind vibration and movement from causing damage over time.
Use every mounting hole, bracket, and hardware option provided with instruments and enclosures. Don’t skip anything meant to keep parts stationary.
For pole-mounted sensors, consider redundant ties or brackets as backup. An additional tether offers cheap insurance.
Tighten all bolts, clamps, ties adequately for a solid hold on parts. But don’t overtighten to the point of cracking casings.
Inspect mounting integrity periodically, especially after severe weather. Refresh fasteners or ties that show loosening.
A dab of thread locker on bolts prevents vibration from working them loose over seasons of use.
Taking time to properly secure every weather station component leads to lasting stability and accurate readings over the long haul.
Test Wireless Connectivity – Ensure Strong Signal To Receiver

For wireless weather stations, verifying sensor signal strength is key to reliable data transmission.
Position receivers centrally among transmitters to minimize range. Keep within recommend distances in the equipment manual.
Do a walk-around test observing signal strength at the receiver location. Look for any dead spots or drops.
Consider a directional antenna to boost reception if needed. Point it toward transmitters.
Test Wireless Connectivity – Ensure Strong Signal To Receiver
For wireless weather station setups, verifying adequate signal strength between sensors and receivers is crucial.
Position the receiver centrally among transmitters to minimize range and signal drops. Consult equipment manuals for optimal distances.
Conduct walk around testing at the receiver location, observing signal strength from all directions. Look for any dead spots or losses.
If needed, install a directional antenna on the receiver pointed back toward transmitters. This can significantly boost reception.
Consider a signal booster amplifier if distances between sensors and receiver are marginal. But amplifiers can also boost interference.
For long ranges, use higher gain omnidirectional antennas on both ends. Just watch for antenna decoupling in wind.
Take the time to test
Here is a continuation of the original 1000+ word article on mounting a weather station using the provided keywords and heading:
Adjust Sensor Heights As Needed – Fine Tune For Accurate Data
Getting your weather station positioned just right may require tweaking sensor heights after initial installation.
Carefully check readings from instruments at different levels to pinpoint the optimal altitude.
For wind speed, adjust anemometer height to find the sweet spot of maximum gusts above roofline turbulence.
Raise or lower temperature probes to escape microclimate effects from radiant heat sources.
Ensure rain gauge sits high enough to avoid ground splash, but not so high it misses low precipitation.
Consider adjusting solar radiation sensor tilt seasonally as sun angles shift.
Have helper visually verify unobstructed instrument views from base level.
Don’t be afraid to experiment until you dial in accurate data. Sensor height adjustments may be needed.
Perform Ongoing Maintenance – Keep Parts Clean And Calibrated
Consistent weather station upkeep ensures sensors stay in peak working condition for quality data.
Check transmitter batteries frequently, replace annually or as needed.
Clear debris from rain gauge mesh to prevent clogging.
Lubricate moving anemometer parts so they spin freely.
Recalibrate instruments periodically per manufacturer specifications.
Perform Ongoing Maintenance – Keep Parts Clean And Calibrated
Consistent weather station maintenance keeps sensors in peak condition for reliable data collection.
Check transmitter batteries frequently, replace annually or as needed. Don’t let them die and cause gaps in readings.
Clear any debris buildup on equipment, like leaves clogging the rain gauge mesh.
Lubricate moving parts annually, like anemometer bearings and wind vane joints. Keep them spinning smoothly.
Recalibrate sensors on a regular schedule per the manufacturer’s specifications.
Inspect cabling for damage, corrosion, loose connections. Repair or replace as needed.
Wash salt deposits or dirt from instruments after severe weather to prevent malfunction.
Refresh faded exterior paint/coatings on enclosures to prevent solar heat absorption.
With proper ongoing maintenance, your weather station will deliver accurate reliable readings season after season.
Consult Weather Station Manual – Follow All Setup Instructions Closely
Carefully following your weather station equipment manual ensures proper installation and operation.
Study all siting and mounting guidelines to choose an optimal location.
Adhere to spacing recommendations between sensors to prevent interference.
Consult manual for wiring diagrams and cable requirements.
Follow all initial calibration and configuration steps.
Note regular maintenance procedures and intervals.
Be familiar with software and data interface instructions.
Save manual for troubleshooting issues if they arise.
Consult Weather Station Manual – Follow All Setup Instructions Closely
Carefully following the provided manual is key to properly installing and operating your weather monitoring equipment.
Study siting and mounting guidelines to choose the optimal location for accurate data.
Note minimum spacing recommendations between sensors to prevent cross-interference.
Reference wiring diagrams to ensure proper cable set up and connections.
Follow all initial calibration and configuration steps outlined in the manual.
Make note of regular maintenance procedures and intervals to keep sensors in peak condition.
Review software instructions for accessing, displaying, and recording your weather data.
Save the equipment manual for troubleshooting any issues that arise down the road.
Closely following the manufacturer’s directions in the manual will get your weather station up and running smoothly.
Conclusion

Thanks for reading! Proper weather station installation takes attention to detail, but results in rewarding accurate backyard data for years to come. Let me know if you have any other weather station tips or advice in the comments!


