Maximize Team Productivity with Dry Erase Boards for Your Office or ClassroomMaximize Team Productivity with Dry Erase Boards for Your Office or Classroom
Choose the Right Dry Erase Board Size for Your Space
When selecting a dry erase board for your office, classroom, or other environment, it’s crucial to consider the size of the board in relation to the size of the room. Having ample writing space for brainstorming, collaborating, and presenting is key for productivity and engagement. The right dry erase board size allows all participants to see the content clearly from their seats or standing positions. It also provides enough room for multiple people to write at once without feeling crowded.
For small to medium sized spaces like small offices or classrooms, a 3′ x 2′ dry erase board is usually sufficient. This provides enough room for basic note taking, calendars, and to-do lists without dominating the entire wall. In a cozy home office, a 2′ x 3′ size is compact while still usable.
Larger rooms benefit from bigger boards in the range of 4′ x 6′ or 4′ x 8′. These dimensions give ample space for more extensive mind-maps, charts, lessons, and diagrams. A 4′ x 10′ dry erase board is ideal for large conference rooms, auditoriums, and training facilities. The expansive surface area engages wider audiences during presentations and workshops. Extra wide and tall boards are great for math and science classrooms where visualizing problems and calculations is beneficial.
For truly oversized gathering places like lecture halls and ballrooms, connecting multiple boards together into one mega-surface delivers maximum visibility. Or utilize entire walls as dry erase surfaces. Just be sure the board height is accessible to users of all heights. Place chairs and tables appropriately to ensure everyone has a clear sightline.
Take measurements of the room layout, seating, and traffic flow when determining the ideal dry erase board size. Boards mounted poorly can impede movement or force users to strain to see content in the corners. Measure the wall space as well to avoid an undersized board swallowed up in a large wall. With thoughtful sizing and placement, a dry erase board becomes a versatile communication hub.
Consider a Lacrosse Dry Erase Board for Durability
When selecting a dry erase board, it’s important to consider durability and longevity. Lacrosse boards stand out as a brand known for quality and sturdiness to withstand daily use in busy offices and classrooms. Their commercial-grade dry erase boards hold up well over time.
Lacrosse uses aluminum trim and marker trays designed for strength and low maintenance. The trim won’t warp or bend even after years of service. Sturdy tray construction prevents dents and damage even when users accidentally drop markers. Lacrosse boards come with a lifetime warranty on the aluminum frame and tray.
The Lacrosse writing surface resists ghosting, staining, and scratches from dry erase markers. Frequent cleaning won’t degrade the surface over time. Lacrosse uses a high-quality melamine surface that maintains smoothness and erasability. It won’t become etched or hazy with heavy use. The combination of durability and erase-ability makes Lacrosse boards ideal for high-traffic areas.
Lacrosse boards are also designed to minimize damage if they’re accidentally knocked off the wall. The aluminum trim features rounded corners to reduce chipping if the edge hits the floor. The steel backing helps the board retain its shape after impact. The enamel writing surface is scratch-resistant and won’t easily shatter if dropped.
When evaluating dry erase boards, check user reviews and warranties to ascertain durability. Lacrosse’s lifetime and 20-year warranties reflect the brand’s faith in their boards’ longevity. For a board that will maintain its professional look for years of meetings, brainstorming sessions, lessons, and presentations, Lacrosse is a top choice. The investment in a durable, high-quality board from Lacrosse will pay off with sustained performance.
Install a Full Wall Dry Erase Board for Maximum Visibility

For presentation spaces, classrooms, and offices requiring ample writing space, installing a full wall dry erase board delivers maximum visibility. Utilizing an entire wall as one giant whiteboard creates a striking focal point for collaboration, brainstorming, and teaching.
Full wall boards allow presenters to utilize the entire surface for visuals, charts, timelines, and diagrams. Audiences can clearly see details from any seat in the room without straining. The expansive workspace also enables more participants to actively use the board during workshops and sessions. Multiple simultaneous users can brainstorm and record ideas without crowding together or erasing each other’s contributions.
In offices, full wall whiteboards foster enhanced creativity for teams. The ample real estate sparks imaginative thinking and deeper discussion while mapping out projects and strategies. For classrooms, a full wall board gives teachers ample room to present lessons visually with diagrams, notes, and student worksamples. Students in the back won’t miss a thing. The oversized board also enables more students to come to the front to demonstrate problem solving.
A few tips for utilizing a full wall dry erase board effectively. Maximize Team Productivity: Choosing the Perfect Dry Erase Board for Your Space
How can dry erase boards boost team productivity. What factors should be considered when selecting a dry erase board. Which brands offer the most durable options. How can full wall dry erase boards transform collaborative spaces.
Selecting the Ideal Dry Erase Board Size for Your Environment
Choosing the right dry erase board size is crucial for maximizing team productivity and engagement in any workspace. The optimal size depends on various factors, including room dimensions, intended use, and the number of participants.
Small to Medium Spaces
For compact areas like small offices or classrooms, a 3′ x 2′ dry erase board typically suffices. This size provides adequate space for basic note-taking, calendars, and to-do lists without overwhelming the wall. In a cozy home office setting, an even smaller 2′ x 3′ board can be practical while remaining functional.
Larger Rooms and Conference Areas
Spacious environments benefit from larger boards, typically ranging from 4′ x 6′ to 4′ x 8′. These dimensions offer ample room for extensive mind maps, charts, lessons, and diagrams. For expansive conference rooms, auditoriums, and training facilities, a 4′ x 10′ dry erase board is ideal, providing maximum visibility for wider audiences during presentations and workshops.

Specialized Environments
Extra wide and tall boards are particularly beneficial in math and science classrooms, where visualizing complex problems and calculations is essential. For truly expansive gathering spaces like lecture halls and ballrooms, connecting multiple boards or utilizing entire walls as dry erase surfaces can create an immersive collaborative environment.
When determining the ideal board size, consider the following factors:
- Room layout and dimensions
- Seating arrangements
- Traffic flow
- Wall space availability
- Accessibility for users of various heights
By carefully considering these elements, you can ensure that your dry erase board becomes a versatile and effective communication hub for your team.
Durability Matters: The Lacrosse Dry Erase Board Advantage
When investing in a dry erase board, durability is a key factor to consider. Lacrosse boards have gained recognition for their quality and sturdiness, making them an excellent choice for high-traffic environments like busy offices and classrooms.

Superior Construction
Lacrosse boards feature aluminum trim and marker trays designed for strength and low maintenance. The trim resists warping and bending, even after years of use. The sturdy tray construction prevents dents and damage, even when markers are accidentally dropped.
Resilient Writing Surface
The Lacrosse writing surface is engineered to resist ghosting, staining, and scratches from dry erase markers. The high-quality melamine surface maintains its smoothness and erasability, even with frequent cleaning and heavy use. This combination of durability and erase-ability makes Lacrosse boards ideal for high-traffic areas where consistent performance is crucial.
Impact Resistance
Lacrosse boards are designed to minimize damage in case of accidental falls. The aluminum trim features rounded corners to reduce chipping if the edge hits the floor. The steel backing helps the board retain its shape after impact, while the enamel writing surface is scratch-resistant and less likely to shatter if dropped.

Warranty and Long-Term Value
Lacrosse’s confidence in their product is reflected in their impressive warranties, including a lifetime warranty on the aluminum frame and tray, and a 20-year warranty on the writing surface. This commitment to quality ensures that your investment in a Lacrosse board will pay off with sustained performance over many years of use.
Transforming Spaces with Full Wall Dry Erase Boards
For presentation spaces, classrooms, and offices requiring extensive writing surfaces, installing a full wall dry erase board can dramatically enhance visibility and collaboration. By utilizing an entire wall as one giant whiteboard, you create a striking focal point that encourages creativity and engagement.
Benefits of Full Wall Dry Erase Boards
- Maximum visibility for all participants
- Ample space for detailed visuals, charts, and diagrams
- Enhanced creativity and deeper discussions
- Ability to accommodate multiple simultaneous users
- Impressive visual impact in any space
Full wall boards allow presenters to utilize the entire surface for comprehensive visuals, timelines, and complex information. Audiences can clearly see details from any seat in the room without straining, promoting better engagement and understanding.
Fostering Collaboration and Creativity
In office environments, full wall whiteboards can significantly boost team creativity. The expansive writing surface encourages imaginative thinking and deeper discussions while mapping out projects, brainstorming ideas, or conducting strategy sessions. Multiple team members can contribute simultaneously without feeling cramped or erasing each other’s work.
Enhancing Educational Spaces
In educational settings, full wall dry erase boards transform classrooms into immersive learning environments. Teachers can create expansive visual aids, timelines, or mind maps that remain visible throughout lessons. Students benefit from the ability to see connections between concepts and engage more actively in the learning process.
Innovative Features to Consider in Modern Dry Erase Boards
As technology advances, dry erase boards have evolved to incorporate innovative features that enhance their functionality and versatility. When selecting a board for your space, consider these modern options:

Magnetic Surfaces
Many contemporary dry erase boards feature magnetic surfaces, allowing users to easily attach documents, charts, or other visual aids using magnets. This added functionality transforms the board into a dynamic display area, perfect for project management, scheduling, or creating interactive presentations.
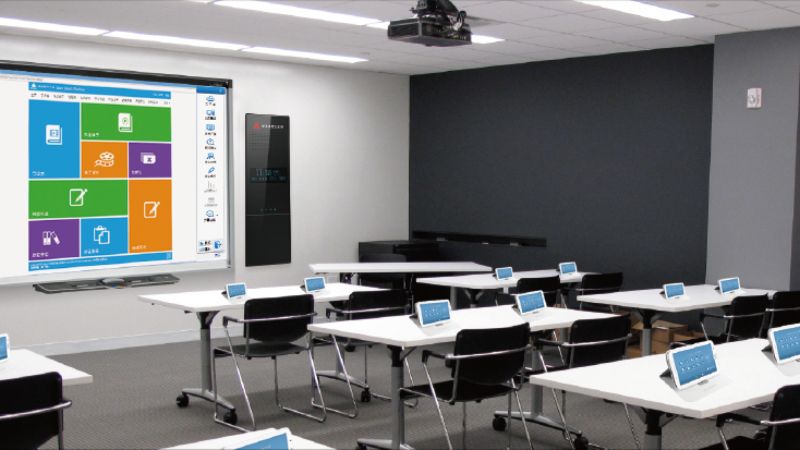
Projection-Friendly Surfaces
Some advanced dry erase boards are designed with projection-friendly surfaces, enabling seamless integration of digital content with handwritten notes. This feature is particularly valuable in modern classrooms and conference rooms where multimedia presentations are common.
Mobile and Reversible Options
For spaces that require flexibility, consider mobile dry erase boards on wheels or reversible boards. These options allow you to easily move the writing surface to different areas of the room or flip between two separate writing surfaces, maximizing functionality in limited spaces.
Interactive Digital Whiteboards
At the cutting edge of whiteboard technology are interactive digital whiteboards. These sophisticated devices combine the tactile experience of traditional dry erase boards with the power of digital technology, allowing users to save, share, and manipulate content in real-time.

Maintaining Your Dry Erase Board for Longevity
Proper maintenance is essential to ensure your dry erase board remains in optimal condition for years to come. By following these best practices, you can extend the life of your board and maintain its performance:
Regular Cleaning
Clean your dry erase board regularly using a specialized whiteboard cleaner or a mixture of water and mild soap. Avoid using abrasive cleaners or rough materials that could damage the surface. For stubborn marks, use a whiteboard eraser spray designed to remove ghosting and stains.
Proper Erasing Technique
Use a clean, soft eraser or microfiber cloth to remove markings. Erase in a circular motion, applying gentle pressure to avoid scratching the surface. Replace erasers regularly to prevent the buildup of marker residue that can lead to smearing.
Marker Selection
Use only high-quality dry erase markers designed specifically for whiteboard use. Low-quality markers or permanent markers can leave stains or ghosting on the board surface. Store markers horizontally to prevent the tips from drying out.

Avoid Leaving Markings for Extended Periods
Try not to leave markings on the board for extended periods, especially overnight or over weekends. Prolonged exposure to marker ink can lead to staining or ghosting, making it harder to erase in the future.
Periodic Deep Cleaning
Perform a deep cleaning of your dry erase board every few months or as needed. This process involves using a specialized whiteboard rejuvenator or a mixture of isopropyl alcohol and water to remove built-up residue and restore the board’s surface.
Integrating Dry Erase Boards into Your Workflow
To maximize the productivity benefits of your dry erase board, it’s essential to integrate it effectively into your team’s workflow. Here are some strategies to make the most of this versatile tool:
Daily Stand-Up Meetings
Use your dry erase board to conduct daily stand-up meetings or scrums. Create a template with sections for each team member to update their progress, challenges, and goals. This visual representation keeps everyone informed and aligned on project status.

Project Timelines and Milestones
Utilize the expansive space of your dry erase board to create detailed project timelines. Mark key milestones, deadlines, and dependencies in a visually engaging format that’s easily updatable as the project progresses.
Idea Generation and Brainstorming
Encourage team members to use the dry erase board for spontaneous idea generation and brainstorming sessions. The act of writing or drawing on the board can stimulate creativity and lead to innovative solutions.
Visual Task Management
Implement a visual task management system using your dry erase board. Create columns for different stages of work (e.g., To Do, In Progress, Done) and use sticky notes or magnets to represent individual tasks. This Kanban-style approach provides a clear overview of work status at a glance.
Learning and Training
In educational or training environments, use the dry erase board to create interactive learning experiences. Encourage participants to come up to the board and contribute to diagrams, solve problems, or illustrate concepts, fostering active engagement and better retention of information.

Enhancing Collaboration with Digital Integration
While traditional dry erase boards offer numerous benefits, integrating digital tools can further enhance collaboration and productivity. Here are some ways to combine the tactile experience of whiteboards with digital technology:
Digital Capture and Sharing
Use smartphone apps or dedicated whiteboard cameras to capture and digitize content from your dry erase board. This allows you to easily share ideas and brainstorming sessions with remote team members or preserve information for future reference.
Hybrid Meetings
For teams with both in-person and remote participants, consider using a digital whiteboard app in conjunction with your physical board. This enables real-time collaboration across locations, ensuring all team members can contribute equally regardless of their physical presence.
Cloud-Based Integration
Explore cloud-based project management tools that offer virtual whiteboard features. These platforms allow you to recreate your physical board in a digital space, enabling seamless transitions between in-person and remote work environments.

QR Code Integration
Create QR codes linking to digital resources and attach them to your dry erase board. This allows team members to quickly access relevant documents, websites, or additional information related to the content on the board.
By thoughtfully integrating your dry erase board into your team’s workflow and combining it with digital tools, you can create a dynamic and efficient work environment that fosters creativity, collaboration, and productivity.
Choose the Right Dry Erase Board Size for Your Space
When selecting a dry erase board for your office, classroom, or other environment, it’s crucial to consider the size of the board in relation to the size of the room. Having ample writing space for brainstorming, collaborating, and presenting is key for productivity and engagement. The right dry erase board size allows all participants to see the content clearly from their seats or standing positions. It also provides enough room for multiple people to write at once without feeling crowded.
For small to medium sized spaces like small offices or classrooms, a 3′ x 2′ dry erase board is usually sufficient. This provides enough room for basic note taking, calendars, and to-do lists without dominating the entire wall. In a cozy home office, a 2′ x 3′ size is compact while still usable.
Larger rooms benefit from bigger boards in the range of 4′ x 6′ or 4′ x 8′. These dimensions give ample space for more extensive mind-maps, charts, lessons, and diagrams. A 4′ x 10′ dry erase board is ideal for large conference rooms, auditoriums, and training facilities. The expansive surface area engages wider audiences during presentations and workshops. Extra wide and tall boards are great for math and science classrooms where visualizing problems and calculations is beneficial.
For truly oversized gathering places like lecture halls and ballrooms, connecting multiple boards together into one mega-surface delivers maximum visibility. Or utilize entire walls as dry erase surfaces. Just be sure the board height is accessible to users of all heights. Place chairs and tables appropriately to ensure everyone has a clear sightline.
Take measurements of the room layout, seating, and traffic flow when determining the ideal dry erase board size. Boards mounted poorly can impede movement or force users to strain to see content in the corners. Measure the wall space as well to avoid an undersized board swallowed up in a large wall. With thoughtful sizing and placement, a dry erase board becomes a versatile communication hub.
Consider a Lacrosse Dry Erase Board for Durability
When selecting a dry erase board, it’s important to consider durability and longevity. Lacrosse boards stand out as a brand known for quality and sturdiness to withstand daily use in busy offices and classrooms. Their commercial-grade dry erase boards hold up well over time.
Lacrosse uses aluminum trim and marker trays designed for strength and low maintenance. The trim won’t warp or bend even after years of service. Sturdy tray construction prevents dents and damage even when users accidentally drop markers. Lacrosse boards come with a lifetime warranty on the aluminum frame and tray.
The Lacrosse writing surface resists ghosting, staining, and scratches from dry erase markers. Frequent cleaning won’t degrade the surface over time. Lacrosse uses a high-quality melamine surface that maintains smoothness and erasability. It won’t become etched or hazy with heavy use. The combination of durability and erase-ability makes Lacrosse boards ideal for high-traffic areas.
Lacrosse boards are also designed to minimize damage if they’re accidentally knocked off the wall. The aluminum trim features rounded corners to reduce chipping if the edge hits the floor. The steel backing helps the board retain its shape after impact. The enamel writing surface is scratch-resistant and won’t easily shatter if dropped.
When evaluating dry erase boards, check user reviews and warranties to ascertain durability. Lacrosse’s lifetime and 20-year warranties reflect the brand’s faith in their boards’ longevity. For a board that will maintain its professional look for years of meetings, brainstorming sessions, lessons, and presentations, Lacrosse is a top choice. The investment in a durable, high-quality board from Lacrosse will pay off with sustained performance.
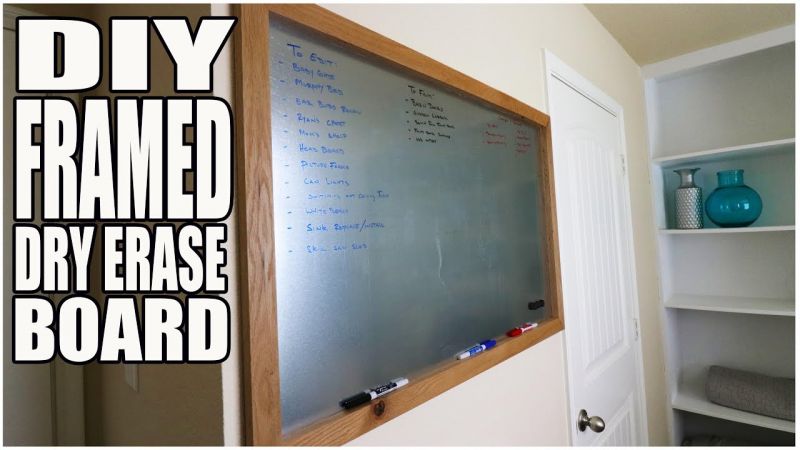
Install a Full Wall Dry Erase Board for Maximum Visibility
For presentation spaces, classrooms, and offices requiring ample writing space, installing a full wall dry erase board delivers maximum visibility. Utilizing an entire wall as one giant whiteboard creates a striking focal point for collaboration, brainstorming, and teaching.
Full wall boards allow presenters to utilize the entire surface for visuals, charts, timelines, and diagrams. Audiences can clearly see details from any seat in the room without straining. The expansive workspace also enables more participants to actively use the board during workshops and sessions. Multiple simultaneous users can brainstorm and record ideas without crowding together or erasing each other’s contributions.
In offices, full wall whiteboards foster enhanced creativity for teams. The ample real estate sparks imaginative thinking and deeper discussion while mapping out projects and strategies. For classrooms, a full wall board gives teachers ample room to present lessons visually with diagrams, notes, and student worksamples. Students in the back won’t miss a thing. The oversized board also enables more students to come to the front to demonstrate problem solving.
A few tips for utilizing a full wall dry erase board effectively: Install boards at a height accessible to users of all statures. Place chairs, desks, and tables properly to ensure clear lines of sight. Use wide chisel tip dry erase markers for bold, visible writing. Include a tray to organize accessories like erasers, magnets, and markers. Clean regularly to keep the expansive surface clutter-free.
While large boards require more diligent maintenance, the benefits of a full wall dry erase board make the effort worthwhile. The striking visibility and ample workspace boost engagement, creativity, and collaboration for impactful lessons, meetings, and presentations.
Get a Dry Erase Board with Grid Lines for Structure
Dry erase boards with grid lines provide helpful visual structure for organizing notes, lessons, and diagrams. The evenly spaced lines create columns and rows to align text and drawings neatly.
In classrooms, gridded dry erase boards assist teachers in presenting clear, structured lessons and mathematical thinking. Columns, rows, and borders keep information organized as students follow along. Diagrams drawn on the grid aid understanding of concepts like fractions, graphs, and geometry. Students utilizing the board can align their work to the neat grid.
Grid lines also bring orderly visuals to office brainstorming and planning. Breaking the expansive surface into rows and columns makes it easy to catalog ideas, data, and meeting notes. Information stays neatly sectioned into categorized boxes or lists. Grids guide the drawing of organized flow charts, timelines, and schematics.
The orderly foundation of a gridded whiteboard fosters efficiency during use. Elements remain aligned instead of straying all over the board. Grids also optimize use of the entire surface area. Information can be precisely positioned to utilize the whole board.
Look for gridded dry erase boards with versatile options like a 1-inch or quarter-inch grid pattern. Squares sized appropriately suit various uses from mathematical equations to drafting diagrams. For more flexibility, choose a board with reversible grid on one side and a blank surface on the other. Use the template as needed but switch to a blank canvas for freestyle collaboration anytime.
Dry erase boards with built-in structure empower users to present information precisely and professionally. The orderly foundation of grids enhances comprehension and productivity during lessons, brainstorming, and beyond. Achieve presentation perfection with the assistance of grid lines.
Use Different Color Dry Erase Markers for Organization

Utilizing different colored dry erase markers brings visual organization to notes, lessons, and diagrams on a whiteboard. The color coding keeps information neatly categorized and easier to follow.
In classrooms, teachers can use distinct colors to emphasize or delineate elements in a lesson. Red can highlight key vocabulary, blue can trace mathematical formulas, and black can write out explanatory notes. Students can follow along with the color-coded visual roadmap.
Color-coding is also helpful for office collaboration and brainstorming. Blue can outline a marketing strategy, green can capture creative ideas, and red can mark important action items. Color makes it simple to locate certain types of information at a glance.
Multi-colored pens turn a dry erase board into a dynamic organizational tool. Try these techniques:
– Use one color consistently to boundaries, borders, or divides on the board. This creates organized sections.
– Assign a color to each team member. Their contributions remain identified.
– Code types of information like dates, headings, or keywords with distinct hues.
– Make key points stand out by underlining or circling them in a vivid color.
Choose quality dry erase markers designed to erase cleanly without staining or ghosting. Test markers on a sample board before use. Replace fading markers promptly for vivid notes. For the broadest color options, select a marker set with 8-10 colors. Prioritize bold primary shades over pale or similar tones.
With the stroke of colorful dry erase markers, whiteboards transform into vibrant organizational charts. Information categorized in hues is professionally presented and easily understood by audiences.
Clean Dry Erase Boards Regularly for a Clutter-Free Surface

For dry erase boards to remain effective communication tools, they need regular cleaning. A cluttered board with faded markers and ghosted residue frustrates users. Establishing a frequent cleaning routine keeps the surface looking fresh, professional, and optimized for collaboration.
The cleaning schedule depends on usage frequency. Private home office boards may only need wiping once a week. High-traffic office and classroom boards used constantly each day require daily cleaning for ideal visibility. At minimum, whiteboards should be erased and restored to a blank slate after every lengthy session to prepare for the next user.
Use dry erase board cleaning spray or wipes designed specifically for the surface. Avoid household cleaners like glass cleaner that can degrade the surface and leave streaks. Spray the board lightly and wipe evenly with a microfiber cloth. Start at the top and work methodically to the bottom to avoid drips.
For ghosts or stubborn stains, use a dry erase board eraser before spraying cleaner. Gently rub the eraser over markings in circles to lift residue. Then wipe with cleaner until no trace remains. Let the board fully dry before writing again so ink doesn’t smear.
A weekly deep cleaning helps minimize buildup. Erase the entire board fully with an eraser. Spray liberally and let cleaner soak for 2-3 minutes. Wipe off with firm pressure. Repeat until no haze or streaks show. Dry completely and your board looks fresh out of the box.
With consistent dry erase board cleaning, your workspace will be visibly clearer and more professional. A crisp, empty surface invites engaging collaboration, creativity, and efficient productivity every time.
Store Dry Erase Markers Correctly to Prevent Drying Out
Dry erase markers contain liquid ink that can dry out with improper storage. Keeping markers capped and stored correctly preserves smooth flow and extended usefulness. Follow these tips for storing dry erase markers.
Always recap markers immediately after use to prevent ink from evaporating and the tip from drying. Store markers upright with the tip pointed down to keep ink saturating the felt nib. The pull of gravity helps ink run down and moisten the tip as needed.
Choose marker storage designed to keep caps on and tips down. Magnetic wall-mounted holders keep uncapped markers at an angle for quick grabbing with the tip pointing down. Storage cans and floor easels hold markers vertically. Individual desk cups secures caps on.
Avoid storing markers horizontally for prolonged periods. Ink pools in the side of the barrel instead of on the tip. To revive a dried tip, shake the marker vigorously with the cap on to re-saturate and then leave it nib down overnight.
Keep storage locations out of direct sunlight and away from heaters that can bake moisture from marker ink. Store in interior wall racks rather than exterior window ledges. Avoid storing on radiators or next to room vents.
Replace aging markers regularly to maintain vivid writing. Indicators of drying out include faded colors, increased streakiness, and requiring more pressure to write. Flush old markers periodically by holding them nib down and depressing the tip to circulate ink.
Proper dry erase marker storage prolongs the life of your board accessories. Follow these simple tips to keep markers writing smoothly session after session. Your board will always be ready for clear communication and vibrant brainstorming ideas.
Utilize Dry Erase Boards for Collaborative Work Sessions
Dry erase boards are ideal collaboration tools for interactive meetings and work sessions. The spacious writable surface allows teams to brainstorm, map out plans, and capture feedback in real time.
Use dry erase boards for creative mind-mapping. Outline a topic or project in the center, then branch out related ideas and action steps. Color code branches with different markers as they develop organic connections.
Visual thinking on a vertically-oriented dry erase board keeps the entire team engaged. All participants can watch strategies unfold and step in to contribute. Quieter team members can write out thoughts rather than interrupting conversation flow.
The simplicity of dry erase boards fosters productivity. No logins, wires, or setup means users can start collaborating immediately. Easily erase, revise, and rearrange content on the fly during fast-paced discussions.
Capture meeting notes directly on the whiteboard for later reference. Use bullet points, headings, concept clusters, and diagrams to note key points, decisions, and task assignments. Photograph the board or transcribe it prior to erasing.
For continued asynchronous collaboration, install a dry erase wall calendar for shift workers to convey updates across schedules. Leave a daily planner board for colleagues to leave cross-departmental messages.
Tap into the flexibility of dry erase boards to drive dynamic teamwork sessions. The oversized workspace sparks conversation, fosters shared understanding, and visually unifies ideas into actionable next steps.
Sketch Out Plans and Ideas on a Dry Erase Board
Dry erase boards are ideal for sketching out plans, ideas, and concepts. The large surface provides plenty of creative space to visualize thinking. The ease of erasing and revising makes boards highly useful for drafting sessions.
In the office, use a dry erase board to map out proposals, workflows, and project plans. Visually working through steps makes complex processes clearer. Easily modify layouts on the fly during meetings to refine strategies.
Teachers can storyboard lesson plans on a classroom dry erase board. Sketch out the key points, interactive activities, and content flow. Revise and refine the plan as ideas come.Teaching assistants can use the sketch to help deliver the lesson if needed.
For creative sessions, a dry erase board allows fluid, expressive thought. Uncork an impromptu brainstorming happy hour by inviting colleagues to diagram concepts on the board over drinks. Capture inspiration before it evaporates.
The simplicity of a dry erase board removes barriers to translating thoughts into visuals. No technical skills needed – just grab a marker and start drawing. Resist overthinking and let ideas flow freely.
Photograph whiteboard sketches or take notes to preserve concepts after erasing the board. Review documentation to clarify and formalize plans for the next stage of development and execution.
A dry erase board becomes a limitless canvas for thinking through ideas visually. The freedom to sketch messily, erase endlessly, and evolve concepts dynamically drives meaningful creative collaboration.
Track Data and Metrics Visually with a Dry Erase Board
Dry erase boards allow teams to visualize data, metrics, and project progress visually in chart form. Seeing statistics in context sparks discussion and actions.
Sales teams can plot sales growth on a graph drawn on the board. Review the chart in meetings to check progress to quarterly goals. Brainstorm strategies to boost performance based on visualized data patterns.
In classrooms, math and science teachers can graph out problem sets on the board. Students can follow along as the data takes shape in charts. Use different colors to plot multiple data sets on one chart.
Project managers can diagram workflows on a dry erase board to indicate status. Show each task as a box, then color code boxes green for completed tasks, yellow for active, and red for late. Seeing progress at a glance facilitates progress checks.
Get creative with data visualization. Use scatter plots to identify correlations. Draw pie charts to break down percentages. Annotate charts with additional metrics and notes in different colors.
Periodically photographing charts provides helpful tracking over time. Notice how sales trends change month to month. Archive classroom charts to give students reference material to study.
Harness the power of visual data. A dry erase board becomes a flexible, interactive canvas for turning statistics into compelling charts that inform smart strategy.
Display Important Notices and Announcements on a Dry Erase Board
Dry erase boards provide excellent visible real estate for displaying important notices, announcements, and messaging in offices, schools, and other settings.
Position boards prominently in gathering spaces like break rooms, lobbies, and hallways. Use for community messaging like room bookings, events, policy changes, and facilities notices. Rotate content to keep it fresh.
Make safety messages stand out by using alternating colors for high visibility. Post procedures and emergency contacts clearly. Diagram evacuation routes or protocols for quick reference.
Encourage employee engagement by welcoming new hires or announcing birthdays on a fun bulletin board. Give kudos for accomplishments and wins. Celebrate diversity and cultural events.
Use dry erase boards creatively for motivation and inspiration. Write an inspirational quote of the week. Sketch images and graphics related to goals. Show individual and team progress towards success.
Changeable dry erase boards make notices flexible to update instantly. Standard paper flyers may be overlooked over time. Erase and refresh messaging on boards to keep content current.
Capture attention with the spacious canvas of dry erase boards. Use them strategically as centralized communication hubs for important updates, motivation, and community engagement.
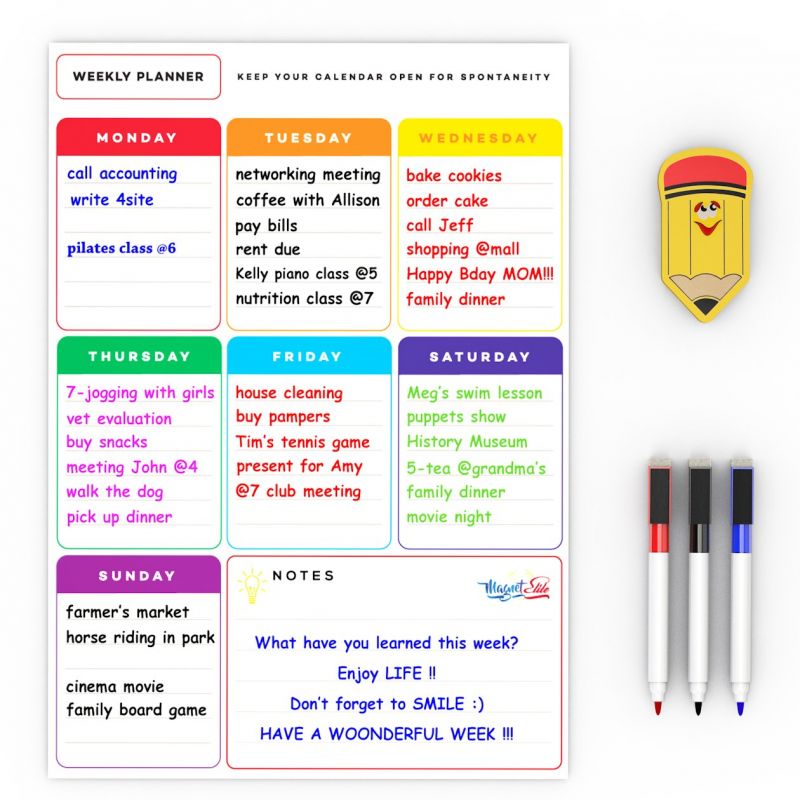
Keep To-Do Lists and Schedules Visible on a Dry Erase Board
Posting to-do lists and schedules on a prominently placed dry erase board keeps tasks and appointments top of mind. The visual reminder and satisfaction of checking off completed items drives productivity.
Map out your weekly schedule on a home office board. Write down appointments, meetings, calls, and deadlines in a calendar grid. Check events off as you complete them for a sense of accomplishment.
For independent workers juggling multiple projects, a to-do board keeps focus. List each task and deadline for current assignments. Erase and rearrange throughout the day as priorities shift.
In classrooms, post the week’s agenda or lesson schedule on the board. Students can prepare by previewing topics, assignments, and tests. Check off items as the week progresses.
Use boards creatively to motivate progress. Draw a thermometer and color it in as tasks get done. Track personal goals like steps or fitness workouts completed.
Capture fleeting thoughts on your board immediately so they aren’t forgotten. A central workplace board allows colleagues to leave messages anytime.
Harness the flexibility of dry erase boards to organize your activities, both personal and professional. A prominent visual reminder keeps you on track towards achieving goals on time.
Engage Students with Lessons On a Classroom Dry Erase Board
An expansive classroom dry erase board allows teachers to actively engage students with interactive lessons, notes, and visual learning.
Present concepts visually on the board through diagrams, images, charts, and graphic organizers. Students can better grasp abstract ideas through strong visuals supporting your verbal lesson.
Draw attention to key points by using color. Highlight essential vocabulary or formulas by circling them in bright marker. Use arrows or underlines to emphasize.
Incorporate student work by displaying examples on the board. Analyze a good essay outline together. Work through math problems step-by-step. Celebrate creativity by sketching student art.
Increase student participation with board-based activities. Have students compete in spelling bees at the board. Divide into teams for quiz bowl academic review sessions.
Use boards flexibly for impromptu teachable moments. If a relevant topic arises during discussion, visualize concepts spontaneously on the board.
Adjacent whiteboards foster small group work. As you assist groups around the room, others can continue tasks independently at their boards.
An oversized dry erase board canvass sparks creative, interactive learning. Capture student attention while making lessons clearer and more memorable through impactful visuals.
Get a Dry Erase Board Desk Calendar to Stay on Track
A dry erase desk calendar board helps both students and professionals visually organize schedules, appointments, deadlines, and tasks. The at-a-glance overview keeps you on track daily.
Choose a board sized appropriately for your workspace. Smaller boards around 12″x18″ fit neatly on a desk. Wall-mounted full-month calendars up to 3’x4′ work for offices.
Use different color dry erase markers to color-code categories. Schedule work meetings in blue, social events in red, school project deadlines in green. Customize a system that suits your needs.
Erase and update your board calendar daily or weekly. Migrate unfinished tasks forward day-by-day. Check off completed items for a sense of accomplishment.
Write schedules, reminders, and to-dos directly on your board. Cross off tasks immediately after finishing to stay current. Add new events and appointments as they arise.
Snap a photo of your board each week to preserve your schedule in other formats like planners or digitally. Many dry erase models come with memory wipe strips.
An at-a-glance dry erase calendar board gives any workspace an organized foundation for time management. Stay on top of responsibilities with this bold visual reminder.
Choose a Mobile Dry Erase Board That Can Move Locations

Mobile dry erase boards provide versatile writing space that can move wherever needed. Easily relocate boards between offices, classrooms, or workspaces.
Select a mobile board with heavyweight casters that roll smoothly across various flooring types. Locking wheels keep the board stationary in use then release to transport.
Check board dimensions to ensure it fits through doorways during transport. Narrower widths around 3 feet work well. Choose a short board height for users of all statures.
Lightweight aluminum frames allow easy maneuverability. Boards that are too heavy become cumbersome to roll. However, weight lends stability when locked in place.
For classroom use, roll boards into groups for small-group work time. Adjust locations to balance sightlines and access. Easily redistribute boards as classroom needs evolve.
Incorporate mobile boards into office workshop sessions. Roll boards into larger meetings for breakouts, then return to storage after. Use in lobby areas for visiting groups.
Store dry erase accessories like erasers and markers directly on the board tray or shelves. Keep supplies with the board for easy mobility.
Maneuver dry erase boards effortlessly on smooth-rolling casters. Flexible boards transform spaces as needs arise to empower effective communication and collaboration.