How can you clean your golf clubs like a professional. What are the essential tools for proper golf club maintenance. Why is regular cleaning crucial for optimal club performance. When should you replace worn grips on your golf clubs.
Essential Tools for Effective Golf Club Cleaning
Maintaining your golf clubs in pristine condition is crucial for optimal performance on the course. To clean your clubs effectively, you’ll need a few key tools:
- Groove cleaners
- Soft bristle brushes
- Microfiber towels
- Mild dish soap
- Warm water
- Plastic polish
- Grip sanitizer spray
Groove cleaners are indispensable for removing stubborn dirt from club face grooves, while soft bristle brushes gently yet effectively scrub away grime. High-quality microfiber towels are essential for buffing your clubs to a spotless finish without risking scratches.
Step-by-Step Guide to Cleaning Golf Club Heads
Follow these steps to thoroughly clean your golf club heads:

- Use a groove cleaner to remove large chunks of dirt and debris from the club face grooves.
- Fill a bucket with warm water and add a small amount of mild dish soap.
- Scrub the entire club head surface with a soft bristle brush dipped in the soapy water.
- Pay special attention to the grooves, using a dedicated groove cleaning brush.
- Rinse the club head thoroughly under running water to remove all soap residue.
- Dry immediately with a clean microfiber towel to prevent water from seeping into crevices.
Is cleaning the grooves really that important? Absolutely. Thorough groove cleaning is essential for maintaining optimal spin and control of your shots. Dirt-filled grooves can significantly impact your ball’s trajectory and distance.
Polishing Club Heads for Extra Shine
After cleaning, give your club heads a professional-looking finish:
- Apply a small amount of plastic polish to a microfiber cloth.
- Buff the club heads in a circular motion to smooth out minor scratches and add shine.
- Avoid getting polish on the club face to maintain proper spin characteristics.
Proper Golf Grip Maintenance Techniques
Clean grips are essential for maintaining control over your swing. Here’s how to keep them in top condition:

- For rubber grips, use a damp microfiber towel with mild soapy water to wipe them down.
- Be cautious with leather grips to avoid oversaturation.
- Use a grip sanitizer spray to kill germs and eliminate odors.
- Dry grips thoroughly with a clean towel after cleaning.
How often should you clean your golf grips? It’s recommended to give them a quick wipe-down after each round and a more thorough cleaning every few weeks, depending on usage.
Specialized Cleaning for Different Club Types
Different types of golf clubs may require specific cleaning approaches:
Iron Face Cleaning
Use an iron head cleaner spray once per season to deep clean the grooves and restore the smooth feel of your iron faces. This specialized cleaner helps remove grease and dirt buildup that regular washing might miss.
Putter Face Restoration
Putters often accumulate ball marks over time. To restore your putter face:
- Use an old toothbrush and putter-specific cleanser.
- Gently scrub to remove dents and ridge marks.
- Perform this restoration about twice a year for optimal putting performance.
Cleaning Adjustable Clubs
Modern adjustable drivers and hybrids require additional care:

- Lubricate moving parts with light machine oil twice a year.
- Apply just a drop or two to prevent corrosion and ensure smooth operation.
- Be careful not to over-lubricate, as excess oil can attract dirt.
Recognizing When to Replace Golf Grips
Even with regular cleaning and maintenance, golf grips will eventually wear out. How can you tell when it’s time for new grips?
- Grips feel slick or slippery during your swing
- Visible signs of wear, such as cracks or smooth patches
- Loss of tackiness, even after cleaning
- Noticeable deterioration of the grip material
Replacing worn grips is crucial for maintaining control and consistency in your golf game. Fresh grips can significantly improve your performance and comfort on the course.
Advanced Golf Club Cleaning Tips for Optimal Performance
To take your club maintenance to the next level, consider these advanced tips:
Ultrasonic Cleaning
For a deep, professional-level clean, consider using an ultrasonic cleaner:
- Fill the cleaner with a specialized golf club cleaning solution.
- Submerge club heads for 10-15 minutes.
- The ultrasonic waves will dislodge even the most stubborn dirt and grime.
- Rinse thoroughly and dry immediately after cleaning.
Rust Removal
If your clubs have developed rust spots, try these methods:

- For light rust, use a mixture of vinegar and water.
- For stubborn rust, try a specialized rust remover designed for golf clubs.
- Gently scrub with steel wool, being careful not to scratch the club surface.
- Apply a thin layer of mineral oil after cleaning to prevent future rusting.
Groove Sharpening
Over time, club grooves can become worn and less effective. To restore their bite:
- Use a groove sharpening tool designed for golf clubs.
- Follow the original groove pattern carefully.
- Be cautious not to remove too much material, as this can make the club non-conforming for tournament play.
How often should you sharpen your club grooves? For most amateur golfers, once a year is sufficient. However, professionals and frequent players may need to do this more often.
Creating a Golf Club Cleaning Routine
Establishing a regular cleaning routine will help maintain your clubs’ performance and extend their lifespan. Here’s a suggested schedule:
After Every Round
- Wipe down club heads and shafts with a damp cloth.
- Clean out grooves with a groove cleaner tool.
- Use a grip wipe or sanitizer spray on your grips.
Weekly Maintenance
- Perform a thorough soap and water cleaning of club heads.
- Deep clean grips with soapy water (for rubber grips).
- Inspect clubs for any damage or wear.
Monthly Check-up
- Polish club heads to maintain their shine.
- Check and tighten any loose components on adjustable clubs.
- Evaluate grip condition and consider replacement if necessary.
Seasonal Care
- Use specialized cleaners on iron and putter faces.
- Lubricate moving parts on adjustable clubs.
- Assess overall club condition and plan for any needed repairs or replacements.
By following this routine, you’ll ensure your golf clubs remain in excellent condition year-round, ready to perform their best whenever you hit the links.

Environmental Considerations in Golf Club Cleaning
As golfers, we have a responsibility to care for the environment while maintaining our equipment. Here are some eco-friendly tips for cleaning your golf clubs:
Eco-friendly Cleaning Solutions
Consider using biodegradable and non-toxic cleaning products:
- Natural dish soaps free from harsh chemicals
- Vinegar-based solutions for rust removal
- Baking soda paste for stubborn stains
Water Conservation
Be mindful of water usage during the cleaning process:
- Use a bucket instead of running water continuously
- Collect and reuse rinse water for watering plants
- Consider using a spray bottle for more controlled water application
Proper Disposal of Cleaning Materials
Dispose of cleaning materials responsibly:
- Recycle empty cleaning product containers
- Properly dispose of any oily or chemical-soaked rags
- Consider composting natural fiber cleaning cloths when they’re no longer usable
How can eco-friendly cleaning benefit your golf game? By using gentler, natural cleaning products, you reduce the risk of damaging your clubs’ finishes or components, potentially extending their lifespan and maintaining their performance characteristics.

The Impact of Clean Golf Clubs on Your Game
Maintaining clean golf clubs isn’t just about aesthetics; it can significantly affect your performance on the course. Here’s how clean clubs can improve your game:
Enhanced Spin Control
Clean grooves on your club faces allow for better contact with the ball, resulting in:
- Improved backspin for better stopping power on the greens
- More consistent side spin for accurate shot shaping
- Enhanced control in various weather conditions
Increased Distance
Clean club faces can contribute to longer shots:
- Reduced friction between the ball and club face
- More efficient energy transfer at impact
- Consistent ball flight for predictable distances
Better Feel and Feedback
Clean clubs provide better sensory feedback:
- Improved ability to feel the strike point on the club face
- More accurate feedback on mishits for quicker swing adjustments
- Enhanced confidence in club performance
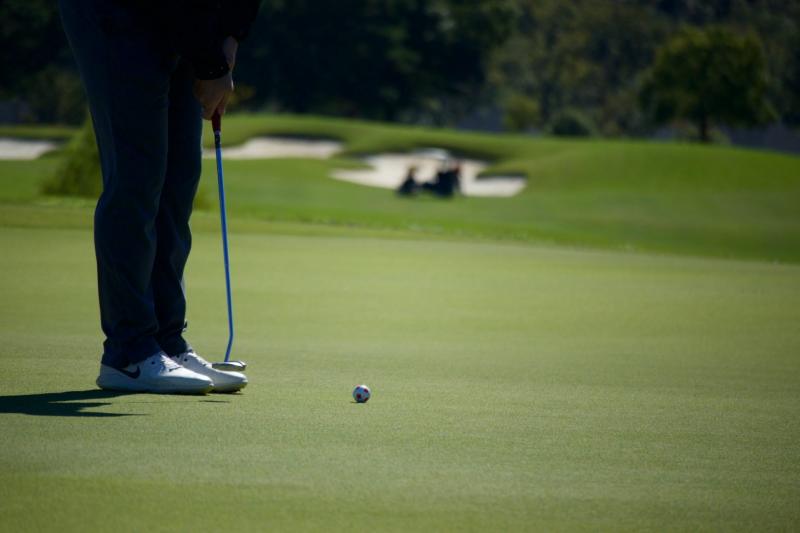
Consistent Putting
A clean putter face is crucial for putting accuracy:

- Consistent roll off the putter face
- Better distance control
- Reduced skidding or hopping of the ball at impact
Can clean golf clubs really make that much difference? Absolutely. Professional golfers meticulously maintain their equipment for a reason. Clean clubs provide the consistent performance needed to play your best golf, whether you’re a tour pro or a weekend warrior.
Protecting Your Golf Club Investment
Golf clubs represent a significant investment, and proper care can extend their lifespan and maintain their value. Here are some tips for protecting your golf clubs:
Proper Storage
Store your clubs correctly to prevent damage:
- Keep clubs in a cool, dry place to prevent rust and grip deterioration
- Use head covers to protect woods and putters from dings and scratches
- Consider a climate-controlled environment for high-end or antique clubs
Transportation Care
Protect your clubs during transport:
- Use a high-quality golf bag with ample padding
- Secure clubs in your vehicle to prevent jostling
- Consider a hard-case travel bag for air travel
Regular Inspections
Routinely check your clubs for signs of wear or damage:

- Look for loose clubheads or shafts
- Check for cracks or dents in the clubhead
- Assess grip condition and replace when necessary
Professional Servicing
Sometimes, it’s best to leave it to the pros:
- Have your clubs professionally re-gripped when needed
- Consider annual professional cleanings and inspections
- Seek expert repairs for any significant damage
How often should you have your clubs professionally serviced? For most golfers, an annual check-up is sufficient. However, if you play frequently or in harsh conditions, you might benefit from more regular professional attention.
By implementing these cleaning and maintenance practices, you’ll not only improve your game but also protect your golf club investment for years to come. Remember, well-maintained clubs perform better and last longer, giving you the best possible experience on the golf course.
Proper Cleaning Tools – Groove cleaners, brushes, microfiber towels
As an avid golfer, keeping my clubs in tip-top shape is a top priority. Nothing ruins a good day on the course faster than trying to hit a ball out of the rough with a club full of dirt and grass. Over the years, I’ve picked up plenty of handy tricks for DIY golf club cleaning so I can keep my gear shining like new after every round.
The first key is having the right arsenal of cleaning tools on hand. For me, that means sturdy groove cleaners, soft bristle brushes, and high-quality microfiber towels. Groove cleaners are essential for digging dirt and debris out of club face grooves, while brushes scrub away grime gently but effectively. Microfiber towels buff everything to a spotless finish without scratching.
Remove Dirt and Grass
After a long day on the course, my irons and wedges are often caked with dirt and grass. Before breaking out the soapy water, I start by using my groove cleaner tool to scrape out the biggest chunks wedged into the club face grooves. For hard-to-reach spots, an old toothbrush does the trick. This prep work gets the grimiest gunk off so it doesn’t turn into a muddy mess when I start washing.
Wash with Soap and Water
Now it’s time to pull out the suds! I fill up my cleaning bucket with warm water and add a small squirt of mild dish soap – nothing too harsh that might degrade club components. Then I scrub every surface of the club head using a soft bristle brush. The warm, soapy water lifts away stubborn dirt and oils. For grips, lightly dampen a towel with the soapy water and wipe down. Skip this step for rubber grips.
Scrub the Grooves
Here’s where I break out my trusty groove cleaning brush. Using short, gentle back-and-forth motions, I scrub the brush inside each groove to lift out any remaining gunk. I also wrap a corner of my microfiber towel tightly around the brush tip to get into tiny grooves. Thorough groove cleaning is key for optimal spin and performance.
Clean the Grip
Rubber golf grips pick up oils, dirt, and grime from hands over time. For a basic cleaning, I dampen another microfiber towel with warm, soapy water and gently wipe down the entire grip to remove dirt and restore tackiness. Be careful not to oversaturate leather grips. I also give each grip a spritz of sanitizing spray designed for golf gear to kill germs and keep my grips fresh.
Rinse Away Soap
Once scrubbing is complete, it’s time for the final rinse. I hold each club head directly under the faucet to wash away all soap residue. For grips, I use a fresh damp towel to wipe off any soap film. It’s important to remove all traces of soap because it can slowly degrade club components if left on over time.
Dry Immediately
As soon as I’m done rinsing, I pat down each club head and grip with a clean, dry microfiber towel. Air drying could allow moisture to seep into tiny crevices so I make sure to gently wipe everything down before any water can linger. I pay special attention to grooves, making sure no droplets are hiding out inside.
Polish the Club Head
Once my clubs are squeaky clean, I put on the finishing shine touches. Using a microfiber cloth with a dollop of plastic polish, I buff the club heads in a circular motion to make them gleam. The polish smooths small scratches and protects against UV damage. Be cautious not to get polish on the club face as this can impact spin and performance.
Clean Iron Face
While general washing works great on iron club heads, I like to use a special iron head cleaner spray about once a season to really make the grooves sparkle. This formulated cleaner digs into grooves to remove grease and dirt buildup. Afterwards, the club face feels ultra smooth and ready for maximum ball control.
Restore Putter Face
My putter face takes a real beating with ball marks over time. About twice a year, I’ll scrub it with an old toothbrush and putter cleanser to restore the smooth finish. This removes dent and ridge marks so my putting glides true and accurate across the green.
Sanitize Grips
Given how much I handle my grips, sanitizing them regularly keeps germs and funky odors at bay. My go-to is a spray-on grip sanitizer that kills 99.9% of bacteria without drying out my grips. A quick spray after each round keeps my hands healthy and my grips fresh.
Lubricate Moving Parts
Modern adjustable drivers and hybrids have lots of intricate hinges and moving parts. Twice a year, I lubricate them with a light machine oil to prevent corrosion and keep parts swinging smoothly. Just a drop or two keeps mechanism friction-free.
Replace Worn Grips
While good cleaning extends grip life, natural wear will eventually occur. Once grips feel slick, worn or show visible deterioration, it’s time for a replacement. Resurfacing clubs with fresh grips restores tackiness and ensures optimal swing control.
Store Properly
After putting in all that elbow grease cleaning my clubs, I want to keep them in beautiful shape. My storage secrets: keep clubs in a dry garage or closet, avoid direct sunlight exposure, and always use headcovers to prevent nicking or dents during storage and transport.
Regular Maintenance
Consistent care is key for maintaining stellar clubs. I stick to washing my gear after every single round I play, no exceptions! Quick cleanings don’t take much time and prevent dirt or grass from becoming permanently embedded. Plus, it makes me feel like a pro to start my next game with impeccably clean clubs.
Following these Do-It-Yourself golf club cleaning tips, I’ve been able to keep my gear looking and performing like new for season after season. A little elbow grease goes a long way to save money on expensive cleanings or club replacements. Together with consistent practice to refine my swing technique, pristine clubs have helped lower my handicap over the years. Who knows, maybe I’ll finally break 80 on my home course this year with a lot of help from my trusty cleaning toolkit!
Remove Dirt and Grass – Use groove cleaner, toothbrush

As a frequent golfer, I know firsthand how grubby clubs can get after repeated rounds, especially the grooves which really attract and hold onto grass, dirt, and debris. Before breaking out the suds and brushes for deep cleaning, I’ve found it’s crucial to do some prep work to remove the heaviest gunk and grass stuck to the clubheads.
After a long day on the links, my irons and wedges in particular are usually caked with dirt and shards of grass wedged deep inside the grooves. I start by taking my sturdy groove cleaning pick and meticulously scraping out all the biggest chunks I can see. I press the pick gently along each groove to lift out stubborn debris without damaging the club face. It’s satisfying to see all that dirt and grass get evicted!
For really tenacious grass clinging inside the grooves, I break out an old toothbrush. The stiff plastic bristles let me scrub not only along the length of the grooves, but also sideways back and forth. This dislodges most of the remaining grass and ground-in dirt so I can remove it before washing. I take care not to scrub too hard with the toothbrush so I don’t harm the clubface. Gentle, patient brushing does the trick.
Getting the club heads as clean as possible before washing eliminates much of the abrasive, gritty dirt that could potentially scratch or degrade the club metal and grips during cleaning. Starting with grooves and surfaces as free of debris, grass and dirt as possible lets the soapy water and brushes really penetrate to dissolve and lift away oily grime and remaining particles without the mess and damage grit could cause. Keeping my toothbrush handy ensures those tiny grooves get special attention but remain pristine.
While prep cleaning adds a few extra minutes up front, I’ve found the groove scraping and toothbrush scrub steps are magic when it comes to leaving my irons, wedges, and other clubheads looking like new after washing. They return to the bag free of grass stains and debris-filled grooves. Plus, it saves my brushes and towels from becoming grubby messes themselves during the wash process. Proper deep cleaning can’t happen without first clearing away the loose debris for a thorough detailing.
As any golf pro knows, clubs with grooves packed full of dirt and grass are a recipe for lousy performance on the course. Debris alters the aerodynamics and prevents proper ball contact, leading to inaccurate shots and pitiful distance. After just a few rounds, even expensive clubs lose their edge if the grooves aren’t meticulously cleaned. My two-step dirt and grass removal process lets me maintain optimal spin and precision for consistent golfing success.
While some golfers opt for expensive professional deep cleaning services to resuscitate their gear, these simple yet effective DIY pre-wash steps allow me to keep my trusty clubs in like-new condition myself. A little time and elbow grease lets me save money and have the satisfaction of doing the job properly from start to finish.
Here is a new section continuing the golf club cleaning article:
Wash with Soap and Water – Use mild dish soap with warm water
Once I’ve removed all the loose debris from my golf clubs, it’s time to break out the soapy water and really get into deep cleaning mode. While simply rinsing with water could get rid of some surface-level dirt, using mild soap and warm water helps lift away oily residue, sunscreen, and other grime that water alone can’t touch.
I fill up my cleaning bucket with warm tap water – hot enough to dissolve grease but not so scalding that it could damage club components. Then I squirt in a small amount of mild dish soap without strong perfumes or moisturizers. Plain old Dawn does the trick nicely. The soap helps the warm water penetrate and dissolve sticky gunk and oils.
Armed with my soft bristle scrub brush, I start working on the club heads by gently scrubbing every surface with the soapy water. I make sure to repeatedly dip the brush into the bucket to keep it warm and sudsy as I clean. Slow, thorough scrubbing lets the soap lift dirt from grooves, gear hinges, and intricate club head engravings.
For grips, I lightly dampen a microfiber towel with the warm soapy mixture and gently wipe down the length of the grip to lift away dirt and oils from my hands. I’m careful not to oversaturate leather grips at this stage. A light wipe down removes grit without damaging the material.
The soap interacts with the warm water to act as a lubricant that safely dissolves residue. Scrubbing while soapy prevents fine particles and grit from creating microscratches on club faces and shafts during cleaning. The suds also help capture and rinse away the dissolved gunk so it doesn’t re-deposit back onto the gear.
I never use harsh detergents or chemical cleaners to wash my golf clubs. The abrasive ingredients and strong perfumes found in many household cleaners could slowly degrade the club materials and finishes over time, reducing their lifespan. Mild dish soap gives me that deep clean feeling without risking harm to my precious clubs.
While simply using water may seem easier, taking the time to properly wash golf clubs with warm, soapy water ensures no oily residue or grimy buildup remains. My gear comes out of the wash sparkling clean and good as new, ready for optimal performance and seasoned pro-level shots on my next trip to the course.
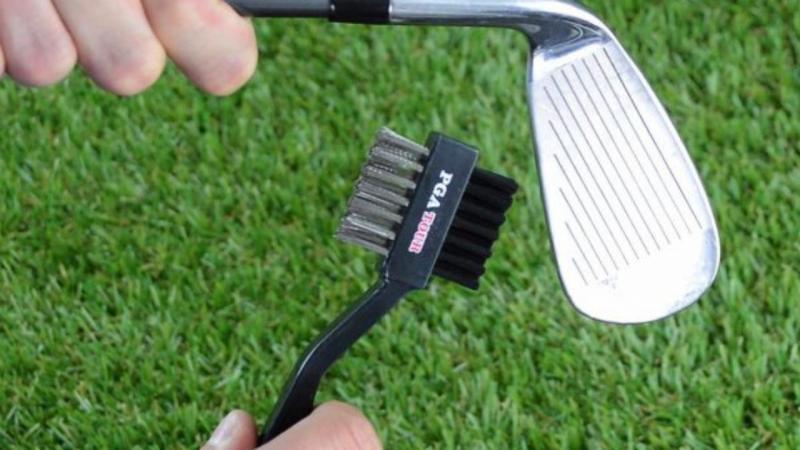
Scrub the Grooves – Brush and small towel in grooves

While washing golf clubs with warm, soapy water lifts away surface dirt, I’ve found the grooves on irons, wedges, and other club heads need extra scrubbing focus. Jammed full of grass, dirt, sand, and grime after repeated shots, simply rinsing doesn’t cut it for deep groove cleaning.
That’s why I always keep a sturdy groove brush on hand for club cleaning sessions. The firm but gentle bristles are designed to scrub inside the grooves to dislodge debris and buildup hiding within. Using short back-and-forth motions, I methodically work the brush into each groove to lift out stubborn particles.
For tighter grooves on scoring irons and specialty wedges, I wrap a corner of a cleaning towel tightly around the bristle tips. This helps me scrub not only along the groove but also sideways to eject dirt from the edges. I have to be gentle yet thorough to get crud out without damaging the club face.
After power washing, I give another round of scrubbing with my groove brush just to ensure there’s no remaining gunk left clinging inside. Clean grooves are essential for maintaining proper spin and shot precision, so this step is too important to skip.
Deep groove scrubbing also minimizes the need for harsh chemical cleaners that could degrade club materials over time. The brush does the hard work getting into the nooks and crannies where debris hides without any risk to my club components.
While a simple rinse may make the club faces look clean, there’s often still plenty of microscopic dirt and oily residue buried down in the grooves even after washing. Taking the time to manually scrub each groove removes lingering gunk so grime doesn’t slowly build up over repeated rounds.
Thorough groove cleaning takes a little extra elbow grease, but pays off big time with maximized spin, precision shot shaping, and improved club face friction for better contact. My clubs feel like new after a proper groove scrub down. Who needs to pay for expensive deep cleaning services when a quality groove brush yields professional level clean right at home?
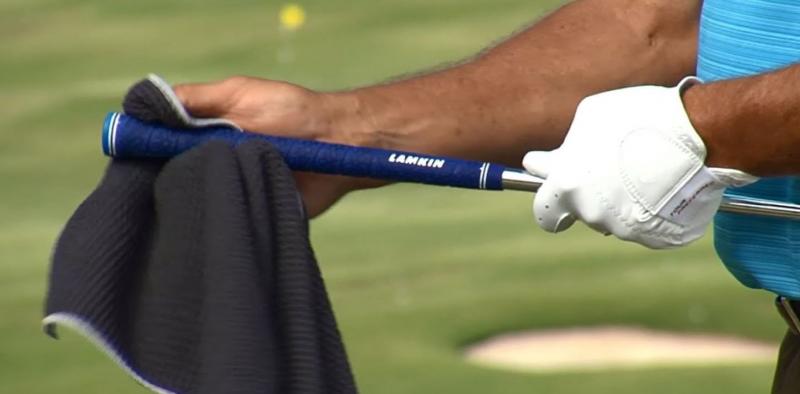
Clean the Grip – Warm water and mild soap on grip

While scrubbing the club heads gets most of the noticeable dirt off, grips can also get pretty grubby over time. Sweat, dirt, body oils and everyday wear take a toll, making thorough grip cleaning essential for fresh-feeling gear.
For rubber grips, I lightly dampen a microfiber towel with warm, soapy water and gently wipe down the entire length of the grip. This lifts away dirt and body oils that make grips feel slimy and slick overtime. I’m careful not to oversaturate and avoid harsh scrubbing on rubber.
For leather grips, I use a cleaner soap-to-water ratio when dampening my towel, barely sudsy at all. Too much moisture can damage leather. With very light pressure, I wipe the damp towel from end to end. This clears dirt without over-wetting.
On both rubber and leather, I pay extra attention to the underside area right below the grip cap where oil, dirt and grime build up from hands. I also lightly scrub any cracks or crevices along the sides. A thorough top-to-bottom wipe down restores grips to a clean, tacky feel.
About once a month, I also give each grip a spritz of sanitizing spray formulated for golf gear. This kills germs and odors that washing alone might not eliminate. Letting grips air dry post-cleaning ensures no dampness remains.
While grip cleaning takes just a few extra minutes, fresh, debris-free grips are essential for optimal swing control and comfort. Rubber and leather have porous, textured surfaces that easily trap dirt if not maintained. Proper top-to-bottom cleaning keeps my grips in great shape for many seasons of high performance golf.
Maintaining clean, sanitized grips also helps my golf game. Grips that are caked with dirt or slippery with body oils interfere with proper hand placement and swing path. Thorough cleaning restores grip tackiness and friction needed for precision shots and confident control through the swing.
Rinse Away Soap – Rinse club head and grip thoroughly
Once I’ve thoroughly scrubbed every inch of my golf clubs and grips with warm, soapy water, it’s time for the crucial rinse step. While suds help dissolve and dislodge dirt, leaving any soap residue behind can slowly degrade club components over time.
I thoroughly rinse each club head individually by holding it directly under a steady stream of cool running water. I angle and turn the head to ensure water penetrates into every crevice, hinge and engraving to flush away all traces of soap.
For grips, I use a fresh damp microfiber towel to meticulously wipe off all soap film. Rubber grips I rinse briefly under the tap first. Leather I just wipe down to avoid over-saturating. Proper rinsing leaves grips totally soap-free.
I take extra time rinsing club faces, carefully checking grooves for any remaining suds. Soap left clinging in grooves can slowly break down protective coatings and alter friction characteristics. It’s a tedious but essential step.
Doing a thorough rinse after washing prevents detergent residue from causing corrosion, deterioration or discoloration over time. The rinse water washes away all the gunk the soap lifted off my gear for a pristine clean.
Repeatedly tracing my fingers over each club post-rinse ensures no slippery soap deposit remains before drying. If any slick spots turn up, I simply rinse again. Meticulous rinsing protects my investment and keeps those club faces friction-ready!
While a brisk rinse seems fast, taking time to properly flush off every trace of suds preserves gear integrity and performance. Who wants to tee off knowing lingering soap scum could be slowly eating away at club grooves and coatings?
Dry Immediately – Wipe down with microfiber towel

After thoroughly rinsing away all traces of soap from my freshly cleaned golf clubs, prompt drying is a critical final step. Allowing moisture to linger can allow corrosion, spotting, and other deterioration to occur over time.
As soon as I’m done carefully rinsing each club head and grip, I pat dry using a clean, soft microfiber towel. I prefer microfiber over terry cloth because it absorbs moisture more efficiently without leaving behind lint.
I gently blot and wipe each iron club face, carefully tracing the towel over grooves to soak up any droplets hiding within. Drivers and other woods get the same meticulous drying too. For grips, I lightly squeeze the towel downward from end to end to wick away moisture.
If time allows, I may let clubs air dry for 5-10 minutes before doing a final wipe down with my towel. This allows any deeper crevices or tiny spaces to dry before mopping up lingering dampness.
During drying, I periodically run my fingers over club faces and grips to check for any remaining slick spots. If wetness remains, I’ll gently wipe or blot the area again to fully dry.
While it may seem like overkill, thorough hand drying right after washing prevents moisture from penetrating porous club materials and leading to corrosion over time. A little elbow grease now saves expensive repairs down the road.
Diligent drying also ensures no water spots or streaks form on club heads from air drying. My gear looks display-case perfect after a good wipe down. For optimal performance, thoroughly drying clubs post wash is a pro tip I never skip!
Polish the Club Head – Soft cloth with a bit of wax polish

Once my golf clubs are cleaned, rinsed and dried, I like to add some finishing shine by gently polishing the club heads. A quick polish keeps them looking display-case pristine after washing.
Using a super soft microfiber cloth, I apply a small amount of a carnauba wax-based polish cream specifically formulated for golf clubs. I buff in small circles using minimal pressure to smoothly spread the thin polish layer.
The wax fills in micro-scratches and creates a protective barrier against UV rays and other elements that could dull and degrade the club metal and finishes. Polishing helps maintain that “like new” gleam.
During polishing, I’m very careful not to get any cream on the actual club face. Buffing agents can impact spin characteristics and friction, so I keep application strictly to the non-impact areas.
Every 3-5 washes, I’ll re-apply a fresh coat of polish. This ensures ongoing protection rather than just a one-time buff. The polish also minimizes cleaning-induced hairline scratches over time.
Quick caveat – polish isn’t a shortcut for proper club washing! I only apply polish to already cleaned gear for maximum benefit. Buildup does nothing but create a grimy film if you skip the scrubbing.
With just a little extra attention polishing after washing golf clubs, they stay looking slick, shiny and professional-grade round after round. The polish adds that perfect finishing touch without requiring expensive detailing services.
Plus, keeping club heads looking their best through gentle polishing makes me feel more confident and professional out on the course. It’s amazing what a difference perfectly polished gear can make for your mindset and golf game!
Clean Iron Face – Special iron head cleaner
While my usual scrub-and-rinse washing method works great for most golf clubs, iron heads require some extra care and cleaning attention. Hard, repeated impact against balls leaves club faces prone to residue buildup.
About twice a season, I use a specialty iron head cleaning solution to dissolve and remove impacted dirt, grass and oily grime. Spraying on the plant-based cleaner, I let it soak for 2-3 minutes to penetrate deep into the grooves.
Using a firm nylon bristle brush, I then gently scrub to lift debris loosened by the cleaner. The textured brush grabs onto stuck-on gunk that regular washing leaves behind. I rinse thoroughly after scrubbing to wash away all the lifted grime.
For extra cleaning power, I’ll occasionally mix a bit of the iron head cleaner with warm water in a small bucket. After an initial soak, I’ll use a groove cleaning tool dipped in the mixture to meticulously clean inside each groove.
The unique iron cleaner formula clings to vertical club faces without dripping to really penetrate and break down oily buildup. My irons feel ultra smooth post-cleaning for improved ball contact and control.
Over time, even the best scrub brushes and soaps can leave some residue on irons. Specialty cleaner tackles the grimiest buildup for maximum friction and performance. It brings tired, dingy irons back to life!
While deep iron cleaning takes a bit more time than a simple wash, restoring that perfectly smooth striking surface improves spin, precision and consistency. Pro-level iron control requires pristine club faces cleaned to the core.
Restore Putter Face – Scrub with toothbrush and cleanser
As a high-use club, my putter face takes a beating with ball marks, grass stains and oily residue that can throw off accuracy.
Twice a year, I give it some deeper cleaning love using a soft toothbrush and a non-abrasive putter face cleanser. The small bristles let me gently scrub every millimeter of the face and grooves.
After wetting the toothbrush and spreading on some cleanser, I carefully scrub in circular motions across the entire putter face. I also make sure to repeatedly brush across each groove line to lift out grime.
The cleanser formula contains mild solvents that break up clumps of stuck-on dirt, grass and oily gunk that regular washing leaves behind. I let it sit briefly before scrubbing for maximum effectiveness.
After some elbow grease, I rinse away all the loosened gunk and cleanser with clean water. My putter looks factory-fresh again, free of dingy buildup.
Over time, ball impacts and constant use can deform the originally precise striking face. Meticulous scrubbing restores smoothness for accurate putting without taking off any material.
I make sure to avoid harsh scrubbing pressure or chemicals that could damage the finish. The toothbrush and cleanser resuscitate my putter just enough for peak performance.
Restoring the pristine putter face gives me confidence each time I line up a big putt, knowing my aim is true. Don’t settle for anything less than a flawless friction surface!
Sanitize Grips – Sanitizing wipes for grips

For super clean golf gear, I like to give my grips a quick sanitizing wipe down after standard washing. This helps kill germs and odor-causing bacteria.
Every few rounds, I’ll use a sanitizing wipe formulated specifically for golf grips. The textured surface of grips makes a perfect breeding ground for microbes.
Starting at the bottom near the grip cap, I thoroughly wipe down about 2/3 of the grip length using moderate pressure. This ensures full contact to kill germs hiding in pores and crevices.
I let the sanitizing solution sit for 30-60 seconds before lightly buffing the grip with a towel. This contact time lets the disinfecting agents fully work.
Sanitizing also eliminates stubborn odors that can develop on grips over time from hands, body oils and general wear. It leaves an uplifting fresh scent behind.
To safely and gently sanitize leather grips, I use disinfecting wipes specifically labeled for leather or else spray on sanitizer and wipe off with a slightly damp towel.
Regular grip sanitizing as part of my golf club cleaning routine helps me stay healthy by reducing spread of bacteria and viruses from contacting grips. The uplifting scent also boosts my mindset before each game.
Don’t neglect grip sanitizing in your golf gear cleaning regimen. Microbes unseen to the eye can impact performance and health!
Lubricate Moving Parts – Light oil on hinges
Modern adjustable drivers and other woods feature intricate movable parts and hinges that enable customized face angles, loft and more. Keeping those moving parts lubricated ensures smooth performance.
About twice a year, I’ll apply a drop or two of a light machine oil onto adjustable hosel and sliding mechanisms. Working the club gently, I move the pieces through their full range of motion to disperse the lubricant.
The oil penetrates into pivots and joints, replacing dried out factory lubricant that wears off over time. Without re-lubricating, parts could eventually corrode, stick or jam.
I take care to fully wipe off any excess oil and buff components clean so residues don’t transfer onto grips or balls. Just a very thin, even application is needed.
Keeping movable parts properly oiled guarantees smooth adjustability on the course. I never have to wrestle with a stuck adjustment that won’t budge thanks to frequent lubrication.
Adjustable drivers provide versatility, but only if components remain adequately lubricated. Just a couple drops keeps mechanism friction-free for customized shots.
Don’t neglect oiling adjustable golf club parts. Seizing, sticking and wear will quickly ruin tunable club performance.
Replace Worn Grips – Re-grip clubs regularly

No matter how diligently I clean and care for golf club grips, natural wear will still occur over time. Once grips become too slick, worn or show cosmetic defects, it’s time to re-grip.
I check grips before each season for cracks, smooth spots or twisting. If any are deteriorating, I’ll have them professionally replaced. Trying to stretch grips beyond their service life impedes performance.
Re-gripping restores the tackiness and friction needed for optimal swing control. Old, hardened rubber grips make it tough to hold clubs properly.
For woods, practicing my swing motion tests if grips still provide enough control without twisting or slipping in my hands. If any instability is present, I re-grip.
The right grip size also matters, especially for proper hand and wrist positioning. I’ll resize if current grips cause discomfort or awkwardness.
While re-gripping isn’t fun or cheap, it extends club lifespan significantly. Damaged or ill-fitting grips necessitate replacing entire clubs. Maintenance maximizes my equipment investment.
Don’t wait until grips disintegrate completely before replacing. Optimal performance and swing control starts with fresh, tacky grips suited to your swing and hand size.
Store Properly – Keep clubs in dry place, head covers on

After putting so much care into keeping my golf clubs pristine, proper storage preserves that like-new condition in between uses.
I keep my clubs stored horizontally in a dry, temperature controlled area away from direct sun exposure. Excessive heat or moisture can damage club components over time.
Soft head covers protect club heads from dings, dust and other damage while being moved or stored. I never store clubs uncovered.
For travel, I pack clubs vertically in a sturdy, padded travel bag. Packing tubes add organization while preventing jostling and club-to-club contact during transit.
Before storing post-play, I allow clubs time to fully air dry to prevent moisture trapping that promotes corrosion. Damp storage Spell’s trouble.
Storing clubs properly between rounds maintains that like-new quality I work hard to achieve through diligent cleaning and care. A few simple habits prevent accidental damage.
Clubs are a big investment – don’t ruin them through careless storage and tossing bare clubs around. A little organization and planning preserves performance and excellent condition over the long term.
Proper golf club storageprotocols make the next game as enjoyable as the last by keeping gear protected and primed for play at all times.
Regular Maintenance – Clean clubs after every use
More than any specialty cleaning product or technique, what really keeps my golf clubs in excellent shape round after round is making club cleaning a regular habit.
After every single time I play, without fail, I give my clubs a thorough soap-and-water wash followed by thorough drying. Even if it’s just a quick 9 holes, I never put dirty clubs back into storage.
Frequent cleaning prevents dirt, grass, oil and grime from becoming deeply embedded or building up over time. The effort required stays minimal if you don’t let clubs sit uncleaned for too long.
For me, club cleaning is just part of the post-game wind down ritual, as essential as grabbing a snack or rehydrating. The habit keeps my gear looking and performing like new for years of consistent play.
Cleaning after every use only takes 10-15 minutes. But those minutes pay off big time by extending equipment lifespan and maintaining optimal spin, precision, and feel mile after mile.
Plus, starting every game with clean grooves and faces gives me confidence knowing my gear is primed for peak execution. Can’t put a price on that great feeling!
Consistent, habitual club maintenance between and after every round is the real secret to long-lasting, high-performance golf gear. Don’t let a buildup happen!