How to build a custom kayak dolly for your Pelican. What materials work best for different terrains. Why choosing the right wheel placement matters. How to secure your kayak properly on the dolly. What unexpected benefits come with a DIY kayak dolly.
The Challenge of Long-Haul Kayaking: Why You Need a Kayak Dolly
Long-haul kayaking can be an exhilarating adventure, but the challenge of transporting a heavy kayak from your vehicle to the water can quickly dampen your enthusiasm. For Pelican kayak owners, this challenge is particularly acute, as these boats are known for their durability and, consequently, their weight.
A fully-loaded touring kayak can easily outweigh its paddler by 40 pounds or more, making portages a back-breaking ordeal. This is where a kayak dolly comes into play, transforming a grueling carry into a smooth roll.
The Benefits of a Kayak Dolly
- Reduces physical strain on the paddler
- Enables easier transportation over various terrains
- Allows for longer portages without fatigue
- Protects the kayak from damage during transport
While commercial kayak dollies are available, creating a custom DIY version offers several advantages, particularly for Pelican kayak owners. A homemade dolly can be tailored to the specific dimensions and weight distribution of your kayak, ensuring optimal performance and ease of use.

Selecting the Right Materials for Your DIY Kayak Dolly
The success of your DIY kayak dolly largely depends on choosing the right materials. Your selection should be based on the type of terrain you’ll most frequently encounter during your kayaking adventures.
Wheel Options for Different Terrains
- Pneumatic tires: Ideal for pavement and moderate trails, offering a comfortable ride
- Foam-filled tires: Provides puncture resistance for rugged routes
- Large diameter wheels: Better for tackling obstacles like rocks and roots
How do you choose the right wheel size? Consider the typical obstacles you’ll encounter. Larger wheels (10-12 inches in diameter) will roll more easily over uneven terrain, while smaller wheels (6-8 inches) are sufficient for smoother surfaces and offer more maneuverability.
Frame and Hardware Considerations
Durability is key when it comes to the frame and hardware of your kayak dolly. Opt for materials that can withstand exposure to both fresh and saltwater.
- Stainless steel: Excellent corrosion resistance
- Marine-grade aluminum: Lightweight and rust-resistant
- High-density polyethylene: Durable plastic option
For mounting brackets, steel U-bolts provide a secure grip on the hull without slipping. To protect your kayak from scratches, consider adding self-adhesive foam sheets to any contact points.

Customizing Your Kayak Dolly Design for Your Pelican
One of the primary advantages of building your own kayak dolly is the ability to customize it to perfectly fit your Pelican kayak. This customization ensures optimal performance and ease of use.
Finding the Balance Point
How do you determine the ideal placement for the dolly’s axle? The key is to find your kayak’s balance point. This is the spot where the kayak will sit level when supported, making it easier to tilt onto the wheels and maneuver.
- Load your kayak with your typical gear
- Use a bathroom scale to find the center of gravity
- Mark this point with tape
- Align your dolly’s axle and mounting arms with this point
Optimizing Stability and Maneuverability
Consider these design elements to enhance your dolly’s performance:
- Wider stance: Increases stability while towing
- Offset wheelbase: Improves pivoting around tight turns
- Foldable design: Allows for easy storage in the kayak’s rear hull hatch
- Padded straps: Secure the folded assembly and double as shoulder straps
Securing Your Pelican Kayak to the Dolly
A crucial aspect of your kayak dolly’s effectiveness is how well it secures your Pelican kayak. The right strap system can make the difference between a smooth portage and a frustrating ordeal.

Choosing the Right Straps
What makes for a good kayak dolly strap system? Look for these features:
- Braided design: Offers strength and durability
- Rubber backing: Prevents slipping
- Quick-release buckles: Allow for easy attachment and detachment
- Adjustable length: Accommodates different kayak sizes
For sit-inside Pelican models, ensure your dolly straps extend at least a foot under the hull for a secure hold. Sit-on-top models may benefit from cradle-style supports instead of straps.
Proper Strap Placement
How should you position the straps on your kayak? Follow these guidelines:
- Place one strap near the front of the kayak, just behind the cockpit
- Position the second strap near the rear, in front of the stern
- Ensure straps are tight but not so tight as to deform the kayak’s hull
- Check and adjust strap tension periodically during transport
Unexpected Benefits of Your DIY Kayak Dolly
While the primary purpose of a kayak dolly is to ease the transport of your Pelican from car to water, you may find it has numerous other applications that make it an even more valuable addition to your gear.

Around the Home and Garden
How can you use your kayak dolly off the water? Consider these possibilities:
- As a wheelbarrow for hauling gardening supplies
- To transport lumber and building materials for DIY projects
- For moving heavy items during home reorganization
The sturdy construction and large wheels that make your dolly perfect for kayak transport also make it ideal for these household tasks.
Helping Others
Your DIY kayak dolly can also be a valuable tool for assisting others. You might use it to:
- Help fellow kayakers transport their boats
- Assist neighbors with moving large items
- Support community events that require equipment transport
These unexpected uses add value to your DIY project and may even make you the go-to person for creative solutions in your paddling community.
Maintenance and Care for Your DIY Kayak Dolly
To ensure your custom-built kayak dolly continues to serve you well through many kayaking seasons, proper maintenance is essential. Regular care will extend the life of your dolly and keep it functioning smoothly.
Regular Cleaning and Inspection
How often should you clean your kayak dolly? After each use is ideal, especially if you’ve been in saltwater or muddy conditions. Here’s a simple maintenance routine:
- Rinse the dolly with fresh water to remove sand, salt, or mud
- Dry thoroughly to prevent rust on metal components
- Inspect all parts for wear or damage
- Tighten any loose bolts or screws
- Lubricate moving parts as needed
Tire Care
The tires are crucial to your dolly’s performance. Keep them in top shape with these tips:
- Check tire pressure regularly if using pneumatic tires
- Inspect for cuts or wear on the tire surface
- Clean the tread to maintain good traction
- Replace tires when tread wear becomes significant
Adapting Your DIY Dolly for Different Kayaking Scenarios
As your kayaking adventures evolve, you may find yourself in new environments that challenge your current dolly design. Fortunately, a DIY kayak dolly can be adapted to meet changing needs.
Beach and Sand Modifications
How can you modify your dolly for beach launches? Consider these adaptations:
- Wider, balloon-style tires for better flotation on soft sand
- Removable skid plate to protect the dolly when dragging through shallow water
- Corrosion-resistant coatings for all metal parts to combat salt spray
Rough Terrain Upgrades
For portages over rocky or root-filled paths, you might want to upgrade your dolly with:
- Larger diameter wheels for better obstacle clearance
- Suspension system to absorb shocks and protect your kayak
- Reinforced frame for added durability
By adapting your DIY kayak dolly to suit various environments, you’ll ensure it remains a valuable tool no matter where your paddling adventures take you.
Safety Considerations When Using Your Kayak Dolly
While a kayak dolly significantly eases the task of transporting your Pelican, it’s important to use it safely to prevent injury to yourself or damage to your kayak.
Proper Lifting Technique
How should you lift your kayak onto the dolly? Follow these steps:
- Bend at the knees, not the waist
- Keep the kayak close to your body as you lift
- Use your legs, not your back, to power the lift
- Ask for help if the kayak feels too heavy
Safe Towing Practices
Once your kayak is on the dolly, keep these safety tips in mind:
/DIYKayakCart-db459e167a384757966b9d1bfb4e3306.jpg)
- Walk at a steady pace to maintain control
- Be aware of your surroundings and potential obstacles
- Use extra caution on slopes or uneven terrain
- Always keep a firm grip on the kayak to prevent tipping
By following these safety guidelines, you’ll ensure that your DIY kayak dolly enhances your paddling experience without introducing unnecessary risks.
Creating a custom kayak dolly for your Pelican can revolutionize your long-haul kayaking experience. By carefully selecting materials, optimizing the design for your specific kayak, and maintaining it properly, you’ll have a valuable tool that makes launching a breeze and extends your paddling adventures. Whether you’re tackling rocky shores, sandy beaches, or long portages, your DIY kayak dolly will be there to ease the journey, allowing you to focus on the joy of kayaking rather than the challenge of transport.
Make Launching a Breeze with DIY Kayak Wheels
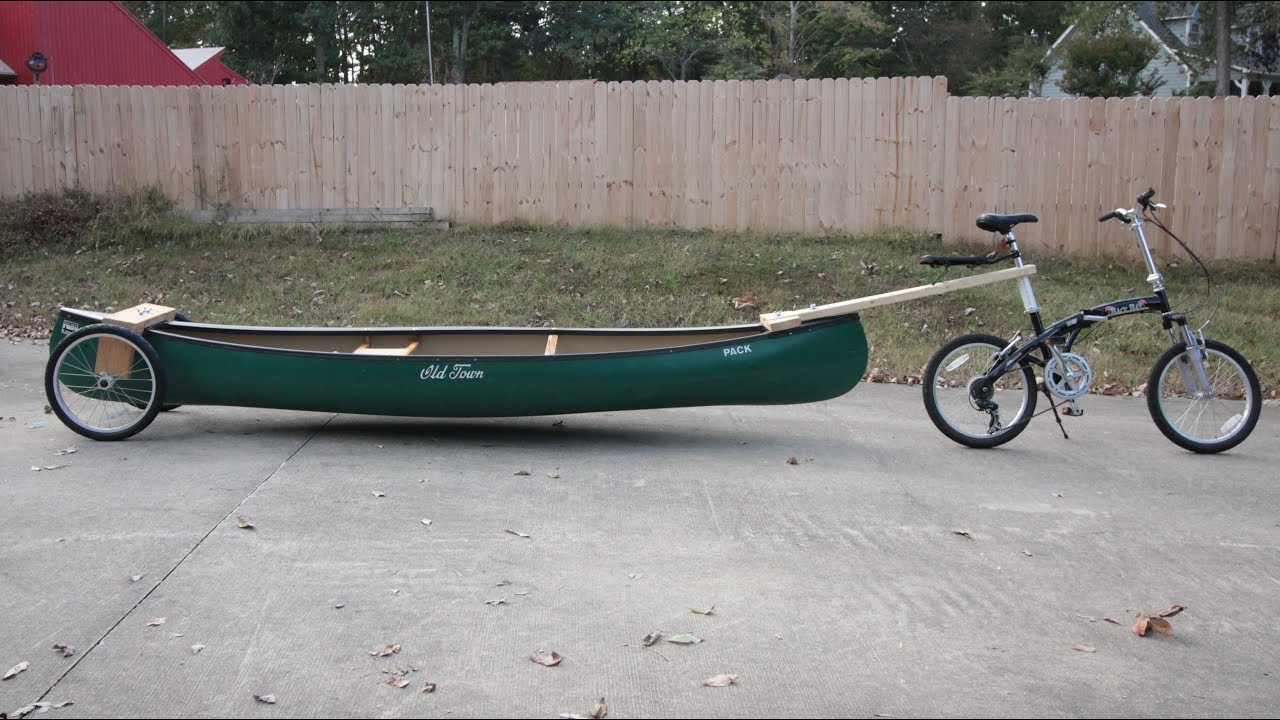
As a long-haul kayaker, I know firsthand the back-breaking challenge of lugging a fully-loaded touring kayak from vehicle to water. My Pelican outweighed me by 40 pounds even before packing gear for multi-day adventures. Dragging that beast over rough terrain nearly put an early end to my paddling passions.
After one portage left me sore for days, I resolved to solve this heavy lifting dilemma once and for all. Fellow paddlers pointed me toward kayak dollies – wheeled contraptions that strap to the hull and turn a carry into a roll. While ready-made designs worked wonders, my tinkering tendencies inspired me to create a custom dolly optimized for my Pelican’s size and weight.
With a few trips to the hardware store and some garage engineering, I cooked up an ultra-durable kayak dolly that has handled hundreds of launches from coast to coast. Whether tackling rocky beaches, muddy trails, or sand dunes, my DIY wheels glide smoothly with my kayak in tow – no more lifting required.
Choosing the Right Materials
The terrain you’ll be traversing dictates the materials for a long-lasting dolly. For everyday rolling on pavement and moderate trails, pneumatic tires provide a comfy ride. Foam-filled tires add puncture resistance for rugged routes. Larger diameters easily tackle obstacles like rocks and roots. Durable plastic or stainless steel resists corrosion from fresh and saltwater.
Secure mounting brackets like steel U-bolts grip the hull without slipping. For padding against scratches, self-adhesive foam sheets cost just a few bucks. Quick-release pins allow easy detachment of the wheel assembly after launching.
Customizing Your Design
While prefab dollies work fine, I enjoyed customizing my wheels to perfectly fit my 17-foot Pelican. I mounted the axle right at the balance point for easy tilting onto the wheels. A wider stance added stability while towing. And I offset the wheelbase to make pivoting around tight turns a breeze.
To simplify transport, my dolly folds flat for slipping into the rear hull hatch. Padded straps secure the folded assembly and double as shoulder straps for carrying the kayak once launched. Adding a handleproduced a hand truck design for hauling gear and supplies.
Bonus Benefits
Though intended for portages, my Pelican dolly has provided unexpected benefits. I use it around the yard as a wheelbarrow to haul supplies for DIY projects. The upright design lets me bring awkward loads like lumber right to the workspace. Even loaded with bricks and gravel, the balloon tires easily roll across the lawn.
Friends have borrowed the dolly for yardwork and garage organizing. I’ve helped strangers haul their boats up from the marina with a spare set of straps. And I even used the sturdy wheels to roll a fridge dolly-style across parking lots during a move.
So if you paddle a Pelican or any full-sized kayak, I strongly recommend investing in or building your own set of kayak wheels. Your back and body will thank you the next time you hit the water for a long haul. Just be prepared for people asking where you bought those cool kayak dollies!
Choose the Right Kayak Dolly for Your Pelican Model
With so many kayak dolly options available, it can be tricky choosing the perfect match for your specific Pelican model. The right fit will make launching a breeze while the wrong pick can lead to headaches and hassles down the road.
Your Pelican’s size, weight, and hull design determine which dolly style works best. Narrow recreational kayaks have different requirements than wide, stable fishing models. And sit-in kayaks need strapped mounting versus sit-on-tops that rest in cradles.
I learned the hard way after an ill-fitting dolly repeatedly dropped my 17-foot touring Pelican on portages. The factory-set wheel width led to tipsy towing and nerve-wracking tilting. So I wasted no time upgrading to a custom dolly tailored to my boat’s specs.
Wheel Placement Matters
Mounting the axle too far forward or back can make a dolly hard to control. The key is finding the balance point where your Pelican sits level during transport. Factor in weight distributions like bow-mounted rod holders or a rear-loaded gear hatch.
I used a bathroom scale to find the center of gravity on my Pelican. Marking the balance point with tape, I then aligned my axle and mount arms to match. Now my kayak gracefully tips back onto the dolly without the awkward teetering.
Secure Strap Systems
Loose, slippery tie-downs spelled trouble for my first dolly attempt. No matter how tight I cranked the straps, my Pelican would gradually slide off the cart. Upgrading to braided mounting straps with rubber backing finally kept my kayak in place.
For sit-inside models, ensure your dolly straps extend a good foot under the hull for a secure hold. And look for quick-release buckles that make strapping in a breeze. Keep a spare strap on hand for when launching tandem with a paddling partner.
Tires That Can Tackle Any Terrain
The factory dolly’s narrow tires constantly got bogged down in soft sand, loose gravel and muddy trails. Switching to wide all-terrain treads gave my Pelican wheels multi-surface gripping power.
Airless foam-filled tires add puncture protection for off-road adventures. Large-diameter wheels easily roll over rocks, roots and other rough terrain. For beach launching, wide balloon tires with deep treads float easily through sugary sand.
Test drive any upgraded wheels before buying to ensure they handle your typical launching environments. Your Pelican dolly tires can make or break the transport experience.
Choosing the optimal kayak dolly for your Pelican’s proportions and personality takes trial and error. But once you dial in the perfect fit, you’ll save endless energy on future hauls. Happy launching out there!
Pick Wheels that Handle All Terrains and Conditions
Kayaking is an amazing way to explore lakes, rivers, and oceans. As any seasoned kayaker knows, transporting your kayak from your vehicle to the water can be a real chore. Carrying a heavy polyethylene kayak any distance is backbreaking work. Using a kayak cart or set of wheels makes moving your kayak much easier. With so many wheel options on the market, it can be tricky to pick the perfect set for your needs. The key is finding wheels that can handle the types of terrain and conditions you regularly encounter.
Sand is one of the most challenging substances for kayak wheels. The soft, shifting nature of sand causes many wheel options to dig in and get stuck. Large, wide wheels with aggressive treads are your best bet for traversing sandy beaches. Balloon tires that can “float” on top of the sand perform the best. Look for a wide wheelbase as well, which increases stability. Some kayak carts meant for sand even have extended frames to prevent tipping.
Rocky trails and gravel roads call for rugged wheels that can withstand punishment. Look for puncture-proof solid rubber or plastic wheels at least 5 inches in diameter. Smaller wheels are more likely to get caught between rocks and sticks. Durable hubs and axles that can handle jarring impacts are also a must for rocky terrain. Airless tires will never go flat at an inopportune time.
When primarily carting your kayak across pavement, look for narrower wheels with a smooth rolling tread pattern. Larger treaded wheels designed for the beach will create more friction and resistance on asphalt. Look for inline wheels and a compact frame that keeps the wheels close together for straight tracking. Softer rubber tires provide more traction and a smoother ride than plastic wheels. Never inflate pneumatic tires to their maximum PSI, as this decreases shock absorption.
For hunting kayaks and other adventures way off the beaten path, oversized all-terrain wheels are the hot ticket. These extra-wide balloon wheels measuring up to 10 inches in diameter can tackle mud, sand, gravel, and other obstacles with ease. Their high clearance keeps your kayak from bottoming out. All-terrain kayak wheels are somewhat heavier and bulkier, so consider how far you need to cart your yak over rugged conditions.
Folding kayak trailers offer ultimate versatility for accessing remote put-in spots. These trailers convert from wheels to a miniature wagon that lets you tow your kayak behind a bike or other vehicle. Look for folding trailers made from corrosion-resistant materials that hold up to water exposure. Fat solid rubber tires provide cushion and floatation over uneven ground. Going this route allows you to traverse virtually any terrain while hauling your kayak.
Personal hand trucks and kayak carts give you powered assistance transporting your boat. Hand trundler carts allow you to remain upright while pulling your kayak rather than bending down to reach a handle. They take the strain off your back. Some feature oversized pneumatic tires for easy rolling over sand and other soft surfaces. Or you can opt for a powered kayak cart that uses an electric motor to propel your kayak.
When shopping for kayak wheels, be sure to match them to how you use your kayak. Lightweight polyurethane wheels work nicely for car-top hauling across smooth surfaces like parking lots. Rugged all-terrain tires are ideal for remote wooded or sandy launches. Measure the wheelbase and ground clearance you need to manage curbs and other obstacles between your vehicle and the water. Professional kayak anglers may want an overbuilt cart that can survive being submerged in rivers and lakes. Consider how compact or transportable the kayak wheels need to be.
The last thing you want is a set of flimsy wheels that leaves you stranded carrying your kayak. Invest in quality wheels sized and built for the conditions you paddle in. Look for solid construction with stainless steel or aluminum components that resist rust and corrosion.Then you can focus on fishing instead of struggling with transport.
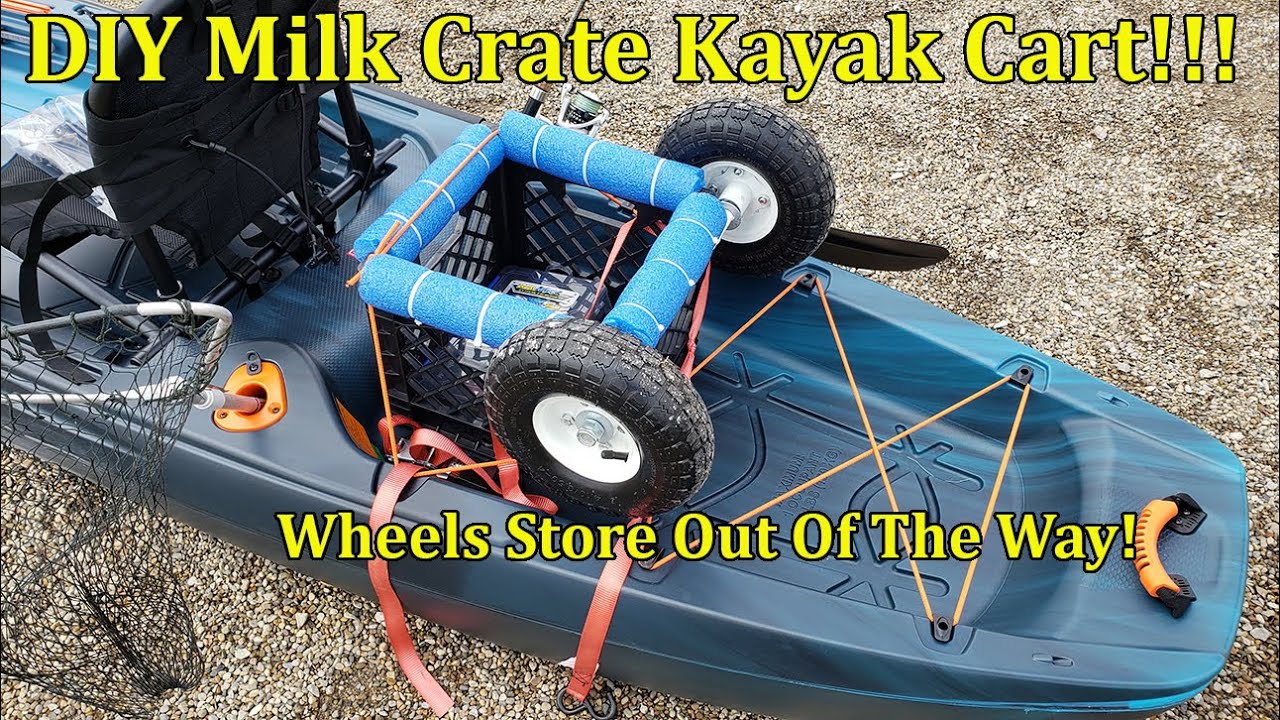
Customize Your Dolly for Easy Transport and Storage
Kayaking is an enjoyable hobby that allows you to explore lakes, rivers, and coastal waterways. But lugging a heavy kayak from your vehicle to the water can quickly drain the fun out of your paddling trip. Using a kayak dolly takes the backache out of transport by letting you roll your boat right to the launch point.
Stock kayak dollies get the basic job done. But customizing your dolly with accessories and upgrades makes transporting your kayak even easier. It also helps keep your dolly protected during storage between paddling adventures. Here are some clever customizations to deck out your Pelican kayak dolly for smooth handling and convenient storage.
Outrigger stabilizer bars help prevent tipping when moving your kayak dolly over uneven ground. Installing a wider wheelbase gives you better stability rolling over rocks, roots and other obstacles near the shoreline. You can find extended dollies made specifically for wider sit-on-top kayaks. Or add your own outriggers using PVC pipe or threaded rods.
All-terrain wheels handle sand and other soft surfaces much easier than narrow standard wheels. Look for wide fat wheels with aggressive treads that can float on top of sand rather than digging in. Big treaded tires provide great traction in the mud too. Just make sure they are still narrow enough to fit in your vehicle.
Customizing your dolly handle makes hauling your kayak less backbreaking. Extend the handle to pull your kayak upright rather than hunched over. Or adjust the handle length to match your height. Padding the handle grip makes long distances more comfortable. A handle that folds down neatly when not in use helps with storage.
Storing your kayak dolly between adventures helps keep it safe from damage. Make a pouch that slides over the wheels to protect them from scrapes and dents. Cut sections of pool noodles to fit over frame corners so they don’t poke holes in things. Hang the dolly upside down from garage rafters or hooks to keep it out of the way.
Tie bright flagging or ribbons to the dolly frame to make it more visible. Reflective tape also helps if you often load up in early morning twilight or return after dark. Make sure to mark it clearly with your name and phone number in case it gets separated from your vehicle.
Optional accessories make transporting your kayak even simpler. A kayak stand lifts the nose at an angle so you don’t have to bend down as far when pulling. Straps or bungees let you firmly secure your kayak to the dolly frame. Consider a kayak cradle addition to fully support the hull rather than just the cockpit rim.
Maintenance like lubricating axles and inflating pneumatic tires extends the usable life of your Pelican kayak dolly. Touch up any scratches on the frame to prevent rust and corrosion issues down the road. Periodically inspect nuts, bolts and fasteners and tighten or replace as needed.
When modifying your kayak dolly, stick with quality components. Reinforce extensions with metal corner brackets or thick marine plywood. Only use corrosion-resistant hardware like stainless steel bolts. Check package weight limits if substantially beefing up the frame size.
Think about how your vehicle hauls when customizing a kayak dolly. Make sure the folded size fits your trunk or truck bed so you can easily take it along. Verify that accessories like outriggers or wider tires won’t cause clearance issues. Position tie-down points to securely attach it for transport.
Get creative modifying your dolly to match where you paddle. Add permanent foam filled tires for buoyancy to roll boats across rivers or marshes. Include a place to clip on a water bottle or small tackle box to keep gear handy. Make the frame brightly colored for high visibility around busy boat ramps.
With some imaginative modifications, your Pelican kayak dolly can handle practically any transport and storage situation. Easily roll it down steep slopes and across busy parking areas. Save your back from lifting kayaks onto roof racks. Then neatly store gear and folds up compactly until your next adventure. A customized dolly helps you spend less time fussing with equipment and more time enjoying the water.
Don’t settle for battling stock dollies that tip and shake over rough terrain. Outfit your kayak cart with stability and convenience accessories that match your needs. Add handles, wheels, and storage solutions for frustration-free transport. With a customized dolly, you can focus on paddling instead of wrestling with unruly boats and gear.
Secure Your Kayak Safely While Towing
Transporting your kayak to beautiful paddling destinations is part of the fun. But safely securing your kayak on a trailer or roof rack is critical. Improperly strapped down boats can cause dangerous road hazards if they come loose at highway speeds. Follow these tips to keep your kayak under control while towing it down the road or trail.
Sturdy vehicle racks provide a solid attachment point for your kayak straps. Factory installed crossbars on your roof work well. For trucks or SUVs, a bed extender rack keeps the kayak elevated for tie downs. Check your vehicle manual for weight limits before loading up multiple boats. Make sure all rack components are tight and structurally sound.
Shorter kayaks under 12 feet can fit inside an enclosed trailer or truck bed for protection. Use equipment like kayak stackers to double up smaller boats. Just make sure watersports gear is secured so it won’t shift and damage hulls. Tie additional straps around the cockpit rim for stability.
Foam blocks help stabilize and protect your kayak during transport. Cut blocks from thick closed-cell foam and shape recesses for the hull. Place blocks snugly at the bow and stern, using the cockpit opening for an anchor point. The blocks prevent side-to-side and fore-aft movement.
Proper strapping technique keeps your kayak anchored tightly to the vehicle. Use wide nylon straps designed for watersports gear. Placing straps at a 45 degree angle provides optimal holding power. Cinch straps very snugly, but not enough to crush the hull. Use bow and stern lines for added security.
Avoid using elastic cords like bungees to tie down your kayak. They allow too much bounce at speed. Extendable kayak pole straps with solid locking mechanisms perform much better for open trailers. Chains can also work if you pad the contact points on your kayak.
Carefully route straps to avoid weak points that could cause hull damage. Keep pressure off of deck lines, grab handles and rigging. Use the cockpit rim or molded-in mid-hull contours as anchor points. Protect the hull with old towels or pool noodles.
Redundant tie-down points provide backup protection in case a strap fails. Run duplicate lines to both the bow and stern. Criss-cross an additional strap across the middle for very long kayaks. You can never have too many quality straps securing your precious boat.
Bright flags mark the ends of your kayak for passing motorists. Use high visibility colors like red or orange. Make sure pole mounts or suction cups hold fast at highway speeds. Add reflective tape for improved visibility at night or in bad weather.
Carefully check all straps and tie points before hitting the road. Give straps a forceful straight-line tug to verify tightness. Do a periodic mid-trip inspection after 20-30 minutes of driving. Look for any loose straps or shifting in your kayak load.
Be extra diligent securing kayaks for long highway drives. Consider using a trailer rather than roof racks for extended distances. Make absolutely certain roof racks comply with kayak weight limits before extended trips.
Towing multiple kayaks requires special care. Stagger boats if possible so their contours nest together snugly. Use wider strap spreads to distribute force evenly. Add tie-downs connecting the bow and stern of adjacent boats.
Paddling destinations like rivers or coastal launches often require driving on bumpy unpaved roads. Take extra time securing your kayak when you know the trailer will bounce and sway. Oversized off-road tires make for a less jarring ride.
Carefully consider how you secure special kayak types like tandems and pedal drives. Very long tandem boats may overhang racks requiring creative strapping. Support pedal drive units properly so they don’t bounce and get damaged.
Transporting kayaks safely is key to adventures on the water. Invest in quality racks, foam blocks, straps and flags for your vehicle. Carefully inspect tie downs before hitting the road. Avoid loose loads that shift and cause accidents. Then you can focus on enjoying beautiful destinations rather than worrying about your gear.
Add Padding for Protection During Portages
One of the best parts of kayaking is paddling through remote areas only accessible by carrying your boat over land. While portaging allows you to reach beautiful backcountry, it also risks scuffing or scratching your kayak as you lug it between waterways. Protecting your hull with padding saves it from damage while hauling across rough terrain.
Foam blocks cushion contact points and absorb impacts when portaging your kayak. Use closed-cell foam like yoga mat material that won’t absorb water. Cut blocks to fit snugly in the bow and stern recesses. Drill holes to securely tie them in place using rigging cords.
Pool noodles make great inexpensive protection pads. Their bright colors also help visibility when portaging near roads or trails. Cut lengthwise to produce strips that lay flat across your deck lines. Use duct tape or zip ties to temporarily attach them.
Inflatable fenders borrowed from your other boat provide a movable cushion that can be positioned where needed. Make sure to partially deflate them to conform to your kayak contours. Attaching them takes some trial and error.
Portage pads give full coverage protection when carrying your kayak over logs, rocks and other obstacles. They unroll to surround the deck in a thick foam layer. Bungee cords or grommets secure them in position for the haul.
Old towels or small area rugs act as padding in a pinch. Fold them to create targeted padding spots. Wrap corners or tie knots to keep them from shifting as you carry your kayak. Just avoid using nice bath towels that will get ruined.
Attach pickup truck bed mats or offcut sections of yoga mats directly to your kayak for permanent padding. Contact cement or heavy duty Velcro keeps them firmly in place. Position pads along the keel line and at each end.
Button-snap fasteners allow you to quickly install and remove fabric pads. Use double-sided adhesive to affix one side of snaps along the deck. Then sew mating snaps onto custom cut pads tailored to your boat.
Proper lifting technique protects your back and your kayak during portages. Use your legs for heavy lifting, bending at the knees with a straight back. Carry the boat upside down whenever possible, cradling the underside. Switch sides often to distribute the workload.
Kayak carts with big all-terrain tires easily roll across boulder fields, streams and other obstacles. Low clearance cartsBUILT SPECIFICALLY FOR PORTAGING LET YOU ROLL RATHER THAN CARRY. sTURDY STEEL FRAMES WITH PADDING PROTECTS YOUR BOAT.
Trekking poles help stabilize and support kayaks during long portage carries. Loop cords around the hull to create temporary harnesses. Or install dedicated metal brackets to grip poles when needed. Don’t let poles bump unprotected hulls.
Portage wheels strap onto one end of your kayak so you can roll it like a wheelbarrow over short distances. But small wheels can’t handle boulders and fallen logs like a full cart. Position the wheel carefully to avoid heel scuffs.
In highly rocky areas, consider stripping your kayak down for the portage. Remove rudders or skegs that could get damaged when dragging over sharp rocks. Carry gear and accessories separately.
When setting up a portage route, clear debris when possible. Move rocks and branches aside to create a smoother path. Take a few test runs with an empty boat to pick the optimal course. Remember to re-pad before each crossing.
Portaging takes extra time, but allows access to amazing paddling locations. Protecting your kayak helps ensure many future adventures. Use padding, proper carry technique, carts and poles to avoid damage. With some preparation, you can safely portage to hidden hotspots without harming your kayak.
Mod Your Dolly into a Hand Truck for Heavy Loads
Got an old dolly lying around collecting dust? Don’t send it to the dump just yet – with some simple modifications, that humble dolly can be transformed into a heavy duty hand truck ready to haul hundreds of pounds with ease. Whether you’re moving equipment for work or tackling some home improvement projects, having a sturdy hand truck on hand can make the tough jobs a whole lot simpler.
The basic design of a standard two-wheeled dolly lends itself perfectly to becoming a rugged hand truck. Built stoutly to support weight on its axle and equipped with wheels designed to roll smoothly under heavy loads, a dolly contains all the fundamental elements needed. With the addition of an extended handle and lower support legs, its weight-bearing capabilities can be greatly improved. Constructing legs from metal piping and securing them to the dolly’s frame distributes weight over a larger surface area, while allowing heavy items to rest directly on the ground.
Adding a handle is the final crucial step for completing the transformation. Ideally, the handle should be made of sturdy steel or thick-walled aluminum tubing long enough to allow you to stand fully upright while pulling the loaded hand truck. Securely weld, bolt or clamp the handle into place at a height that feels natural when you grip it. Consider adding foam or rubber padding to improve comfort and control when hauling extremely heavy items.
Once your enhanced hand truck is finished, you’ll be amazed at how much weight it can handle. Properly balanced loads of 500 pounds or more can be managed with ease. Make sure to load items centrally over the axis and legs to minimize strain on the handle. Strapping or tying items securely in place helps prevent shifting during transport. Always remember to lift safely by keeping your back straight and using your legs – don’t try to pull extremely heavy items up stairs or over obstructions without assistance.
That old, tired dolly collecting dust in your garage or basement can enjoy new life as a rugged DIY hand truck ready for any moving task. With scrap metal parts and some simple welding or bolting, it transforms easily into a super-duty hauling machine. Put your modified hand truck to work and make easy work of tough jobs!
Long-Haul Kayaking Made Easy: Transform Your Pelican into a Rolling Wonder
For kayakers looking to cover serious miles, transporting your boat to and from the water can be a real headache. Car-topping your kayak on each outing quickly gets old, and dragging it any distance is back-breaking. So why not modify your vessel to make it easy to roll right up to the water’s edge and back?
With the addition of a simple wheel dolly system, your kayak becomes a rolling wonder, letting you effortlessly cover long distances over any terrain. Commercial options are available, but you can easily DIY a dolly setup for your Pelican kayak using basic materials and tools. Here’s a quick guide to converting your boat into a long-haul transport machine:
Choose the Wheels
Almost any set of wheels can do the trick, from wide pneumatic models that handle sand nicely to narrow plastic wheels that glide easily over pavement. Just ensure the wheels are rated to handle your kayak’s weight. Mount them to an axle spanning the width of the kayak.
Build the FrameUse scrap lumber or PVC tubing to construct a simple frame that attaches to the kayak’s stern and bow. The frame should hold the wheels at an appropriate height to keep the kayak hull balanced when rolling. Padding the contact points protects the hull.Add the Tow Handle
Run a length of rope, nylon webbing or PVC tubing from the stern up to a handle you can grasp to pull or push the dolly. Add foam grips on the handle for comfort during longer transports.
Secure the Kayak
Use cam straps or ratchet tie downs to firmly secure the kayak to the dolly frame. This prevents rocking or sliding during transport over rough terrain. Allow quick release for easily loading and unloading.
Test It Out!
Once fully assembled, test your creation by rolling it moderate distances over varied surfaces. Adjust the wheels or support frame as needed to achieve smooth, easy transport.
With your Pelican Kayak mounted on DIY wheels, you’ll look forward to outings involving miles-long portages or shuttle runs. No more grueling carries or cumbersome roof loading. Just hook up and roll right to the water wherever your adventures take you!
Outfit Your Wheels for Sand and Surf Launches
Heading to the coast for some kayak adventures? You’ll want to prep your wheels for handling soft sand launches and watery retrievals. Stock wheels work fine on solid ground, but sandy shores and surf zone exits can stop them dead. Outfitting your kayak dolly for beach and water access opens up miles of coastal paddling.
Fat, wide wheels are the key to transforming your stock kayak dolly into a beach and surf machine. With increased surface area, fat wheels float atop sand rather than digging in. Large treads provide added traction to power through soft conditions. Premium models are even inflatable, allowing you to fine-tune pressures for ideal performance on any terrain.
But wheels alone aren’t enough for surf zone success. You also need components that shed sand and resist corrosion in the salty environment. Choose aluminum or stainless steel hardware and avoid bearings that can seize up. Rutted plastic wheels easily packed with sand can be swapped for disc or spoke designs that shed debris.
Getting your kayak from parking lot to surf presents another challenge. Wide, soft terrain can cause thin-wheeled dollies to tip and roll. Outfit yours with lateral outriggers – additional small wheels mounted left and right on supports. These stabilize the cart and prevent rollovers.
Maneuvering a loaded kayak through surf demands both hands on the boat. Install a coiled leash to pull your modified dolly behind you. Or use a collapsible design that allows the wheels to swing up and out of the way during launches and landings. Just flip them back down to roll loaded back up the beach.
Beach wheel upgrades transform your stock kayak dolly into a veritable stretch limo equipped for sandy style. Here are some options to consider:
Super Stable Outrigger System
This aftermarket kit clamps onto standard kayak dollies and outfits them with two extra-wide outrigger wheels. The extended stance prevents tipping on soft sand or uneven ground. Integrated coil leash for pulling.
Ultra-Portable Inflatable Wheels
These compact 8-inch inflatable wheels add minimal weight yet provide big traction. Low pressure operation floats across loose sand with ease. Deflates for packing. Durable molded rubber tread sheds debris.
Heavy Duty Quick-Release Wheel Kit
Transform your kayak cart into a beach machine with these ultra wide snap-on/off wheels. Anodized aluminum construction resists corrosion, and they pop on and off in seconds for easy storage.
RinseKit Pressurized Beach Cleaning System
This portable 35psi pump system connects a standard garden hose to a precision spray nozzle. Quickly blast sand and salt off wheeled kayak dollies after beach exits. Essential for preventing corrosion and keeping things rolling smoothly.
With beefy specialized wheels and cleanup tools, you’re ready to drop boats directly into the surf and paddle away without compromise. Your souped-up dolly rolls with ease across sand, eliminates difficult carries, and speeds post-paddling rinse-offs. See you on the sand!
Fold-Up Designs Offer Compact Storage on Board
Kayak carts with wheels make getting your boat to the water a breeze. But their bulky size can make stowing them aboard a headache. Fold-up designs offer the best of both worlds: easy transport when needed, then out-of-the-way storage while paddling.
Standard kayak dollies fold up at a single hinge point, allowing the wheels to orient parallel with the frame. This shrinks their footprint, but they still eat up valuable cockpit space. Carts that fold into a compact triangle are even better for tucking away during your outing.
Choose a lightweight alloy frame to minimize stowed size without sacrificing durability. Opt for smaller wheels that provide adequate traction without huge bulk. Inflatable wheels offer superb compressibility – deflate them when not in use.
The key benefit of a folding design is the ability to stow it completely out of the way. But how do you secure it? Bungees work for quick lashing, but the cart may bounce around on rough water. For real stability, install permanent mounting points.
Small pad eyes bolted through the kayak’s deck allow you to clip or tie down your folded cart tightly. Position them near the cockpit for easy access. A center-mounted day hatch offers a great interior storage spot accessible through the cockpit.
Thinking of adding wheels to a cart-less kayak? Purpose-built folding mounts provide ideal built-in storage:
Scupper Hole Wheel Mounts
These smart mounts secured in rear scupper holes hold the axle ends of a folding wheel kit. Rotate up into boat for storage, flip down for transport. No frame needed.
Under Deck Storage Track
Installed crosswise under the deck near the cockpit, this low-profile track lets you securely slide in a folding wheeled kayak carrier. Out of the way when paddling.
Side-Mounted Cart Clip Plates
Attaching to each gunwale just behind the seat, these plates hold a folding wheeled kayak dolly tightly against the hull when not needed. Rotates upright in seconds for easy transport.
Don’t let a bulky kayak cart keep you from bringing your wheels along for the ride. Today’s folding designs offer rugged transport plus out-of-sight on-board storage. Stash your cart away and focus on the paddling!
Retrofit Old Wheels to Save Your Back and Budget
Dragging your kayak across parking lots or down trails can quickly wear out your back. A set of wheels makes transport easy, but commercial options cost big bucks. With some DIY handiwork, you can retrofit old wheels and turn scrap into a kayak-hauling machine on a budget.
Scour garages, thrift stores, and classified ads for used wheels. Look for in-line skate wheels, caster wheels from furniture or appliances, lawn mower wheels, wheelbarrow replacement wheels or even kids’ wagon wheels. The key is sturdy construction and quality bearings.
Smaller diameters like 2-3 inches work best for clearing obstacles, but very large wheels can better handle rough terrain. Wide tread patterns improve traction in soft conditions. Inflatable tire types tend to have the best all-around performance.
Mount the axle between two pieces of scrap lumber lag-bolted together in a “U” shape. Use sturdy plastic or steel bar for the axle itself and secure with hardware. Place the assembly toward the back to balance the boat’s weight.
Now add a way to connect the wheels firmly to your kayak. Ratchet straps work in a pinch, but installing permanent hold-down points yields a cleaner setup. Small eye or pad bolts positioned on the hull or underside of the deck allow solid tie-down spots.
Don’t forget a handle! Install a length of plastic pipe or wood dowel that spans the width to create a grip for pulling your DIY wheeled kayak dolly creation. Now let’s look at some ways to source used or discount wheels on a budget:
Reuse Kids’ Wagon Wheels
Plastic wagon wheels are often sold as replacements when damaged. Grab a set online for cheap and repurpose for your kayak cart.
Salvage Wheelchair and Walker Wheels
Check donation centers and classifieds for used mobility aids being retired. Their large wheels work perfectly for your kayak dolly retrofit.
Upcycle Inline Skate Wheels
Wheels from worn-out inline skates have great shape and bearings for a kayak cart. Look for disc or spoke designs that shed sand and debris.
With ingenuity and elbow grease, scrap materials become a custom kayak transport system. Your wallet will thank you, and your back will rejoice next time you hit the water. DIY for the win!
Foam-Filled Tires Roll Over Rocks with Ease
For kayakers embarking on long-haul journeys, outfitting your vessel with the right accessories can make all the difference. One often overlooked upgrade that can vastly improve your experience is installing foam-filled tires. These innovative tires provide unparalleled performance over difficult terrain, helping your kayak glide over rocks, roots and other obstacles.
Traditional inflatable kayak tires work great for short trips on smooth surfaces. But for multi-day excursions over rugged landscapes, standard tires simply can’t cut it. Even the slightest impact can cause a puncture, leaving you stranded mid-trip with a flat. And as every seasoned paddler knows, dragging a deflated kayak over rocks and dirt trails quickly saps your energy and dampens your spirit of adventure.
That’s where foam-filled tires enter the picture. Made from durable closed-cell foam, these tires require no inflation. They smoothly roll over rough ground without any risk of going flat. The foam construction provides a gentle, cushioned ride that absorbs impacts, protecting both your gear and your body from jarring bumps.
Foam tires also grip the terrain exceptionally well, providing stability even on steep inclines. The tread design channels water, mud and debris away from the wheel’s contact patch, ensuring reliable traction no matter the conditions. This makes portaging your kayak through muddy, wet environments a much easier endeavor.
Installing foam-filled tires on your kayak essentially transforms its handling and off-road capabilities. With these all-terrain tires, you’ll no longer need to meticulously chart routes avoiding sharp rocks. You can traverse over gravel beds, tree roots and other obstacles that previously proved impassable. This opens up a whole new world of remote rivers, lakes and coastlines for your future adventures.
Choosing the Right Foam Tire Size
When upgrading to foam tires, the most important factor is selecting the proper tire size. You want a diameter that lifts the kayak hull sufficiently off the ground when portaging. But overly large tires will make it unwieldy to maneuver the boat on land.
For most solo kayaks, 8 to 10 inch foam tires provide an ideal balance of ground clearance and stability. Wider tandem kayaks can accommodate larger 10 to 12 inch tires. Measure across the widest section of your kayak’s hull to determine the maximum tire size that won’t protrude out too far.
The foam density rating also impacts performance. Higher density foams around 8 to 10 pounds per cubic foot offer the best resilience. They cushion impacts well while retaining their shape. Lower density foams below 6 pounds per cubic foot tend to compress more under loads. This can lead to inconsistent rolling and handling.
Foam Tire Upgrades Deliver a Smoother Ride
Once you experience gliding your kayak over rocks and roots with ease, you’ll never want to go back to standard inflatable tires again. Foam-filled tires deliver comfort and performance for the long haul, opening up remote terrain that inflatable tires simply can’t access.
Upgrade kits make switching to foam tires a breeze. Quality kits include two airless wheels with durable ABS plastic hubs and treads. Kits designed specifically for kayaks feature extended axles that provide optimal clearance beneath the hull. Premium sets even include adjustable rod holder mounts for securely transporting your paddles over land.
Whether you’re an avid kayak angler seeking access to new fishing spots or a weekend paddling enthusiast looking to escape the crowds, foam-filled tires unlock your vessel’s full overland potential. Leave the hassle of flat tires behind so you can fully immerse yourself in the journey ahead.
Balance and Stability Keep You Upright on the Move
Kayaking opens up a world of adventure on the water, but it also requires mastering the art of balance. Maintaining proper equilibrium and stability is essential for staying upright and in control, especially on long-distance journeys over variable conditions. With the right gear and techniques, you can enhance your kayak’s stability and make even the roughest rivers and remote coastlines accessible.
A kayak’s initial stability stems from its hull design. Wider, flatter-bottomed kayaks offer more primary stability and are more forgiving for beginners. Narrower, rounded hulls have less primary stability but more secondary stability due to their maneuverability. Finding a kayak with a hull shape that matches your skill level and paddling environment is key.
Outfitting your kayak with a rudder can also improve directional stability. A foot-controlled rudder helps counteract wind and current, keeping you on course. Retractable rudders allow you to deploy stabilization only when conditions require it.
Proper seating position and posture are equally important. Sit upright with your knees comfortably bent and feet stabilized against foot braces. This centered position gives you the best control. Avoid slouching or leaning, which raises your center of gravity and can cause capsizing.
Leg Muscles Provide Stability in Motion
While underway, engage your leg muscles to maintain stability. Extend your knees against the foot braces when your boat tips or rocks side-to-side. This engages your quadriceps and glutes to stabilize your lower body, keeping your upper body centered.
In rougher water, brace your paddle vertically against the waves. A strong paddle brace relies mainly on your torso strength. Rotate your torso and lean into the paddle to prevent capsizing in churning currents. Keep your grip hand high and use a paddle with a large blade for maximum bracing power.
Improve Balance with Equipment Upgrades
The right gear adjustments can also boost your stability. Installing an adjustable seat lets you tweak your height for better balance. A higher seat lifts your center of gravity for initial stability; lower it in rough conditions. Thigh braces prevent your legs from splaying outward, creating a solid base.
While learning, consider a wider “sit-on-top” kayak design. The open cockpit allows easy re-centering and self-rescue if you tip. For extreme stability, try outriggers – floating pontoons mounted sideways to the hull. Always wear a secure vest; the flotation keeps you stabilized if capsized.
Don’t let fears of capsizing limit your paddling adventures. With the right kayak, gear and techniques, you can master balance and unlock amazing journeys on waterways near and far.
Quick-Release Axles Let You Detach and Carry with Ease
Transporting your kayak from your vehicle to the water’s edge can quickly dampen your paddling enthusiasm. Carrying a heavy, awkward kayak any distance over rough terrain strains your back and shoulders. That’s where installing quick-release axles can make a world of difference for your kayaking adventures.
Quick-release axles allow you to easily detach the wheels from your kayak cart with the flick of a lever. This lets you roll the boat right up to the water, then instantly convert it back to a lightweight carrying configuration. No more struggling under a cumbersome wheeled kayak down steep, rocky banks.
Having the ability to go from rolling to carrying mode in seconds delivers major convenience. You can transport your kayak smoothly over level ground and pavement. Then when you reach an obstacle like steps or a steep slope, simply release the axles and lift. This flexibility opens up access to launch sites beyond the parking lot.
Choosing the Right Quick-Release System
Quick-release designs utilize a lever mechanism that tensions a bolt running through the axle. Flipping the lever releases the tension so you can pull out the axle ends. This creates an instantly wheel-free frame for lifting and carrying.
For kayak transport, a double-sided quick release with levers on both hubs works best. Look for marine-grade materials that resist corrosion, along with tall wheels that clear your kayak’s underside. Padded handle tubes improve comfort when carrying.
Keep in mind that while removing the wheels reduces weight, the full cart frame remains. For true lightweight portability, some paddlers opt for a breakdown cart that disassembles into pieces small enough to stow inside the kayak hull.
Transport Your Kayak Anywhere with Ease
Quick-release axles offer the best of both worlds when transporting your kayak to remote waters. Use the wheels whenever possible to minimize lifting. Then when the terrain turns tough, simply detach the axles and carry on. You’ll preserve your energy for the paddling journey ahead.
With a quick-release cart, you can enjoy kayaking destinations lacking launch site access. Explore small streams by rolling your boat in a half mile. Or discover hidden coves on lakes by detaching the wheels and carrying your kayak over a rocky outcropping. The convenience of quick-release wheels opens your eyes to new waters near and far.
Don’t accept the burden of clumsy kayak transport that can sap your strength before you ever hit the water. Invest in a quick-release cart system that adapts to any situation. You’ll waste less time schlepping boats, and more time exploring the watery wilderness.
Identify Quality Materials Built for the Long Haul
When prepping your kayak for multi-day journeys, you need gear built to go the distance. Whether it’s racks, cradles, or trailer parts, smart materials choice is key. High-quality components withstand constant exposure to sun, water and rough handling – ensuring your accessories last trip after trip.
Marine-grade stainless steel sets the standard for corrosion resistance. Stainless steel alloys like 316 contain molybdenum for enhanced protection in wet environments. Parts like racks, screws and hinges made of stainless steel withstand years of saltwater without corrosion.
Anodized aluminum also fares well on boats. Anodization deeply oxidizes the aluminum surface, creating a weatherproof ceramic-like layer. This shields vulnerable aluminum from UV damage and prevents pitting or flaking. Sturdy anodized aluminum rail mounts and tower legs hold up season after season.
Polyethylene & ABS Plastics Excel in Marine Settings
For kayak cart and dolly parts, plastic polymers offer durability and weather-resistance. High density polyethylene (HDPE) stands up to sun, salt and moisture exposure without cracking or degrading. It also retains flexibility in cold weather. Polyethylene wheels, handle tubes and cradles endure abuse and retain their function.
Acrylonitrile butadiene styrene (ABS) is another rugged plastic for marine use. ABS combines strength, rigidity and impact resistance. ABS housings flex slightly but won’t become brittle with age. Parts like hubcaps and tire treads made of ABS deliver long service lives.
Avoid lower cost plastics like PVC or nylon for critical components. These degrade faster in outdoor environments. For long term reliability, stick with marine-grade stainless steel, anodized aluminum or HDPE/ABS plastics.
Don’t Skimp on Safety and Convenience
High quality doesn’t just mean long-lasting and durable, but also safe and hassle-free. Look for thoughtful designs that make handling cumbersome kayaks less stressful. Ergonomic foam handles reduce hand fatigue. Spring-loaded cradles make loading and unloading easy.
Don’t forget essential safety features like reflectors and lights for road travel visibility. Premium accessories enhance the journey from driveway to waterway. Investing a bit more means you can embark on remote expeditions with confidence your gear will hold up.
For kayaking journeys spanning days, weeks or more, every piece of equipment must be seaworthy. By selecting accessories made with quality marine materials, you can focus on the adventure ahead – not worries about failed equipment.
DIY Instructions for Building Your Own Dolly for a Pelican Kayak
If you’re a kayak enthusiast who owns a Pelican brand kayak, you know how heavy and cumbersome these boats can be to move around. Investing in a kayak dolly makes transporting your boat to and from the water a breeze. But did you know you can easily build your own DIY kayak dolly on the cheap? With a few basic materials and tools, plus these step-by-step instructions, you’ll have a custom Pelican kayak dolly ready for action in no time.
Materials and Tools Needed
Building your own Pelican kayak dolly is a pretty straightforward project. You’ll need the following materials and tools:
- 3″ PVC pipe – you’ll need 12 feet
- PVC elbow joints – 4
- PVC T joints – 2
- 10″ pneumatic tires – 2
- Tire axle rods – 2
- Washers and cotter pins for axle rods – at least 4 washers and 4 cotter pins
- 18″ bungee cords with hooks on both ends – 4
- Reflectors or reflective tape
- Spray paint
- Hacksaw or pipe cutters
- Drill
- Adjustable wrench
Before you start building, take some measurements of your Pelican kayak so you can customize the dolly to fit it perfectly. You’ll want to measure the width at the widest point, and the distance from the bottom of the hull to the ground. This will determine how long the vertical supports need to be.
Step-by-Step Instructions
Follow these DIY steps to build your own rolling Pelican kayak dolly:
- Cut the 12′ PVC pipe into the following lengths using a hacksaw or pipe cutters:
- 2 x 36″ pipes
- 2 x 6″ pipes
- 2 x 14″ pipes
- 2 x 20″ pipes
- Measure the distance from the bottom of your kayak hull to the ground. Cut the two 20″ vertical support pipes to this length.
- Drill holes in the four elbow joints large enough for the axle rod to pass through. Drill corresponding holes in the ends of the 36″ horizontal support pipes.
- Insert the axle rods through the elbows and 36″ pipes. Place a washer on each end and secure with a cotter pin.
- Attach the pneumatic tires to each axle rod.
- Insert the ends of the 14″ crossbar pipe into the tee joints. Insert the 6″ vertical pipes into the other end of the tees.
- Insert the vertical support pipes into the elbow joints.
- Spray paint the entire dolly frame. Use reflective spray paint for improved visibility.
- Attach the bungee cords to the dolly frame, two per side. Space them evenly along the 36″ horizontal pipes.
- Add reflectors or reflective tape to the vertical support posts so your dolly is visible from the sides.
- Place your Pelican kayak upside down on top of the dolly. Wrap the bungee cords up and over the hull to secure it in place.
- You’re now ready to wheel your kayak dolly down to the water!
Custom building your own Pelican kayak dolly is easy with PVC pipe and a few other affordable materials. Not only does this DIY dolly save money compared to buying one, you can customize it to perfectly fit your kayak. Plus, you’ll have the satisfaction of rolling your kayak to the water on a dolly you crafted yourself.
This simple yet durable PVC frame paired with pneumatic tires makes transporting your kayak a smooth ride. The bungee cords hold it securely in place while you wheel it around. Make sure to pad any parts of the dolly frame that contact the kayak hull to prevent scratches.
Addingreflectors or reflective tape improves visibility so others can see you coming. Pick a bright color like red or yellow for the spray paint job. You can even stencil the dolly with your kayak’s name for a little extra personalization.
If you need to take your DIY Pelican kayak dolly apart to transport it, the PVC construction makes disassembly a cinch. Simply detach the pipes and pack it all in your vehicle. When you arrive at your kayaking destination, piece it back together again in just a few minutes.
While specially designed kayak carts and trolleys can cost $200 or more, you can build this handy homemade version for less than $50 in materials. Not only will your budget thank you, but your back and arms will too when it’s time to haul your kayak to and from your vehicle or campsite.
So next time you and your Pelican are headed out for a paddling adventure, equip yourself with this easy-to-build DIY dolly. You’ll be gliding smoothly down to the water in no time!