How to unpack and set up your La Crosse weather station. How to charge and install batteries. How to mount the outdoor sensor. How to connect the sensor to the display. How to set time and date. How to customize settings. How to interpret weather data.
Understanding La Crosse Technology Weather Stations
La Crosse Technology has been at the forefront of personal weather station development for over three decades. Their wireless weather stations are renowned for their accuracy, user-friendliness, and comprehensive weather monitoring capabilities. These devices offer a wide range of features, from basic indoor/outdoor temperature readings to advanced systems with rain gauges, wind sensors, and smartphone connectivity.
Why choose a La Crosse weather station? These devices provide real-time data on various weather parameters, including:
- Temperature
- Humidity
- Wind speed and direction
- Rainfall
- Dew point
- Heat index
- Wind chill
- Barometric pressure
Additionally, many models feature weather forecast icons and trend arrows to help predict short-term conditions. Some even include atomic time synchronization and weather-triggered alarms, offering an unparalleled weather monitoring experience.
Essential Steps for Unpacking and Initial Setup
When you first receive your La Crosse weather station, it’s crucial to approach the unpacking and setup process methodically. Here’s a step-by-step guide to get you started:
- Carefully unbox all components, identifying each part using the included manual.
- Remove any protective materials such as cardboard, tape, or plastic.
- Verify that all required parts are present before proceeding with the setup.
- Choose suitable locations for both the display unit and outdoor sensor, avoiding obstructions and direct sunlight.
Can you set up a La Crosse weather station indoors? While the display unit is designed for indoor use, the outdoor sensor must be placed outside for accurate readings. Ensure you have a suitable outdoor location before beginning the setup process.
Powering Up: Battery Installation and Charging
Proper power management is crucial for the continuous operation of your La Crosse weather station. Here’s what you need to know about batteries and charging:
Outdoor Sensor
Most outdoor sensors run on replaceable batteries. Follow these steps:
- Locate the battery compartment on the sensor.
- Install fresh alkaline or lithium batteries as specified in the manual.
- Note the expected battery life and set a reminder for future replacement.
Display Unit
The display unit often features a rechargeable battery pack. To set it up:
- Connect the AC adapter to the display unit and plug it into a power outlet.
- Allow the backup battery to charge completely before relying on battery power alone.
- This backup power ensures your station maintains time and settings during power outages.
How long does it take to fully charge a La Crosse weather station display unit? While charging times can vary by model, most units require 4-6 hours for a full charge. Consult your specific model’s manual for precise charging duration.
Optimal Placement and Mounting of the Outdoor Sensor
The accuracy of your weather data largely depends on the proper placement of the outdoor sensor. Follow these guidelines for optimal results:
- Mount the sensor vertically on a north-facing wall or pole.
- Ensure it’s at least 5 feet (1.5 meters) above the ground.
- Avoid obstructions from trees, buildings, or other structures.
- Place it at least several feet away from any radiant heat sources.
Once you’ve selected the ideal location, use the provided mounting bracket and hardware to secure the sensor:
- Attach the mounting bracket to the chosen surface using screws or appropriate fasteners.
- Slide the sensor into the bracket, ensuring it’s firmly seated.
- For pole mounting, use cable ties through the bracket holes for added stability.
- Double-check that the sensor is level and won’t sway in windy conditions.
Is it necessary to calibrate the outdoor sensor after mounting? While La Crosse sensors are typically pre-calibrated, some models allow for manual calibration. If available, follow the calibration instructions in your manual after the sensor has been in place for 24 hours to ensure optimal accuracy.
Establishing a Connection: Syncing Sensor and Display
For your La Crosse weather station to function properly, the outdoor sensor must successfully transmit data to the display unit. While many models come pre-paired, you may need to manually synchronize them. Here’s a general guide to the syncing process:
- Place the sensor and display unit within 3-6 feet (1-2 meters) of each other.
- Locate the “channel” or “sync” buttons on both units.
- Press these buttons as directed in your model’s manual to initiate the syncing process.
- Wait several minutes for the units to establish a connection.
- Once synchronized, outdoor data should appear on the display unit.
What should you do if the sensor and display won’t sync? Try these troubleshooting steps:
- Move the units closer together and attempt the sync process again.
- Verify that batteries are fresh and correctly installed.
- Check for any potential sources of interference, such as other electronic devices.
- Consult the troubleshooting section of your manual for model-specific guidance.
Remember, patience is key during the initial sync process. Some models may take up to 10 minutes to establish a stable connection.
Configuring Time and Date Settings
Accurate time and date information is crucial for proper weather monitoring and forecasting. Most La Crosse weather stations offer straightforward methods for setting these parameters:
Manual Time and Date Setting
- Locate the clearly labeled time and date adjustment buttons on your display unit.
- Use these buttons or touch keys to set the hours, minutes, calendar date, month, and year.
- For models with dual time zone capabilities, ensure you’re adjusting the correct zone.
Atomic Time Synchronization
Many La Crosse models feature automatic time synchronization:
- Look for WWVB (North America) or DCF77 (Europe) radio receiver capabilities in your model.
- Enable the auto-update feature if available.
- The station will periodically sync with atomic time signals for maximum accuracy.
Do all La Crosse weather stations have atomic time synchronization? While many models offer this feature, it’s not universal. Check your specific model’s specifications to confirm if atomic time sync is available.
Personalizing Your Weather Station Experience
One of the key advantages of La Crosse weather stations is their customizability. Take time to explore the various settings and options to tailor the station to your preferences:

Units of Measurement
Adjust the display to show measurements in your preferred units:
- Temperature: Celsius or Fahrenheit
- Wind speed: mph, km/h, or m/s
- Rainfall: inches or millimeters
- Pressure: inHg, hPa, or mmHg
Display Options
Customize the visual aspects of your weather station:
- Language: Select your preferred display language if multiple options are available.
- Backlight: Enable auto-dimming for nighttime use or set weather-activated backlight triggers.
- Graph intervals: Adjust the time scale for trend graphs.
Weather Forecasting
Fine-tune the forecasting features:
- Set your specific location for more accurate local forecasts.
- Choose between different forecast icon styles if available.
- Adjust sensitivity settings for pressure change indicators.
Can La Crosse weather stations be customized to show only specific data? Many models allow you to cycle through different display modes or hide certain parameters. Consult your manual for instructions on customizing the data fields shown on the main display.
Decoding Weather Data: Understanding Your Station’s Readings
A La Crosse weather station provides a wealth of meteorological data. Here’s a guide to interpreting some of the key information:
Basic Readings
- Current time and date
- Indoor and outdoor temperature
- Indoor and outdoor humidity
- Barometric pressure
Advanced Measurements
- Wind speed and direction
- Rainfall accumulation (daily, weekly, monthly)
- Dew point
- Heat index
- Wind chill
Forecast Icons and Trend Indicators
Many La Crosse stations use symbols to represent short-term weather forecasts:
- Sun: Clear conditions expected
- Partly cloudy: Mix of sun and clouds
- Cloudy: Overcast conditions likely
- Rain: Precipitation expected
- Snow: Winter precipitation (on applicable models)
Trend arrows often accompany these icons, indicating whether conditions are expected to improve, worsen, or remain stable.
How accurate are La Crosse weather station forecasts? While these personal weather stations provide valuable local data, their forecasting capabilities are based on trends in temperature, humidity, and pressure. For the most accurate long-term forecasts, it’s best to combine your station’s data with professional meteorological sources.

Maximizing Your Weather Station’s Potential
To get the most out of your La Crosse weather station, consider these advanced tips and features:
Data Logging and History
Many La Crosse models offer data logging capabilities:
- Review historical weather data directly on the display unit.
- Some models allow for data export to a computer for more detailed analysis.
- Use this historical data to track long-term weather trends in your area.
Weather Alerts and Alarms
Take advantage of programmable alerts:
- Set high and low temperature alarms for both indoor and outdoor readings.
- Configure alerts for rapid pressure changes, which may indicate incoming storms.
- Some models offer wind speed alerts, useful for protecting outdoor equipment.
Integration with Smart Home Systems
Certain La Crosse models offer connectivity features:
- Look for Wi-Fi enabled models that can connect to your home network.
- Use companion smartphone apps to access your weather data remotely.
- Some stations can integrate with smart home platforms for automated actions based on weather conditions.
Can La Crosse weather stations be used for professional or scientific purposes? While these stations are primarily designed for personal use, some advanced models provide data accurate enough for amateur meteorology or agricultural applications. For professional scientific use, however, specialized equipment is typically required.
Maintaining Your La Crosse Weather Station
Regular maintenance ensures the longevity and accuracy of your weather station. Follow these tips to keep your system in top condition:
Outdoor Sensor Care
- Clean the sensor housing periodically with a soft, damp cloth.
- Check for and remove any debris, spider webs, or insect nests.
- Inspect the mounting hardware regularly to ensure it remains secure.
- Replace batteries as recommended, typically every 12-24 months.
Display Unit Maintenance
- Dust the display screen gently with a microfiber cloth.
- Keep the unit away from heat sources and direct sunlight.
- If using rechargeable batteries, perform a full discharge/recharge cycle every few months.
Software and Firmware Updates
For models with update capabilities:
- Check the La Crosse Technology website periodically for firmware updates.
- Follow the provided instructions carefully when updating your station’s software.
- Updates can improve performance, add features, or fix bugs.
How often should you calibrate a La Crosse weather station? While these stations are designed to maintain accuracy over time, it’s a good practice to check calibration annually. Some models allow for manual calibration, while others may need to be compared to official weather data sources to verify accuracy.
Troubleshooting Common Issues
Even with proper setup and maintenance, you may encounter occasional issues with your La Crosse weather station. Here are solutions to some common problems:
Sensor Connection Loss
If your display unit stops receiving data from the outdoor sensor:
- Bring the sensor closer to the display unit and attempt to re-sync.
- Replace the batteries in the outdoor sensor.
- Check for sources of interference, such as other wireless devices.
- Ensure the sensor is within the specified range (typically 300-330 feet in open air).
Inaccurate Readings
For unexpected or seemingly incorrect measurements:
- Verify that the outdoor sensor is properly placed and shielded from direct sun and heat sources.
- Check for proper ventilation around the sensor.
- Compare readings with nearby official weather stations to gauge accuracy.
- Consider recalibrating the sensors if your model allows for manual calibration.
Display Issues
If you’re experiencing problems with the display unit:
- Ensure the unit is receiving power, either from batteries or the AC adapter.
- Perform a factory reset if available, following the instructions in your manual.
- For persistent display glitches, contact La Crosse Technology customer support.
What should you do if your La Crosse weather station stops working entirely? First, try a complete power cycle by removing all batteries and unplugging the AC adapter for at least 10 minutes. If this doesn’t resolve the issue, consult the troubleshooting section of your manual or reach out to La Crosse Technology’s customer support for assistance.
Expanding Your Weather Station’s Capabilities
Many La Crosse weather station models offer the ability to expand their functionality through additional sensors or integrations. Here are some ways to enhance your weather monitoring setup:
Additional Sensors
Depending on your model, you may be able to add:
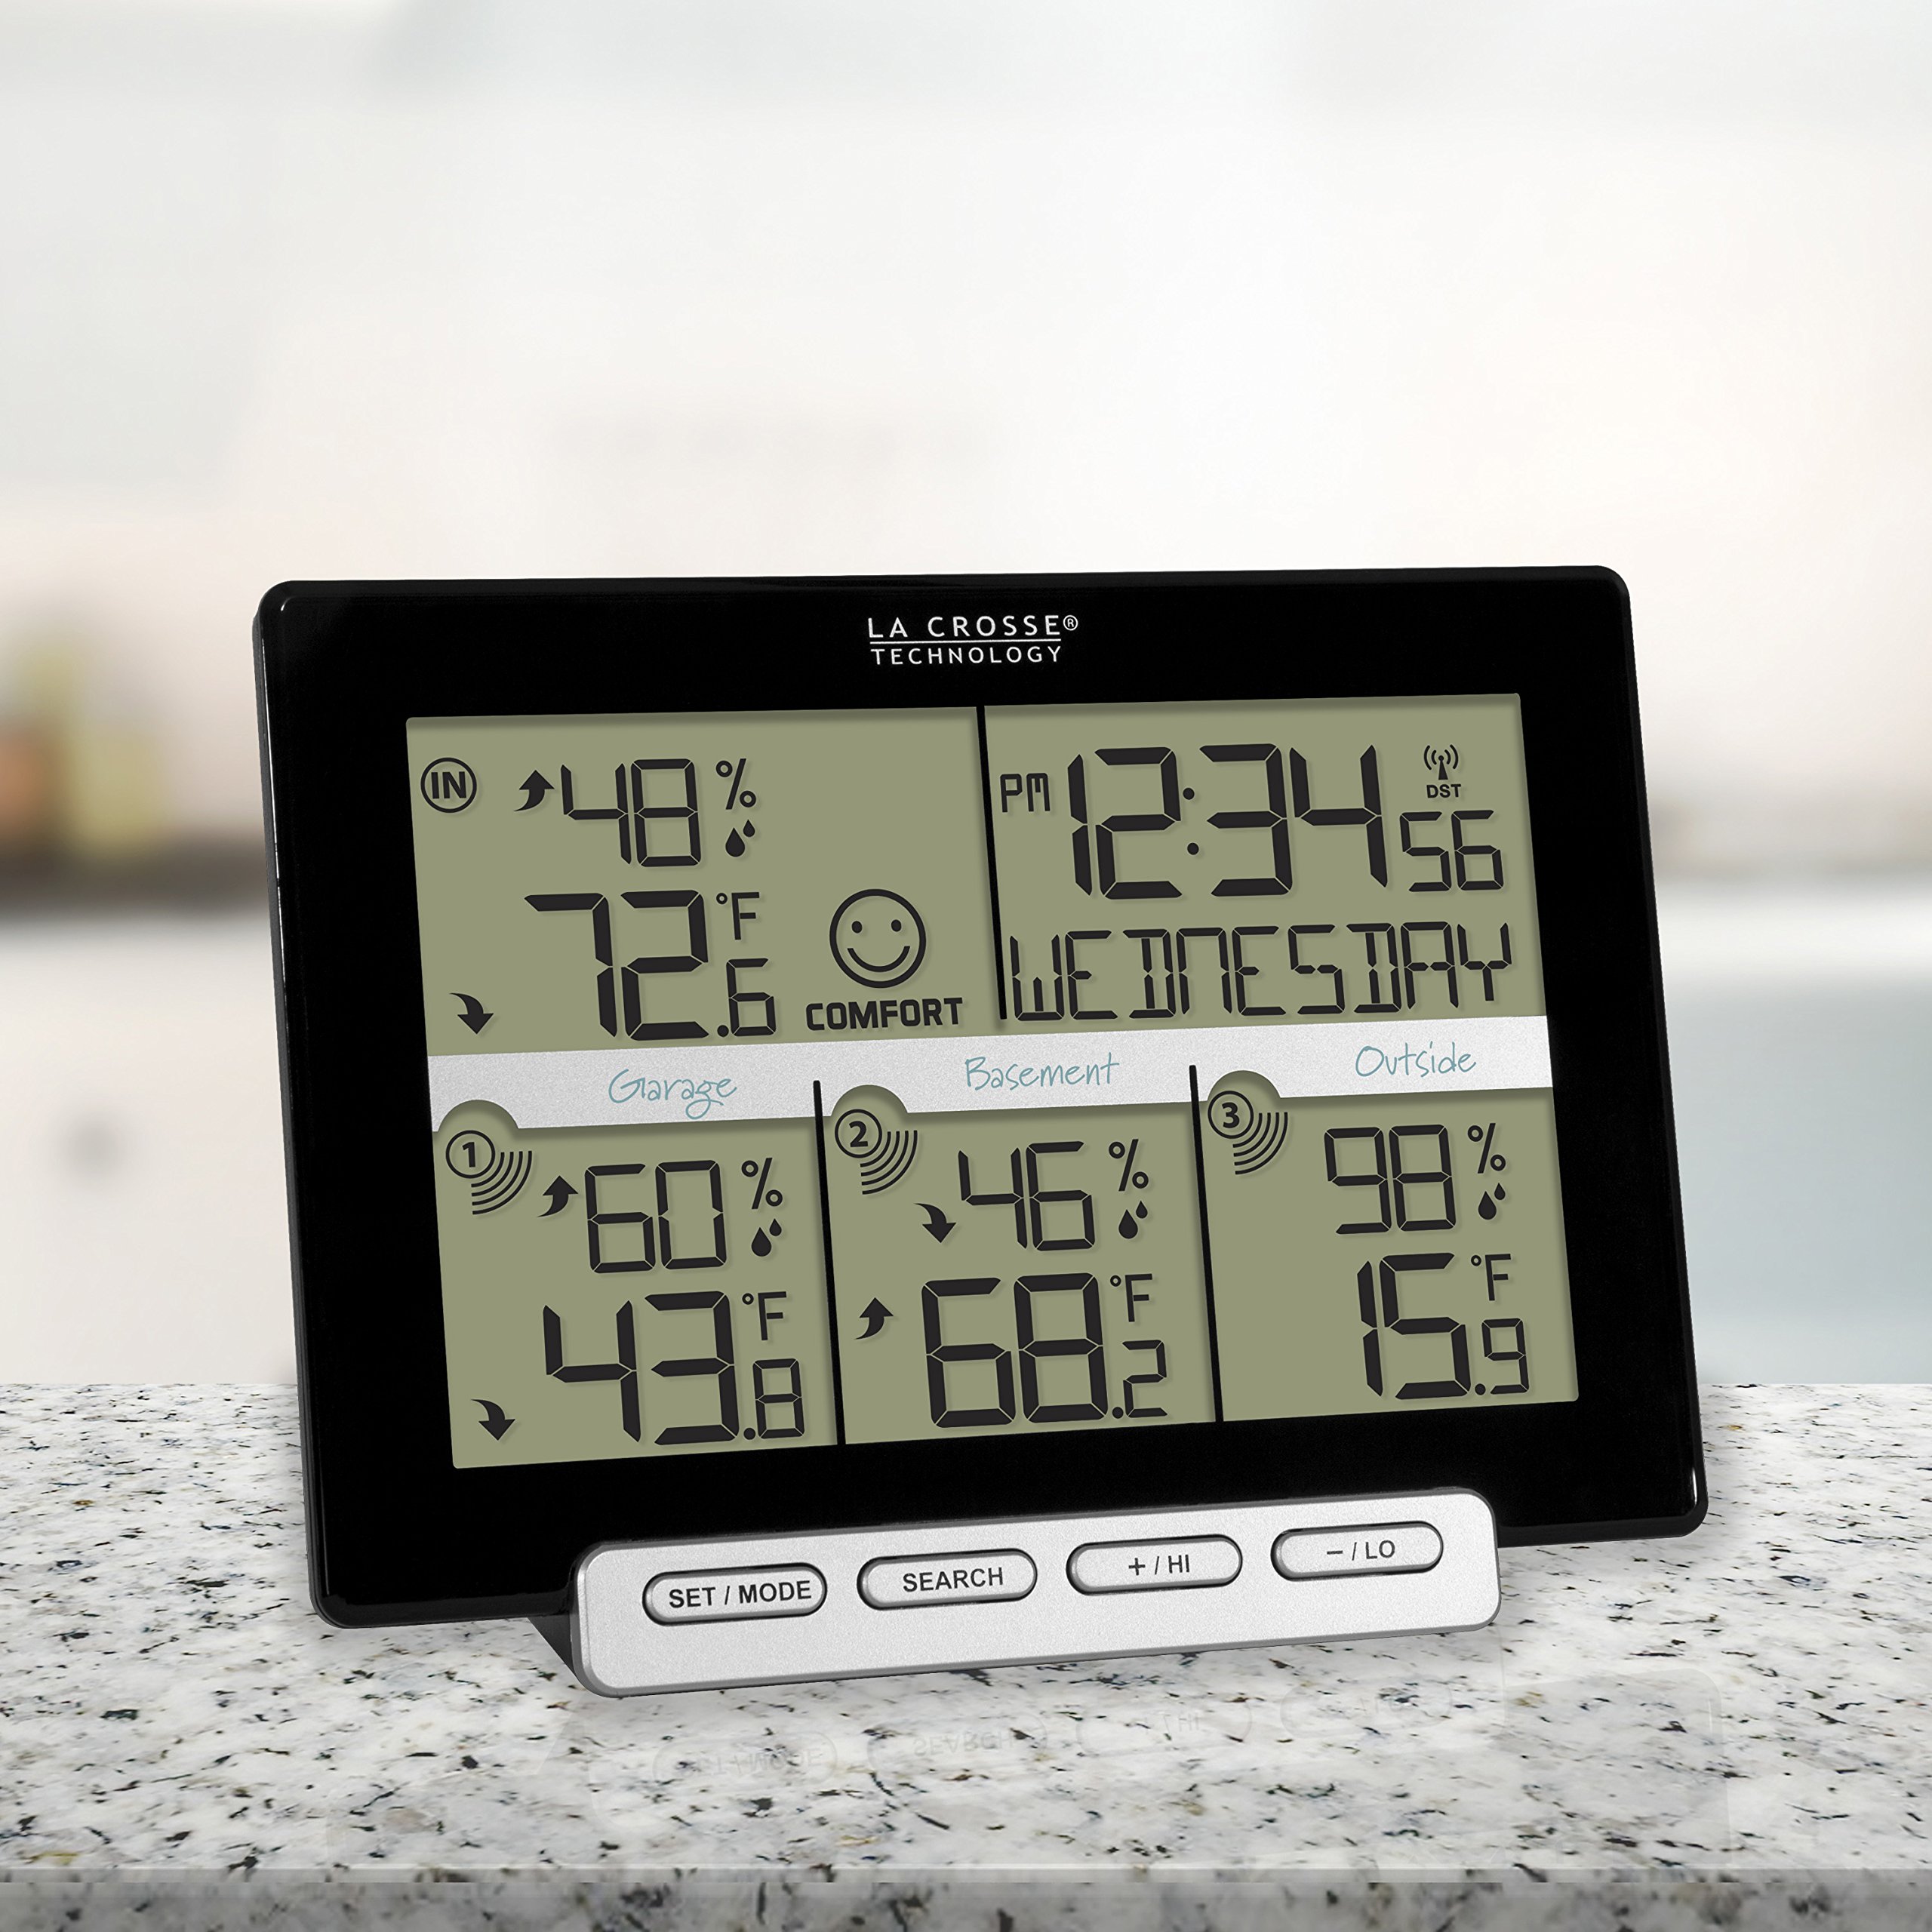
- Extra temperature and humidity sensors for monitoring multiple locations
- Soil moisture sensors for gardening applications
- Pool temperature sensors for water monitoring
- Lightning detectors for severe weather tracking
Welcome to the wonderful world of La Crosse Technology weather stations! These innovative devices open up new possibilities for monitoring the weather right from the comfort of your own home. In this guide, we’ll walk through everything you need to know to get the most out of your new weather station.
An Introduction to La Crosse Technology Weather Stations
La Crosse Technology has been a leader in personal weather stations for over 30 years. Their wireless weather stations are designed to be accurate, easy-to-use, and packed with helpful weather monitoring features. With options ranging from basic indoor/outdoor thermometers to complete systems with rain gauges, wind sensors, and smartphone connectivity, La Crosse has a weather station for every need.
These stations can display current temperature, humidity, wind speed, wind direction, rainfall, dew point, heat index, wind chill, and barometric pressure. You’ll get weather forecast icons and trends arrows to help predict short-term conditions. With options like atomic time and weather-triggered alarms, La Crosse weather stations provide an unparalleled weather monitoring experience.
Unpacking and Setting Up Your Weather Station
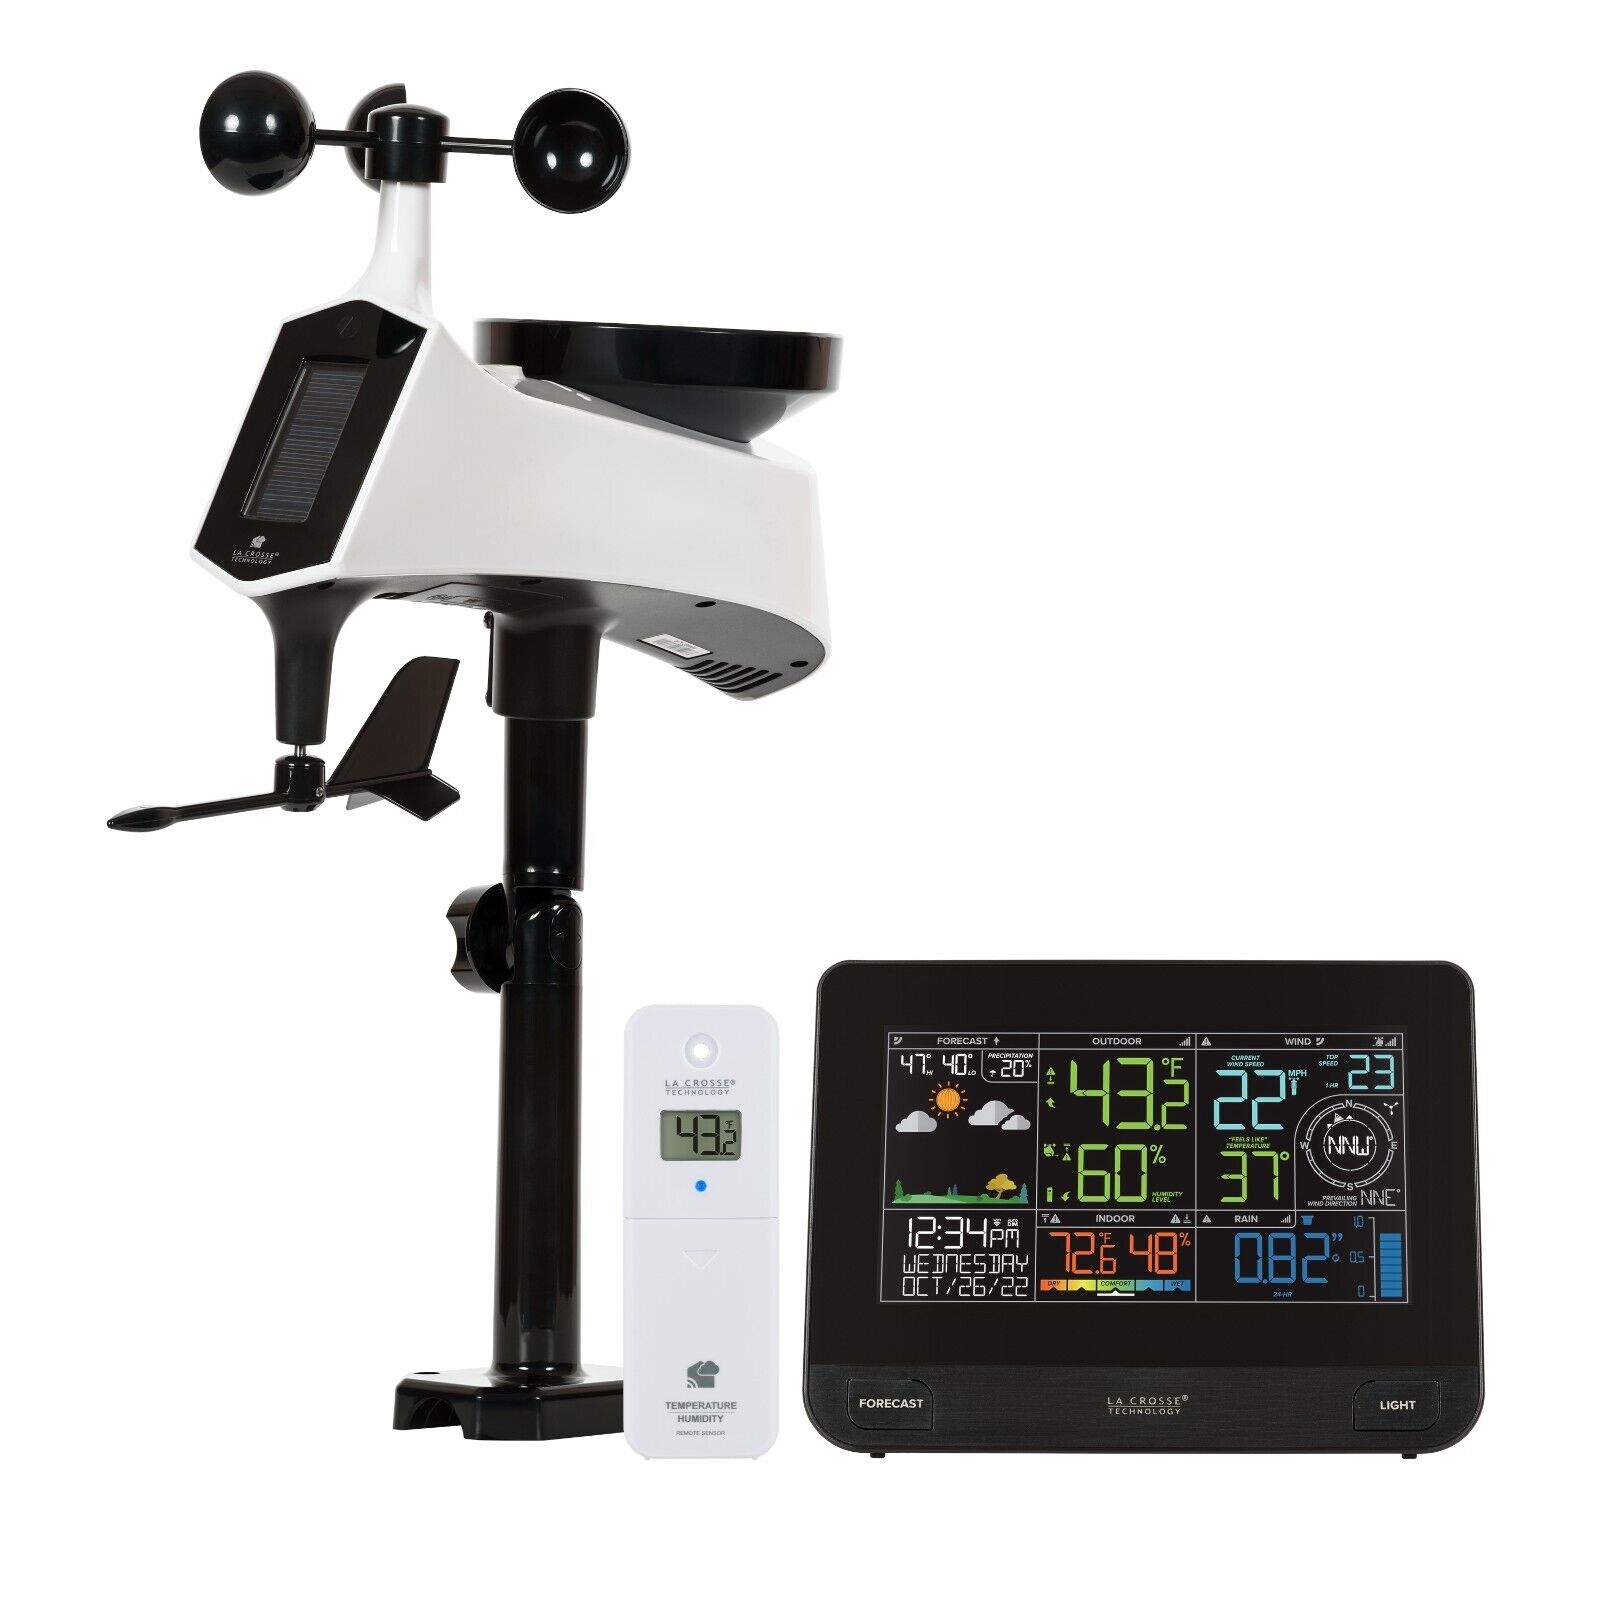
When you first unbox your La Crosse weather station, take a few minutes to identify each of the parts and pieces. Most models include an LCD display unit, outdoor sensor/transmitter, power adapter, and mounting hardware. Some also have add-ons like wind cups and rain gauges.
Carefully remove any protective cardboard, tape, or plastic from the components. Refer to the instruction manual and make sure you have all required parts before beginning set up. Choose locations for the display and outdoor sensor that avoid obstructions and direct sun.
Charging and Installing the Batteries
Your outdoor sensor will likely run on batteries you’ll need to install, while the display unit may have a rechargeable battery pack. Install fresh alkaline or lithium batteries in the sensor. Check the manual for how long they should last before needing replacement.
For the display, plug it into an outlet using the AC adapter to charge its backup battery. This will allow it to keep time and settings in a power outage. Charge it completely before operating on battery power alone.
Mounting the Outdoor Sensor
Proper placement of the outdoor sensor is crucial for accurate measurements. Mount it vertically on a north-facing wall or pole, at least 5 feet off the ground. Make sure it’s not obstructed by trees or buildings and is at least several feet from radiant heat sources.
After selecting the right location, use the provided mounting bracket and hardware to securely affix the sensor. Run cable ties through the bracket holes to attach it to a pole or wall. Make sure it’s stable and won’t shake or sway in windy weather.
Connecting Your Sensor to the Display
Your outdoor sensor should wirelessly transmit data to the display unit. They are often pre-paired at the factory, but you may need to sync them manually. Refer to the instruction manual for your model’s syncing method.
This usually involves pressing a “channel” or “sync” button on both units to connect them. Do this with the units 3-6 feet apart and wait several minutes for them to synchronize. The outdoor data should then display on the station.
If they won’t sync, try moving them closer together and repeating the process. Make sure batteries are fresh and installed correctly. Consult the troubleshooting section of the manual if issues persist.
Setting the Time and Date
Accurate time and date information are crucial for weather monitoring and forecasting. Your La Crosse station should have clearly labeled buttons to set the time and date. Many models offer dual time zones as well.
Use the manual buttons or touch keys to adjust the hours, minutes, calendar date, month, and year as needed. For the most accurate atomic time, enable the auto update feature if available on your model.
Some models have a WWVB or DCF77 radio receiver for automatically syncing to Atomic time signals broadcast from Colorado or Germany.
Customizing Your Weather Station Settings
One of the great benefits of La Crosse weather stations is the ability to customize settings. Browse the menus using your manual or touch keys to configure options like units of measurement, display language, forecast icons, graph time intervals, backlight mode, and more.
Adjust temperature, wind, rainfall, and pressure units to your preference. Enableauto-dimming of the backlight at night. Turn on weather-activated backlight triggers. You can even set your location to ensure the forecast data is relevant to your area.
Interpreting the Weather Data
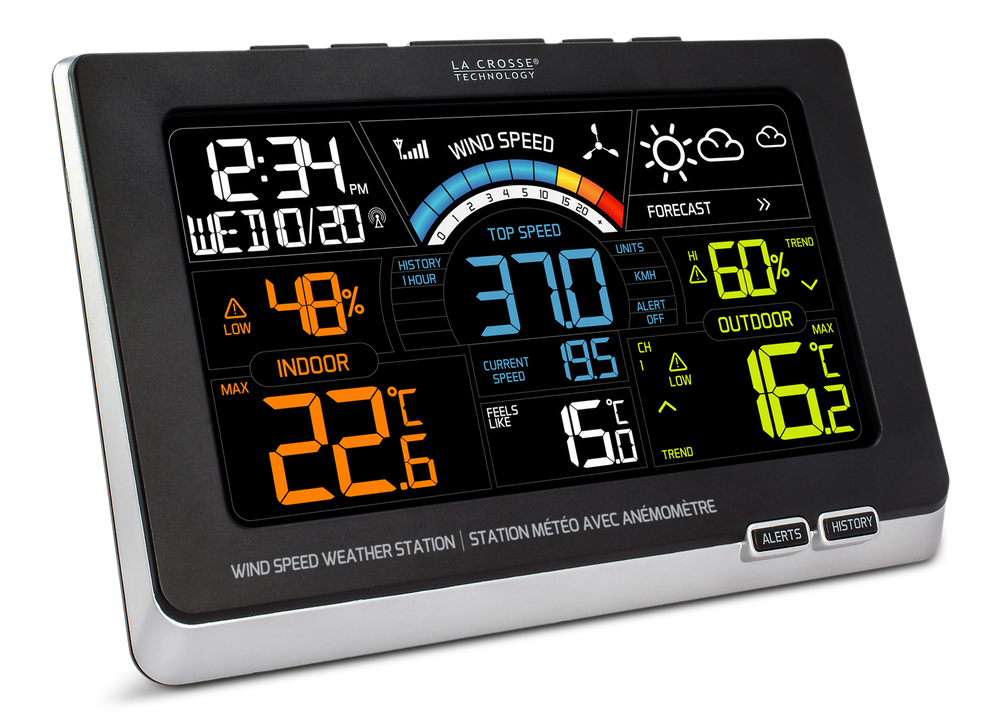
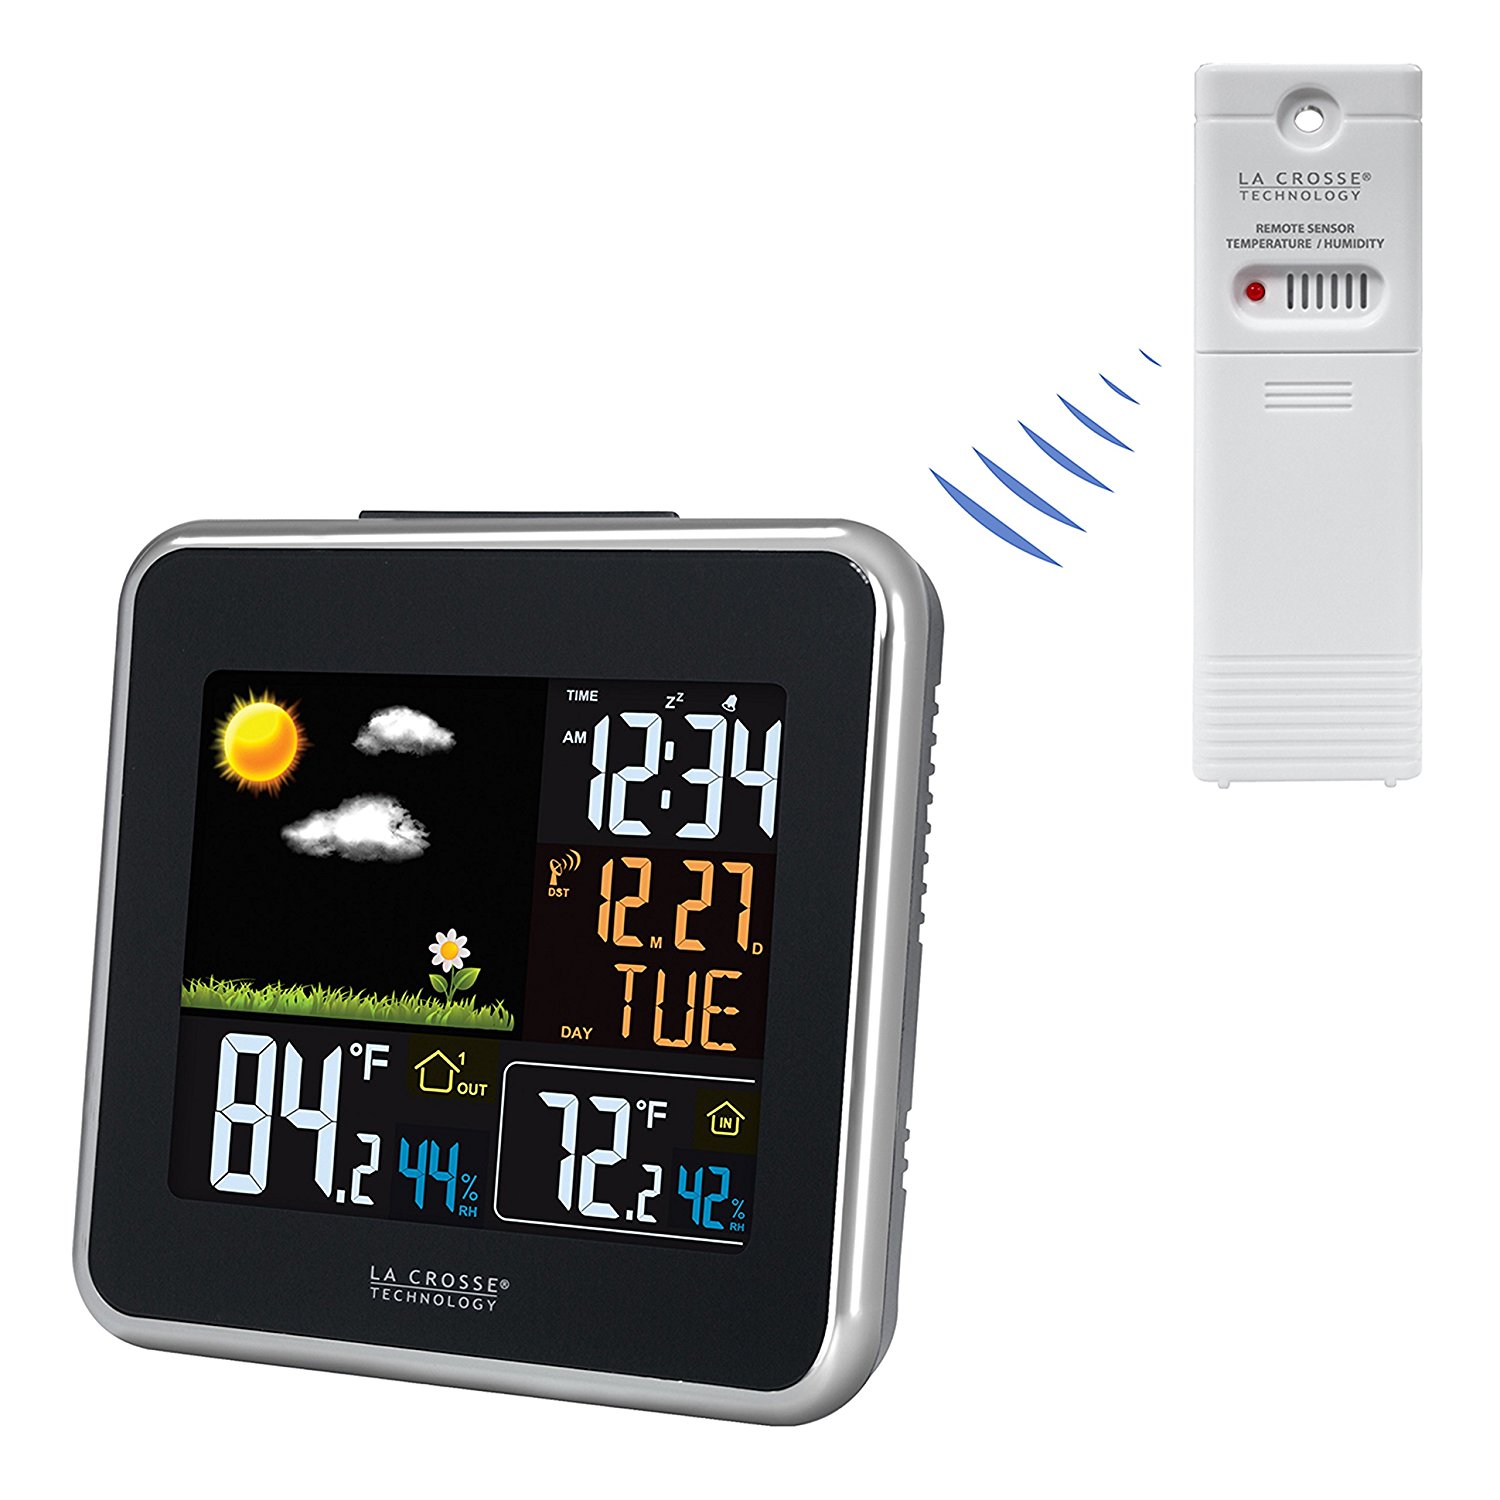
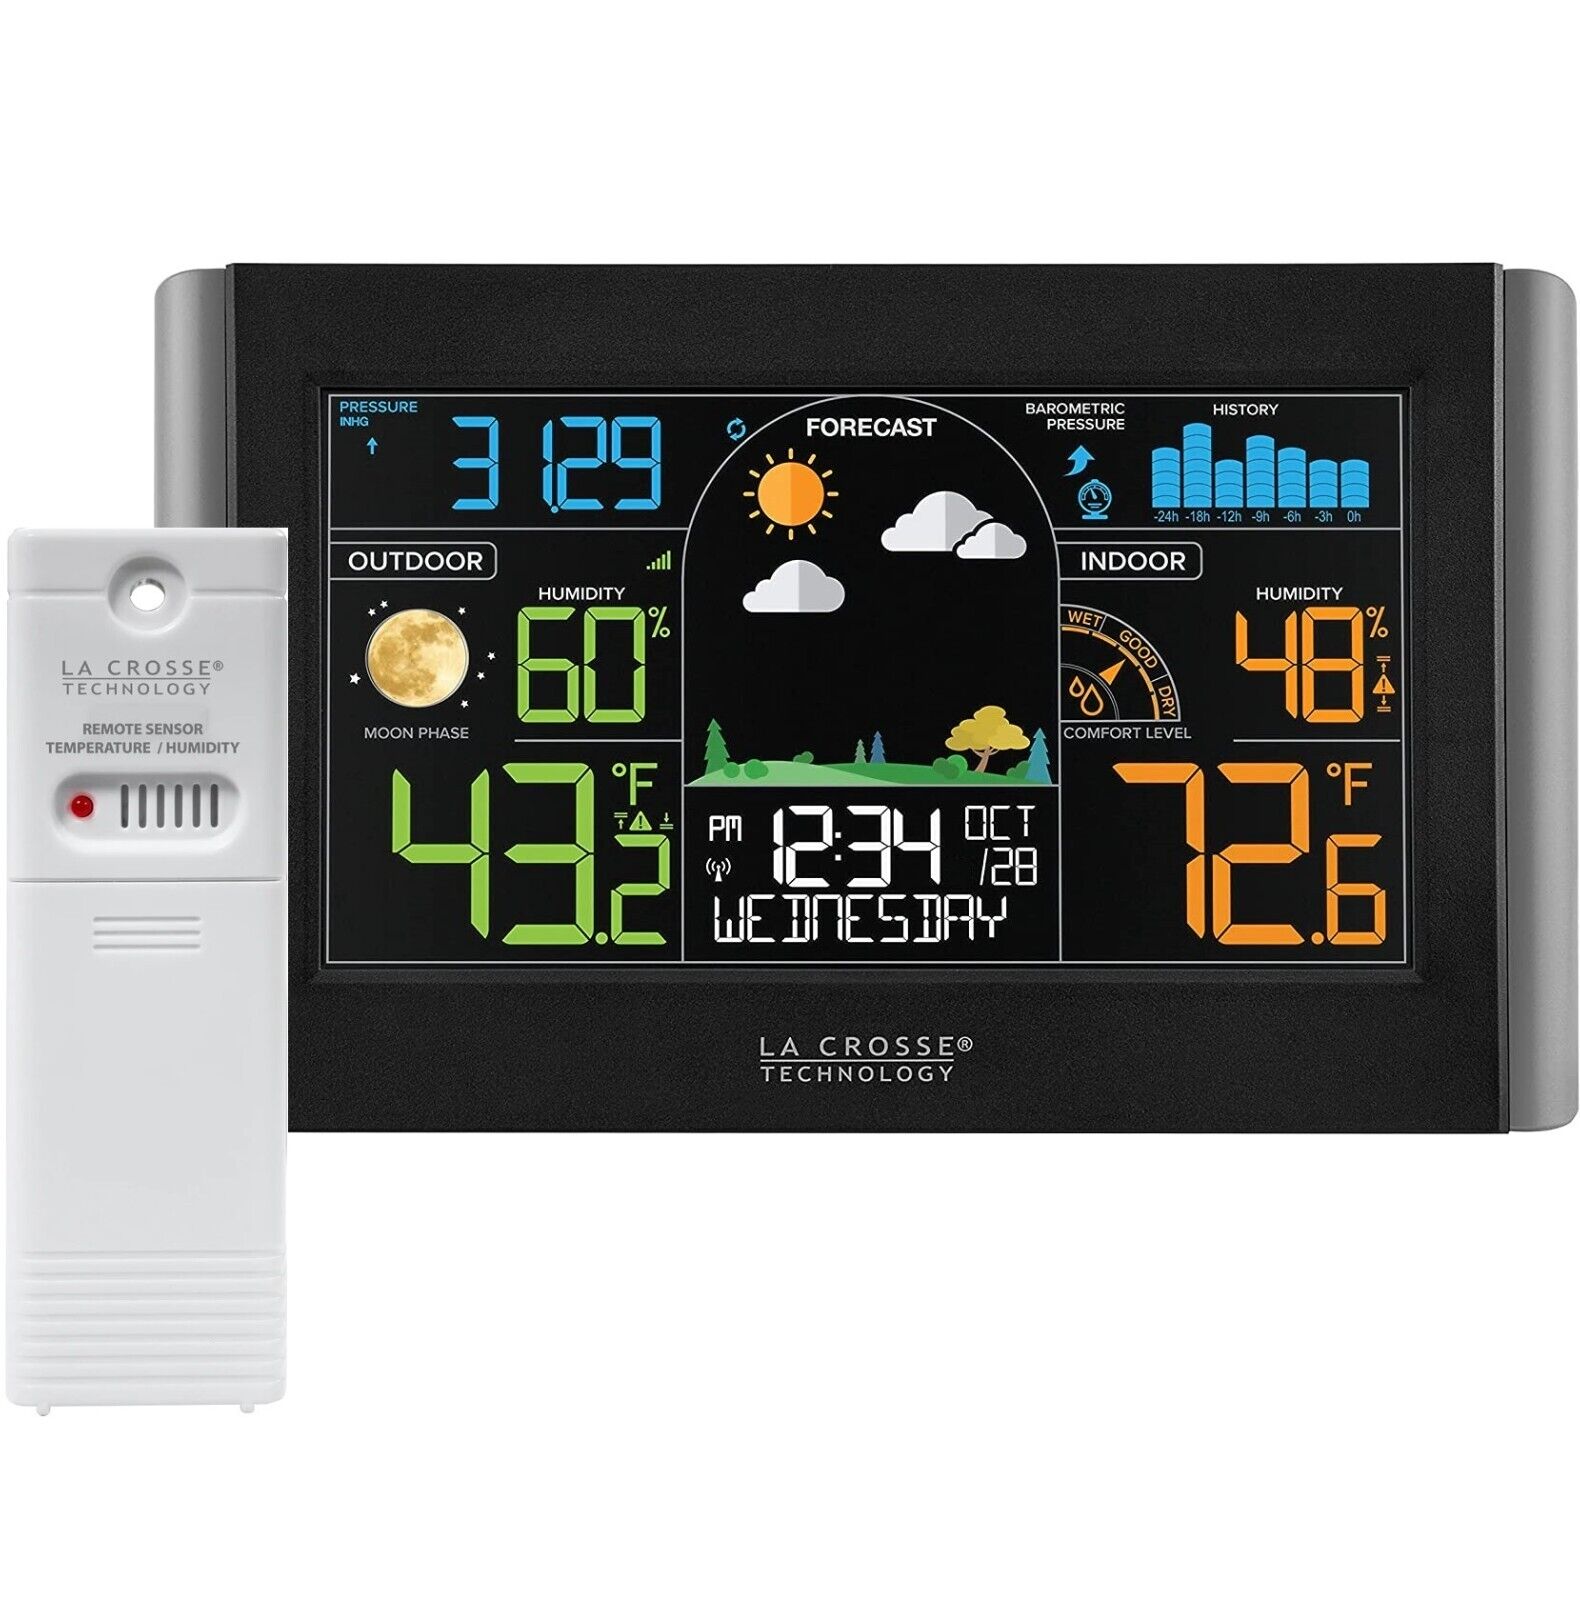
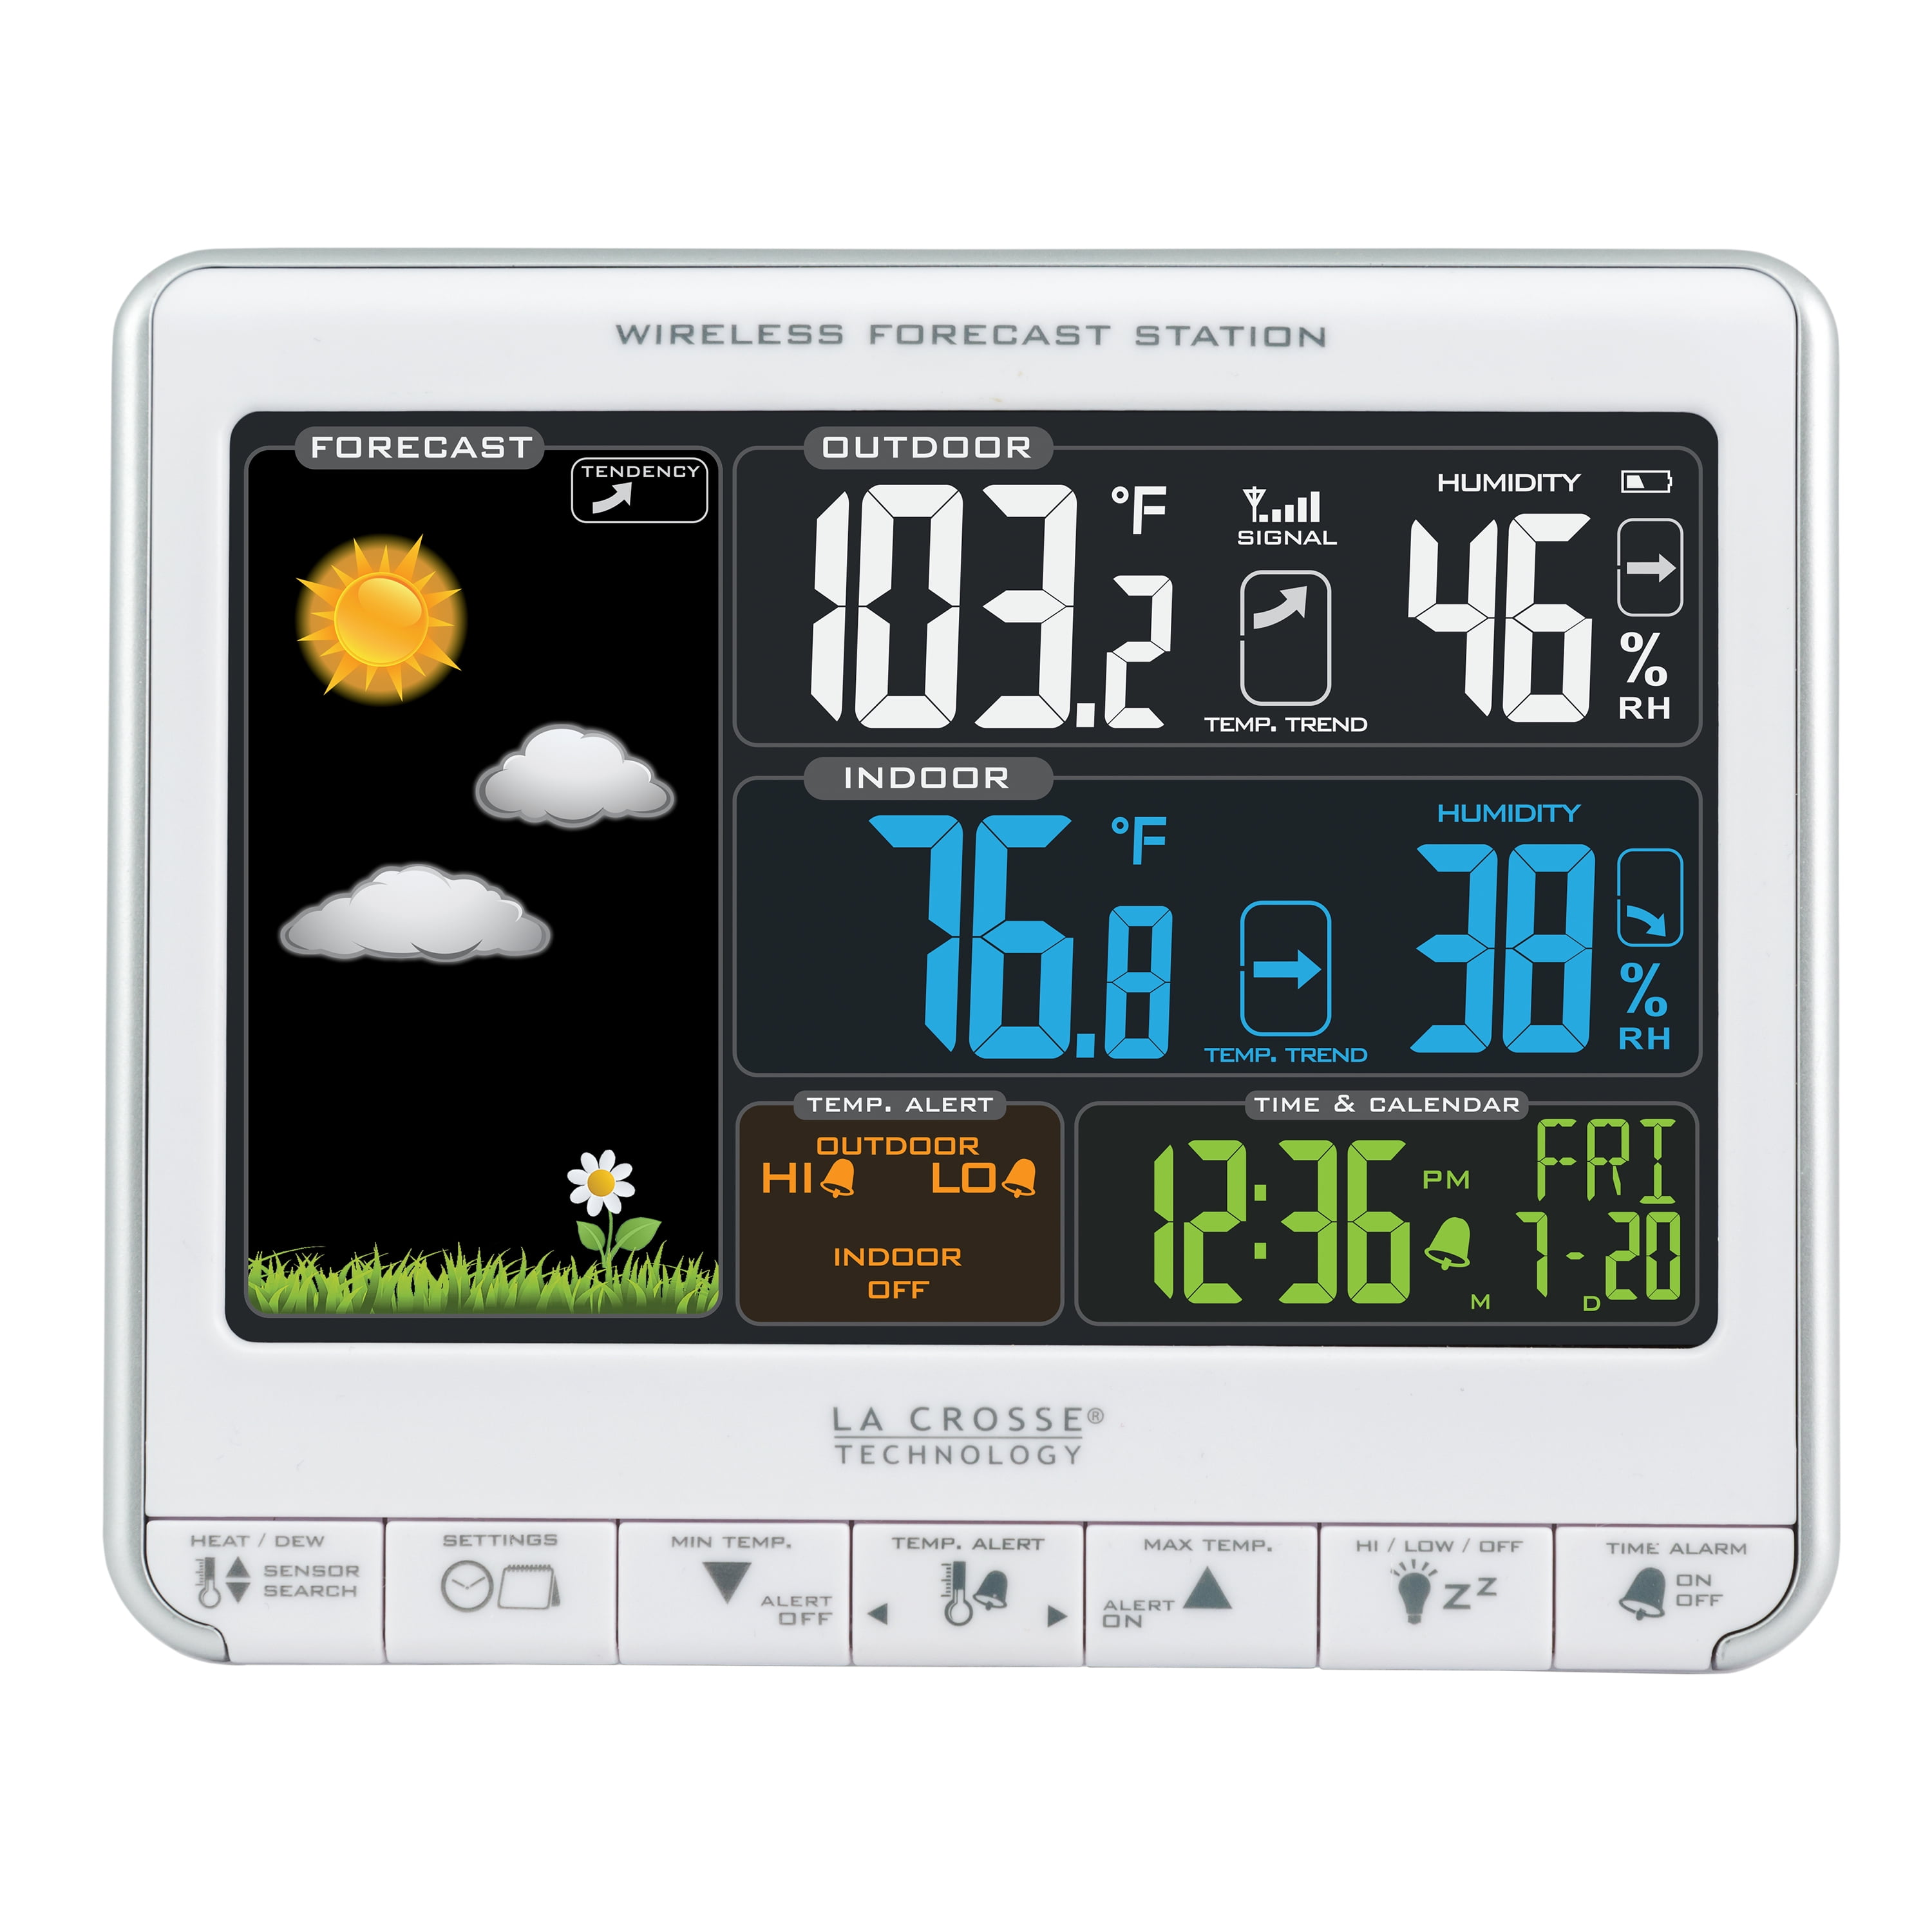
At a glance, your La Crosse weather station will display your location along with the current time, outdoor temperature and humidity. You’ll also see forecast icons, moon phase, graphs, and additional info like heat index and wind chill.
Data like daily rainfall, weekly UV index levels, and high/low records can be accessed by navigating the menus. Use the manual to learn what each section of the display means to get the most from the weather data.
Using Forecast and Trend Arrows
Those colorful sun, moon, cloud, and rain icons are more than just decoration – they represent the predicted short-term weather forecast. These will update throughout the day based on changing conditions.
Arrow trends are also very useful. Up arrows mean conditions are improving, down arrows indicate deterioration, while sideways arrows signify steady weather ahead.
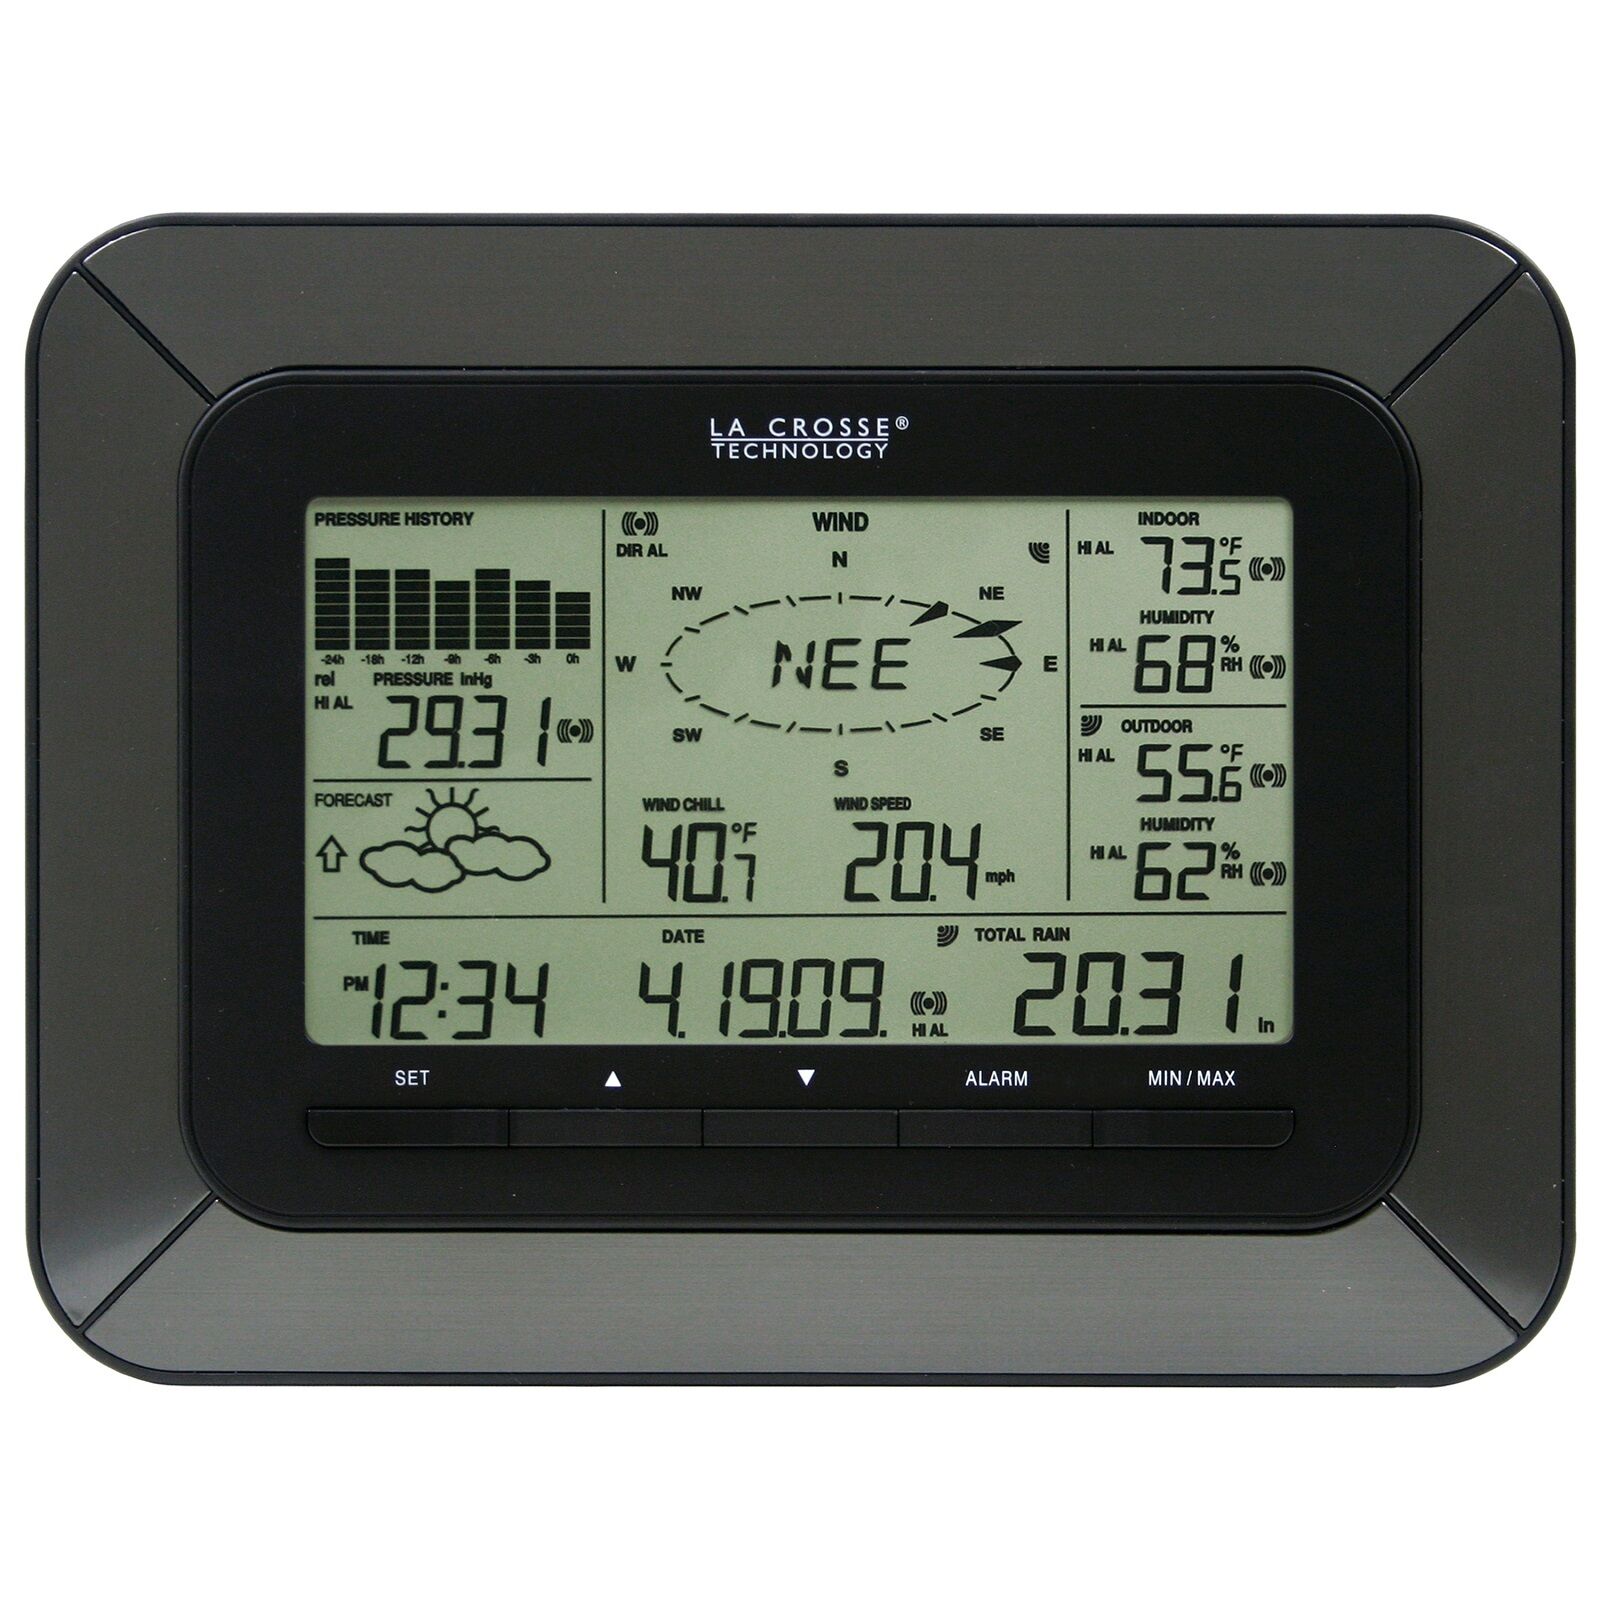
Reading Wind Speed and Direction
Monitoring wind conditions becomes possible with La Crosse weather stations that include detachable anemometers. These measure wind speed and transmit the data back to the display.
Wind direction is also tracked using compass bearings or cardinal directions. Keep an eye on gust speeds too for a better picture of wind conditions.
Monitoring Rainfall
Precipitation levels are measured with tipping bucket rain gauges, available on select La Crosse models. These have a seesaw mechanism that tips with each 0.01″ of rainfall, allowing very precise rain data.
The display will track rain rate by the hour, daily, weekly, monthly, and yearly totals. You can even view rain event histories and graphs to identify rainfall patterns.
Viewing Temperature and Humidity
You’ll always have current outdoor temperature and humidity levels shown on your La Crosse weather station. Max/min records store the highs and lows. Temperature is displayed in °F or °C.
An external thermo-hygrometer sensor with radiation shield measures conditions accurately. You can compare indoor and outdoor temperature and humidity too.
Checking Barometric Pressure
Changes in barometric pressure, measured in inHg or hPa, can indicate shifting weather. Rising pressure generally means improving conditions, while falling pressure often signals deteriorating weather.
Your La Crosse station monitors and graphs pressure data, along with relative pressure compared to previous points. Altitude compensation is included on select models.
Setting Alarms and Alerts
With a La Crosse weather station, you can configure alarms to go off for certain weather conditions. High/low temperature thresholds, humidity levels, wind chill, and more can trigger alerts.
Storm warning alarms use dropping pressure and temperature to warn of approaching severe weather. Setup audible alarms or flashing screen alerts so you can take action when needed.
Maintaining Your Weather Station
Like any equipment exposed to outdoor elements, your La Crosse weather station will need occasional maintenance. Replace batteries before each weather season. Clear debris from wind and rain sensors. Keep the display clean by dusting it gently.
At least once per year, thoroughly clean the outdoor sensor with a damp cloth to keep it running accurately. Consult the owner’s manual for sensor recalibration procedures as components age over time.
With proper care and placement, your La Crosse weather station will deliver years of reliable weather data and forecasting power. Let this guide help you tap into its full potential as your personal at-home weather center.
Unboxing a new La Crosse Technology weather station is an exciting experience! But before you can start monitoring the weather, you’ll need to unpack all the components and get everything set up properly. Here’s a step-by-step guide to smoothly setting up your new wireless weather station.
Unpacking and Setting Up Your Weather Station
When that long-awaited package from La Crosse Technology arrives at your door, you’ll be eager to tear into it right away! But hold those horses – setting up your weather station will be much easier if you first take a methodical approach to unpacking the box and identifying all the included components.
Start by carefully cutting open the tape on the box and unfolding the flaps. You may want to take a photo of the contents in their original packaging, for reference later. Remove any plastic bags, cardboard inserts, cable ties, or protective film from the various components.
You should find an instruction manual, quick start guide, or setup pamphlet included. Set this documentation aside for reference throughout the setup process. You’ll likely see a display console, outdoor sensor, power adapter cables, and mounting hardware.
Some higher-end models also include add-ons like anemometers for wind speed, rain gauges, UV/solar radiation sensors, and more. Verify you have each expected component before moving to the next steps.
Now comes the fun part – choosing installation locations! Pick a spot for the display console indoors near an electrical outlet, on a window sill or tabletop. Ensure the outdoor sensor can be mounted with an unobstructed view of the sky.
Avoid radiant heat sources like HVAC vents for the indoor console. Select a mounting location for the outdoor sensor away from trees or overhangs that could skew temperature, wind or rain data.
Once you’ve identified the ideal mounting locations, it’s time to fasten down the hardware. Use included screws to affix the outdoor sensor’s mounting bracket on a north-facing wall or pole, at least 5 feet above ground.
With planning and patience, you’ll have your new La Crosse Technology weather station components smoothly unpacked and arranged in no time. Now the real excitement begins – let’s move on to powering up the system!
What weather wonders will your La Crosse station reveal? As your personal weather center comes to life, you’ll have a window into atmospheric conditions no matter the forecast. Let your weather adventure begin!
Power is everything when it comes to getting your La Crosse weather station up and running. Let’s focus on charging any rechargeable batteries and installing fresh power cells to bring your station to life.
Charging and Installing the Batteries
Your outdoor sensor will operate on replaceable consumer batteries, while the display console may have a rechargeable battery built-in. Make sure you have a suitable battery or power source for each component before continuing.
For the outdoor sensor, open the battery compartment and insert new alkaline or lithium batteries per the instruction manual. Avoid rechargeable batteries, as they often have lower voltages that can impair sensor operation.
Check your console unit for a battery charging port. Plug this into an AC outlet using the included power adapter. Allow it to charge completely – this can take 12 hours or longer. The initial full charge is crucial to ensure proper performance and backup operation when disconnected from wall power.
As the console battery charges, take a moment to remove any plastic tabs that may be insulating the batteries for shipment. Make sure the contacts are clean and corrosion-free before inserting the batteries into the outdoor sensor.
Be mindful of proper battery polarity as you install them! Match the + and – markings on the batteries to the marked terminals inside the battery compartments. Inserting a battery backwards can damage the units.
Once the console battery is fully charged, you can operate it from the internal battery source alone and unplug the AC adapter if desired. Check the manual for the expected backup battery life during a power outage – usually around 24 hours.
For the outdoor sensor, replace the batteries once per year before heavy weather season. Choose name-brand, high-capacity cells from Energizer or Duracell. Avoid cheap generic batteries with lower amp-hour ratings.
With fresh power sources installed in both components, you’ve crossed another setup hurdle! Now sit back and let the batteries work their magic powering up your weather station.
Remember, always use quality alkaline batteries and keep spares on hand. Recharge and replace batteries regularly so you never miss a moment of weather monitoring!
Your outdoor sensor is the eyes and ears providing weather data to your La Crosse station. Properly mounting it is crucial for accurate measurements. Let’s explore outdoor sensor placement best practices.
Mounting the Outdoor Sensor
Choosing the right location is vital for your outdoor sensor. You’ll want an open, unobstructed spot allowing the sensor to monitor conditions in your surroundings.
Mount it vertically on a north-facing exterior wall or pole, at least 5 feet off the ground. This prevents radiant heat from the ground or nearby objects from skewing temperature data.
Make sure the sensor has an unimpeded view of the sky in all directions. Avoid placing it below overhangs or tucked under porches that could influence rain and wind readings.
Position it away from HVAC system vents, chimneys, pavement, and other heat sources that may radiate warmth and impact temperature accuracy.
Once you’ve identified the ideal spot, use the included mounting bracket and hardware to securely fasten the sensor. For mounting to a wooden pole, run screws through the bracket holes.
Use sturdy cable ties threaded through the bracket openings to attach to a metal pole or PVC pipe. Just be sure it’s solidly anchored and won’t wobble around in windy conditions.
Leave some slack in the sensor wiring so it’s not strained during installation. Seal any holes with caulk to prevent moisture ingress.
Take your time selecting the optimal sensor mounting location and physically securing it. Paying attention here will reward you with reliable, accurate outdoor weather data for years to come.
With monitoring of current conditions and logging of weather history, your outdoor sensor unlocks the full potential of your La Crosse weather station. Position it properly and let the weather insights begin!
A key step in completing your weather station setup is establishing communication between the outdoor sensor and the indoor display. Let’s get these two components paired up to start relaying weather data.
Connecting Your Sensor to the Display
Modern La Crosse weather stations use wireless transmission between the outdoor sensor and the indoor display console. This allows flexible placement without running cables between the units.
In most models, the sensor and display will be pre-paired at the factory. But if needed, you can manually sync them up via a button-press sequence on both components.
Consult your instruction manual for the proper syncing method for your specific model. Often, you’ll press and hold a “Channel” or “Sync” button on the sensor and display simultaneously for a few seconds to initiate linking.
During this sync process, keep the two units 3 to 6 feet apart for optimal wireless coupling. Watch for a confirming beep, light flash, or on-screen message when pairing is complete.
If the outdoor sensor data doesn’t immediately begin displaying on the indoor console, repeat the sync process. Make sure fresh batteries are installed in the sensor. Move the units closer together temporarily to improve the radio link strength.
With one-time syncing, the sensor and display will remain wirelessly paired going forward. The sensor continuously relays temperature, humidity, wind, rain, and other readings back to the indoor console.
Wireless syncing prevents running long cables and allows flexible sensor placement for optimal weather data. With just a button press or two, your La Crosse weather insight is unleashed!
When display and sensor communicate clearly, you gain a window into hyperlocal weather. Let the wireless pairing usher in new possibilities for monitoring the elements right at your own residence!
Setting the Time and Date
Placing the Outdoor Sensor
Connecting the Sensor
Mounting the Display Console
Interpreting the Data
Calibrating and Troubleshooting
Now you can set up your La Crosse weather station like a pro! Just take it step by step using the detailed guidance provided above. In no time, you’ll have current weather conditions at your fingertips. Whether you’re a meteorology buff, gardening enthusiast or just weather curious, a quality station like La Crosse provides tons of fascinating atmospheric data to explore right at home. Happy forecasting!
Customizing Your Weather Station Settings
Connecting to Your Smart Home
Exploring Add-On Sensors
And there you have it – everything you need to set up, customize, connect and accessorize your La Crosse wireless weather station! Follow this advice and you’ll be a meteorological pro in no time. Stay tuned for advanced tips on data interpretation, trend analysis and forecasting inferences. The journey is just getting started!
Interpreting the Weather Data
Using Data for Forecasting
Using Trends and Patterns
There you have it – everything you need to start making sense of the wealth of weather data coming your way courtesy of your La Crosse weather station. From real-time readings to forecasting to long-term trends, the insights are endless. Happy analyzing!
Using Forecast and Trend Arrows
Using Vector Arrows
Using Moon Phase Display
There you have it – a guide to interpreting your La Crosse weather station’s forecast icons, trend arrows, wind vector and moon phase displays. These visual indicators provide helpful at-a-glance insights for both short term and long term patterns. Check them often to become a backyard forecasting expert!
Reading Wind Speed and Direction
Reading Wind Chill
Anemometer Maintenance
So now you’re a pro at extracting every iota of weather intelligence from your La Crosse station’s extensive wind data. Speed, direction, chill and vane – track it all to become a master of your hyperlocal winds!
Monitoring Rainfall
Monitoring Humidity
Monitoring Air Pressure
There you have it – a detailed overview of tapping into your La Crosse weather station’s bountiful rainfall, humidity and pressure data. These readings all provide pivotal pieces of the forecasting puzzle.
Viewing Temperature and Humidity With Your La Crosse Technology Wireless Weather Station: A 15-Step Guide
Got a new La Crosse Technology wireless weather station and want to get the most out of it? This handy gadget can tell you so much more than just the temperature outside. With a few easy steps, you’ll be on your way to monitoring indoor and outdoor conditions like a pro.
Let’s start with the basics: how to view the current temperature and humidity readings. Here’s a simple 15-step guide to walk you through it:
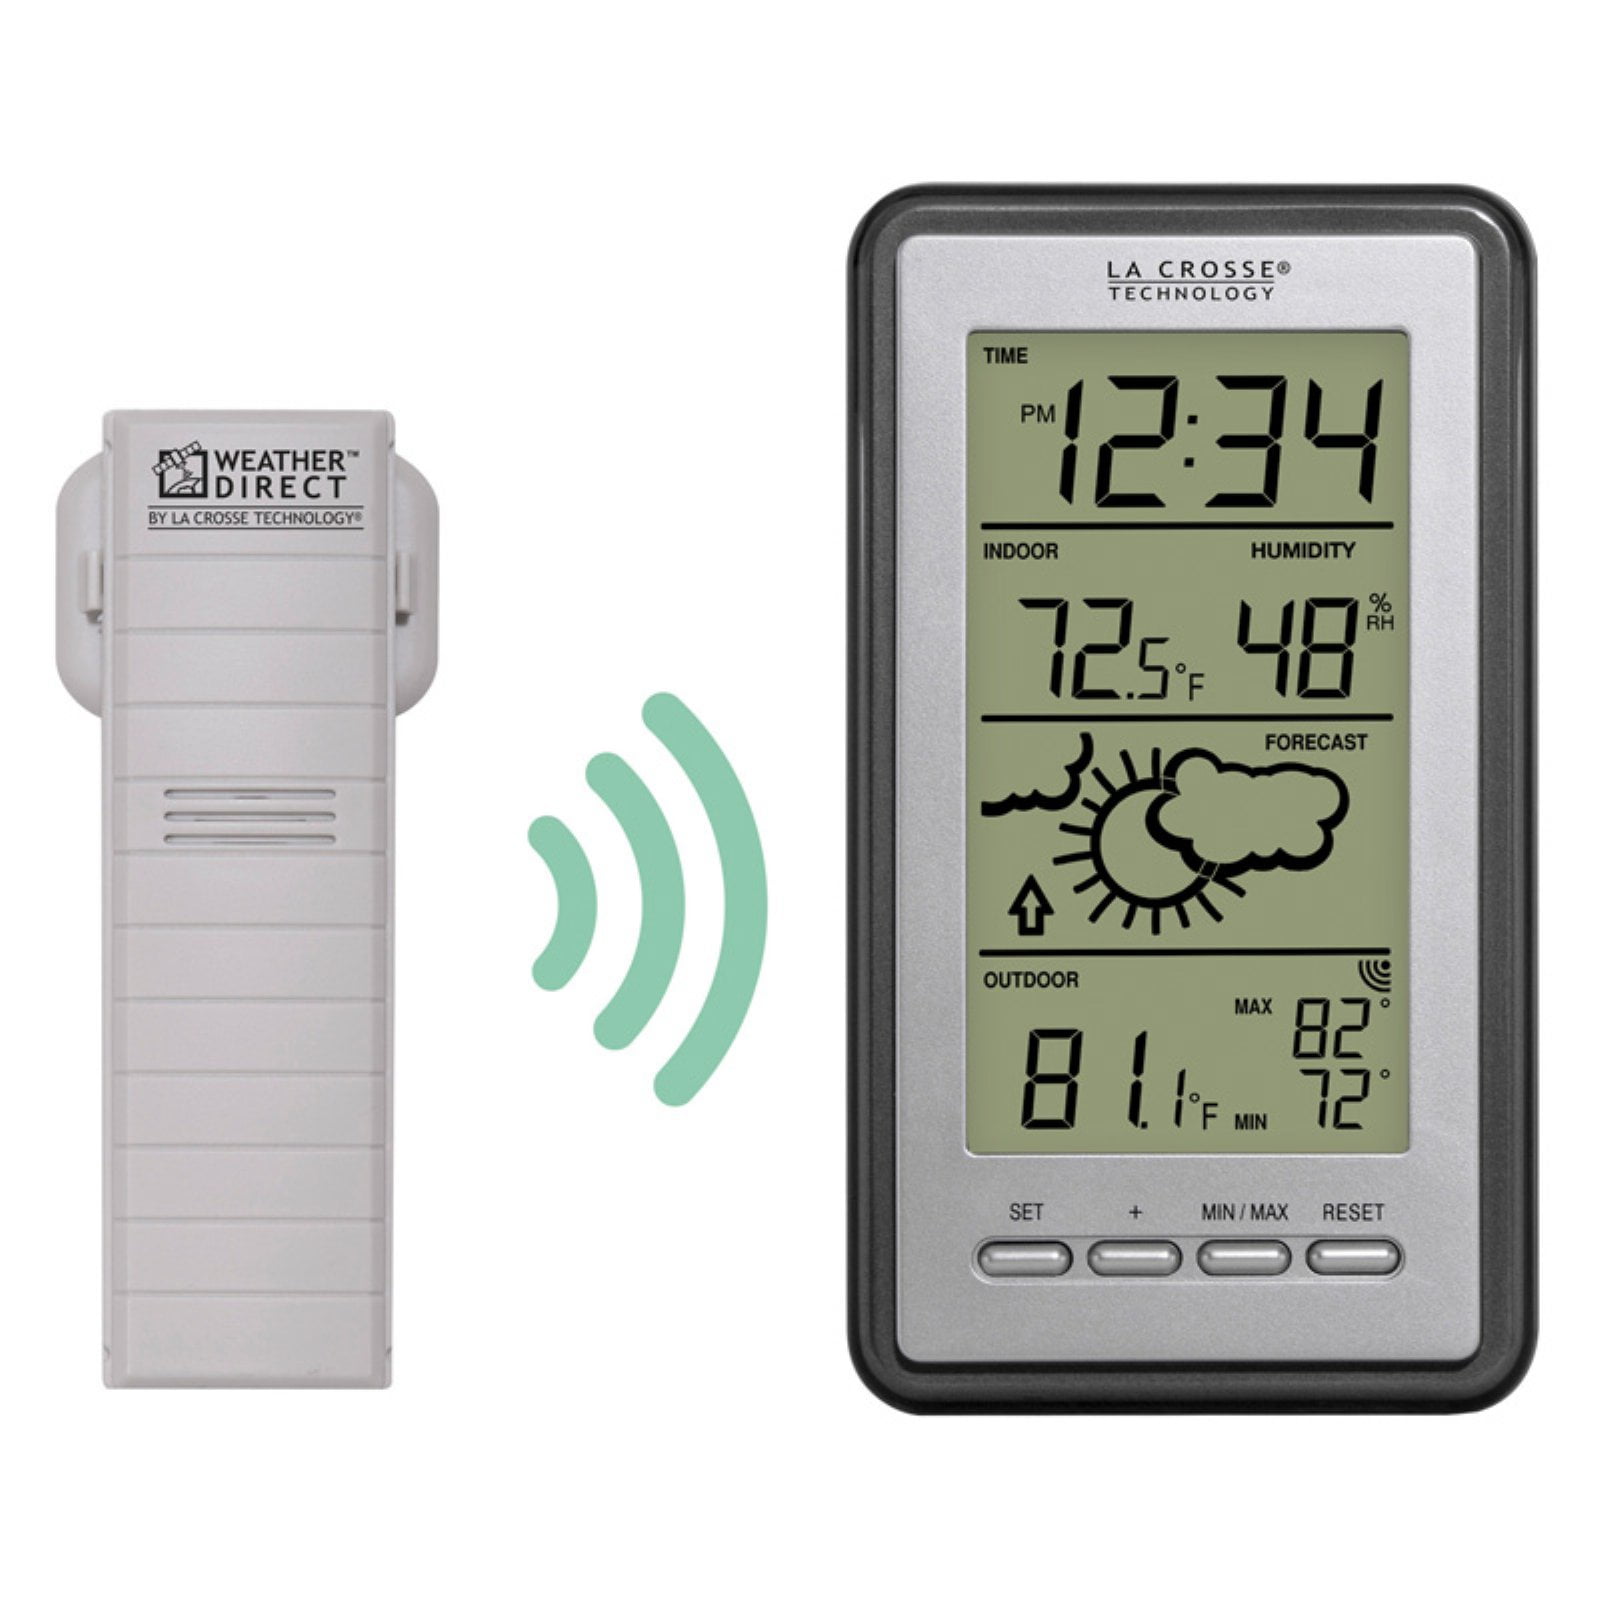
- Unbox your La Crosse wireless station and locate the outdoor sensor. This is the small unit with an antenna that transmits data to the indoor display.
- Find a suitable location to place the outdoor sensor, like an open area of your backyard. You want good exposure to sun and wind but avoid direct heat sources.
- Secure the sensor in place using the provided mount or screws. The transmission range is over 300 feet but closer is better.
- Insert 2 AAA batteries into the sensor. Check that the LED light flashes when the batteries are installed.
- Bring the indoor display unit inside and insert 3 AAA batteries into the battery compartment.
- After a minute, the outdoor temperature and humidity readings should display on the screen automatically.
- If they don’t show up, press the “CHANNEL” button on the back to cycle through sensor channels until data appears.
- To toggle between Celsius and Fahrenheit, press the round “C/F” button below the display.
- To view indoor conditions, simply place the display unit in the location you want to monitor.
- Press the “IN/OUT” button below the display to toggle between indoor and outdoor readings.
- The indoor temperature will be measured right on the display unit while the outdoor data comes from the sensor.
- To see humidity levels, press the round “%/” button below the temperature reading.
- This will cycle between showing indoor and outdoor humidity percentages.
- Low battery icons mean it’s time to replace the AAA batteries in the unit or sensor.
- Use the “ALERT” button to set temperature and humidity range alerts which will trigger beeping sounds.
- Refer to the full manual for advanced features like forecasts, moon phase, PC connectivity, and more.
With those basics covered, you’ll now be able to monitor current conditions for indoor and outdoor temperature and humidity. Place the sensor in different locations around your home to compare readings.
Here are some tips to get the most accurate data:
- Allow up to one hour for the outdoor sensor to acclimate to the environment when first setting up.
- Clean rain or dirt buildup on the sensor to avoid interfering with the hygrometer readings.
- Periodically calibrate the indoor and outdoor readings with a known-accurate thermometer.
- Keep the sensors out of direct sunlight and away from radiant heat sources.
With the La Crosse wireless weather station, you’ll always know the temperature and humidity conditions inside and outside your home. You can even track trends and patterns by recording data over time. Place temperature and humidity sensors in multiple locations to compare conditions.
These gadgets are relatively easy to set up but offer tons of useful information. With the basics covered, dive into the manual to explore advanced features. Soon you’ll be a weather monitoring expert!
Checking Barometric Pressure With Your La Crosse Technology Wireless Weather Station
A handy feature of La Crosse Technology wireless weather stations is the ability to monitor barometric pressure right on the indoor display. This can provide useful insights into upcoming weather patterns.
Here is a quick guide to help you find and understand the barometric pressure readings:
- Locate the “BAR” button below the main display on your La Crosse wireless station.
- Press this button to cycle through the various data readings.
- When “BAR” is displayed on the screen, you will see the current barometric pressure.
- The pressure will be shown in inches of mercury (inHg) or millibars, depending on your unit’s settings.
- Typical pressure readings range from about 29.50 to 30.50 inHg at sea level.
- To interpret the barometric pressure, you need to look for the trend not the absolute number.
- Rising pressure usually indicates improving weather conditions, while falling pressure typically means deteriorating conditions.
- Quickly falling pressure may signify an approaching storm system with rain or snow.
- The rate of change can help determine the intensity – a sharp drop over 3+ hours often means a potent storm.
- Keep a log of pressure readings over time to establish a baseline for your location.
- Compare current readings to recent ones to spot significant changes up or down.
- Combine barometric pressure data with wind, temperature, and humidity readings for the most accurate forecasts.
- Adjust for your altitude – pressure decreases as you rise in elevation so mountain readings will be lower.
- Calibration to a local weather station can improve accuracy if the sensor is off.
- Replace batteries annually so sensor degradation doesn’t impact pressure accuracy.
Here are some examples of what different barometric pressure readings may indicate:
- Rapid pressure drop: Storm system approaching, gale force winds
- Gradual falling pressure: Deteriorating conditions, rain/snow likely
- Level steady pressure: Fair weather for the near term, status quo
- Slow rising pressure: Conditions improving, precipitation ending
- Sharp pressure rise: Clear and sunny weather ahead
Beyond forecasting, tracking barometric pressure can also provide climate insights and identify altitude changes when traveling or hiking into elevations with lower air pressure.
Here are some tips for maximizing the accuracy of your wireless weather station’s pressure sensor:
- Avoid placing near heat sources that could warm the sensor and impact readings.
- Keep the unit out of direct sunlight which can cause false high-pressure readings.
- Close doors and windows to ensure stable indoor temperature when checking indoor pressure.
- Allow sufficient time for indoor and outdoor readings to stabilize when sensors are moved.
- Compare pressure against a known-accurate barometer periodically to calibrate if needed.
With a basic understanding of how to read barometric pressure and spot trends, your La Crosse Technology wireless weather station becomes an even more powerful forecasting tool.
Monitoring pressure alongside humidity, wind, and temperature readings can paint a detailed picture of developing weather conditions. This allows you to plan accordingly and become your own local meteorologist.
So unlock the forecasting power of air pressure data from your wireless weather station. With barometric pressure on your side, you’ll always have an edge in knowing what weather is headed your way.
Setting Alarms and Alerts on Your La Crosse Technology Wireless Weather Station
Want your La Crosse wireless weather station to actively notify you when certain weather conditions occur? The alert and alarm capabilities let you program the device to beep when thresholds are crossed for things like temperature, humidity, wind, and more.
Here is a quick guide to setting up alerts and alarms on your weather station:
- Locate the “ALERT” button on the front or back of the indoor display unit.
- Press and hold this button for 2-3 seconds to enter alert setup mode.
- The alert icon will start flashing and you can use the arrow keys to select the parameter to set an alert for.
- Options may include indoor/outdoor temperature, humidity, wind speed, pressure, etc.
- Press the + and – keys to set the alert threshold value for the selected parameter.
- For example, high 80°F for outdoor temperature or low 30% for indoor humidity.
- The station will beep when measurements exceed your defined high or low limits.
- Press the “ALERT” button again to confirm and activate the alarm.
- The alert icon will remain solidly lit to indicate active alerts.
- To set additional alerts, repeat the process choosing other parameters.
- Up to 10 total alarms can be programmed across all weather metrics.
- When an alert is triggered, the station will beep for 2 minutes and flash the alert icon.
- Press any button to silence the alarm which remains ready to re-trigger when conditions exceed limits again.
- To cancel an alert, enter the setup menu and press + and – together when the parameter is selected.
- Clear all alerts at once by holding “ALERT” for 5+ seconds until the icon disappears.
Here are some examples of handy weather alerts you can configure:
- High temperature – Warm outdoor or indoor temps
- Low temperature – Cold outdoor or indoor temps
- High humidity – Uncomfortably humid indoor air
- Low humidity – Very dry indoor air
- High wind speed – Dangerous winds or storms
- Low pressure – Approaching storms/fronts
- Pressure drop – Rapidly falling pressure
When setting alert values, consider these tips:
- Add a buffer of 3-5 degrees for temperature alerts to avoid frequent alarms.
- Set humidity alerts closer to the high/low limits for your comfort zone.
- Calibrate sensors before using pressure alerts to ensure proper baseline.
- Start conservative with wind speed alerts based on your location’s typical range.
Alerts are handy for both monitoring developing weather conditions and keeping your environmental conditions within a preferred range. Other examples include:
- Monitor indoor temperatures for pets while away
- Prevent pipes from freezing by alerting before temps drop too low
- Get notified if outdoor party weather becomes rainy
- Be alerted to open windows/doors when indoor humidity spikes
- Know when outdoor conditions are unsafe for pets
Get in the habit of checking alerts periodically as outdoor conditions and seasons change. Adjust values and add new alerts as needed to stay informed.
Notifications from your La Crosse wireless weather station allow you to stop guessing and stay on top of temperature, humidity, wind, pressure, and more. Configure it to your specific needs and let the built-in alarms actively keep you informed of changing weather and environmental conditions.
Maintaining Your La Crosse Technology Wireless Weather Station
To keep your wireless weather station operating at peak accuracy and reliability, it’s important to follow a few maintenance best practices.
Here are some tips for proper care and upkeep of your La Crosse Technology weather monitoring system:
- Replace batteries annually – Use reputable alkaline batteries and set a reminder to swap out yearly.
- Check battery compartments – Look for corrosion or leaks which can damage the electronics.
- Clean sensors monthly – Use a soft cloth to gently wipe the temperature/humidity sensors to avoid buildup.
- Inspect sensor casing – Ensure the outdoor sensor remains securely closed to protect the inner components.
- Calibrate annually – Compare readings to a known-accurate thermometer and hygrometer and adjust as needed.
- Update firmware – Check the vendor’s website and update firmware when new versions are released.
- Re-sync sensors – If readings seem off, press the sync button to re-establish connections.
- Inspect connections – Verify cables and wires are still securely plugged into the devices.
- Check for interference – Ensure the sensors aren’t located directly next to electronics that could cause interference.
- Confirm sensor line of sight – Verify the outdoor sensor has unobstructed transmission path to the display.
- Lubricate moving parts – Use a small amount of graphite powder or lubricant on any sticky moving components.
- Check for insect nests – Ensure bugs haven’t nested inside casing and clogged ventilation openings.
- Test transmission range – Move the sensor progressively farther away to confirm the maximum functional range.
Additionally, here are some maintenance steps when preparing for seasonal changes:
- Spring – Clear debris from gutters to avoid overflow issues when rains arrive.
- Summer – Trim back nearby trees/shrubs to allow good sun exposure to the sensors.
- Fall – Clean gutters again prior to autumn leaf buildup.
- Winter – Add anti-icing spray to sensors to prevent frozen precipitation from accumulating.
Proper weather station siting is also important for accuracy:
- Mount outdoor sensor away from radiant heat sources like asphalt or concrete.
- Avoid positioning near structures that could impact wind and rain measurements.
- Elevate sensor array to avoid snow buildup and improve wireless range.
- Ensure indoor display is not near heating/cooling vents or direct sunlight.
Troubleshooting issues when they first appear can prevent bigger problems down the road. Reference the instruction manual for sensor recalibration procedures, recommended battery voltages, and interpreting error codes.
Document all maintenance in a logbook with dates, details of work completed, and any pertinent observations. This provides helpful records should issues later occur.
With proper annual maintenance and cleaning, a quality La Crosse wireless weather station should provide many years of reliable data. But periodic care and attention is key.
By following these tips, checking for problems, updating components, and ensuring proper siting, your weather station will function optimally. Take a hands-on approach to regular upkeep and your weather monitoring station will maintain peak accuracy and performance.


