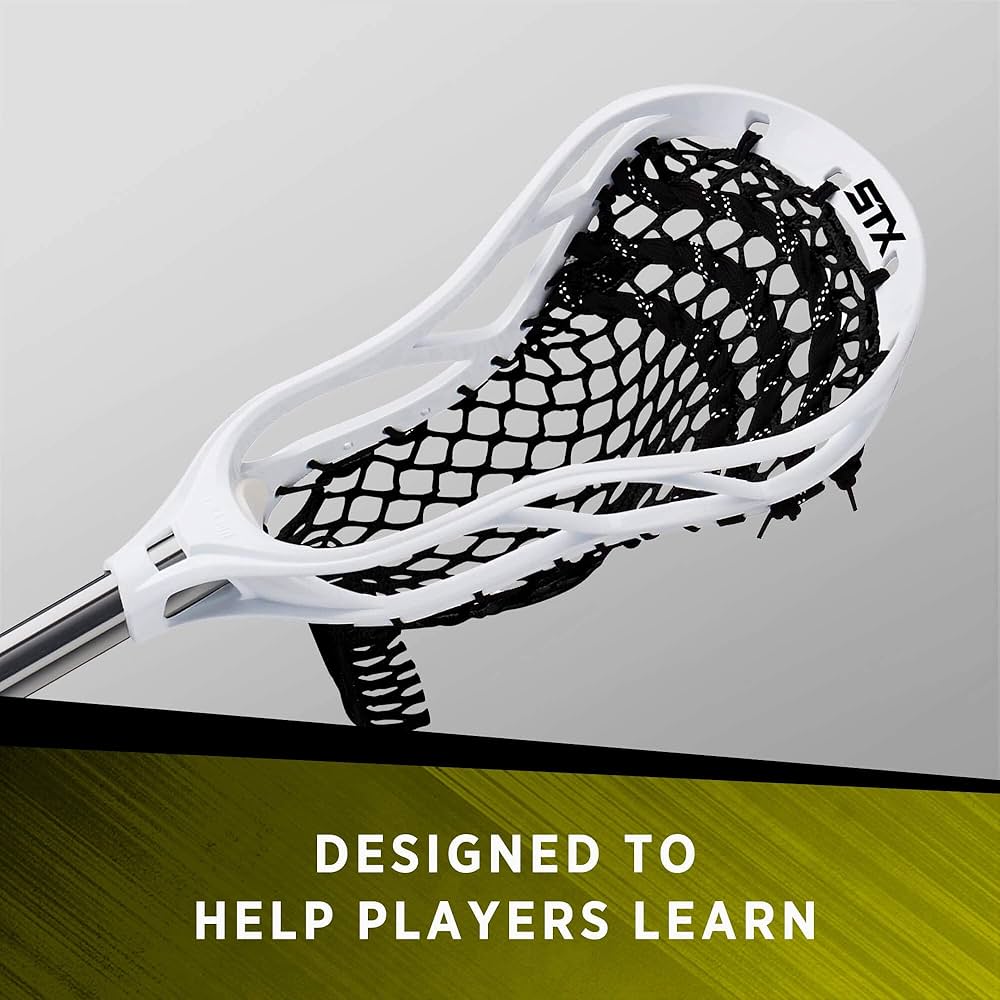
How To String a Lacrosse Goalie Head For Maximum Performance in 2023How To String a Lacrosse Goalie Head For Maximum Performance in 2023
Researching Different Semi-Hard Goalie Mesh Options
When it comes to stringing a lacrosse goalie head, one of the most important choices is selecting the right semi-hard goalie mesh. The mesh acts as the pocket that cradles the ball, so you’ll want to find an option that complements your playing style and provides the control, durability, and release you need. Many players swear by popular brands like ECD and Hero Mesh for their high-quality materials, consistency, and performance. But with so many types of goalie mesh out there, how do you determine what’s best for your needs?
The shape and size of the mesh pieces can impact pocket shape, hold, and flexibility. Do you want a mid-high pocket or more of a mid-low setup? How much whip and break-in do you prefer? Pieces that run 10 diamonds wide or more are a popular choice. You’ll also want to think about diamond size – larger diamonds tend to be stiffer while smaller diamonds create more hold and adjustability. Dense polyethylene and nylon-blend meshes like Hero Mesh tend to hold their shape extremely well while providing great feel. ECD meshes incorporate unique textures and coatings for excellent durability and water-resistance.
You may want to experiment with different goalie mesh brands and types during the stringing process. See how the materials respond to string pull forces and how they break-in over time. It’s often wise to observe what the top goalies are using and why before making a choice. Keep in mind your restringing costs too. The better the quality, the longer the mesh will maintain its integrity. With the right semi-hard goalie mesh selection as your starting point, you’ll be on your way to stringing up a pocket that takes your game to the next level.
Selecting the Right Goalie Stringing Kit

Once you’ve chosen the best goalie mesh for your playing needs, the next crucial step is selecting a high quality stringing kit. Your kit should contain all the essential components needed to string your head for optimal performance. The shooting strings in particular should be heavy nylon cords that won’t lose tension or degrade from repetitive impact. For the sidewall and cross-lacing strings, you’ll want sturdy options that will hold up to abuse while allowing for tension adjustments.
Pre-packaged goalie stringing kits offer everything you need for standard string jobs in one convenient package. They typically include 20 to 30 yards of high strength shooting string, 10 to 20 yards of softer goalie lace for the sidewalls and cross-lacing, wooden or plastic sidewall stringing needles, and Crimped Metal and Coated Stopper Strings to finish off the sidewalls. The best kits provide the highest grade materials from trusted brands like JimaWAX, Thruster, and Longstreth. This ensures even goalies who wring every ounce of velocity from their shots won’t experience premature string breakage.
For veteran stringers doing more elaborate string jobs, it may make sense to purchase bulk rolls of string rather than pre-packaged kits. This allows you to fully customize your setup with the exact shooting strings, sidewall strings, stoppers, and accessories you prefer. Popular options like hockey laces and lacrosse shooter strings provide a range of flexibility and performance. You’ll also want to stock up on high quality stringing needles in various configurations to effortlessly weave the sidewall and cross-lacing patterns. Take an inventory of what’s already in your stringing toolbox and then order precisely what’s needed to optimize your next stringing project.
With the right goalie stringing supplies, you’ll be able to restring sticks as often as needed and experiment with different pocket placements and shooting string configurations. Be sure to focus on precision and consistency each time you string. Take it from the professionals – the right tools and materials make all the difference in crafting a pocket that truly maximizes your on-field potential.
Learning Proper Stringing Techniques

Stringing a lacrosse goalie head requires learning specialized techniques to end up with a high-performing pocket. While a strong stringing kit is essential, you also need to understand proper stringing methods to get the most out of your mesh and materials. There are many considerations when it comes to goalie stringing patterns, including the top string, sidewalls, cross-lacing, and shooters.
One of the most popular goalie head top string patterns is the 10 diamond configuration. This creates excellent ball control and hold since the diamonds cradle and cup the ball well within the pocket. Start by anchoring the top string at each sidewall hole. Then string a diamond pattern, pulling each string so it’s tensioned evenly. Keep the diamonds uniform in size for consistency. You can also experiment with a 9 diamond or 6 diamond pattern to change flex and pocket shape.
The sidewalls help determine overall pocket structure, placement, and depth. Use a sturdy stringing material and string from each sidewall hole to its corresponding partner across the head, crisscrossing in the center. Tight sidewalls allow for a more defined pocket shape and snappy releases while looser sidewalls create a deeper pocket with more hold. Use stringing needles to neatly weave and tension each sidewall string.
Cross-lacing refers to the horizontal laces that connect the sidewall strings and run perpendicular to them. These should be evenly spaced in a ladder-like configuration and serve to further define pocket shape. Start from near the scoop and work downwards. Pull each cross-lace taut as you string to optimize pocket placement. The cross-laces also allow the pocket to maintain its integrity over time.
Finally, installing a straight shooter running from the throat of the head up through the middle of the pocket is key for adding velocity and precision. Place it in the optimum shooting sweet spot for your head’s flex profile. You may also consider adding a second nylon shooter. With the right techniques, you’ll be able to string a pocket with the exact performance characteristics your game demands.
Customizing Stringing Patterns
- Mesh shape and size
- Pocket depth preference (mid-high or mid-low)
- Desired level of whip and break-in time
- Diamond size and count
- Material composition (e.g., polyethylene, nylon blends)
Larger diamonds typically offer more stiffness, while smaller diamonds provide enhanced hold and adjustability. Dense polyethylene and nylon-blend meshes, like those offered by Hero Mesh, excel in maintaining shape and offering excellent feel. ECD meshes often feature unique textures and coatings for superior durability and water resistance.
Experimenting with Different Mesh Types
To find the perfect mesh for your playing style, consider experimenting with various brands and types during the stringing process. Observe how different materials respond to string tension and break in over time. It’s also beneficial to research what top goalies are using and understand their reasoning behind their choices.
Keep in mind that higher quality mesh often comes with a higher price tag but can provide long-term benefits in terms of performance and durability. Investing in premium mesh can reduce the frequency of restringing and maintain pocket integrity for extended periods.
Essential Components of a High-Quality Goalie Stringing Kit
After selecting your ideal goalie mesh, the next crucial step is assembling a comprehensive stringing kit. A well-equipped kit should contain all the necessary components to string your head for optimal performance. Let’s explore the key elements of a high-quality goalie stringing kit:
Shooting Strings
Shooting strings play a vital role in pocket formation and ball release. Look for heavy nylon cords that can withstand repetitive impact without losing tension. These strings should be durable enough to maintain their integrity even under intense play conditions.
Sidewall and Cross-Lacing Strings
Choose sturdy options for sidewall and cross-lacing strings that can endure abuse while allowing for tension adjustments. These strings are crucial for shaping the pocket and determining its overall performance characteristics.
Stringing Needles
High-quality wooden or plastic sidewall stringing needles are essential tools for weaving intricate patterns. Having a variety of needle configurations will help you navigate different stringing techniques with ease.
Stopper Strings
Crimped metal and coated stopper strings are used to finish off the sidewalls and secure the pocket in place. These small but crucial components ensure your stringing job remains intact during intense gameplay.
Pre-packaged goalie stringing kits from reputable brands like JimaWAX, Thruster, and Longstreth often provide all these components in one convenient package. For more experienced stringers looking to customize their setups, purchasing bulk rolls of string and individual components may be a preferable option.
Mastering Essential Goalie Head Stringing Techniques
Understanding and implementing proper stringing techniques is crucial for creating a high-performing goalie pocket. Let’s delve into some key aspects of goalie head stringing:
Top String Patterns
The top string pattern plays a significant role in ball control and hold. One popular configuration is the 10-diamond pattern, which excels in cradling and cupping the ball within the pocket. To create this pattern:
- Anchor the top string at each sidewall hole
- String a diamond pattern, ensuring even tension throughout
- Maintain uniform diamond sizes for consistency
Experimenting with 9-diamond or 6-diamond patterns can also yield interesting results, potentially altering the pocket’s performance characteristics.
Sidewall Stringing
Proper sidewall stringing is essential for achieving the desired pocket depth and shape. When stringing the sidewalls:
- Start from the top and work your way down
- Use consistent tension to avoid distorting the mesh
- Incorporate knots and skips to create specific pocket formations
- Pay attention to how tight or loose each row affects the overall pocket shape
Optimizing Pocket Depth and Ball Release
The depth and shape of your goalie pocket significantly impact your ability to make saves and clear the ball effectively. Let’s explore how to optimize these crucial aspects:
Finding the Right Pocket Depth
The ideal pocket depth for a goalie head strikes a balance between ball retention and quick release. To achieve this balance:

- Experiment with different sidewall string tensions
- Adjust the bottom string to fine-tune the pocket’s lowest point
- Consider your playing style and personal preferences
A deeper pocket may offer better ball control but can slow down your release. Conversely, a shallower pocket allows for quicker releases but may sacrifice some control. Finding the sweet spot that complements your playing style is key.
Enhancing Ball Release
To optimize ball release from your goalie pocket:
- Pay attention to the tension of the bottom string
- Experiment with different shooter string configurations
- Consider the angle and placement of your shooting strings
A well-tuned release allows for quicker and more accurate outlet passes, giving your team a competitive edge in transition play.
Fine-Tuning Shooting Strings for Accuracy and Consistency
Shooting strings play a crucial role in determining the flight characteristics of the ball as it leaves your stick. Proper adjustment of these strings can significantly enhance your accuracy and consistency. Here’s how to fine-tune your shooting strings:

Number and Placement of Shooting Strings
Most goalie heads benefit from 2-3 shooting strings. Consider the following placement options:
- U-shape: Two parallel strings with a U-shaped string below
- V-shape: Two strings forming a V pattern
- Straight: 2-3 parallel strings across the pocket
Experiment with different configurations to find what works best for your playing style and desired ball flight.
Tension and Material
The tension of your shooting strings affects both hold and release. Tighter strings generally provide more whip and hold, while looser strings allow for a quicker release. Consider using a mix of materials, such as:
- Nylon for durability and consistency
- Hockey lace for added grip and control
- Specialized lacrosse shooting lace for a balance of hold and release
Importance of Proper Pocket Placement for Goalie Success
The placement of your pocket within the goalie head can significantly impact your ability to make saves and control rebounds. Let’s explore why proper pocket placement is crucial for goalie success:

Optimal Pocket Location
For most goalies, the ideal pocket placement is slightly off-center towards the top of the head. This position offers several advantages:
- Improved visibility of the ball in the pocket
- Enhanced control for quick stick saves
- Better positioning for efficient outlet passes
To achieve this placement, focus on adjusting your sidewall string pattern and tension to shift the pocket’s sweet spot to the desired location.
Customizing for Your Style
While there are general guidelines for pocket placement, it’s essential to customize your setup to complement your unique playing style. Consider factors such as:
- Your natural hand position when making saves
- Preferred clearing techniques
- Personal comfort and feel
Experiment with slight variations in pocket placement to find the configuration that enhances your strengths and mitigates any weaknesses in your game.
Maintaining and Adjusting Your Goalie Head String Job
A well-strung goalie head requires regular maintenance and occasional adjustments to maintain peak performance. Here are some tips for keeping your string job in top condition:
Regular Inspection and Maintenance
Implement a routine maintenance schedule that includes:
- Checking for loose or frayed strings
- Inspecting the mesh for wear or damage
- Cleaning the pocket to remove dirt and debris
- Applying mesh wax or conditioner to maintain water resistance
Regular maintenance can extend the life of your string job and ensure consistent performance.
Making Minor Adjustments
As you play and break in your pocket, you may need to make minor adjustments to maintain optimal performance. Consider the following:
- Fine-tuning shooting string tension
- Adjusting sidewall knots to modify pocket depth
- Experimenting with different bottom string configurations
Keep a record of the adjustments you make and how they affect your play. This information can be invaluable when restringing or setting up a new head in the future.
Researching Different Semi-Hard Goalie Mesh Options
When it comes to stringing a lacrosse goalie head, one of the most important choices is selecting the right semi-hard goalie mesh. The mesh acts as the pocket that cradles the ball, so you’ll want to find an option that complements your playing style and provides the control, durability, and release you need. Many players swear by popular brands like ECD and Hero Mesh for their high-quality materials, consistency, and performance. But with so many types of goalie mesh out there, how do you determine what’s best for your needs?
The shape and size of the mesh pieces can impact pocket shape, hold, and flexibility. Do you want a mid-high pocket or more of a mid-low setup? How much whip and break-in do you prefer? Pieces that run 10 diamonds wide or more are a popular choice. You’ll also want to think about diamond size – larger diamonds tend to be stiffer while smaller diamonds create more hold and adjustability. Dense polyethylene and nylon-blend meshes like Hero Mesh tend to hold their shape extremely well while providing great feel. ECD meshes incorporate unique textures and coatings for excellent durability and water-resistance.
You may want to experiment with different goalie mesh brands and types during the stringing process. See how the materials respond to string pull forces and how they break-in over time. It’s often wise to observe what the top goalies are using and why before making a choice. Keep in mind your restringing costs too. The better the quality, the longer the mesh will maintain its integrity. With the right semi-hard goalie mesh selection as your starting point, you’ll be on your way to stringing up a pocket that takes your game to the next level.
Selecting the Right Goalie Stringing Kit
Once you’ve chosen the best goalie mesh for your playing needs, the next crucial step is selecting a high quality stringing kit. Your kit should contain all the essential components needed to string your head for optimal performance. The shooting strings in particular should be heavy nylon cords that won’t lose tension or degrade from repetitive impact. For the sidewall and cross-lacing strings, you’ll want sturdy options that will hold up to abuse while allowing for tension adjustments.
Pre-packaged goalie stringing kits offer everything you need for standard string jobs in one convenient package. They typically include 20 to 30 yards of high strength shooting string, 10 to 20 yards of softer goalie lace for the sidewalls and cross-lacing, wooden or plastic sidewall stringing needles, and Crimped Metal and Coated Stopper Strings to finish off the sidewalls. The best kits provide the highest grade materials from trusted brands like JimaWAX, Thruster, and Longstreth. This ensures even goalies who wring every ounce of velocity from their shots won’t experience premature string breakage.
For veteran stringers doing more elaborate string jobs, it may make sense to purchase bulk rolls of string rather than pre-packaged kits. This allows you to fully customize your setup with the exact shooting strings, sidewall strings, stoppers, and accessories you prefer. Popular options like hockey laces and lacrosse shooter strings provide a range of flexibility and performance. You’ll also want to stock up on high quality stringing needles in various configurations to effortlessly weave the sidewall and cross-lacing patterns. Take an inventory of what’s already in your stringing toolbox and then order precisely what’s needed to optimize your next stringing project.
With the right goalie stringing supplies, you’ll be able to restring sticks as often as needed and experiment with different pocket placements and shooting string configurations. Be sure to focus on precision and consistency each time you string. Take it from the professionals – the right tools and materials make all the difference in crafting a pocket that truly maximizes your on-field potential.
Learning Proper Stringing Techniques
Stringing a lacrosse goalie head requires learning specialized techniques to end up with a high-performing pocket. While a strong stringing kit is essential, you also need to understand proper stringing methods to get the most out of your mesh and materials. There are many considerations when it comes to goalie stringing patterns, including the top string, sidewalls, cross-lacing, and shooters.
One of the most popular goalie head top string patterns is the 10 diamond configuration. This creates excellent ball control and hold since the diamonds cradle and cup the ball well within the pocket. Start by anchoring the top string at each sidewall hole. Then string a diamond pattern, pulling each string so it’s tensioned evenly. Keep the diamonds uniform in size for consistency. You can also experiment with a 9 diamond or 6 diamond pattern to change flex and pocket shape.
The sidewalls help determine overall pocket structure, placement, and depth. Use a sturdy stringing material and string from each sidewall hole to its corresponding partner across the head, crisscrossing in the center. Tight sidewalls allow for a more defined pocket shape and snappy releases while looser sidewalls create a deeper pocket with more hold. Use stringing needles to neatly weave and tension each sidewall string.
Cross-lacing refers to the horizontal laces that connect the sidewall strings and run perpendicular to them. These should be evenly spaced in a ladder-like configuration and serve to further define pocket shape. Start from near the scoop and work downwards. Pull each cross-lace taut as you string to optimize pocket placement. The cross-laces also allow the pocket to maintain its integrity over time.
Finally, installing a straight shooter running from the throat of the head up through the middle of the pocket is key for adding velocity and precision. Place it in the optimum shooting sweet spot for your head’s flex profile. You may also consider adding a second nylon shooter. With the right techniques, you’ll be able to string a pocket with the exact performance characteristics your game demands.
Customizing Stringing Patterns
One of the great things about stringing your own goalie head is the ability to fully customize the pocket based on your playing style and needs. While there are certain best practice stringing techniques, you can also experiment with tailored adjustments to the pattern. This allows you to create a unique pocket with specialized performance advantages.
For example, you may want to tweak the top string pattern slightly to shift the pocket higher or lower in the head. A mid-low pocket placement can improve visibility for smaller goalies, while a mid-high placement creates more ball control. The diamond size in the top string can also affect hold – try going with diamonds that are slightly larger or smaller than the standard size. Additionally, altering the sidewall stringing tightness affects structure. A tighter channel creates quicker releases while a more open channel provides increased flexibility.
Get creative with the cross-lacing configuration too. Varying the spacing between the horizontal laces changes pocket shape. Some goalies create a custom “W” pattern with the cross-lacing to deepen the pocket even more. Don’t be afraid to add additional shooters, use an asymmetrical sidewall pattern, or experiment with specialty mesh inserts to create the optimal configuration.
It’s wise to follow core stringing principles, but small adjustments can give you an edge. Tweak the pattern during restringing until you find your ideal setup. Keep notes each time so you can replicate it precisely. Dialing in the perfect pocket placement, depth, and shooter setup for your individual style is well worth the effort. With the right custom string job, you’ll notice improvements in control, hold, and ball velocity. And in a sport where small margins make all the difference, that customized pocket could be your secret weapon!
Finding the Optimal Pocket Placement

One of the most important stringing considerations for lacrosse goalies is identifying the ideal pocket placement for their playing style and needs. The exact location where the pocket sits in the head can significantly influence performance. There are generally three main pocket positions – mid-low, mid-high, and high – each with their own benefits.
A mid-low pocket placement sits deep in the head just above the throat. This gives the goalie excellent ball control and hold since a larger portion of the ball is surrounded and cradled by the head and mesh. The tradeoff is this can slightly limit visibility looking down into the pocket. A mid-low pocket works well for goalies who rely on their quick hands and reflexes.
Alternatively, a mid-high pocket placement sits higher in the head, closer to the scoop. With more of the ball exposed above the sidewalls, visibility is enhanced. This pocket type gives up some ball control for added quickness on clears and passes. Shorter goalies who need to see over the ball often prefer the mid-high placement.
Finally, a high pocket extends all the way up towards the scoop of the head. This maximizes visibility and passing speed but surrenders a great deal of ball control. High pockets are less common in modern goalie stringing.
During stringing, pocket placement can be tuned by adjusting the sidewall tightness, cross-lacing pattern, and top string configuration. Keep the desired placement in mind as you string and test the pocket frequently. With experimentation across several restringing projects, you’ll gain a feel for what works best. Dialing in that ideal pocket location tailored specifically to you gives a noticeable advantage when defending the cage.
Installing a Straight Shooter Properly

A key component of any lacrosse goalie stringing project is installing a straight shooter properly in the optimum shooting sweet spot. The shooter is the main cord that runs vertically from the throat of the head up through the middle of the pocket. This cord adds critical ball velocity on clears and outlets by imparting energy directly to the ball upon release.
Choosing quality shooter string material is important – look for thick, durable nylon cords that withstand high tension without stretching or breaking down over time. For installation, start by anchoring one end of the shooter at the center throat hole. Pull the string taut and weave it vertically through the middle of the pocket, sitting inside the 1st and 2nd sidewall strings. Keep the shooter straight and avoid angling it left or right.
The optimum sweet spot placement will depend on the flex profile of your head. On stiff heads with little flex, position the shooter to end about two-thirds up the head. For more flexible heads, end the shooter higher, around three-fourths up the head. This accounts for flex so that the sweet spot sits centered upon release. Tie off the end of the shooter and use sturdy crimped stoppers to secure it.
Test the release by tossing balls with normal throwing mechanics and observe the ball flight and velocity. Make small adjustments to the shooter placement and re-test until you find the maximum velocity sweet spot for that head’s flex characteristics. Take the time to properly install an optimized shooter – you’ll notice the difference on lightning-quick clears under pressure when your technique can make the difference in a game.
Creating a Deep Pocket for Control
One of the key benefits of stringing your own goalie head is the ability to customize the pocket depth to your exact specifications. While a shallow pocket provides quick ball release, most goalies prefer a deeper pocket for superior ball control and hold. This allows them to cradle and corral even the hardest shots with confidence.
When stringing, there are a few techniques you can use to create extra pocket depth. Using a mesh with more flexible vertical breaks, rather than stiff upright rods, allows the mesh to bag more. A traditionally strung pocket with a 10 diamond top string and tight sidewalls gives a good base depth. From there, manipulating the cross-lacing can deepen it further.
Try widening the gaps between the horizontal cross-laces, stringing them every 2 or 3 holes rather than every hole. This extra space allows the mesh to sag lower. You can also string cross-laces in a “W” pattern to maximize depth. For even more hold, add specialty mesh inserts above and below the main runner. This creates extra cradling surfaces to envelop the ball.
Be sure to experiment with pocket depth across several restringing projects to find your ideal setup. While you want to stay within legality limits, the deepest usable pocket gives an advantage. Take shots to test hold and make small adjustments until you dial in a pocket with the superior control, hold, and flexibility your reaction-based style requires. With a customized deep pocket, you’ll gain the confidence to stop even the most blistering shots cold.
Stringing a Tight Channel for Quick Releases

While most goalies want deep pockets for control, the ability to make crisp, accurate outlet passes is also crucial. This is where stringing a tight sidewall channel becomes important. By creating a defined channel between tight sidewalls, you can optimize the pocket for lightning-quick releases.
Start the stringing process by using a very stiff mesh or even traditional hard goalie mesh. This will resist bagging and stretch. Anchor the top and bottom of the mesh securely with durable stringing material. Then focus on keeping the sidewalls tight. String each line tightly from sidewall hole to the corresponding partner across the head, without leaving any slack.
Use high-grade hockey lace or dedicated sidewall string for durability. Make sure to string the first few holes extremely tight to create a narrowed throat channel. Wide gaps between any sidewall strings can allow the ball to sit crooked and release unpredictably. Keep the entire length of the channel uniform with taut strings.
With a tightly strung channel, you’ll notice crisp, consistent releases even when passing on the run upfield. The ball comes cleanly out of the pocket every time. During games, you can transition from controlling hard shots to hitting your targets downfield with pace. Finding the right balance of control and quick release through precision stringing gives a vital edge against unrelenting offenses. Maintaining possession through outlet passes can be a game-changer.
Focusing on Consistent Pocket Shape

One of the marks of a well-strung goalie head is a pocket with a uniform, consistent shape. This allows the goalie to develop muscle memory and reflexively know exactly where the ball will sit. No matter the technique – cradling, corralling shots, or passing – the pocket behaves predictably when the shape stays uniform.
Creating a consistent pocket shape starts with precision across the entire stringing process. First, the top string diamonds should be identical in size and tension. Avoid having some diamonds looser than others. The sidewall strings must be uniformly tight, with no gaps between holes. Cross-lacing should be spaced evenly to maintain pocket geometry. Consistent shooter placement also prevents distortion.
Just as important as the initial stringing is checking and adjusting the pocket during break-in. As you use the head, the mesh and strings will settle and stretches slightly. Periodically press down on the pocket and feel for any inconsistencies. If the mesh bags lower in spots or the channel widens, re-tighten the problem areas. This ensures the head breaks in evenly.
Be vigilant about pocket shape whenever you restring as well. Use photos or stringing notes to replicate your targeted shape each time. With practice, you’ll gain a feel for exactly how to string each section to create a harmonized pocket. Don’t settle for lumps or bulges. By honing your stringing precision, you’ll come to rely on that familiar, customized pocket shape as an extension of your own hands.
Adjusting Pocket Depth for Your League
When stringing a goalie head, one important consideration is making sure the final pocket depth complies with regulations for your league. Pockets can’t be excessively deep in order to prevent ball-hogging and slow play. Each league has specific rules and tests to make sure stringing is legal.
For high school lacrosse, there is the basic “roll test” where the ball must fully roll out of a horizontally held head within 2 seconds. For elite play in college and pro leagues, there are more precise specifications – the ball must sit above the bottom of the sidewall when placed in the pocket. These rules keep the game fast-paced and high-scoring for spectators.
The best way to ensure a legal pocket depth is to reference your league’s exact regulations during stringing. As you adjust the sidewall tightness, cross-lacing, and diamond top string, continually test the depth by placing a ball in the pocket. For quick checks, mark a line on the inside of the head at the maximum depth limit and make sure the ball doesn’t drop below it.
If the pocket is too deep, you can make adjustments by tightening the top string diamonds, sidewalls, and cross-lacing in the lower third of the head. This will elevate the ball higher in the pocket. Removing mesh runners can also help raise ball position. Don’t sacrifice too much control, however – the deepest legal pocket will still give you an advantage as a goalie.
Adjusting Pocket Shape for Different Head Shapes

When stringing a lacrosse goalie head, you’ll need to tailor the pocket shape and placement to the specific head shape and dimensions. Wider or narrower heads, along with varying sidewall heights, require adjustments to the stringing pattern. This ensures optimal pocket performance with any head type.
In wide heads with high sidewalls like the Eclipse 2, you can afford to string a slightly deeper pocket without sacrificing ball control. Focus on widening the lower diamond shapes on a 10 diamond top string to maximize pocket depth. You can also widen the gaps between cross-laces to allow for more sag and bag. Just be sure to keep cross-laces low to maintain pocket shape.
Narrower, lower profile heads like the STX Eclipse Fit require more precision in stringing. Here, use smaller diamonds on the 10 diamond top string to prevent an overly deep pocket. Keep cross-lacing tight throughout the head, stringing from nearly every hole. This keeps the pocket elevated and shaped precisely for quick outlet passes with a narrower head.
The best way to optimize pocket performance is to string the head, test it, and make adjustments. Shoot and observe ball rebound and control. Try outlet passes to check ball delivery. Look for uneven bagging in the mesh or inconsistent sidewall gaps. By tailoring your stringing methods to the head shape, you can maximize both control and passing precision.
Adding a Second Nylon Shooter

Most lacrosse goalie stringing jobs utilize a single main nylon shooter threaded vertically through the middle of the pocket. However, some goalies choose to add a second shooter to provide even more velocity and power on clears.
The key is properly positioning both shooters in the optimum sweet spots on the head. Anchor the first shooter through the center of the pocket as usual. Then, anchor the second shooter halfway between the first shooter and the sidewall, passing it through alternate diamonds. This divides the pocket into vertical thirds for maximum energy transfer.
Situate the first main shooter in the prime power position for that head’s flex – typically two-thirds or three-fourths up the head length. Place the second shooter approximately 2 diamonds lower than the first. This accounts for decreased flex closer to the sidewalls. Both shooters should remain straight vertical lines without angling.
With two properly aligned shooters, you create two accelerated release points as you throw. The shooters act like slingshots, channeling more energy into the ball as it leaves the pocket. The split power triangle configuration also helps stabilize the ball during cradling and prevents twisting on off-center shots.
As always, test and tweak the dual shooter setup to maximize performance. The ideal position may vary based on head model and mesh type. Get the shooters dialed in perfectly, and you’ll notice the extra punch when moving the ball clear downfield under pressure. The dual shooter system gives your clears an undeniable boost in velocity.
Continuous Testing and Tweaking
When stringing your own lacrosse goalie head, the work doesn’t stop once the initial stringing is complete. To achieve maximum performance, you need to test, analyze, and tweak the pattern through an ongoing break-in process.
During the first few practices with a freshly strung head, pay close attention to how the pocket is behaving. As the mesh and strings settle, you may notice inconsistencies in shape, depth, and shooting sweet spot. The pocket may bag lower in certain diamonds or the shooters may angle off-center. Don’t just play through these issues – address them promptly.
Make small adjustments like tightening specific diamonds, adjusting cross-laces, or re-aligning shooters. You want the head to break-in evenly to maintain pocket shape. It’s much easier to tweak the pockets early before bad habits become ingrained. Take notes on adjustments needed so you can improve the pattern next stringing.
This tuning process applies each time you restring as well. Your techniques will improve, so don’t just replicate the same pattern without thinking. Try lowering diamond sizes incrementally or adjusting shooter angles by a hole or two. Use feedback from your initial testing to make each iteration better.
With continuous analysis and refinement, you’ll eventually dial-in your customized, peak performing pattern. The extra testing and tweaking time will pay off the first time you stonewall an off-speed bounce shot thanks to your perfectly optimized pocket.
Considering Restringing Costs

When stringing your own lacrosse goalie head, one practical consideration is the cost of materials each time you restring. Top quality mesh, shooter strings, and sidewall laces improve performance but can add up over time. Evaluating your options for managing these expenses is wise.
Using premium materials from trusted brands helps maximize both longevity and consistency. Mesh made from high-density polymers maintains its structure much longer than lower cost meshes. Investing in durable shooting cords reduces the risk of breakage during impact. Buying quality supplies in bulk quantities can help reduce per-stringing costs.
How often you choose to restring also impacts overall cost. Some goalies restring every few months to maintain fresh shooting cords and consistent pocket feel. Others stretch out string jobs as long as possible before replacing mesh or laces. Finding your ideal balance between performance and cost comes down to your stringing priorities.
If funds are limited, you can reduce stringing costs by preserving and reusing undamaged sidewall laces when restringing. Shooter cords can be reinforced or supplemented with hockey laces rather than replaced entirely. Mesh can be rotated to distribute wear evenly. With some creativity, stringing costs can be managed without sacrificing too much performance.
At the end of the day, proper stringing gives you the competitive edge you need in the crease. Don’t compromise on the materials integrity too much simply to save on costs. Look at each restringing investment as an opportunity to further refine your customized pocket.
Maintaining Peak Performance

Once you put in the work to perfect your lacrosse goalie head stringing technique, the next challenge is maintaining top performance stringing after stringing. Even with great stringing skills, it’s easy for pockets to slowly lose their ideal shape, depth, and shooting sweet spot over time.
The key is consistency across every restringing. Meticulously take notes on diamond shapes, sidewall and cross-lacing patterns, and shooter placements each time you string. Use visual aids like photos. Record measurements of critical dimensions like pocket depth and shooter height. Follow your documentation exactly when restringing to prevent deviations.
Periodically evaluate and re-calibrate your methods too. As your skills improve or mesh preferences change, don’t just copy old patterns out of habit. Look for small refinements you can implement to get output that’s even more optimized. Don’t settle for minor inconsistencies – strive for precision.
Just as important as technique is maintaining high restringing frequency. Heads with older, worn mesh or stretched out laces won’t perform the same. Follow recommendations on when to replace shooter cords and side laces. Commit to restringing every season at a minimum to restore fresh feel and performance.


