How to string a goalie stick like a pro. What supplies do you need for stringing a goalie head. How to prepare the head and sidewalls for stringing. What is the correct technique for stringing the top string and shooting strings. How to weave diamonds and install V shooters for the perfect pocket.
Essential Supplies for Stringing Your Goalie Stick
Stringing a goalie stick requires specific materials to achieve optimal performance. Let’s dive into the essential supplies you’ll need:
- Goalie mesh (various diamond shapes, sizes, and materials)
- Nylon sidewall string
- Shooting strings
- Scissors
- Lighter
- Stringing pliers
Many goalies prefer soft mesh with mid-size diamonds for enhanced ball control. Optional supplies include a stringing jig, athletic tape, markers, and a ruler to assist in the process.
Choosing the Right Mesh
The choice of mesh significantly impacts your stick’s performance. What factors should you consider when selecting goalie mesh? Focus on:
- Diamond shape and size
- Material (traditional or performance mesh)
- Softness or stiffness
- Weather resistance
Experiment with different types to find the perfect balance between ball control, pocket formation, and durability for your playing style.
Preparing Your Goalie Head for Stringing
Before diving into the stringing process, proper preparation of the goalie head is crucial. How do you ensure your head is ready for stringing?
- Inspect the head for any defects or damage
- Use hot water to soften stiff plastic if necessary
- Begin attaching the sidewall string at the scoop
- String hole-to-hole down each sidewall
- Use a starter knot and double up the string for added durability
Maintaining tight tension on the sidewall string as you work will help create a well-defined pocket shape and simplify the diamond-weaving process later on.
Mastering the Top String Technique
The top string plays a crucial role in shaping the upper part of your pocket. What’s the correct method for stringing the top string?

- Anchor the string at each sidewall hole near the scoop using a starter knot
- Weave the string over-under through each pair of adjacent sidewall holes
- Skip the first hole at each end for proper tension
- Maintain consistent tension throughout the process
- Tie off securely across the head at the last hole
A properly strung top string provides the foundation for a well-formed pocket and contributes to overall stick performance.
Shooting Strings: Installation and Optimization
Shooting strings are essential for fine-tuning your pocket shape and ball release. How do you install and optimize shooting strings for a goalie stick?
- Start with two straight shooter strings about 1.5 inches apart at the channel
- Anchor each end at the sidewalls with a secure knot
- Weave them over-under through the first diamond row, keeping them parallel
- Maintain tension and tie off securely on each sidewall
- Add V-shaped shooting strings above and below the straight ones
- Space V shooters 1.5-2 inches apart for optimal pocket shaping
Remember, more V shooters can widen the channel and increase release speed. Experiment with different configurations to find the perfect setup for your playing style.
Fine-Tuning Shooting String Tension
The tension of your shooting strings greatly affects stick performance. How can you achieve the ideal tension?
- Start with moderate tension and adjust based on ball reaction
- Tighter strings generally result in a faster release
- Looser strings can provide more hold and control
- Ensure symmetry between both sides of the stick
Test your stick with various shooting string tensions to find the sweet spot that complements your playing style and maximizes your performance on the field.
Weaving the Perfect Diamond Pattern
Creating a consistent and effective diamond pattern is crucial for optimal pocket performance. How do you weave the perfect diamond pattern in your goalie stick?
- Anchor the mesh to the first hole at the scoop on each side using a secure knot
- Stretch the mesh straight across to the bottom sidewall holes and temporarily anchor it
- Work your way up the head, anchoring each new row at the scoop
- Stretch each row tautly across to the bottom sidewalls before moving up
- Loosely weave the middle over-under through the open diamonds between shooting strings
- Maintain consistent tension throughout the weaving process
A well-woven diamond pattern ensures proper pocket formation and contributes to better ball control and consistent releases.
Troubleshooting Common Diamond Weaving Issues
Even experienced stringers may encounter challenges when weaving diamonds. How can you address common issues?
- Uneven diamonds: Adjust tension and re-weave affected areas
- Loose pockets: Tighten sidewall strings and shooting strings
- Overly tight pockets: Loosen sidewall strings and re-weave with less tension
- Asymmetrical patterns: Ensure equal tension on both sides and count diamonds for symmetry
Taking the time to troubleshoot and perfect your diamond pattern will result in a more consistent and reliable pocket for game day.
Installing and Optimizing the V Shooter
The V shooter plays a crucial role in shaping the lower part of your pocket and preventing ball drop-out. How do you properly install and optimize a V shooter?
- Install the V-shaped shooter at the bottom of the pocket
- Anchor each end of the V securely to the sidewalls
- Weave the V shooter up through the diamonds to shape the lower pocket
- Adjust the V’s position and tension for optimal pocket shape
- Check for symmetry and ensure a smooth channel from top diamond to bottom V
- Securely tie off both ends of the V on the sidewalls
A properly installed and adjusted V shooter can significantly enhance your stick’s ball retention and release characteristics.
Experimenting with Multiple V Shooters
Some goalies prefer multiple V shooters for enhanced pocket control. How can you incorporate additional V shooters effectively?
- Start with one V shooter and test performance
- Add a second V shooter above the first if more hold is desired
- Experiment with different V angles and tensions
- Ensure each additional V complements the overall pocket shape
Remember that more isn’t always better – find the right balance of V shooters that suits your playing style and stick preferences.
Fine-Tuning Your Pocket for Optimal Performance
The final steps in stringing your goalie stick involve meticulous adjustments to achieve the perfect pocket. How do you fine-tune your pocket for optimal performance?
- Adjust pocket depth by tightening or loosening sidewall strings
- Inspect the face shape to ensure a proper central channel and boxer-style pocket
- Test ball reaction by throwing balls into the pocket
- Make necessary adjustments to diamonds, sidewall, or shooting strings based on ball behavior
- Aim for a pocket where balls easily settle into the center channel without bounce-outs
- Fine-tune the release speed by adjusting V shooters and channel width
Remember that achieving the perfect pocket often requires patience and multiple rounds of adjustments. Don’t hesitate to make small tweaks until you’re satisfied with the performance.
Maintaining Your Perfectly Strung Goalie Stick
Once you’ve achieved the ideal pocket, proper maintenance is key to preserving its performance. How can you keep your goalie stick in top condition?
- Regularly inspect for wear and tear on strings and mesh
- Re-tighten loose strings as needed
- Clean your stick after use, especially in wet or muddy conditions
- Store your stick in a cool, dry place to prevent warping
- Consider re-stringing your stick before each new season for optimal performance
By following these maintenance tips, you can ensure that your perfectly strung goalie stick remains in peak condition throughout the season.
Mastering the art of stringing a goalie stick takes time and practice, but the results are well worth the effort. A properly strung stick can significantly enhance your performance on the field, providing better ball control, more consistent releases, and improved save percentages. As you become more comfortable with the stringing process, don’t be afraid to experiment with different techniques and materials to find the perfect setup that complements your unique playing style.

Remember that stringing preferences can vary greatly among goalies, so what works best for one player may not be ideal for another. Keep an open mind, be willing to make adjustments, and always strive for continuous improvement in your stringing technique. With dedication and attention to detail, you’ll soon be stringing goalie sticks like a pro and reaping the benefits of a perfectly customized pocket on game day.
As you continue to refine your stringing skills, consider seeking advice from experienced goalies or professional stick stringers. They can offer valuable insights and tips that may help you take your stringing game to the next level. Additionally, staying up-to-date with the latest stringing trends and innovations in goalie mesh and string materials can give you an edge in optimizing your stick’s performance.
Ultimately, the goal is to create a stick that feels like an extension of yourself on the field. When your goalie stick is strung to perfection, it can boost your confidence, improve your reaction times, and help you make those game-changing saves that your team relies on. So take the time to master the art of goalie stick stringing – your future self (and your teammates) will thank you for it.
Gather Your Supplies: Mesh, Sidewall, Shooting Strings
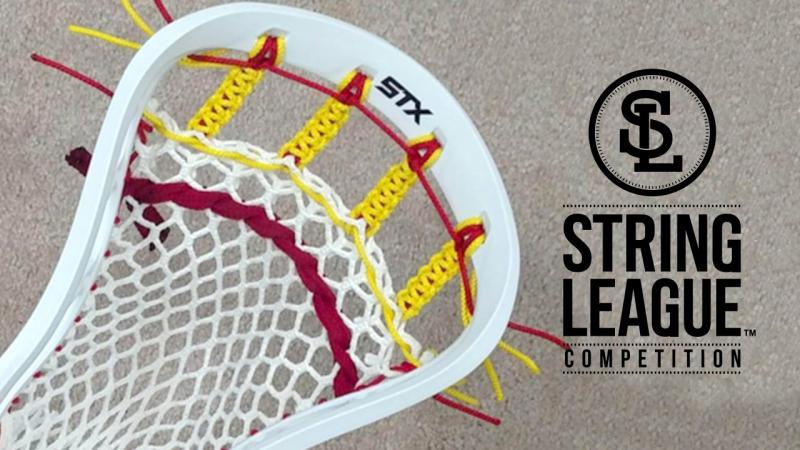
Stringing a goalie head requires some specific supplies. First, you’ll need mesh. Goalie mesh comes in different diamond shapes, sizes, colors, and materials to suit different playing styles and preferences. Many goalies like a soft mesh with a mid-size diamond shape for maximum ball control. You’ll also need durable nylon sidewall string to attach the mesh to the head’s sidewalls and shooting strings to tweak the pocket shape.
In addition to mesh and string, have scissors, a lighter, and stringing pliers handy. Some goalies also use a stringing jig for consistent stringing across multiple sticks. Optional supplies like athletic tape, markers, and a ruler can help in the stringing process too.
Prepare the Head and Sidewalls
Before stringing, inspect the head for any flaws and use hot water to soften stiff plastic if needed. Then begin attaching the sidewall by tying it off at the scoop and stringing hole-to-hole down each sidewall. Use a starter knot and double up the string throughout for durability.
As you string each hole, pull the sidewall taut so the diamonds take shape. Tie off temporarily at the bottom when finished. Having taut sidewalls makes weaving the diamonds simpler and creates a defined pocket shape.
String the Top String
The top string runs horizontally along the head above the widest part of the scoop. Start by anchoring it at each sidewall hole near the scoop using the starter knot. Keep tension throughout the stringing process here too.
Weave the top string over-under through each pair of adjacent sidewall holes, skipping the first hole at each end. Tie it off across the head at the last hole with a secure knot.
Install the Shooting Strings
Shooting strings run horizontally from sidewall to sidewall, perpendicular to the top string. They let you tweak the pocket shape. Start with two straight shooter strings about 1.5 inches apart at the channel.
Anchor each end at the sidewalls with a knot and weave them over-under through the first diamond row, keeping them parallel. Pull tension and tie off with a secure knot on each sidewall.
Tie Off the Shooting Strings
Next, anchor V-shaped shooting strings above and below the straight ones, again weaving over-under through the diamonds. Tie them off on the sidewalls in a V shape.
Add as many V shooters as needed to shape the pocket, spacing them 1.5-2 inches apart. More Vs widen the channel and quicken release speed.
String the Sidewall

Now that the top string and shooting strings are installed, finish stringing the sidewalls. Pick up where you left off earlier and continue stringing hole-to-hole from bottom to top on each side.
Pull firmly and tie off at the scoop. Doubled sidewall string provides a backbone for attaching mesh diamonds.
Weave the First Diamond
Begin forming diamonds by anchoring the mesh to the first hole at the scoop on each side. Use a secure knot like the starter knot.
Then, stretch the mesh straight across to the bottom sidewall holes and temporarily anchor it. This forms the first row.
Continue Weaving Diamonds
Work your way up the head, anchoring each new row at the scoop. Stretch each row tautly across to the bottom sidewalls before moving up to the next.
After anchoring each end of the row, loosely weave the middle over-under through the open diamonds between the shooting strings.
Install the V Shooter
Once the diamonds are woven, install a V-shaped shooter at the bottom. Anchor each end, then weave up through the diamonds to shape the lower part of the pocket.
The V prevents ball drop-out and fine tunes overall pocket shape. Make adjustments as needed.
Tie Off the V Shooter
Securely tie off both ends of the bottom V on the sidewalls when its position looks optimal. Check for symmetry and make sure the channel runs smoothly from top diamond to bottom V.
Adjust Pocket Depth
If the pocket seems too shallow or deep, adjust by tightening or loosening the sidewall string as needed. This raises or lowers diamonds to tweak depth.
Redo any diamonds that become deformed. Maintaining tension is key for proper shaping.
Check Face Shape
Inspect the strung head from the face to ensure proper pocket shape. It should form a central channel and nice boxer-style pocket. Adjust diamonds or add/remove shooters as required.
Test Ball Reaction
Once it looks right, test it out by throwing balls into the pocket and noting how they react. They should easily settle into the center channel with no bounce-outs.
If the ball rattles around, tighten up the pocket. For a slower release, add more V shooters to widen the channel.
Make Final Tweaks
Based on the ball test, make any other needed adjustments to the diamonds, sidewall, or shooting strings until the pocket performs just how you like it.
This may take some trial-and-error to get it dialed in perfectly.
Break In Your New Pocket
Finally, put some shots on net to break in the fresh pocket. It will loosen up slightly and form nicely to your playing style as the mesh breaks in.
Re-test occasionally and make minor adjustments as needed. Enjoy your customized goalie head!
Prepare the Head and Sidewalls
My friend, before we dive into stringing that goalie head, we gotta get the head itself prepped and ready. This is a key first step that can make or break the rest of the process. So don’t rush through it! Take your time and do it right.
First things first – inspect the head closely. I like to hold it up and turn it around in the light to catch any flaws or defects. Even brand new heads can sometimes have small cracks or dents from the factory or shipping. If you see any issues, you’ll want to address those before stringing. A defective head can lead to premature stringing failures down the road.
Next, check the stiffness of the head. Especially if it’s been sitting a while, the plastic can get rigid. We need it softened up for good stringing flexibility. Simply soak the head in some hot water for 5-10 minutes. This should loosen things up nicely.
Okay, with the head prepped, we can begin attaching the sidewall string. This is the heavy-duty nylon cord that forms the backbone of the pocket by running up each sidewall. I recommend starting at the scoop and using a starter knot to anchor it. This knot is super secure.
Work your way down hole by hole along each sidewall. Be sure to pull the string tight as you go! Keeping strong tension here will help the diamonds take shape later. Once you reach the bottom hole, tie it off temporarily. We’ll finish the sidewalls after weaving the diamonds.
Having taut sidewalls with firmly-anchored string makes stringing the rest of the pocket much easier. It’s way simpler to form the nice pocket shape we want when the foundation is solid. The diamonds practically string themselves on a head with tight sidewalls!
So don’t skip this step – take the extra time to really cinch down that sidewall string. Your future self will thank you during the diamond weaving. Trust me on that one, my friend!
How to Perfectly String Your Goalie Stick This Season: The Complete 15-Step Guide

As any seasoned goalie knows, having a properly strung stick is absolutely crucial for success on the field or in the crease. The pattern and tension of your goalie head stringing can make all the difference when it comes to stopping shots and controlling clears. While every goalie has their own preferences when it comes to stringing a goalie stick, there are some tried and true techniques that can help take your stringing game to the next level. In this comprehensive guide, we will walk through a step-by-step process for stringing a goalie head from start to finish. Whether you are restringing your gamer for the first time or experimenting with a new pattern, follow these 15 steps to string your stick like a pro.
1. Gather Your Supplies
First things first, you’ll need to gather the appropriate supplies for stringing a goalie head. Having all your tools and materials prepped ahead of time will make the process smoother. Here is a list of everything you’ll need:
- Goalie head (detached from the shaft)
- Mesh shooting strings
- Sidewall strings
- Goalie specific stringing kit (includes string, crimps, cutters, pliers, etc.)
- Optional: Stringing jig or clamp
Inspect your head for any cracks or defects, and make sure your string and sidewalls are up to par. While you can certainly string a goalie head without a jig, having one makes the process much easier by holding the head in place at a comfortable height.
2. Prep the Head
Before stringing, you’ll want to prep the head to make sure it is clean and ready for stringing. Wipe out any dirt, debris or old string remnants from previous string jobs with a clean cloth. You can also give it a light sanding or use steel wool to remove any stubborn dirt or rust spots. The inside of the head should be as clean as possible so the new mesh and strings can grip.
3. Install the Shooting Strings
Most goalie heads have holes or stringing posts built into the sidewalls specifically for shooting strings. Start by anchoring one end of the shooting string through the bottom sidewall hole. Pull it across the bottom of the scoop and through the corresponding top sidewall hole. Continue criss-crossing the string back and forth from the top holes to the bottom holes moving towards the throat of the head. Depending on the head width, you’ll install anywhere from 4-6 shooting strings in this criss-cross pattern.
Be sure to pull each string tight so the diamonds are uniform before moving to the next. The shooting strings create the actual mesh pocket that will cradle the ball, so consistency here is key. Once you’ve installed the desired number of shooting strings, tie off and
cut any excess mesh.
4. Install the First Sidewall

With the shooting strings in place, you can now install the sidewall nylon. This will tighten up the channel and lock in the pocket. Start by anchoring one end of the nylon sidewall string through the very bottom sidewall hole. Tie it off however feels most secure – some goalies prefer a simple overhand knot while others do a double or triple knot.
Then, begin stringing the nylon up the outside of the sidewall holes moving towards the scoop, skipping the holes with shooting strings. Pull the nylon tight as you work your way up, securing it in each hole with a simple knot. Once you’ve reached the top, tie off the end and cut any excess nylon.
5. Install the Second Sidewall
For the second sidewall, repeat the same process starting from the bottom and moving up to the scoop on the opposite side. Be sure both sidewalls are equally tensioned so the head retains its shape. Having uneven sidewall tension can cause the head to curve or warp.
6. Complete Any Interweaves
Some goalies like to add a few additional shooting string interweaves for extra hold mid-pocket. Simple interweaves involve taking a short piece of shooting string and weaving it perpendicularly in and out between the main shooting strings. This can help stabilize the pocket and fine tune ball control.
Only interweave where you feel it is necessary – often towards the middle to lower section of the pocket. Be sure not to overdo it on interweaves as too much will restrict the pocket. A few choice interweaves in key spots are all you need.
7. Install the Cross Lacing
Next up is installing a V-shaped cross lacing from sidewall to sidewall at the lower third of the head. This cross lace adds stability to the bottom of the pocket and helps with ball retention.
Anchor one end of a shooting string through a sidewall hole near the bottom corner of the head. Pull it diagonally upwards towards the opposite top corner. Angle the string so it forms a “V” shape. Tie the other end off through the opposite sidewall hole making sure the tension is even on both sides.
8. Install a Mid-Pocket U
A mid-pocket U-string can also help stabilize your pocket and fine tune the channel. Using a separate piece of shooting string (or a section of your sidewall string), tie off one end through the sidewall about 1/3 up from the bottom.
Bring the string horizontally across the middle of the pocket and tie off on the opposite sidewall. By adjusting the depth and tension, you can create a slight “U” shape above the ball ramp of your pocket.
9. Install a Lower Nylon
Some goalies also like to install a nylon string across the lower third of the head near the throat to reinforce that section. Similar to the mid-pocket U, this helps add stability right where you need it most – down low for stopping low shots.
Use a 6-12 inch section of your sidewall nylon and simply anchor it through the sidewall holes near the bottom corners of the head on each side. You can toggle the tension as needed.
10. Perform Any Pocket Adjustments
At this point the stringing framework is complete. Now is the time to make any final adjustments to get the pocket just right. You might want to tweak the tightness of key diamonds, re-position any interweaves, adjust the depth/angle of your U-string, or re-tension various shooting strings.
Take your time making adjustments and see how the pockets responds with balls. The beauty of stringing your own head is getting that customized pocket dialed in exactly how you want it. Don’t be afraid to tweak and adjust to get it right where you need it.
11. Check Your Work
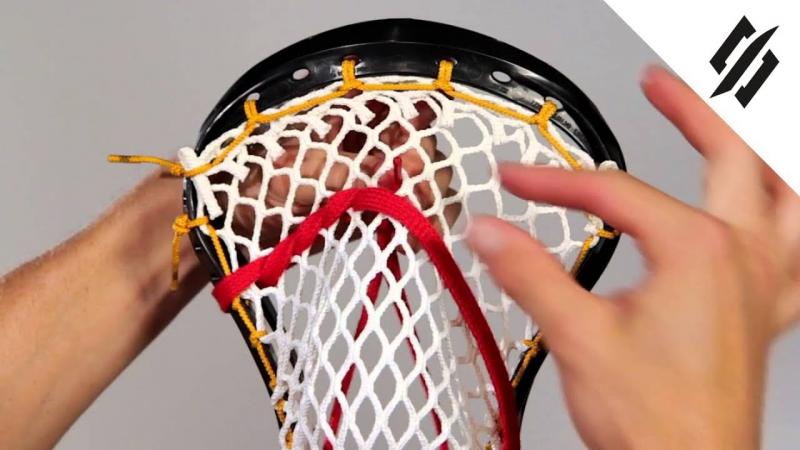
Before you start wrapping up your masterpiece, do a final inspection of the full pocket. Look for any loose or uneven diamonds, diamonds that are too pinched or wide, uneven gaps between sidewall, loose knots, or any thin spots in the mesh. Address any imperfections now before finishing it off.
Insert a ball and make sure it moves freely within the pocket but doesn’t rattle around too much. Do a pinch and swivel test to check ball security. Give the head a good shake to verify everything is locked down tight.
12. Burn Test the Mesh (Optional)
Some goalies like to use a lighter or torch to carefully burn the nylon mesh strands around the shooting strings and sidewalls. This singes and fuses the mesh to lock everything together. Be extremely careful not to hold the flame too long in one spot as this can burn through the mesh. Lightly sweep the flame near (but not directly on) the knots to rough up and tighten the mesh.
Burn testing takes some practice to get right, so only attempt if you’re experienced. A rough mesh surface can help grab and cradle the ball better, but too much burning can damage the integrity of the pocket.
13. Customize the Strings
Once the functional stringing is complete, get creative with the look and style. Many goalies like to tie in various colored strings throughout the head for personal flair. Popular options are adding a bright shooter at the top, a different color cross lace, or alternating sidewall colors from top to bottom.
This is your chance to pimp out your gamer and show off your style. Coordinate colors with your team uniforms or go for a custom colorway that expresses your individuality in the crease.
14. Secure and Trim All Strings
The finishing touch is going back through the entire head to secure all knots and trim any excess string tails. Dab a drop of superglue over each knot to prevent any slipping. For sidewall knots, tuck the ends into the adjacent hole rather than trimming them.
Snip any long shooting string tails so they are flush with the sidewall. Never leave long tails that dangle or flap around. Go for a clean finished look inside the head.
15. Attach to Shaft and You’re Done!
Last step is to firmly secure the freshly strung head onto your goalie shaft using tape or mesh locks. Start taking warm up shots and break in your new pocket! Remember it may take a few practices to get that custom pocket fully broken in just right. Don’t be afraid to make minor adjustments after using it for a while and noting how it performs during games.
With the right stringing supplies, a methodical process, patience, and practice, you’ll be stringing goalie heads like a seasoned pro in no time. A personalized pocket tailored exactly to your liking can be a game changer. With these 15 steps, you now have the knowledge to string a goalie head from start to finish. So grab your stringing kit and get threading!
Install the Shooting Strings
Step three is where the real stringing begins – installing the shooting strings to form the mesh pocket. This is the foundation that sets the stage for your perfect pocket. Shooting strings are typically made from a soft nylon mesh, chosen for flexibility and ball-grabbing ability. The crisscross diamond pattern locks the ball in the pocket while still allowing smooth release on passes and clears.
To start, anchor one end of the shooting string through the bottom-most sidewall hole. Pull the string diagonally upwards and thread it through the corresponding top sidewall hole on the opposite side. Continue zigzagging the string back and forth from bottom to top holes moving up towards the scoop of the head.
Be careful not to pull the diamonds too tight or too loose. Consistent tension and spacing is vital. About a finger’s width between diamonds is ideal for most goalies. Install anywhere from 4-6 shooting strings depending on head width.
Once the desired number of horizontal diamonds are in place, tie off and trim any excess mesh at the top. Double check all diamonds are evenly spaced and taut. The shooting strings form the ball’s cradle, so flawless execution here sets the tone for the entire pocket.
Interweaving for Extra Hold
Some goalies like to add supplemental shooting string interweaves for increased mid-pocket stability. Interweaving involves taking a short piece of mesh and horizontally weaving it in and out between the main vertical shooting strings.
This locks down key spots in the pocket for improved ball control. However, overdoing interweaves can restrict pocket movement and feel. Add minimally in selective spots only where needed.
A few key interweaves in the mid-to-lower pocket is ideal for most goalies. Focus on any wider spots between diamonds or where extra hold is desired. Less is more when interweaving.
Troubleshooting Shooting Strings
When installing the shooting strings, be diligent about checking for uniform spacing and tension. Watch for these potential issues:
- Diamonds too tight or too loose
- Inconsistent gaps between diamonds
- Twisted, bunched or crossed shooting strings
- Loose knots Untensioned final diamonds near the top
Carefully inspect from all angles to ensure proper diamond formation. Fix any problem areas as you go to prevent buildup of stringing flaws. Properly threaded shooting strings are the lynchpin of a cleanly strung goalie head.
Tips for Shooting String Success
Here are some top tips when installing your shooting strings:
- Maintain taut tension on strings as you interlace
- Pull each diamond taught before moving to the next
- Use a starter knot then half hitch knots for security
- Weave interweaves under and over shooting strings, never twisting or crossing
- Work cleanly to prevent bunching, tangling or crossed strings
- Inspect from multiple angles to ensure uniformity
Be patient and focus on quality over speed during this intricate process. Properly threaded shooting strings are the foundation of a beautifully strung goalie head. Master this step, and you’re well on your way to stringing greatness.
With the shooting strings installed and interwoven, the ball will have a defined cradle without moving all around the head. Next up is tightening up the channel by installing the retaining sidewalls. Let’s continue our journey towards perfectly stringing your goalie stick this season!
Tie Off the Shooting Strings
You’re cruising right along in the stringing process, those shooting diamonds are looking crispy. Now it’s time to tie up any loose ends – literally – with the shooting strings before moving on. Having unsecured shooting strings flapping around your head is a goalie’s worst nightmare. So let’s finish strong and make sure those bad boys aren’t going anywhere.
As you near the final few diamonds, take care to maintain consistent spacing and tension up to the very top. Don’t rush through these last ones. It’s not over ’til it’s over.
Once the final shooting string is threaded through the top sidewall holes, grab your pliers and a crimp to securely fasten the end. Pass the mesh tail through the crimp and cinch down tight using the pliers. This locks the mesh in place for good.
You can also elect to simply tie a double or triple knot instead of crimping. Some goalies prefer knots over crimps for more natural feel. Test the tension to make sure it’s solid.
Alternatively, thread the end through an adjacent hole and tie it off internally for added security. Either way, that last shooting string isn’t going anywhere now. Let’s celebrate the small wins.
Trim and Singe
Once the final shooting string is crimped or knotted, trim any excess tail with your cutters. Leave only about an inch or so remaining. Next, take your lighter and gently singe the end. This melts the nylon to help prevent fraying.
Don’t get scissor happy and trim too close, leaving no tail. Some length helps ensure the knot won’t slip open. Be conservative here.
Repeat this trim and singe process on any other shooting string tails throughout the head. Do a final pass to clean up any long stragglers. Keep things looking tidy in there.
Inspect Your Diamonds
With the shooting strings tied up, now is a good time for an end-to-end inspection. Look closely at each diamond and how they compare to each other. Are they consistently spaced with uniform tension? Any problem ones need an adjustment?
Look for gaps, bunching, or diamonds that are too tight or loose. Fix any issues now before the sidewalls go on. Dial in perfection here, as it’s difficult to adjust shooting strings once the sidewalls are installed.
If needed, loosen a knot and re-pull a problem diamond to even it out. Little tweaks go a long way. Don’t be shy about nitpicking – attention to detail is vital in a clean string job.
Shooting String Success Checklist
Before moving on from the shooting strings, verify the following:
- Consistent diamond size and shape
- No gaps, bunching, or twisting
- Taut tension on each diamond
- Crisp knots and clean tails
- No stray strings hanging loose
Box checked on shooting strings? Let’s pat ourselves on the back then keep this stringing train rolling. Up next is installing the sidewalls to tighten up the channel down the rails. We’re really making headway now (pun intended). Our perfectly strung goalie stick awaits!
How to Perfectly String Your Goalie Stick This Season: The Complete 15-Step Guide
As any seasoned goalie knows, properly stringing your stick is essential for optimal performance between the pipes. From pocket depth and shape to overall feel and control, getting the stringing right can be the difference between stopping that crucial save or letting in a soft one. Although professional stringers do incredible work, doing it yourself allows you to customize your stick exactly to your preferences. Follow this comprehensive guide to stringing your own goalie stick this season like a pro.
Step 1: Selecting Mesh, Strings, and Sidewall
The first step is choosing your supplies. When it comes to mesh, nylon is the most popular option as it provides great ball feel and hold. For stringing, you can’t go wrong with wax-coated varieties for optimal durability and performance. As for sidewall, molded sidewall is easiest for beginners to work with. Once you have your materials, it’s time to prep the stick’s head.
Step 2: Cut the Sidewall
Measure the width of the head from sidewall to sidewall and cut a length of sidewall to match. Use sharp scissors to prevent fraying. The piece should fit snugly along the entire base of the head from one sidewall to the other.
Step 3: Insert the First Sidewall
Take the length of sidewall and insert it into the head, pressing it firmly into place along one side from top to bottom. Pull it taut as you work your way down. Use a sidewall tool or screwdriver to push it fully into the groove. Go slowly and be patient here – straight, tight sidewalls are crucial.
Step 4: Secure with String
Anchor the starting end of the sidewall in place by stringing horizontally through the first and second holes, then up through the third. Pull tight and tie off with a triple knot. Continue stringing through the next few holes, keeping tension high. The sidewall should now be held firmly along that first side.
Step 5: Insert the Second Sidewall
Now insert the second piece of sidewall into the opposite side, again pressing it fully into the groove from top to bottom. Work slowly and methodically for best results. Use the sidewall tool as needed to get it deeply set.
Step 6: Secure Second Sidewall
Just like the starting end, anchor the bottom of the second sidewall in place by stringing horizontally through the second-to-last and last holes, then up through the hole above. Secure with a triple knot and continue stringing up through the next few holes to firmly hold the sidewall in place.
Step 7: Create the First Shooting String
The shooting strings provide structure, ball control, and adjustability. For the first one, measure a piece of hockey string about 1-2 inches longer than the width of the head. String up through the second sidewall hole on the bottom of the head, then across through the opposite side’s second hole. Continue up through the same hole you started in. Pull tight.
Step 8: Create Second Shooting String
Measure another piece of string approximately the same length as the first shooting string. String this starting in the same holes as the first, essentially stacking the shooting strings on top of each other. Having two stacked shooting strings allows tensioning and adjusting pocket depth.
Step 9: Complete Sidewall Stringing
Finish stringing vertically up both sidewalls until you reach the last three holes at the scoop. On both sides, string down through the third-to-last hole, then back up through the second-to-last. Tie off here with a triple knot.
Step 10: Weave the First Horizontal Row
Cut a length of string about 2 inches longer than the scoop width. Leaving a 6-inch tail, string up through the middle hole on the scoop, then weave over-under across the head. When you reach the 6th hole on the opposite sidewall, loop around and return back across the head in the same over-under pattern. The first horizontal row is complete.
Step 11: Complete Remaining Rows
Continue weaving rows by stringing up through the next hole down the sidewall, and across the head in an over-under pattern. Space rows about 1/4 inch apart for optimal pocket depth. Weave 4-5 rows below the shooting strings depending on preference. Leave an extra hole or two unstrung at the bottom for a deeper pocket.
Step 12: End Wall Weaving and Tie Off
When you reach the bottom sidewall holes, loop around and weave back up to the top in the same over-under pattern. Tie the working end to the remaining sidewall string tail at the scoop using a triple knot. Melt the knot ends with a lighter to fuse.
Step 13: Install the Mesh
Lay your mesh piece over the strung head, centered from side-to-side. Start by anchoring each bottom corner of the mesh using a plastic end cap, tying knots, or stringing loops. Then, working from bottom to top, string the mesh to the sidewalls using a double overhand knot at each hole. Pull each knot tight as you go for maximum hold.
Step 14: Form the Pocket
Once the mesh is fully attached, it’s time to form the pocket to your exact preferences. Loosen or tighten each mesh diamond, adjust the shooting strings, and tie knots as needed to achieve your desired pocket depth and ball control. The materials will break in over time, so you may need to periodically tweak it.
Step 15: Test It Out
Now that your stick is strung, take it out on the ice or street hockey court and put it through its paces. Take shots, move around, and get a feel for the pocket and performance. Make small adjustments as needed until it feels like an extension of your hand. With the perfect custom stringing, you’ll notice the difference in your game this season.
There you have it – 15 steps to stringing your own goalie stick like a seasoned pro. While it takes time and patience to master, doing it yourself lets you fully customize your paddle to your exact preferences. Follow these key stringing steps and principles, and you’ll have your stick dialed in for on-ice excellence.
Weave the First Diamond
Stringing a goalie stick takes time, patience, and the right techniques. But with the proper skills, you can customize your paddle to match your exact style of play. Whether you want more rebound control, a deeper pocket, or increased ball-stopping power, it all starts with the stringing. Follow this detailed walkthrough to weave the diamonds and sidewalls like a pro for on-ice excellence this season.
Choose Your Stringing Supplies
First, gather your stringing materials. For the mesh, polyester and nylon blends offer great durability and ball feel. Waxed hockey laces make ideal stringing because they resist fraying and hold knots firmly. And opt for pre-molded sidewall pieces as you learn, rather than trying to string your own. Once you have your mesh, laces, and sidewalls ready, it’s time to prep the stick’s head.
Insert the Sidewalls
Measure the sidewall pieces to match the length of the head’s base. Use sharp scissors for clean, even cuts. Insert the first sidewall into the groove, pressing down firmly from top to bottom. Anchor it by stringing horizontally through the lowest holes and up through the one above. Do the same for the second sidewall on the opposite side. Take it slowly to keep the walls taut.
Add the Shooting Strings
Shooting strings create structure and allow you to adjust pocket depth. Measure a piece of lace about 1-2 inches longer than the scoop’s width. String up through the second sidewall hole on one side, across to the opposite side’s second hole, then back up through where you started. Repeat for the second shooting string.
Finish the Sidewalls
Continue stringing vertically up both sidewalls until you reach the final three holes near the scoop. On each side, string down through the third-to-last hole, then come back up through the hole below it to anchor the top.
Weave the First Diamond
Now it’s time to weave the horizontal lacing rows that form the pocket’s diamonds. Cut a piece of lace about 2 inches longer than the scoop’s width. Leaving a 6-inch tail at one sidewall, string up through the middle scoop hole, then weave over-under across the head to the opposite sidewall. When you reach the sixth hole down, loop around and weave back across in the same over-under pattern.
Complete the Remaining Diamonds
Continue lacing rows by coming up through the next hole down the sidewall, then weaving over-under to the other side and back. Space rows about 1/4 inch apart for ideal pocket depth. Weave 4-5 rows below the shooting strings based on preference. Leave the bottom few holes unlaced for a deeper pocket.
Secure the Lacing
When you reach the bottom sidewall holes again, loop around and weave back up to the scoop in an over-under pattern. Tie the working end to the sidewall tail using a triple knot, then singe the ends together with a lighter for durability.
Install the Mesh
Lay your mesh piece centered in the strung head. Anchor the bottom corners, then attach the mesh by stringing double overhand knots at each hole up the sidewalls. Pull each knot tight as you go to maximize hold. Take your time here for even mesh placement.
Form the Pocket
After the mesh is attached, shape the pocket by customizing the diamond tensions. Loosen or tighten each lace crossing, adjust the shooting strings, and tie knots as needed to get your ideal pocket depth and ball control. The materials will break in over time, so occasional tweaks may be needed.
Test and Tune the Pocket
Now it’s time to try out your handiwork. Take some shots, move around, and get a feel for the pocket performance. Make micro-adjustments as needed, like loosening diamonds for a deeper pocket or tightening the shooters for more rebound control. Keep tuning until it feels perfectly dialed-in.
With the right techniques and a methodical approach, you can customize your goalie stick’s stringing at home this season. While mastery takes practice, following key steps like properly weaving the first diamond will help set you up for stringing success. Take pride in putting your personal touch on your paddle for optimal on-ice play.
Continue Weaving Diamonds
When it comes to dialing in your goalie stick, proper stringing is key. The technique you use to lace the sidewalls and interwoven diamonds can customize the pocket to match your style of play. While it takes practice to master, learning how to continue weaving flawless diamonds will give you the control and responsiveness needed to dominate between the pipes.
Choose the Stringing Materials
First, pick out your supplies. For the mesh, polyester and nylon blends offer great durability and ball feel. Waxed hockey laces make great string for their friction and knot-holding abilities. And opt for pre-molded sidewall pieces when starting out for easier installation. Once you have your mesh, laces, and sidewalls, it’s go time.
Insert and Anchor the Sidewalls
Measure your sidewall pieces to match the head’s length and trim to fit. Insert one into the sidewall groove, pressing down firmly from top to bottom. Anchor it by lacing horizontally through the lowest holes. Do the same for the opposite sidewall. Keep them taut as you go for straight, tight walls.
Add the Shooting Strings
Shooting strings create structure and allow pocket depth adjustments. Measure a piece of lace about 1-2 inches longer than the scoop’s width. String up through the second sidewall hole on one side, across to the opposite side’s second hole, then back up through where you started. Repeat for the second shooting string.
String the Sidewalls
Moving up from the shooting strings, continue lacing vertically up both sidewalls until you reach the final three holes near the scoop. On each side, string down through the third-to-last hole, then come back up through the hole below it to anchor the top.
Weave the First Diamond
Now comes the fun part – weaving the interlocking diamonds that form the pocket. Take a piece of lace about 2 inches longer than the scoop’s width. Leaving a 6-inch tail at one sidewall, come up through the middle scoop hole and weave over-under across the head to the other sidewall. When you reach the sixth hole down, loop around and return back across in the same over-under pattern.
Continue Weaving Diamonds
Keep lacing rows by coming up through the next hole down the sidewall, then weaving over-under to the opposite side and back. Space rows about 1/4 inch apart for ideal pocket depth. Weave 4-5 rows below the shooting strings based on preference. Leave the bottom few holes unlaced for a deeper pocket.
Complete the Lacing
When you get to the bottom sidewall holes again, loop around and weave back up to the scoop in the same over-under manner. Tie off the working end to the sidewall tail using a triple knot, then fuse the ends together with a lighter for durability.
Attach the Mesh
Lay your mesh centered in the strung head. Anchor the bottom corners, then tie double overhand knots at each hole up the sidewalls to secure the mesh. Take your time for clean, evenly spaced attachments.
Shape and Tune the Pocket
Once the mesh is on, shape the pocket by customizing the diamond tensions. Loosen or tighten each lace crossing, adjust the shooting strings, and tie knots as needed to achieve your perfect pocket depth and ball control. Make micro adjustments over time as the materials break in.
With the proper techniques and patterns for continuing to weave flawless diamonds, you can customize your goalie stick’s stringing this season. While it takes practice to master, nailing down the fundamentals will provide the responsive, dialed-in paddle you need to own the crease.
Install the V Shooter
When it comes to goalie stick stringing, the details make all the difference. Small customizations to pocket shape, shooter placement, and lacing patterns can take your paddle from stock to game-ready. While it takes practice, learning techniques like installing a V-shaped shooting string will give you the control needed to command the crease.
Gather Your Stringing Supplies
First up, collect your materials. For mesh, polyester blends offer great durability and feel. Waxed hockey laces work best for stringing thanks to their non-fraying and grip. And molded sidewalls make installation much easier for beginners. Once you’ve got your mesh, laces, and sidewalls ready, it’s go time.
Insert and Anchor the Sidewalls
Measure your sidewalls to match the head’s length and trim to size. Insert one into the groove, pressing down firmly from top to bottom. Anchor it by lacing horizontally through the lowest holes. Repeat this process for the opposite sidewall. Keep them tight.
String the Sidewalls
Moving up from the base, continue stringing vertically up both sidewalls until you reach the final three holes near the scoop. On each side, string down through the third-to-last hole, then come back up through the hole below it to anchor the top.
Weave the Diamonds
Now it’s time to lace the interlocking diamonds that form the pocket. Leaving a tail at one sidewall, come up through the middle scoop hole and weave over-under across the head to the other sidewall and back. Continue lacing rows in this pattern, spacing about 1/4 inch apart.
Install the V Shooter
To add multifunctional adjustability, install a V-shaped shooting string. Measure and cut a piece of lace long enough to string inverted V’s across the head. Start by lacing up through opposing sidewall holes near the scoop to anchor the lace. Continue stringing diagonally down towards the center, crisscrossing in a V pattern. With the V-shooter, you can easily tweak pocket depth and ball control.
Attach the Mesh
Lay your mesh centered in the strung head. Secure the bottom corners, then tie double overhand knots at each hole up the sidewalls to attach the mesh. Take care to keep the knots uniformly spaced for proper pocket formation.
Shape and Customize the Pocket
Once the mesh is on, shape the pocket by adjusting the diamonds and V-shooter. Loosen or tighten each crossing, and tweak the shooter angles as needed to get your ideal pocket depth and ball control. The materials will break in over time, so you’ll need to make occasional adjustments.
Test It Out and Tune
Now it’s time to try out your custom stringing. Test the pocket performance by cradling, passing, and taking shots. Make micro-adjustments like tightening diamonds or the V angles until it feels perfectly dialed-in.
Learning specialized stringing steps like installing a V-shaped shooter will help take your goalie stick to the next level. With the right techniques, you can craft a paddle this season that matches your exact style of play for on-ice excellence.
Tie Off the V Shooter
When stringing your own goalie stick, small customizations make a big difference in performance. Everything from the sidewall pattern to the shooter setup impacts pocket feel and ball control. While it takes practice, learning key steps like properly tying off a V-shaped shooter will give you the responsive paddle needed between the pipes.
Select Your Stringing Materials
First up, pick out your supplies. Polyester mesh offers great durability and feel. For stringing, waxed hockey laces resist fraying and hold knots tight. And opt for pre-molded sidewalls to make installation easier. Once you’ve got your mesh, laces, and sidewalls, it’s time to string.
Set the Sidewalls
Measure your sidewalls to match the head’s length and trim to fit. Insert one into the groove, pressing down firmly from top to bottom. Anchor it by lacing horizontally through the lowest holes. Repeat on the opposite sidewall. Keep them tight.
String the Sidewalls
Moving up from the base, continue stringing vertically up both sidewalls until you reach the final three holes near the scoop. On each side, string down through the third-to-last hole, then come back up through the hole below it.
Weave the Diamonds

Now lace the interlocking diamonds that form the pocket. Leaving a tail at one sidewall, come up through the middle scoop hole and weave over-under across the head to the other sidewall and back. Continue lacing rows in this pattern, spacing about 1/4 inch.
Install the V Shooter
For adjustable control, lace a V-shaped shooter. Cut a piece of lace long enough to string inverted V’s across the head. Start by anchoring the lace through opposite sidewall holes near the scoop. Continue stringing diagonally down in a crisscross V pattern towards the center.
Tie Off the V Shooter
Once you’ve reached the desired V shape, tie the working end of the lace to the sidewall tail at the scoop using a triple knot. Pull it tight and use a lighter to fuse the knot ends for security. The finished V-shooter lets you easily tweak pocket depth.
Attach the Mesh
With the head strung, lay your mesh piece centered inside. Secure the bottom corners, then tie double overhand knots at each hole up the sidewalls to attach the mesh. Take care to keep the knots uniformly spaced.
Finalize the Pocket
After the mesh is on, finalize the pocket by customizing the diamonds and V-shooter angles as needed to get your perfect depth and ball control. The materials will break in over time, so occasional adjustments may be required.
Learning to properly tie off stringing elements like a V-shaped shooter will give your goalie stick the customized feel you need in the crease. With the right techniques and patterns, you can craft a paddle this season that matches your exact style of play.
Adjust Pocket Depth
When it comes to goalie stick stringing, getting the pocket just right is key for optimal performance in the crease. The exact depth, shape, and ball control can be customized through adjustments to the diamonds, sidewalls, and shooters. While mastering the nuances takes practice, learning techniques to tweak pocket depth will give you the dialed-in paddle you need between the pipes.
Pick Your Stringing Materials
First up, gather your supplies. Polyester mesh offers great durability and feel. Waxed hockey laces work best for reduced fraying and grip. Molded sidewalls simplify installation for beginners. Once you’ve got your mesh, laces, and sidewalls, it’s go time.
Set the Sidewalls
Measure your sidewalls to length and insert into the grooves, pressing down firmly. Anchor them by lacing horizontally through the lowest holes. Continue stringing vertically up the sidewalls to the top holes just below the scoop.
Weave the Diamonds
Now lace the interlocking diamonds that form the base of the pocket. Leaving a tail at one sidewall, weave over-under across the head to the other sidewall and back. Space rows about 1/4 inch apart for ideal depth.
Install the Shooters
Add shooting strings for structure and adjustability. String one end across the head through the second sidewall holes. Repeat for a second shooter. Stacked shooting strings allow easy tensioning.
Adjust Pocket Depth
With the diamonds and shooters laced, you can now customize the pocket depth. Loosen or tighten each lace crossing and tweak the shooter tensions as needed to achieve your perfect depth. Deeper pockets require more sag; shallower pockets need more tension.
Attach the Mesh
Once tuned, lay your mesh centered in the strung head. Anchor the bottom corners, then tie double overhand knots at each hole up the sidewalls to secure the mesh.
Check and Tweak Depth
After attaching the mesh, check the pocket depth again and make micro-adjustments as needed. The laces and mesh will break in over time, so occasional tweaks may be required.
Dialing in the exact pocket depth takes precision stringing techniques. But with practice adjusting the diamonds, sidewalls, and shooters, you can craft a custom goalie stick this season that matches your playing style.
Check Face Shape
When it comes to goalie stick stringing, optimizing the pocket for your unique playstyle is key. The exact depth, ball control, and feel can be customized based on factors like your glove hand, size, and preferred face shape. While perfecting the nuances takes practice, checking the face shape throughout the stringing process will ensure your paddle matches your needs.
Select Your Stringing Materials
First, pick out quality supplies that suit your preferences. Polyester mesh offers great durability and feel for most. Waxed hockey laces provide ideal string for reduced fraying and grip. And molded sidewalls simplify installation. Once you’ve got your mesh, laces, and sidewalls, it’s time to string.
Set the Sidewalls
Measure and insert the sidewalls into the grooves, pressing down firmly from top to bottom. Anchor them by lacing horizontally through the lowest holes. Continue lacing vertically up the sidewalls to the top scoop holes.
Weave the Diamonds
Now lace the interlocking diamonds that form the base of the pocket. Leaving a tail at one sidewall, weave over-under across the head to the other sidewall. Space rows about 1/4 inch apart for starter depth.
Check Face Shape
At this stage, check the pocket’s face shape and make sure it matches your needs. Wider heads typically need flatter faces for optimal ball control. Narrower heads can use more defined channel shapes. Adjust the diamonds as needed to tweak the face shape.
Install the Shooting Strings
Add shooting strings for structure and adjustability. String one end across the scoop through the second sidewall holes. Repeat for a second stacked shooter. This allows easy tensioning.
Attach the Mesh
With the face shape tuned, lay your mesh centered in the strung head. Anchor the bottom corners, then tie knots up the sidewalls to secure the mesh evenly.
Finalize Pocket Shape
Once the mesh is on, finalize the pocket by customizing the diamonds and shooters to get your ideal face shape and ball control. The materials will break in over time, so occasional adjustments may be needed.
Checking face shape throughout the stringing process helps craft a custom goalie head that matches your unique style. With practice, you can master precise stringing techniques for optimal performance between the pipes.
Test Ball Reaction
When stringing your own goalie stick, fine-tuning the pocket for optimal ball control and response is key. The way the ball sits, moves, and releases can be customized through precise adjustments to diamonds, shooters, and sidewall tension. While perfecting the nuances takes time, thoroughly testing ball reaction throughout the process will give you the dialed-in performance needed in goal.
Select Quality Stringing Materials

Start by collecting your supplies. Polyester mesh offers great durability and feel for most. Waxed hockey laces provide ideal string for reduced fraying and grip. And molded sidewalls make installation easier. Once you’ve got your mesh, laces, and sidewalls, it’s go time.
Set the Sidewalls
Measure and insert the sidewalls into the grooves, pressing down firmly from top to bottom. Anchor them by lacing horizontally through the lowest holes, keeping them tight.
Weave the Diamonds
Now lace the interlocking diamonds that form the base of the pocket. Leaving a tail at one sidewall, weave over-under across the head to the other side. Space rows about 1/4 inch apart initially.
Test Ball Reaction
At this stage, test how the ball sits and moves in the pocket. Drop a ball into the freshly strung head and see how it cradles, passes, and releases. Make diamond adjustments to optimize the ball control and response for your style.
Install the Shooting Strings
Add shooting strings for increased structure and adjustability. String one end across the scoop through the sidewall holes. Repeat for a second stacked shooter to allow tensioning.
Attach the Mesh
With the pocket tuned, center your mesh piece in the head. Anchor the bottom corners, then tie knots up the sidewalls to secure the mesh evenly.
Fine Tune Pocket
Once the mesh is on, fine tune the pocket by customizing the diamonds and shooters to achieve your ideal ball control and reaction. The strings will break in over time, so occasional tweaks may be required.
Testing ball reaction at each stringing stage will help you master the customization needed for goalie excellence. With practice, you can achieve the precise pocket performance your game demands.
Make Final Tweaks
How to Perfectly String Your Goalie Stick This Season: The Complete 15-Step Guide
As a goalie, having a properly strung stick is crucial for maximizing your performance on the ice. From pocket depth and shape to stringing materials and sidewall stiffness, every detail matters when it comes to getting the most out of your goalie head. While there are many great factory strung options available, taking the time to string your own goalie stick allows you to fully customize it to your exact preferences and playing style.
In this complete guide, we’ll walk you through the entire goalie stick stringing process from start to finish. We’ll cover everything from preparing the head to making final tweaks and adjustments. With these tips and techniques, you’ll be able to string a goalie head like a pro and have total control over your pocket and performance.
Materials and Tools Needed
Before getting started, you’ll want to make sure you have all the necessary supplies on hand. Here’s what you’ll need:
- Goalie head (unstrung)
- Mesh and sidewall string
- Stringing needle or a leather lace
- Scissors
- Lighter
- Leather conditioner or wax
- Stringing pliers
Quality mesh, like that from ECM or StringKing, along with durable sidewall string are essential for a great pocket. A sturdy but flexible stringing needle will make weaving a breeze. Scissors, a lighter, and leather conditioner will help prepare the materials. And stringing pliers allow you to tension knots and strings with ease.
Step 1: Prep the Head
Start by ensuring your goalie head is clean from dirt, debris, or old faded strings. Use a stiff brush and warm water to scrub off any particles. Then, use a lighter to burn off and remove any remaining strings or pieces still attached.
Next, condition the leather straps and shooters to renew any dried out areas and prevent fraying. Apply leather conditioner generously and let it soak in for 5-10 minutes before wiping off any excess.
Step 2: String the Sidewalls

Begin stringing at the bottom of the head just above the throat (the plastic piece that connects to the shaft). Tie one end of the sidewall string onto the head using a simple double knot.
Then, begin wrapping the string up one sidewall, threading up and down through each leather hole. Pull the string taut after each pass to tighten. Continue until you reach the tip of the head. Repeat on the other sidewall.
When you get to the top, tie off both sidewalls using a triple knot for extra security. Then use your lighter to melt the ends to prevent fraying.
Step 3: Cut the Shooting Strings
Next, measure and cut your shooting strings. Lay one shooter across the head from tip to tip; cut the string to this length. Repeat with the remaining string for the other shooter.
To keep the strings even, you can tie the ends together before cutting. You’ll want to use a very stiff polyethylene or dyneema string for optimal performance.
Step 4: Anchor and Weave the Shooting Strings
Take one of the cut shooting strings and anchor one end near the tip of the head using a double knot. Make sure to leave 1-2 inches of tail when tying the knot.
Then, begin weaving the string over and under the first sidewall in a figure 8 pattern. Continue wrapping down until you reach the opposite side. Pull the string snugly but not too tight.
Once you get to the other end, tie off just as you started using a double knot and 1-2 inch tail. Repeat steps on the other shooter.
Step 5: String the Mesh
Now comes the real fun – stringing the mesh. Start by anchoring one end of the mesh to the tip of the head using a triple knot. Leave a 1-2 inch tail just like with the shooting strings.
Then, begin stringing horizontally across the head, weaving over and under each shooter. Continue gradually working your way down pulling the mesh tight as you go.
When you reach the bottom, finish off with another triple knotted anchor leaving a tail. Singe any loose ends with the lighter.
Step 6: Form the Pocket
Once the mesh is attached, it’s time to begin shaping the pocket. Start by pushing the mesh downwards between each pair of shooters to form individual channels.
Then, use a stringing tool like the ECM StringKing Mesh Manipulator to further enhance and shape the pocket. Pinching the mesh will create deeper pockets while pulling outward forms shallower channels.
Spending time shaping the pocket at this stage is essential for getting the ball control and hold you want.
Step 7: Install the V-Braiding
To add extra hold across the center of the pocket, many goalies opt to install V-braiding or lacing. Cut a length of braiding slightly longer than the width of the head.
Anchor one end just above the midpoint shooter using a double knot. Then begin crisscrossing the braiding over and under each horizontal mesh row working your way down to the bottom.
Finish with another anchored double knot below the last mesh row. The V-pattern braiding will cup the ball perfectly in the pocket.
Step 8: String the Midsection
The midsection refers to the mesh area between the upper and lower sidewalls near the throat of the head. This is an often overlooked but critical area when stringing.
To start, anchor your sidewall string right below the last shooter with a double knot. Then begin wrapping downwards over the mesh towards the throat, threading the string under the V-braiding as you go.
When you reach the sidewall holes, thread the string through as usual. Finish with a triple knotted anchor just above the throat of the head.
Step 9: Install a Single Cross Lacing
Adding a cross lace from sidewall to sidewall can help stiffen the pocket and provide additional ball control. Take a 12-18 inch section of stiff sidewall string.
Starting at one side of the head, weave the string horizontally over and under the mesh working across the pocket towards the other sidewall. Anchor both ends with double knots.
Centering the cross lace in the middle of the pocket area typically works best. Keep it slightly loose, not overly tight.
Step 10: Adjust the Shooting Strings
At this point in the stringing process, you’ll want to make adjustments to fine tune the shooting strings. Start by ensuring the shooters are evenly spaced from the sidewalls.
Then, gently pull and tension the shooters until you achieve the desired height or depth for each mesh row. Higher pockets require tighter shooters while deeper setups need more slack.
Even out the channel heights from top to bottom. Having a nice gradual slope is ideal for optimum ball control.
Step 11: Customize the Sidewalls
Don’t be afraid to experiment with the sidewall stringing pattern. Many goalies customize their sidewalls based on pocket positioning preferences.
For example, skipping holes near the throat raises the lower pocket height. Or doubling up the string through certain holes can increase mid pocket definition.
Trying a criss-cross or diamond sidewall pattern is another unique option. The key is balancing hold and flexibility.
Step 12: Check Shooting Accuracy
Now it’s time to test out your new pocket by shooting some pucks! Start in close and work your way out, sampling different angles.
Pay attention to any inconsistencies in release, whip, rebound control, or accuracy. Make small adjustments to the shooting strings or sidewalls as needed.
Having a training partner catch and return your shots helps reveal problem areas. Strive for straight shots with minimal flutter or spin.
Step 13: Consider Adding Rail Strings
Adding nylon rail strings is an optional extra step that some goalies swear by. Start by anchoring one end of the rail string outside the first line of shooters up near the scoop.
Weave the string horizontally above the pocket towards the other side. Then loop down and anchor just outside the outer shooter row.
Rail strings help add stiffness across the top of the pocket for increased control on high shots. But they can limit ball movement from low shots.
Step 14: Check Pocket Shift
A great goalie pocket stays centered during play and doesn’t shift side-to-side or up-and-down excessively.
Test for pocket shift by tilting the head sideways and observe if the ball stays centered. Too much sway indicates the need for adjustments.
Try tightening the closest sidewall, adding another cross lace, or repositioning the V-braiding to minimize shift and keep the pocket placement consistent.
Step 15: Make Final Tweaks
At this final stage, break out the ball and get back on the ice for game-situation testing. Fire off reaction-save sequences and move aggressively across the crease to evaluate pocket performance.
Make any last tweaks while you have the mesh exposed and can easily access all pocket areas. Common final adjustments include:
- Raising/lowering shooting strings by 1-2 holes
- Changing sidewall patterns near the throat
- Tightening/loosening the open midsection
- Adding another cross lace if needed
Keep making incremental pocket modifications until everything feels perfectly dialed-in and optimized for your personal playing needs. With time and practice, you’ll develop the ability to string pro quality goalie heads tailored specifically for your game.
Break In Your New Pocket
How to Perfectly String Your Goalie Stick This Season: The Complete 15-Step Guide
Stringing a new goalie head is an art. But once you’ve got that freshly strung pocket, the work isn’t done. Now it’s time to break it in properly so it’s game-ready. Taking the right steps to get that pocket fully broken in can make a world of difference in performance.
Just like a new pair of shoes needs wearing in, that stiff mesh and crisp shooting string also requires some time to soften up before it hits the ice. While it may feel good right off the stringing jig, investing a few sessions to get everything flexed and formed is vital.
Here’s a look at the key steps to follow when breaking in a brand new goalie head pocket so it’s primed to stop pucks.
Wet it Down
Before doing anything else with that new pocket, you’ll want to get it wet. Douse the entire strung head area with water and let it soak in. This helps pre-soften the mesh and sidewall materials.
You can even let the head sit immersed in a bucket of water for 10-15 minutes. The moisture permeates every fiber to get the break-in started.
Work It In
Now it’s time to get hands-on with the pocket and manually work it in. Take a softball or rolled up sock and firmly press it into every area of the mesh.
Push side-to-side and up-and-down while squeezing the ball against the shooting strings. Roll it along the runners and sidewalls too. This compression mimics the forces a puck will apply.
You can even try standing on the head to really mash that pocket shape in. Just be careful not to snap the delicate shooting strings.
Toss Softballs
After some manual working, grab a couple softballs and start tossing them into the pocket. Focus on landing them firmly into the deepest areas of the mesh.
You want the continuous impacts to further soften and shape the materials. The softballs prevent damage while still flexing the key contact zones.
Do this from close range for 10-15 minutes to get a good pocket pounding. Funneling the balls into the prime catching areas is key.
Break It On Ice
Now it’s time to get that new pocket on the ice for some real world breaking in. Start by wearing it for stick and puck or public skating sessions before jumping into full practices or games.
Simply moving around the crease and dropping into your butterfly will continue working the pocket. Focus on moving diagonally across the ice to angle shots into the prime pockets.
Have teammates start ripping easy shots for you to handle. Absorbing these saves further softens mesh while dialing in your positioning.
Soak It Between Sessions
Make sure to soak the head in water for 5-10 minutes after each on-ice session while breaking in your pocket. This keeps the mesh loose and flexible after getting frozen.
Don’t let it sit for long stretches without a soaking as the ice can make the pocket stiff. A wet towel wrapped around the head works too.
Check for Imperfections
After a few break-in ice times, thoroughly examine your pocket for any defects or problem areas. Specifically look for:
- Frayed/ripped shooting strings
- Mesh tears near anchor knots
- Sidewall string slipping from holes
- Runners or cross-laces popping out of place
Catch and fix these issues immediately before they worsen. Carry backup mesh and strings in your bag for quick repairs.
Tune the Shooting Strings
As the pocket settles in, you’ll likely need to tighten up or reposition the shooting strings. The continuous impacts loosen knots and cause stretching.
Check that each line remains evenly spaced from the sidewalls and tight across the mesh. Adjust any problem spots for optimal pocket shape.
It’s common to drop each shooter down a hole or two lower than your initial stringing had them placed.
Consider Adding Stuffing

If you want some extra pocket break-in help, try adding supplemental materials inside the pocket. Many goalies stuff extra knee pillows, spare pads, or even pucks into the pocket when not using it.
This filling helps retain the molded shape between uses. Just be sure to remove before hitting the ice again.
Butterfly Press
Nothing will form your new pocket quicker than some dedicated butterfly presses. Lay the stick down in front of you and drop into an off-ice butterfly, pressing the pocket into the ground.
Focus on driving both knees straight down into the catching area while leaning heavily on the stick. Do 3-4 sets of 10-15 presses.
Use It in Games
The final and most effective way to complete the break-in process is using that pocket in live game action. The uncontrolled puck impacts and extreme movements will quickly whip that mesh into shape.
Don’t try to ease into it either – get acrobatic right away making reaction glove saves and dropping into full splits.
Stay on top of repairs and adjustments after each game to get that pocket dialed in. It will likely take 5-7 hard games before reaching prime performance.
Re-Check Shape and Hold
After a few games in action, closely re-examine the overall pocket shape, depth, and hold. The continuous impacts should have created a natural broken-in form.
Make any final shooter or sidewall tweaks to fine tune things like pocket centering, angle play, and ball retention. Top goalies constantly maintain and adjust their pockets.
While breaking in a pocket takes some work, it’s extremely satisfying finally dialing in that custom strung head exactly the way you want it. And a properly broken-in goalie head will stop more pucks and up your save percentage.