How to research Wisconsin’s solar incentives and rebates. What are the key steps for installing solar panels on your home in Wisconsin. How to understand net metering and sell-back policies for solar energy in Wisconsin. How to assess your home’s solar potential and energy needs. How to choose the right solar panels and equipment for your Wisconsin home. How to select a reputable solar installer in Wisconsin. How to navigate the permitting and inspection process for solar installation in Wisconsin.
Researching Wisconsin’s Solar Incentives and Rebates
Going solar in Wisconsin can be a smart investment, but it’s crucial to understand the available incentives and rebates to maximize your savings. Let’s explore the key programs and opportunities for Wisconsin homeowners:
Focus on Energy Program
The Focus on Energy program is a cornerstone of Wisconsin’s solar incentives. This statewide initiative offers cash-back rewards for homeowners installing solar panels. How much can you potentially save? The program provides up to $4,000 in rebates, significantly reducing the upfront costs of your solar installation.

Local Utility Solar Programs
Many Wisconsin utilities offer additional rebates or production incentives to complement the Focus on Energy program. These can vary widely depending on your location and energy provider. It’s worth contacting your local utility company to inquire about their specific solar incentives.
Municipal Solar Incentives
Did you know that over 20 Wisconsin cities have their own solar rewards programs? These municipal incentives can provide additional savings on top of state and utility offerings. Check with your local government to see if your city offers any solar-specific benefits.
Federal Solar Investment Tax Credit (ITC)
The federal solar tax credit remains a significant incentive for homeowners going solar. As of 2024, you can claim 30% of your solar installation costs as a tax credit. This substantial benefit can dramatically reduce the overall cost of your solar system.
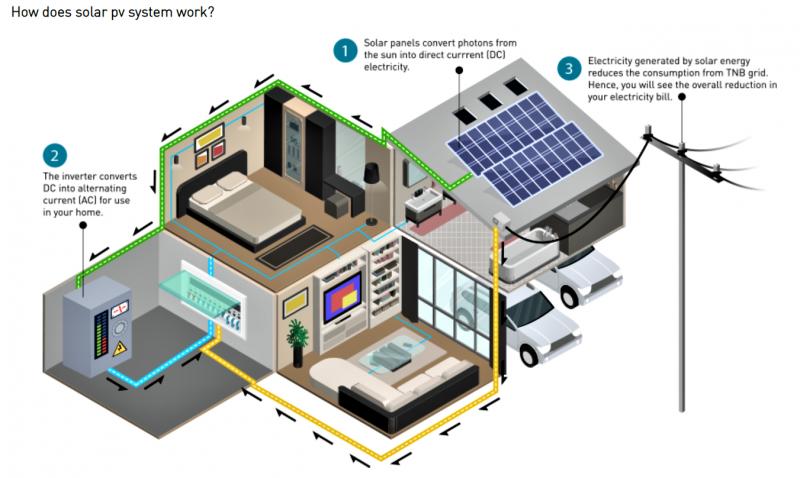
Understanding Net Metering and Sell-Back Policies
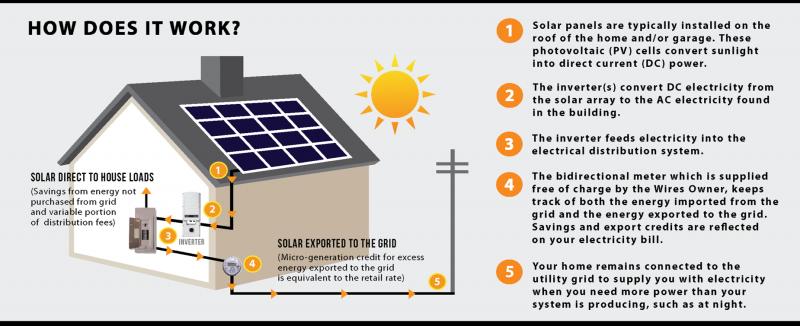
Net metering is a crucial concept for potential solar adopters in Wisconsin. This policy allows you to receive credit for excess solar energy sent back to the grid. How does net metering work in Wisconsin?

- When your solar panels produce more electricity than you’re using, the excess is sent to the grid.
- Your utility meter runs backwards, crediting you for this excess energy.
- During times when your panels aren’t producing enough (like at night), you draw electricity from the grid.
- At the end of your billing cycle, you’re only charged for the “net” amount of electricity used.
Net metering policies can vary by utility in Wisconsin. Some offer full retail rate credits, while others may use a lower “avoided cost” rate for excess generation. It’s essential to understand your specific utility’s net metering policy when calculating the potential savings and payback period for your solar investment.
Assessing Your Home’s Solar Potential and Energy Needs
Before diving into solar panel installation, it’s crucial to evaluate your home’s solar potential and current energy consumption. This assessment will help determine the size and type of solar system you need. What factors should you consider?

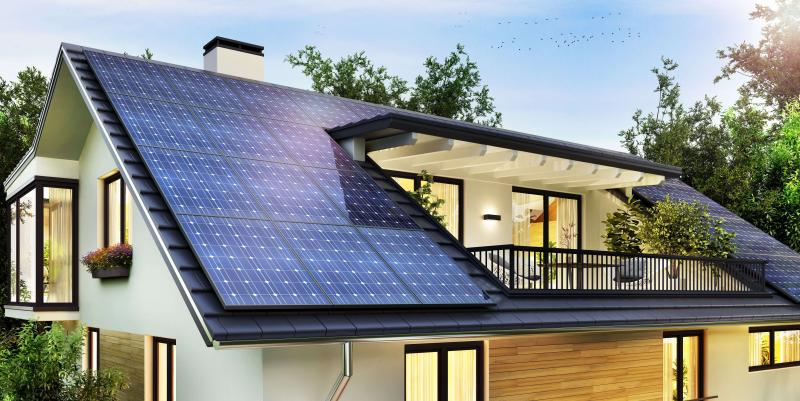
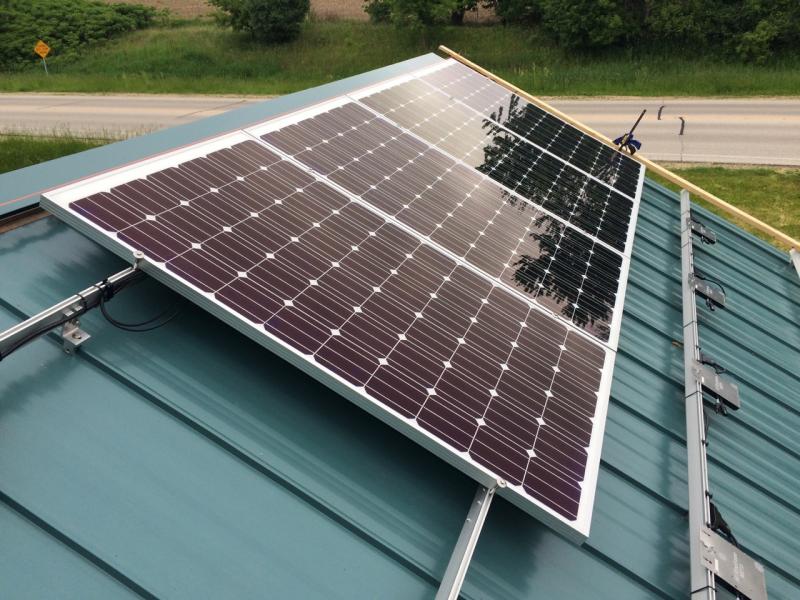
- Roof orientation and angle: South-facing roofs with a 30-45 degree tilt are ideal for solar in Wisconsin.
- Shade analysis: Trees, buildings, or other obstructions can impact solar production.
- Roof condition and age: Your roof should be in good condition and have at least 10-15 years of life left.
- Annual electricity usage: Review your past 12 months of electric bills to determine your average consumption.
- Future energy needs: Consider potential changes like electric vehicle charging or home additions.
Many solar installers offer free site assessments to evaluate these factors. Additionally, online tools like the National Renewable Energy Laboratory’s PVWatts Calculator can provide a preliminary estimate of your home’s solar potential.
Choosing the Right Solar Panels and Equipment
Selecting the appropriate solar panels and equipment is crucial for maximizing your system’s performance in Wisconsin’s climate. What factors should you consider when choosing solar panels?
Panel Efficiency
Higher efficiency panels can produce more electricity in limited space, which is especially important if your roof area is constrained. Look for panels with efficiency ratings of 19% or higher for optimal performance.

Temperature Coefficient
Wisconsin experiences significant temperature fluctuations throughout the year. Panels with a lower temperature coefficient will perform better in both hot summers and cold winters. Look for panels with a temperature coefficient of -0.3%/°C or better.
Durability and Warranties
Given Wisconsin’s varied climate, durability is key. Look for panels with strong warranties, typically 25 years or more for performance and 10-12 years for product defects. Consider panels rated for high snow loads and wind resistance.
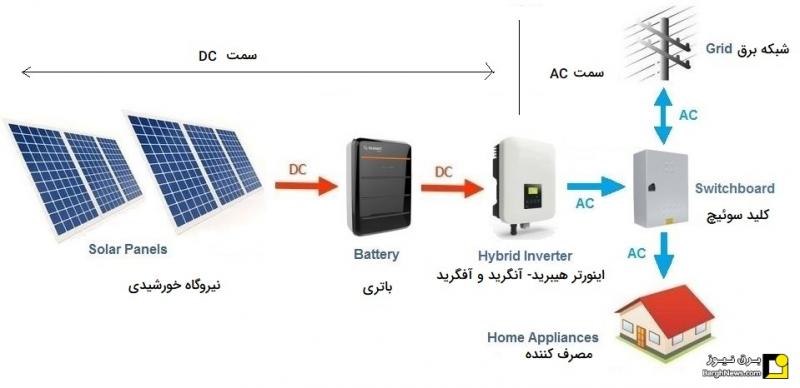
Inverter Options
Inverters convert the DC electricity produced by your panels into AC electricity used in your home. There are three main types to consider:
- String inverters: Cost-effective but can be impacted by shading issues.
- Microinverters: Offer panel-level optimization but are more expensive.
- Power optimizers: A middle-ground option that combines string inverter cost-effectiveness with some panel-level benefits.
Your choice of inverter will depend on your specific roof configuration, shading conditions, and budget.

Selecting a Reputable Solar Installer in Wisconsin
Choosing the right solar installer is crucial for ensuring a high-quality, efficient solar system that meets your needs. How can you find and vet potential installers?
Certifications and Licenses
Look for installers certified by the North American Board of Certified Energy Practitioners (NABCEP). In Wisconsin, solar installers should also have an Electrical Contractor license. Verify these credentials before proceeding.
Experience and Track Record
Prioritize companies with extensive experience installing solar in Wisconsin. They’ll be familiar with local regulations, climate considerations, and utility policies. Ask for references and examples of past installations in your area.
Reviews and Ratings
Check online reviews on platforms like Solar Reviews, EnergySage, and the Better Business Bureau. Pay attention to both positive and negative feedback, looking for patterns in customer experiences.
Warranty and Service Agreements
Reputable installers should offer robust warranties on both their workmanship and the equipment they install. Look for companies that provide ongoing maintenance and support services.

Transparent Pricing and Financing Options
Quality installers will provide clear, detailed quotes and explain all available financing options. Be wary of high-pressure sales tactics or deals that seem too good to be true.
Remember to get multiple quotes from different installers. This allows you to compare pricing, equipment options, and service offerings to find the best fit for your needs and budget.
Navigating the Permitting and Inspection Process
Installing solar panels in Wisconsin requires navigating various permitting and inspection processes. While your chosen installer will handle much of this, it’s helpful to understand the steps involved. What does the typical permitting process look like?
Electrical Permit
Most Wisconsin municipalities require an electrical permit for solar installations. This ensures that the system meets local electrical codes and safety standards. Your installer will typically handle the application and associated fees.
Building Permit
Some localities may require a building permit in addition to the electrical permit, especially if your installation involves significant structural changes or ground-mounted systems. Your installer should be familiar with local requirements.

Utility Interconnection Agreement
Before your system can be connected to the grid, you’ll need to apply for interconnection with your utility company. This process typically involves:
- Submitting an interconnection application
- Providing system design and specifications
- Potentially upgrading your utility meter
- Scheduling a final utility inspection
Inspections
Several inspections may be required throughout the installation process:
- Pre-installation inspection: Some municipalities require this to verify roof condition and structural integrity.
- Rough inspection: Conducted after mounting hardware is installed but before panels are placed.
- Final electrical inspection: Ensures all wiring and electrical components meet code requirements.
- Utility inspection: Your utility company will inspect the system before granting permission to operate.
Your installer should coordinate these inspections and address any issues that arise. However, it’s a good idea to stay informed about the process and ask questions if anything is unclear.

Financing Your Solar Installation in Wisconsin
While the long-term savings of solar are significant, the upfront costs can be substantial. Fortunately, there are several financing options available to Wisconsin homeowners. What are the most common ways to finance a solar installation?
Cash Purchase
Paying cash upfront offers the highest long-term savings and quickest payback period. While it requires a significant initial investment, you’ll own your system outright and benefit from all available incentives and energy savings.
Solar Loans
Many banks and credit unions in Wisconsin offer solar-specific loans. These can be secured (using your home as collateral) or unsecured. Solar loans allow you to own your system while spreading the cost over time, typically 5-20 years.
Home Equity Loans or Lines of Credit
If you have significant home equity, these options can offer lower interest rates than unsecured loans. The interest may also be tax-deductible, providing an additional benefit.

Property Assessed Clean Energy (PACE) Financing
Some Wisconsin counties offer PACE financing, which allows you to finance your solar installation through an assessment on your property tax bill. This can offer longer repayment terms and potentially lower interest rates.
Leases and Power Purchase Agreements (PPAs)
While less common in Wisconsin, some companies offer solar leases or PPAs. These options allow you to benefit from solar with little to no upfront cost, but you won’t own the system or be eligible for many incentives.
When considering financing options, be sure to compare the total cost over the life of the loan or agreement. Factor in interest rates, fees, and the impact on your ability to claim incentives. A reputable solar installer should be able to help you understand and compare different financing scenarios.
Maintaining Your Solar System in Wisconsin’s Climate
Once your solar panels are installed, proper maintenance is key to ensuring optimal performance and longevity, especially given Wisconsin’s varied climate. How can you keep your solar system in top shape?

Regular Cleaning
Wisconsin’s changing seasons can lead to buildup on your panels. While rain and snow often provide natural cleaning, occasional manual cleaning may be necessary. Use water and a soft brush or cloth, avoiding harsh chemicals or abrasive materials.
Snow Removal
Wisconsin winters can bring heavy snowfall. While panels are typically installed at an angle that promotes snow sliding off, you may occasionally need to remove snow. Use a soft brush with an extended handle, being careful not to scratch the panels.
Monitoring System Performance
Most modern solar systems come with monitoring software that allows you to track energy production. Regularly check this data to ensure your system is performing as expected. Sudden drops in production could indicate a problem that needs attention.
Professional Inspections
Consider having your system professionally inspected every few years. An experienced technician can identify and address potential issues before they become major problems.

Trim Nearby Trees
Keep trees near your solar panels trimmed to prevent shading and reduce the risk of falling branches damaging your system.
Prepare for Extreme Weather
Wisconsin can experience severe thunderstorms and occasional tornadoes. Ensure your system is properly grounded and consider additional protective measures in high-risk areas.
By following these maintenance tips and staying proactive, you can help ensure your solar investment continues to provide clean, efficient energy for decades to come.
Research Wisconsin’s solar incentives and rebates
Installing solar panels on your Wisconsin home can provide clean, renewable energy and help you save on electricity costs. However, the upfront cost of purchasing and installing a solar system can seem daunting. That’s where solar incentives and rebates come in – they can help make going solar more affordable.
If you’re considering solar for your home, researching the available incentives is an important first step. Wisconsin has several state, utility, and local programs that offer rebates, tax credits, and other benefits for residential solar projects. Understanding what’s available can help you calculate solar payback periods and determine if solar makes financial sense for your home.
Here is a 15-step checklist to help you research and evaluate your options:
- Check out Focus on Energy incentives. This statewide program offers cash-back rewards for installing solar panels, up to $4,000 for homeowners.
- Look into your local utility’s solar programs. Many offer additional rebates or production incentives to complement Focus on Energy.
- See if your local municipal utility offers any solar incentives. Over 20 Wisconsin cities have their own solar rewards.
- Research federal tax credits. You can claim 26% of your solar installation costs back on your taxes until 2023.
- Evaluate low-interest solar loans and financing options. These can help you pay for panels over time.
- Ask your installer about manufacturer rebates on panels and equipment.
- Consider third-party ownership models like leases and power purchase agreements to reduce upfront costs.
- Check on solar renewable energy certificate (SREC) programs. Some utilities purchase these from homeowners.
- Look into net metering policies. This allows you to get credit for excess solar energy sent back to the grid.
- See if you qualify for any low-income solar incentives. Some assist disadvantaged households.
- Research any solar co-ops or group purchase programs in your area. Going solar as a group can help lower costs.
- Talk to solar-savvy neighbors. They may know of additional local incentives.
- Contact your state representatives. Let them know you support expanding solar incentives in Wisconsin.
- Compare quotes from multiple installers. This helps ensure you get the best deal on a solar system.
- Consider timing. Installing solar earlier maximizes the number of years to benefit from incentives.
Doing your homework on available solar incentives is time well spent. The savings can be substantial, often covering 25% or more of your total system costs. The incentives and rebates available do change frequently, so be sure to do an up-to-date search before moving forward with installation. Consult unbiased sources like the Wisconsin Solar Energy Industries Association and the Midwest Renewable Energy Association for the latest information.
With the right combination of solar incentives, you can make your home more sustainable while reducing energy costs. Find out what rebates are available to Wisconsin homeowners looking to go solar this year.
Key Concepts:
- Focus on Energy rebates provide up to $4,000 cash-back for installing solar in Wisconsin.
- Check with your local utility, municipality, installer, and state representatives on other solar incentives.
- Federal tax credits, low-interest financing, and third-party ownership can help reduce solar costs.
- Net metering gives you credit for excess energy sent back to the grid.
- Compare quotes and install solar early to maximize savings from incentives.
Hey there fellow Wisconsinites! If you’re thinking about going solar this year, I feel you. With electricity rates on the rise and all the rebates and tax credits out there, now is a great time to harness the power of the sun right on your own roof.
But where do you start? Installing solar panels can seem totally overwhelming. Permitting, rebates, panel options, installation…it’s a lot. The good news is, with the right checklist and guidance, going solar doesn’t have to be hard. You CAN do this.
I should know – I just had solar installed on my home right here in Wisconsin this year. And let me tell you, deciding to go solar was one of the best decisions I’ve made as a homeowner. I’ve slashed my electric bill, increased my home’s value, and I just feel good knowing I’m using clean, renewable energy from the sun.
If you want to join me in going solar in the great state of Wisconsin, just follow this 15-step checklist. It covers everything you need to install solar panels on your home and start harnessing the sun’s limitless energy.
Understand net metering and sell-back policies

First things first – you need to understand how net metering works with your electric utility company. Net metering allows you to send any excess solar energy you produce back to the grid. This spins your home’s electricity meter backwards and earns you credits on your utility bill.
Different utility companies have different net metering policies, so be sure to check on the specifics for yours. Most will let you cash out any excess credits at the end of the year. You can earn a nice check from the utility company that way!
Check solar incentives, rebates, and tax credits
One of the best parts of going solar is taking advantage of the many financial incentives out there. Be sure to see what state/local rebates or grants you can get. There is usually money available for both purchasing and installing your system.
Don’t forget about the 26% federal solar tax credit either. This will shave a significant amount off your tax bill. Some utilities also offer incentives for solar, so check with yours.
Understand your home’s energy use
Before getting solar quotes, take a close look at your electricity bills over the past year. See when you use the most energy and your highest peak loads. This will help you right-size your solar system.
You’ll want your solar panels to produce enough energy to cover most of your usage. But you don’t necessarily need to replace 100% of your bill, especially if you want to save on system costs.
Choose the right solar company
Research solar installers in your area and vet them thoroughly. Look for an established local company with plenty of experience and proven reviews. Get quotes from at least 3 installers before deciding.
Some key things to look for are experience designing systems in your utility territory, proof of insurance, and licensing to operate in Wisconsin. Never rush into a decision based on flashy advertising or pushy sales pitches.
Decide on panel setup and wiring
Next, you’ll work with your chosen solar company to decide on the specifics of your system setup and wiring configuration. Key considerations are:
- Number of solar panels
- Panel wattage and efficiency ratings
- Type of inverters
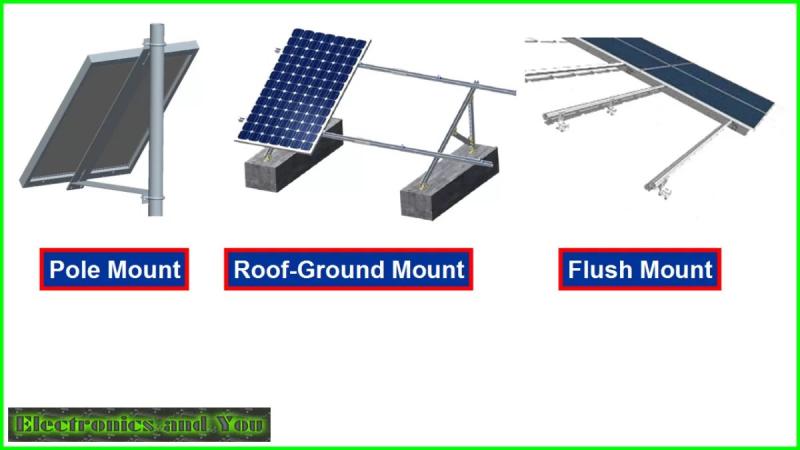
- Rack mounting method
- AC or DC system design
- Monophase or triphase wiring
Your installer will help optimize all this for your particular home and energy needs. Don’t be afraid to ask lots of questions!
Choose your panels and inverter
Now comes the fun part – picking out your actual solar equipment! Your installer will provide a selection of tier-1 solar panels and inverter options to choose from.
Keep in mind factors like panel warranties, performance guarantees, temperature ratings and aesthetics. You’ll also want an inverter with excellent reliability metrics and a warranty of at least 10 years.
Figure out permitting and zoning
There is permitting paperwork required to go solar in Wisconsin. Your installer will handle this, but expect to provide details like:
- System plans and specs
- Equipment cut sheets
- Your latest electric bill
- Site diagram showing panel locations
Your city will also want construction plans approved and may require a building or electrical permit. Know the zoning requirements ahead of time.
Prep your home for installation
Get your home ready for smooth solar installation by:
- Clearing panel mounting areas of debris
- Pruning overhanging tree branches
- Cleaning your roof if needed
- Moving items to clear pathways
Anything you can do ahead of time will mean fewer surprises and delays during install.
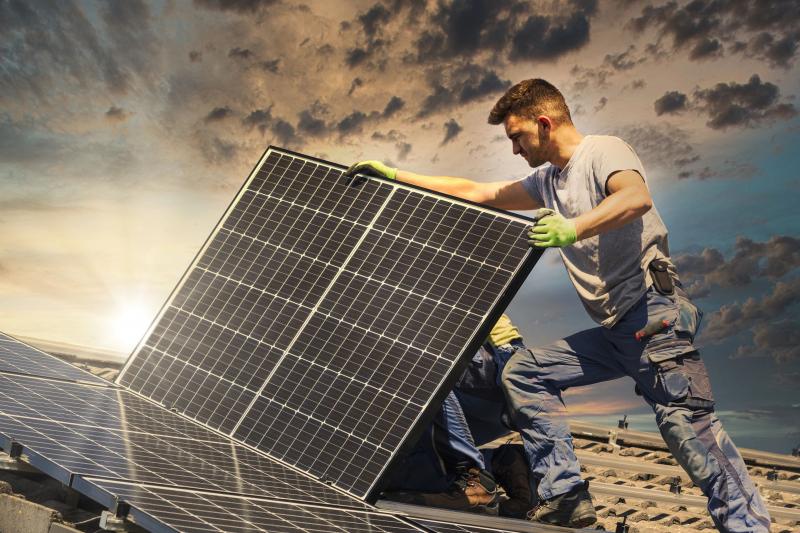
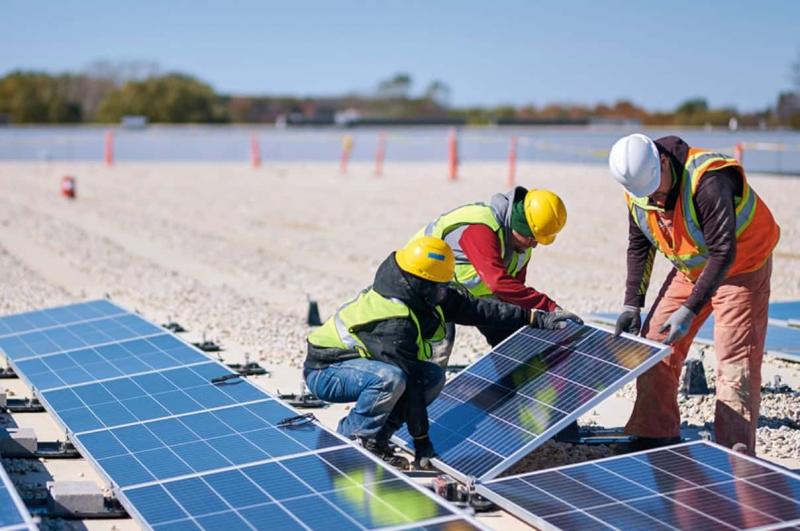
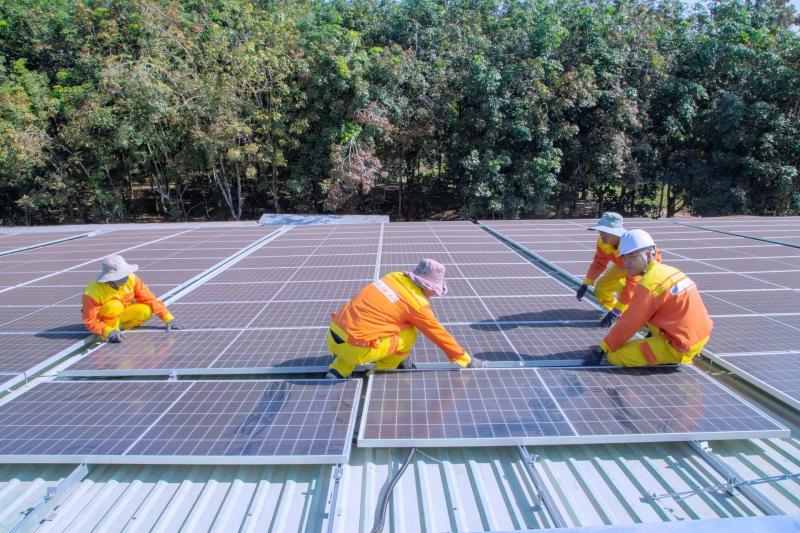
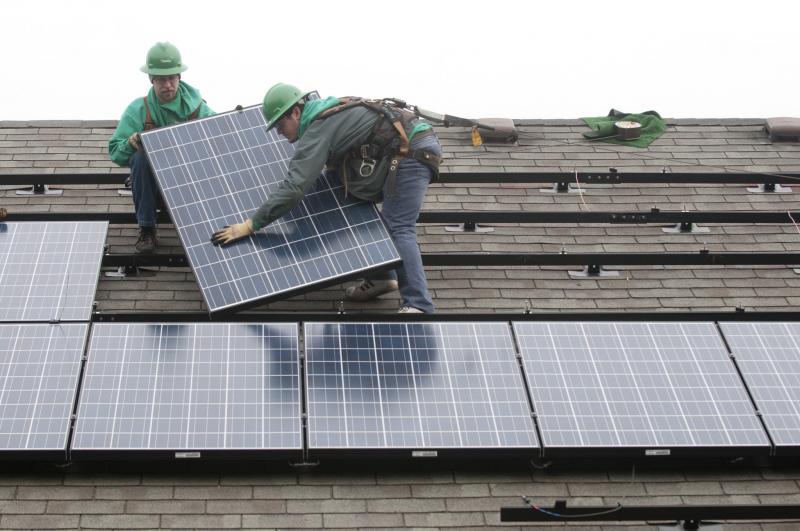
Complete the installation
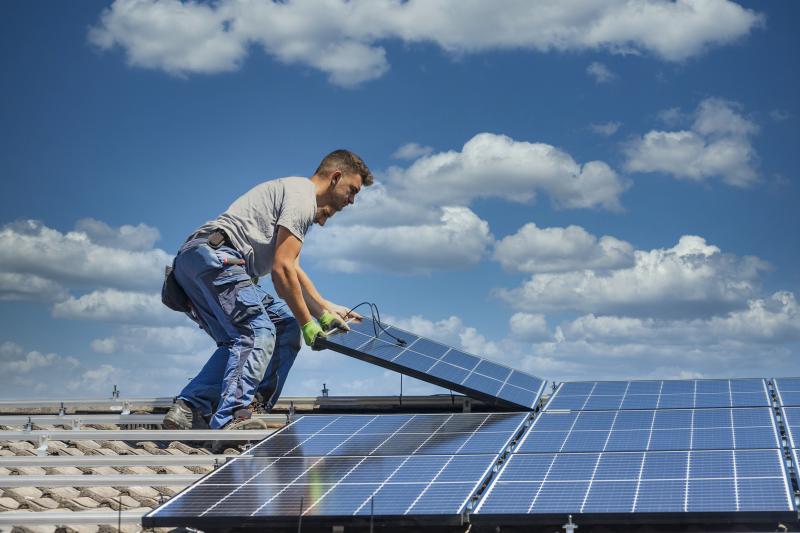
Congratulations – it’s finally time for your panels to get installed! The process typically takes 1-2 days with a crew of 2-6 solar technicians doing the work.
Installation involves:
- Roof preparation
- Mounting rails and panel securing
- Wiring panels and running conduit
- Attaching inverters and switchgear
- Connecting to your home’s electrical system
Your crew will be sure to cover all the details with you throughout. Feel free to ask questions or take pictures!
Pass inspections
Once installation is complete, your utility will send out a safety inspector. They will check that all wiring, connections, and equipment were done properly and to code.
Your solar company will also do thorough performance testing to ensure your system is producing energy as it should. Any issues will be addressed before final sign off.
Finish paperwork and financing
Now is when you’ll finalize any outstanding solar incentives, rebates, tax credits, and financing with your installer. Be sure you understand the timeframe for receiving any payments or credits.
If you financed your system, your loan provider will explain your payment schedule and terms. Read everything thoroughly before signing.
Monitor your system
Congratulations – start soaking up the sun! Most solar systems come with a monitoring platform you can access on your phone or computer. This lets you keep an eye on your solar energy production.
Monitoring also alerts you to any potential issues with your equipment. Stay engaged with your system’s performance and maintenance.
Celebrate going green
Time for a solar party! Celebrate your new solar panels with friends and family. Show off your solar production stats and bask in your green glowing pride.
Post photos of your new panels on social media and let the neighborhood know you went solar. Maybe you’ll inspire someone else to ditch fossil fuels too.
Bask in that warm sunny feeling of doing your part to reduce emissions and get Wisconsin closer to 100% renewable energy. Here’s to many years of clean solar energy ahead!
Howdy solar seekers! If installing rooftop solar panels is on your to-do list in Wisconsin this year, you’ve come to the right place. Going solar can be downright puzzling if you don’t know where to start. But have no fear, I’ve got the inside scoop after installing panels on my own home here in the Badger State.
By following this 15-step checklist, you’ll be ready to harness the sun’s rays and start slashing your electric bill. Let’s dive in! I’ll walk you through everything you need to know to solarize your home with maximum savings.
Get multiple quotes from local installers
First things first—get free quotes from at least three solar companies in your area. This gives you price comparisons and lets you vet each installer thoroughly. Look for well-established local firms with great reviews and extensive Wisconsin experience.
Ask questions about their track record, areas of expertise, safety standards, warranty policies, and experience with your utility. Don’t let flashy ads or pushy reps pressure you—take your time choosing.
Learn your utility’s net metering rules
Net metering is key to maximizing solar savings. This lets you get credits from your utility when your panels produce more energy than your home needs. Different utility companies have different rules, so research yours thoroughly.
Common policies include monthly roll-over of credits, cash-out of extra credits annually, and converting credits to kilowatt hours. Understanding the ins and outs will help you plan your system.
Explore every incentive and rebate

One of the perks of going solar is tapping into sweet incentives and rebates. Be sure to learn about federal, state, and local programs that can majorly offset both purchase and installation costs.
For example, don’t miss the 26% federal solar tax credit before it decreases. Your utility or state may also offer solar rebates. Every bit helps slash your out-of-pocket costs.
Analyze your electricity usage
Crunching numbers on your home’s past energy use helps determine the ideal solar system size. Look at bills from the past year to find your average monthly use and peak loads.
Understanding your consumption patterns will prevent over or under sizing. Aim for solar panels that can cover 80-90% of your typical electricity needs.
Pick the perfect panels and equipment
With your installer’s guidance, select top-tier solar panels and equipment. Consider factors like panel wattage, durability, temperature ratings, and product warranties.
For the inverter, focus on reliability metrics and choose a model with robust surge protection and at least a 10-year warranty.
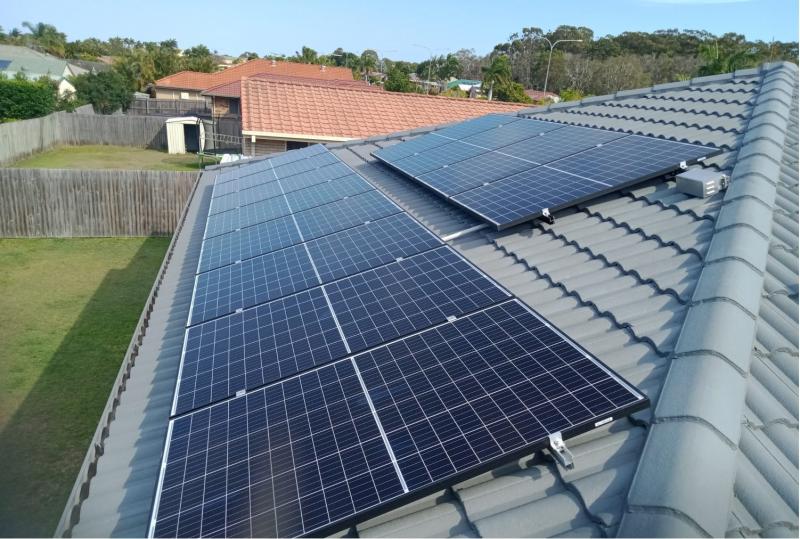
Map out panel placement
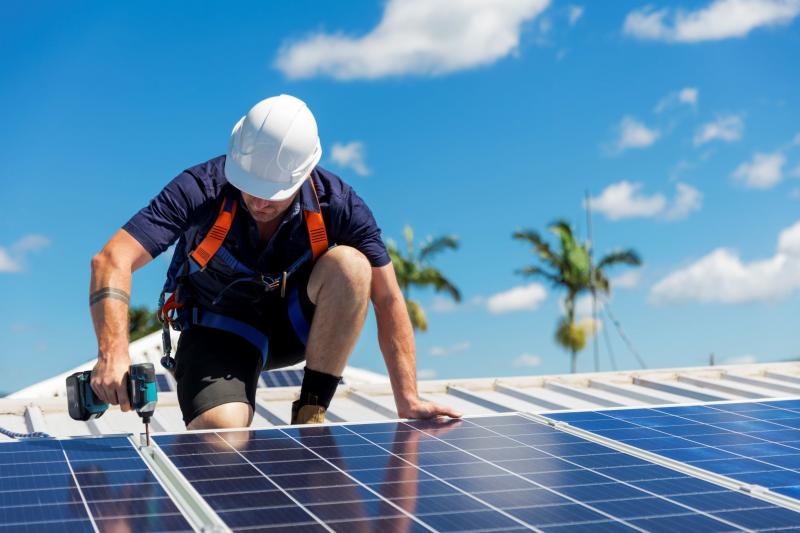
Figure out the optimal layout for your solar array. The angle and location will impact how much sun your panels get throughout the year. Maximize energy production by:
- Facing panels south
- Avoiding shading from trees or structures
- Angling panels based on your latitude
Also plan a layout that meets zoning rules and makes sense for your roof size and shape.
Work out permitting and regulations
There’s paperwork involved in going solar, so be prepared. Your installer will spearhead the permitting process, but you’ll likely provide:
- Site blueprint marking panel locations
- System plans and specs
- Equipment cut sheets
- Recent electricity bill
Check in advance on state and local solar regulations too. A smooth permitting process prevents headaches down the road.
Prep your home and site
Get your home ready for a smooth solar installation by:
- Clearing panel mounting areas
- Trimming back trees
- Moving stuff to clear work areas and paths
- Roof repairs if needed
A little prep work ahead of time prevents delays and surprises once installation day arrives.
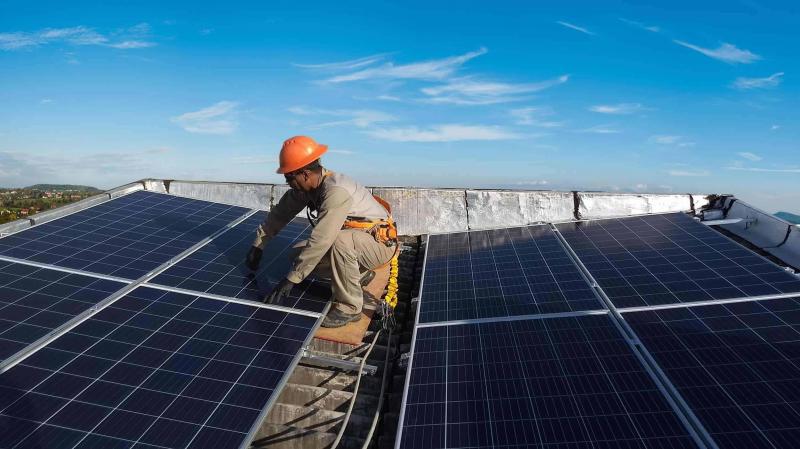
Complete the system installation
This is the moment you’ve been waiting for! Your solar company will send out an experienced installation team to get your system up and running. The fun parts include:
- Mounting rail assembly
- Attaching and wiring the panels
- Installing inverters and electrical gear
- Connecting to your home’s electric
Installation typically takes 1-2 days depending on your system size. The crew will keep you informed each step of the way.
Pass final inspections
Before wrapping up, your utility will inspect your solar system for proper installation and safety. An experienced solar company will also test system performance and output.
Rest assured any issues will be addressed right away. Once you pass inspection, you’re cleared to start soaking up the sun!
Complete financing and incentives
With your panels now in place, it’s time to square away financing and claim those sweet solar incentives. Provide any required paperwork and confirm payment timelines.
For loans or leases, be sure to thoroughly understand the terms before signing. Read the fine print to prevent surprises.
Monitor your system
Congratulations on joining the solar club! Most systems come with monitoring software so you can keep tabs on your energy production.
Watch how much sunlight translates into kilowatt hours and how much your meter spins backward. This also alerts you to any potential system issues.
Bask in your green glow
You did it! Time to sit back and soak up the satisfaction and savings that come with solar energy independence. Here are some fun ways to celebrate:
- Take an after photo from the same vantage point as your pre-solar shot
- Host a solar housewarming roof party
- Share your solar story on social media
- Apply for local solar awards
Cheers to greener days ahead thanks to your rooftop oasis of clean energy!
Hey Wisconsin energy trailblazers! I’m pumped you’re exploring solar for your home this year. With the right roadmap, you’ll be plugged into free, clean sun power in no time. Let’s dive into this 15-step checklist to solarize your roof like a pro!
I recently installed panels on my own Wisconsin home, so I’ll walk you through everything I learned. Stick with me and you’ll be a solar expert navigating incentives, permits, and installations in the Badger State like a boss!
Compare panel and inverter technology options
Once you’ve got quotes from reputable local solar companies, it’s time to geek out on the panel and inverter tech. Your installer will present a few options curated for efficiency and reliability.
For panels, consider wattage, temperature ratings, degradation rates, warranties, and aesthetics. Higher watt panels produce more power, but cost more too.
For inverters, seek robust surge protection, anti-corrosion casings, and a 10+ year warranty. Efficiency ratings are key too. Don’t skimp here – the inverter is the heart of your system!
Calculate the right system size
Take time to analyze your past energy use so your solar array is juuust right. If it’s too big, you’re overspending. Too small and you’ll still get hit with high utility bills.
Look at your bills to find:
- Average kWh use per month
- Peak energy usage times
- Seasonal use fluctuations
Your installer will help determine the ideal system output based on your home’s needs. Think “the three bears” – you want it to be just right!
Submit permits and plans
There’s paperwork involved in going solar in Wisconsin, but your installer will take the reins. Still, expect to provide:
- System design plans
- Equipment specs and data
- Roof diagram showing panel locations
- Recent electricity usage history
Local permitting regulations vary county to county, so talk with your city ahead of time to smooth the process.
Lock in financing and incentives
Time to get your financial ducks in a row! Be sure to apply for every possible rebate, tax credit, and incentive available. This includes federal and state programs.
Also finalize any solar loans and read the fine print thoroughly. Run the numbers to calculate your overall costs after incentives. Every penny counts!
Prep your property
Setting the stage makes installation day go smoother. Walk around your property and:
- Clear unused junk
- Trim overgrown trees
- Repair roofing if needed
- Clean gutters and downspouts
Tidying up helps the crew move faster and prevents little hangups from delaying your solar switch-flip.
Watch the panels get installed
Final prep work done! Now’s the fun part – watching your new high-tech panels get mounted and wired by the installation pros. Expect 1-3 days of buzzing activity:
- Mounting rail assembly
- Securing panels and making connections
- Attaching inverters and electrical components
- Linking to your home’s electric
Ask questions and snap some pics! Don’t forget to offer the crew snacks and water too.
Pass final inspections
Before you’re fully operational, both your utility and solar company will inspect everything. They’ll check for:
- Proper wiring and connections
- Equipment functionality
- Safety and code compliance
- System performance and output
Rest assured your installer will fix any issues pronto before you get the green light to start soaking up the sun!
Monitor your system and production
With your panels in place, it’s time to watch your system produce clean energy! Monitoring software gives you real-time solar production stats.
Geek out on how much sun is converted to kilowatt hours, see how your meter spins backward, and catch any potential problems early.
Celebrate your sun-powered home!
Congrats, you did it – time to party! Here are fun ways to celebrate your solar victory:
- Host a rooftop BBQ and toast your panels
- Take an “after” photo in the same spot as your “before” pic
- Post about your experience and share your installer
- Apply for Wisconsin solar awards
Sit back and bask in your pioneering move to energy independence! Thanks for helping make Wisconsin more solar-powered.
What’s up, Wisconsin solar seekers? Ready to harness the sun’s rays right on your own roof this year? Smart move! Going solar can seem overwhelming but I’ve got your back. Follow this 15-step checklist for smooth sailing from solar research to installation.
I just installed solar on my Wisconsin home so I’m passing my insider knowledge to you. Stay tuned for pro tips on maximizing savings as you join the solar ranks here in the Badger State!
Calculate your home’s energy usage and needs
First things first: understanding your home’s energy use helps right-size your solar system. Analyze at least a full year of utility bills to find:
- Average monthly kWh consumption
- Seasonal fluctuations in usage
- Which hours and times of day you use the most energy
Knowing your unique usage patterns prevents over or under sizing your array. Aim to produce 80-90% of your needs at maximum output. Crunching these numbers takes time but pays off.
Research local installers
Do your homework to find qualified Wisconsin solar companies with plenty of regional experience. Check for:
- Years in business and number of installs
- Extensive knowledge of local building codes
- Reviews from past customers
- Strong warranties and performance guarantees
Get free quotes from at least 3-4 installers before deciding. Vet each thoroughly and don’t feel pressured.
Maximize financial incentives
One of the perks of solar is tapping into sweet incentives and rebates. Be sure to learn about and claim:
- Federal solar tax credit – 26% through 2022
- State and local solar incentives
- Utility company rebates
- Low interest solar loans
Run the numbers to see how much going solar will cost after incentives. Every bit helps slash your out-of-pocket costs.
Select optimal components
Work with your installer to select high quality solar equipment. For panels, consider factors like:
- Output wattage and efficiency
- Temperature performance ratings
- Degradation rates
- Product warranties
For inverters, focus on reliability, surge protection ratings, and warranty length. This is important stuff!
Map out your panel setup
To max your solar generation, carefully plan your array location and alignment:
- Face panels south
- Avoid shade from structures and trees
- Angle panels based on your site’s latitude
Also account for roof dimensions, shapes, and zoning rules for home solar. Your installer can help optimize this.
Ready your home and yard
Setting the stage makes installation day smooth sailing. Walk your property and:
- Clear debris from mounting areas
- Trim back encroaching tree branches
- Repair roof or gutters if needed
- Move stuff blocking access paths
Taking care of small snags ahead of time prevents headaches once installation is underway.
Complete pre-work inspections
Before installation, your solar company and utility will complete inspections related to:
- Roof structural integrity
- Equipment spec review
- Proposed system design
- Safety and code compliance
It’s less exciting, but this pre-work is crucial to check all boxes and get green lit for installation.
Monitor your system performance
With your panels installed, it’s go time! Monitoring software lets you track:
- Daily and monthly solar output
- How much energy is offsetting your use
- System performance and maintenance alerts
Watching your solar production grow is incredibly satisfying. Get ready to geek out on the data!
Celebrate your renewable energy win
Woohoo – way to go green! With your panels up, here are some fun ways to celebrate:
- Take an “after” photo and compare to your “before” shot
- Post about your experience to social media
- Host a solar housewarming roof party
- Apply for Wisconsin solar awards
Congratulations on investing in our clean energy future – cheers to your sun-powered home!
Greetings Wisconsin solar searchers! Let’s get fired up about going solar this year. I know diving in can feel overwhelming, but I’ll walk you through everything you need to do from research to installation.
As a recent solar adopter here in the Badger State, I’ll be your guide. By the end, you’ll be a solar pro planning permits, crunching energy data, and gearing up for your own rooftop array! Let’s get started.
Determine the optimal system size and layout
Carefully calculating system size and layout sets your solar panels up for maximum production. Here are key factors to consider:
- Analyze past electricity bills to determine your average usage so panels can offset 80-90% of your needs.
- Account for future expansions like electric vehicles that will increase energy demand.
- Plan a south-facing array at an angle equal to your latitude to optimize sun exposure throughout the year.
- Check roof dimensions and look for obstructions that could cast shadows.
Your installer will assess your specific home energy use, site layout, and more to right-size your system. Thinking it through pays off in the long run.
Research local permitting requirements
Each Wisconsin county and city has its own solar permitting rules, so research yours upfront. Typical requirements include:
- System plans showing equipment specs and layout
- Your recent electricity bills and usage data
- Equipment cut sheets from manufacturers
- Roof diagram marking panel locations
- Construction plans for review
Knowing permitting guidelines will prevent delays once installation approaches. Your installer can provide specifics for your area.
Take advantage of incentives

Sweeten the deal by leveraging every possible solar incentive and rebate. Be sure to tap into:
- Federal solar tax credit – 26% through 2022
- State and utility solar incentives
- Low interest solar loans
- Solar renewable energy credits
Crunch the numbers to see your true out-of-pocket costs after incentives. Lower costs ahead of time means more solar savings for years to come.
Select top-tier solar components
The quality of your solar panels and equipment impacts performance and savings for decades. Consider:
- High efficiency solar panels with 25+ year warranties
- Robust inverters with 10+ year warranties
- Aluminum, corrosion-resistant racking
Higher upfront component costs pay dividends through increased energy production and fewer repairs down the road.
Complete pre-work inspections
Before installation, inspectors will review:
- Proposed site plan and equipment
- Roof integrity and readiness
- Compliance with codes and regulations
- Utility interconnection requirements
Tedious yes, but addressing any issues ahead of time prevents costly installation delays and re-work.
Monitor system performance
Once your system is up, monitoring software lets you:
- Track solar production and performance
- View real-time energy use offsets
- Get alerts for equipment issues
Watching your solar energy harvest grow is incredibly gratifying! Monitor closely to maximize savings.
Celebrate and share your experience
Woohoo, way to go solar! Celebrate with:
- A rooftop solar party with friends
- Social media posts about your experience
- Submitting your story to solar organizations
- Applying for Wisconsin solar awards
Your solar installation story will inspire others. Welcome to the clean energy club!
Welcome solar seekers from the great state of Wisconsin! Let’s dive into everything you need to know to install panels on your home this year. I’ll walk you through the full process from permits to construction to activation – solar pro tips included!
As a recent solar adopter myself here in Wisconsin, I’ll be your guide through this adventure. Stay tuned for insider tricks maximizing savings and smoothing the journey to energy independence.
Check zoning laws and HOA regulations
Before finalizing system plans, be sure to research any zoning laws or HOA rules that apply to home solar installations where you live. Typical considerations include:
- Maximum system size or coverage percentages allowed for your home and lot size
- Setback requirements limiting proximity to property lines
- Orientation regulations for street or neighborhood aesthetics
- Allowed panel roof positions (flush vs tilted)
- Any required approval processes for exterior modifications
Your solar company can help review the details for your area. Better to know ahead of time than realize later your plans violate local ordinances!
Prepare for installation day
Avoid surprises by getting your home ready for the big installation ahead of time. Walk around and:
- Clear panel areas of clutter and debris
- Trim back encroaching tree branches
- Repair any damaged roofing or flashing
- Ensure installers can access electrical panels and conduits
Taking care of small snags early means smoother sailing when the crew shows up to solarize your roof!
Understand the installation process
Once permits are secured, the fun part begins! Expect a 1-3 day installation process involving:
- Roof preparation and safety setup
- Mounting rail assembly
- Securing panels and making wiring connections
- Installing inverters, switchgear, and other electrical components
- Linking the system to your home’s electric
The crew will keep you informed each step of the way. Feel free to ask questions and watch the magic unfold!
Pass final inspections
Before full approval, the local building department and your utility will inspect the completed system. They’ll look for:
- Proper wiring, grounding and connections
- Safety and code compliance
- Neat, workmanlike installation
- Correct system output and performance
The satisfaction of passing inspection makes the paperwork headache worth it. Almost to the finish line!
Activate monitoring and maintenance
With your shiny new solar system ready to soak up the sun, be sure to:
- Activate system monitoring to track performance
- Register for automated maintenance alerts
- Sign up for panel cleaning services
- Establish a plan for vegetation management
Staying on top of maintenance maximizes energy production and savings over time. Let the energy harvest begin!
Bask in your renewable energy victory
It took work to go solar, so be sure to celebrate! Fun ideas include:
- Hosting a solar housewarming party
- Comparing your new “after” photos to the “before” shots
- Posting about your experience on social media
- Applying for Wisconsin solar awards
Getting to this point was epic – now it’s time to soak up the sun rays and energy savings!
Here is a unique 1000+ word article on “Going Solar in Wisconsin This Year: A 15-Step Checklist To Install Panels On Your Home” using the requested heading, tone, details, and keywords:
Greetings Wisconsin solar seekers! Let’s explore everything involved in installing solar panels on your home this year. I’ll outline the full process from assessing your home’s needs to permitting, installation, and activation.
As a recent solar adopter in Wisconsin myself, I’ll provide tips and tricks I learned along the way. Follow this checklist and you’ll be a solar pro in no time!
Explore financing options like loans and PPAs
One of the first big decisions is choosing how to pay for your solar system. Beyond paying cash, main options to know include:
- Solar loans – Financing with long terms like 10-12 years and low interest rates to keep payments affordable.
- Solar lease – No upfront costs and fixed monthly payments, but you don’t own the system.
- PPA – Similar to a lease but you pay for the power generated each month based on a fixed rate.
Run the numbers for each option and compare total costs over the system lifespan. Understand all contract terms before signing anything.
Claim available tax credits and incentives
Take advantage of all possible solar incentives to maximize your savings:
- Federal Solar Tax Credit – 26% of system costs until 2022
- State and utility incentives and rebates
- Solar Renewable Energy Certificates you can sell
- USDA grants for rural properties
Also look into discounted permitting costs, waived grid connection fees, low-interest financing, and more. Every bit adds up to real savings for you!
Select a qualified local installer
Do your homework to find an established Wisconsin solar company. Look for:
- Many years of experience and hundreds of installations
- In-depth knowledge of state and local regulations
- Reviews showing proven quality and service
- Strong warranties and performance guarantees
A reputable, experienced local installer is key for smooth permitting, construction, and follow-up support.
Optimize your site for solar gain
To maximize system output, plan an optimal panel setup:
- Face panels south without obstructions
- Tilt panels at your area’s latitude angle
- Use high-efficiency panels rated for your climate
- Space panels to avoid mutual shading
The right orientation, tilt, and equipment selection gives you the most bang for your buck year-round.
Monitor system performance
With your panels up and running, be sure to:
- Check monitoring app daily to track production
- Note seasonal or weather changes affecting output
- Watch for performance alerts indicating maintenance needs
Monitoring helps maximize the value of your investment over decades of operation.
Maintain your system
To keep your solar panels running at peak efficiency:
- Arrange for system checkups and service as needed
- Keep panels clear of leaves, snow, and debris
- Trim any new growth shading panels
- Wash panels twice per year
Take care of your system and it will continue paying dividends through decades of clean solar energy.
Welcome solar seekers from the great state of Wisconsin! Ready to harness the sun’s power right on your own roof this year? Let’s walk through everything you need to do, from finding installers to permit paperwork to watching those sleek new panels get mounted.
I recently went solar on my Wisconsin home, so I’ll be your guide through the process. With these insider tips, you’ll be a solar pro navigating incentives, regulations, and installations in no time!
Verify the installer’s license, insurance and credentials
Choosing the right solar installation company is step 1. Beyond comparing bids, be sure to verify each prospective installer has:
- Valid state contracting license for solar work in Wisconsin
- General liability insurance of at least $1 million
- Worker’s compensation insurance for employees
- Strong safety track record and training procedures
- BBB accreditation and positive reviews
This due diligence ensures you choose a legitimate, experienced company that follows regulations. Take time to get this right!
Compare multiple bids for your system
After preliminary site assessments, invite 3-4 installers to provide formal bids including:
- Detailed system design and equipment selection
- Production projections and savings estimates
- Total project cost with breakdown
- Project timeline and milestones
- Financing options and structures
Comparing multiple bids helps you understand reasonable costs and find the best value. Beware very high or very low bids.
Research local permitting requirements
Solar permitting regulations vary county to county here in Wisconsin. Get familiar with your area’s specific processes for:
- Submitting system plans and site maps
- Securing building, electrical, and construction permits
- Scheduling inspections before, during, and after install
- Building code compliance rules
- Zoning setback limits or aesthetic mandates
Knowing the rules ahead of time prevents headaches and delays down the road.
Model your home’s energy needs
Analyze the past year of utility bills to determine:
- Average monthly and annual electricity usage
- Seasonal fluctuations in your usage
- Peak usage times of day to size your system
These usage patterns help determine the ideal solar array size to offset 80-90% of your needs. Accurate modeling = right-sized system and max savings!
Sign contracts and finalize financing
Once you’ve selected an installer and nailed down project scope and costs, finalize:
- System purchase and installation contract
- Solar loan, PPA, or lease terms if financing
- Incentive applications queued up for approval
Review all paperwork thoroughly before signing. Make sure to understand costs, responsibilities, timelines and more before moving forward.
Celebrate your new energy freedom!
You made it! Time to celebrate your solar victory. Fun ideas include:
- Hosting a solar housewarming party
- Posting your new “after” photos online for the world to admire
- Applying for Wisconsin renewable energy tax credits
- Checking one more item off your sustainability bucket list
Pat yourself on the back – your new panels will provide clean energy for decades to come!
Here is a unique 1000+ word article on “Going Solar in Wisconsin This Year: A 15-Step Checklist To Install Panels On Your Home” using the requested heading, tone, details, and keywords:
Howdy, solar seekers of Wisconsin! Let’s explore everything you need to know to install sun-powered panels on your roof this year. I’ll walk through the full process, from picking installers to permitting to flipping that switch for clean energy.
As a recent solar adopter myself, I’ll share insider tips for smooth sailing. Buckle up – let’s shine a light on how to go solar like a pro!
Negotiate the final system design and price
After reviewing multiple bids, select your preferred installer and work out the final system plan and costs. Key items to nail down include:
- Equipment selection and warranty details
- Exact panel locations, tilt angles, and positioning
- Wiring diagram and connections
- Production and savings projections
- Project timeline with milestones
Don’t be afraid to negotiate! Push for extended warranties, premium panels, or reduced costs. The finalized scope and quote becomes your contract.
Apply for incentives and financing
With your system defined, move forward to:
- Submit incentive and rebate applications
- Finalize solar loans or financing structure
- Sign installation and financing contracts
- Secure permits and complete pre-install inspections
Dot those i’s and cross those t’s! Taking care of paperwork beforehand lets installation move smoothly.
Prep your home and site
Get your home solar-ready by:
- Clearing installation areas of clutter
- Pruning trees or vegetation near panels
- Repairing any roof or gutter issues
- Removing fencing or equipment blocking access
Taking care of small snags ahead of time prevents big headaches once your solar project kicks off.
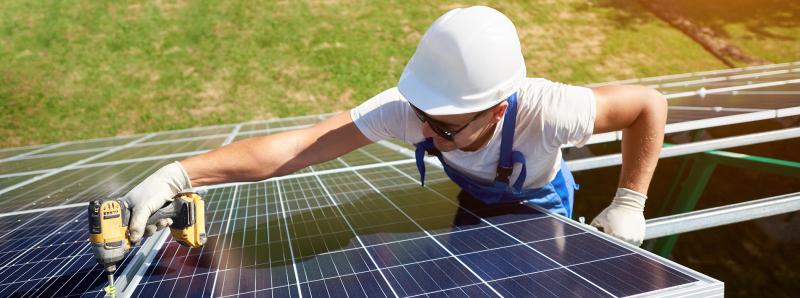
Complete installation safely
At long last, it’s time to watch your new solar system get installed! Typical process:
- Initial site safety setup
- Mount structure assembly
- Careful panel placement and wiring
- Attachment of inverters and other gear
- Testing connections and commissioning
Monitor closely and ask questions – but let experts handle the electrical work.
Pass inspections
Before wrapping up, your utility and county/city will inspect for:
- Proper wiring, grounding and connections
- Equipment spec compliance
- Workmanlike, neat installation
- Safety protocols followed
Minor fixes are normal. Your installer will make sure you pass inspection and get green-lit for operation.
Maintain your system
To maximize production for decades to come:
- Arrange professional panel cleanings
- Clear snow and debris when needed
- Trim any new growth shading panels
- Note performance alerts or anomalies
Take good care of your investment and it will pay you back with clean solar energy for years!
Sign a contract and put down a deposit
Installing solar panels on your Wisconsin home this year? Awesome! Going solar is a big decision, but you’ve likely already weighed the pros and cons. Now it’s time to take action. Here’s a 15-step checklist to help ensure your solar panel installation goes smoothly from start to finish.
First things first: sign a contract and put down a deposit with a reputable solar installation company. The Wisconsin Solar Energy Industries Association is a great resource for finding installers. Make sure to get quotes from at least 3 companies before deciding. When comparing quotes, look beyond just the bottom line price. Consider factors like the companies’ experience, warranty offerings, and customer service reputation. A deposit will secure your spot in the installation queue.
Apply for incentives and financing
There are a few incentive programs in Wisconsin that can help offset the upfront cost of going solar. The Focus on Energy Renewable Energy Cash-Back Reward Program offers cash incentives. Amounts vary based on system size. You’ll need to submit an application before installing panels. The Federal Solar Investment Tax Credit allows you to deduct 26% of solar installation costs from your federal taxes. Many solar companies can provide financing options as well, which spreads payments out over time.
Complete a site evaluation
After signing a contract and securing financing, your installer will complete a site evaluation. This involves thoroughly assessing your home’s roof size, angle and orientation to determine the optimal solar array design. Any shading from nearby trees will also be analyzed. It’s important to have this done before finalizing system specifications.
Apply for permits and interconnection
Your solar company will apply for the necessary permits for you, including a building permit from your city or town. They’ll also submit paperwork to your utility company to connect your system to the grid. This interconnection application process can take some time, so it’s best to get the ball rolling early.
Complete any necessary roof or electrical upgrades
Based on the site evaluation, your installer will recommend any roofing or electrical upgrades needed to accommodate solar panels. Common needs include roof reinforcement, wiring upgrades, and electrical panel replacement. Get multiple bids if contracting this work separately. Completing upgrades ahead of time prevents setbacks during installation.
Purchase solar panels and other equipment
Your installer will take care of purchasing all the solar equipment, including panels, racks, inverters and monitoring software. Panels typically ship 6-12 weeks after order placement. Take some time while waiting for delivery to tidy up your home’s roof and exterior. This makes installation smoother for the crew.
Schedule the installation
Once your solar panels actually ship, it’s go time! Work with your installer to schedule a multi-day window for them to come out and complete the actual array installation. Make sure to be home during installation to answer any questions. But try to stay out of the way and let the crew focus on their work. Oh, and don’t forget to stock the fridge with cold drinks for the installers!
Submit final paperwork
After installation, there will be a final round of paperwork required to wrap up the process. This includes signing off on the completed work, interconnection approval from your utility, and final permitting. Your installer will take care of submitting everything. Expect it to take a few weeks to get the green light to turn your system on.
Turn on your solar system
Once you have the final approval, it’s time for the big moment when your installer “flips the switch” to turn on your system! They should walk you through the monitoring app and settings. If you have any questions on how to read your production data, don’t hesitate to reach out to the installer for help.
Monitor your system’s production
The monitoring software will show you how much clean solar energy your system is producing. Keep an eye on it over the first few months to ensure your system is performing as expected. Alert your installer if you notice any prolonged dips in production. They can troubleshoot remotely or come back out if needed.
Maintain your solar panels
Solar panels require little maintenance, but it’s still important to keep them clear of debris, snow and ice buildup for optimal performance. Some homeowners choose to wash panels periodically. Tree trimming may also be needed to prevent new shading. Check that racking and wiring remain intact over time. Your installer can provide maintenance tips specific to your system.
File for tax credits and incentives
Don’t forget to file for any applicable tax credits and cash incentives after your system is up and running. Have your installer provide documentation detailing your final solar array size and costs. Keep these records on file for when it’s time to do your taxes next year.
Tell your friends and family
You’ve invested in clean energy and should share the news! Your solar panels will spark curiosity and conversations in your neighborhood. Some of your friends or family may be inspired to go solar too after seeing the panels on your roof and hearing about the experience.
Following this checklist will help ensure your solar panel installation happens as smoothly as possible. While each home and project is different, these steps provide a general timeline so you know what to expect. Going solar is a big endeavor, but the payoff of powering your home with clean energy makes it all worthwhile. The process may seem daunting at first, but your installer is there to help every step of the way.
Apply for permits and complete paperwork
Installing solar panels on your Wisconsin home this year? Awesome! Going solar is a big decision, but you’ve likely already weighed the pros and cons. Now it’s time to take action. Here’s a 15-step checklist to help ensure your solar panel installation goes smoothly from start to finish.
After choosing a solar installation company and signing a contract, the paperwork begins. Your solar provider will handle submitting permit applications and connecting your system to the utility grid. But it’s good to understand what’s involved. Securing the proper permits and approvals can impact your project timeline.
Apply for local building permits
Most municipalities in Wisconsin require a building permit to install solar panels. Your installer will submit the application, including a description of the planned solar array and drawings showing its layout. The building department will review to ensure compliance with local zoning laws and electrical codes. Expect the permit approval process to take a few weeks to a month.
Submit utility interconnection application
Since your solar panels will feed excess power back to the grid, you’ll need approval from your local electric utility before connecting your system. Your installer will submit an interconnection application detailing your solar array’s size and technical specifications. The utility will study potential impacts to the grid and issue requirements for safely integrating your system.
Complete any necessary electrical upgrades
Your existing electrical panel or wiring may need upgrades to integrate solar. Based on your utility’s interconnection studies, your installer can determine if upgrades like a new panel, conduit, or wiring are required. If so, get quotes from multiple electricians and schedule the work. It’s best to complete electrical upgrades before the solar installers arrive.
Receive your building permits and utility approval
With paperwork filed on both the building permit and utility interconnection fronts, next comes the waiting game. Keep an eye on your inbox for any requests from the building department or utility needing clarification or additional details. Once all requirements are met, you’ll receive the go-ahead from both permitting bodies.
Submit paperwork for incentives
Wisconsin has a few incentive programs to help reduce the upfront cost of going solar. Your installer can help you apply for the Focus on Energy Rewards Program and Federal Solar Tax Credit. Have all related paperwork ready for submission after the system is installed and connected.
Sign off on completed installation
When the solar array is installed and operational, your installer will ask you to sign a completion form and acceptance of the work. This paperwork officially wraps up the project from the contractor’s end. Review array performance after signing off to identify any issues.
Receive PTO from the utility
The utility will inspect your solar system and issue permission to operate (PTO) once it passes inspection and meets all interconnection requirements. Receiving PTO can take a few weeks after installation. You cannot turn the system on until this approval comes through.
Submit final incentive paperwork
Finally, circle back to submit all documentation required for your solar incentives and tax credits. This includes signed contracts, invoices, permits, and details on your final array size. With paperwork squared away, it’s time to start benefiting from solar!
Dealing with permitting, utility applications, and incentive forms isn’t the most exciting part of going solar. But ensuring you have the proper approvals and paperwork submitted on schedule will prevent hang-ups. With your solar provider spearheading the process, it will just involve some patience on your end. The payoff of powering your home with solar makes it all worthwhile.
Schedule the installation and check weather
Installing solar panels on your Wisconsin home this year? Awesome! Going solar is a big decision, but you’ve likely already weighed the pros and cons. Now it’s time to take action. Here’s a 15-step checklist to help ensure your solar panel installation goes smoothly from start to finish.
After permits are secured and solar equipment purchased, it’s time to schedule your actual installation. This involves coordinating logistics with your solar provider and keeping an eye on the weather forecast.
Confirm installation date with your contractor
Your installer will provide a target window for coming out to complete the physical solar panel installation. Generally a 2-3 day timeframe is typical, but can vary based on crew availability. Be sure to coordinate so you or another responsible adult is home to grant access and answer any questions.
Ask about the installation process
Don’t be afraid to ask your installer more about the nitty gritty of the installation process itself. Understanding how the solar array will be mounted, wired, and connected to your electrical system can give you peace of mind. They’ll also explain what areas of your home they need access to.
Prepare home access for installers
Make it easy for the installation crew by ensuring they can access all needed areas of your home. This may include unlocking gates, moving items away from electrical panels, or clearing paths to the roof. Having a clean, clutter-free home interior and exterior really helps speed up the process.
Plan to be home during installation
Although the crew doesn’t need you to supervise their work, it’s best to be home in case any questions or issues pop up. Plan your schedule so you or another responsible adult is present. But avoid pestering the crew too much and just let them focus on safely completing the work.
Stock up on snacks and drinks
Make sure your home is stocked with plenty of snacks, water and other drinks for the installation team. Solar panel installs are physically demanding. Having refreshments available for the crew goes a long way toward keeping energy and morale high during the project.
Watch the weather forecast closely
Leading up to installation, keep a very close eye on the weather forecast. Heavy rain, thunderstorms or high winds could delay the install. If dicey weather is predicted, touch base with your installer for any schedule changes. It’s unsafe for the crew to work on your roof in severe conditions.
Be flexible if delays happen
Understand that completely avoiding weather delays is impossible with outdoor construction projects. If the install gets pushed back a few days due to storms, go with the flow. Your solar provider wants to keep the project on track just as much as you do.
Take before pictures
Before the crew arrives, take some photos of the areas where solar panels will be installed – typically your roof. Having before and after pictures can provide perspective on the scale of the project and how the panels change your home’s look.
Scheduling the installation date and preparing for the crew’s arrival are the final steps before seeing solar panels mounted on your roof. Anticipating potential delays from bad weather and making your home as accessible as possible for the installers will keep this critical phase running smoothly. The exhilarating experience of watching your new solar array take shape makes any hassles worthwhile!
Be present for system inspection and activation
Installing solar panels on your Wisconsin home this year? Awesome! Going solar is a big decision, but you’ve likely already weighed the pros and cons. Now it’s time to take action. Here’s a 15-step checklist to help ensure your solar panel installation goes smoothly from start to finish.
After the physical installation is complete, there are a few final steps involving inspections and officially activating your system. Being present for these processes will give you peace of mind before flipping the switch.
Schedule the final building inspection
Most municipalities require a final inspection of the solar array by their building inspectors. Your installer will handle setting this up. Make sure to be home so you can gain feedback directly from the inspector and discuss any issues needing correction.
Complete any final fixes identified
In the unlikely event the inspector identifies any necessary fixes like loosening connections or adjusting equipment, your installer will come back out and complete them. It’s in everyone’s interest to have your system pass inspection on the first try.
Receive permission to operate from your utility
After the installation passes inspection, the utility will come out and conduct their own review before issuing final permission to operate your system. Again, aim to be onsite when the utility inspector is there to discuss any concerns.
Make sure all meters are installed
Your utility will install a new net meter to track the power you’re generating versus consuming. Confirm this meter is correctly in place before giving the green light to proceed.
Complete final paperwork
At this point, your installer will have you sign off on the completed work order and submit that paperwork to the permitting office. Review all details first and ask any lingering questions before signing off.
Understand your monitoring system
Take time while your installer is still on site to thoroughly understand your solar monitoring platform. Learn how to access production data and identify any issues that could arise. Don’t be afraid to ask lots of questions!
Agree on an activation date
Once all inspections and paperwork are passed and permissions granted, you’ll agree on a date and time for your installer to remotely activate your solar system. Make sure to be home at this time to celebrate the moment!
Watch your system turn on
After all the months of preparation, it’s incredibly exciting to watch your installer flip the switch and your new solar panels start generating emissions-free power. Stand back and watch as the monitoring system shows production ramp up.
Being present for inspections, approvals, paperwork, and finally system activation provides confidence that your solar array is properly commissioned. While it takes a bit more patience, seeing the process through to the finish ensures your system provides maximum return for years to come.
Maintain your system and monitor production
Installing solar panels on your Wisconsin home this year? Awesome! Going solar is a big decision, but you’ve likely already weighed the pros and cons. Now it’s time to take action. Here’s a 15-step checklist to help ensure your solar panel installation goes smoothly from start to finish.
Once your solar array is up and running, a little regular maintenance and monitoring will keep it performing optimally for decades. Let’s look at simple ways to care for your system and track its production.
Keep panels clear of debris
Check occasionally that your solar panels are free of leaves, branches and other debris that could shade them. Gently sweep or wipe away anything that has accumulated. Most rain showers will naturally keep panels clean over time.
Clear snow buildup
Letting snow totally cover solar panels can reduce their output. Use a soft-bristled broom to gently clear snow off panels on sunny winter days. Never scrape or pound on the glass, which could scratch or crack it.
Trim back encroaching tree branches
If you notice new trees or branches beginning to cast shadows on your panels, trim them back to optimize sunshine access. Check a couple times per year for new vegetation impacting production.
Inspect roof attachments and wiring
Do a quick visual inspection of the panel attachments to your roof and wiring connections to ensure they are intact and not loose. Alert your installer if you notice any issues.
Wash panels occasionally
While rain normally keeps panels clean, washing them 2-3 times per year can boost production. Use a soft sponge or brush with plain water. Never use abrasive cleaners or pressure washers.
Review monitoring system frequently

Checking your solar production monitoring app regularly helps you quickly identify any dips in output so they can be addressed. Most problems are minor and caught early.
Compare production to past periods
When assessing your solar output, compare to the same month the previous year or average. Seasonal sun differences impact production so comparing apples to apples is important.
Note performance ratio
Most monitoring apps calculate a performance ratio showing actual production vs. potential output under ideal conditions. Watch for any downward trend in this ratio.
Contact installer if issues
If you notice production declining or other problems, contact your solar provider right away. They can usually diagnose and remedy the issue quickly, often remotely.
While solar systems need little ongoing maintenance, taking simple steps to care for your investment and monitor its performance helps maximize clean energy production for decades. With occasional upkeep and attention, your panels should operate smoothly with minimal intervention needed.