How can linemen improve their skills without pads. What are effective drills for enhancing reaction time, hand speed, and explosiveness. Which exercises develop separation, leverage, and pass rush techniques without equipment.
The Ball Drop Drill: Boosting Reaction Time and Hand Speed
For linemen looking to sharpen their skills during the off-season or with minimal equipment, the Ball Drop drill offers an excellent way to enhance reaction time and hand speed. This drill focuses on improving the critical first step of the get-off while also honing the ability to quickly shoot hands to engage blockers.
Equipment and Setup
To execute the Ball Drop drill, you’ll need:
- Two tennis balls or similar-sized rubber balls
- A visible line of scrimmage
- Two single-file lines of defensive linemen
The coach stands between the two lines, holding a ball in each hand, arms extended at shoulder height.
Execution and Technique
How does the Ball Drop drill work? Players start in a three-point stance at the line of scrimmage, each focusing on the ball in front of them. When the coach releases the balls, players explode out of their stance, aiming to catch the ball after one bounce while shooting their hands forward with locked elbows.
Key coaching points include:
- Emphasizing a good first step, replacing the down hand (same hand, same foot concept)
- Maintaining a flat back for proper pad level
- Adjusting ball drop height to challenge players as they improve
Shield Hand Violence: Mastering Hand Speed and Lock-Out Technique
The Shield Hand Violence drill is designed to improve hand speed from the ground and perfect the technique of locking out an opponent. This drill is crucial for linemen who need to quickly engage and control blockers.
Drill Setup and Equipment
For this exercise, you’ll need:
- Three hand shields
- Four players (one defender, three shield holders)
The defender starts in a six-point stance, with three shield holders positioned in a triangle formation in front of them.
Execution and Coaching Points
How is the Shield Hand Violence drill performed? On the coach’s signal, shield holders step towards the defender one at a time. The defender must explosively shoot their hands from the ground, lock out the pad, and return their hands to the starting position. This sequence is repeated for all three shields, with the final pad requiring a full lock-out with a flat back and eyes up.
Critical aspects to focus on include:
- Maintaining eyes, head, and thumbs up during each hand strike
- Quick hand recoil after each strike
- Avoiding body contact with the ground during the final lock-out
The Wipe Drill: Regaining Leverage and Escaping Blockers
The Wipe Drill is an essential exercise for teaching defensive linemen how to recover from a defeated position and escape blockers when the ball is more than two gaps away. This drill enhances a player’s ability to maintain leverage and maneuver effectively in challenging situations.
Setup and Execution
No special equipment is needed for the Wipe Drill. Players are divided into offensive and defensive lines, partnering up for one-on-one practice. The drill begins with the defender in a “fit” position, grasping the blocker’s V of the neck with bent elbows and knees.
How does the Wipe Drill unfold? On the coach’s command, the blocker sprints laterally, attempting to reach or cut off the defender. The defender must use proper technique to regain leverage and escape the block.

Enhancing Explosiveness: Plyometric Exercises for Linemen
While not mentioned in the original text, incorporating plyometric exercises into a lineman’s training regimen can significantly boost explosiveness and power. These exercises focus on quick, powerful movements that translate directly to on-field performance.
Box Jumps: Building Lower Body Power
Box jumps are an excellent plyometric exercise for linemen. They develop explosive leg strength, which is crucial for a powerful first step off the line of scrimmage.
How to perform box jumps:
- Stand facing a sturdy box or platform
- Quickly drop into a quarter squat
- Explosively jump onto the box, landing softly with bent knees
- Step down and repeat
Start with a lower box height and gradually increase as your strength and technique improve.
Medicine Ball Slams: Developing Upper Body Explosiveness
Medicine ball slams help linemen develop powerful striking ability, which is essential for hand fighting and shedding blocks.
Proper medicine ball slam technique:
- Stand with feet shoulder-width apart, holding a medicine ball overhead
- Forcefully slam the ball into the ground in front of you
- Catch the ball on the rebound or pick it up quickly
- Repeat for the desired number of repetitions
Footwork Fundamentals: Ladder Drills for Agility and Coordination
Agility ladder drills are invaluable for linemen looking to improve their footwork, coordination, and overall quickness. These drills enhance a player’s ability to change direction rapidly and maintain balance during complex movements.
Basic Ladder Drill Variations
Here are some effective ladder drill variations for linemen:
- High Knees: Run through the ladder, lifting knees high with each step
- Lateral Shuffle: Move sideways through the ladder, touching each square
- In-and-Out: Step into each square with both feet, then out to the sides
- Ickey Shuffle: Perform a three-step pattern (in, in, out) while moving forward
Perform these drills for 30-60 seconds each, focusing on quick, precise foot placement.

Core Strength: The Foundation of Lineman Performance
A strong core is essential for linemen to maintain balance, generate power, and resist opposing forces. Incorporating targeted core exercises into your training routine can significantly enhance overall performance.
Effective Core Exercises for Linemen
Consider adding these core-strengthening exercises to your workout:
- Planks and Side Planks: Hold for 30-60 seconds, focusing on maintaining a straight body line
- Russian Twists: Perform with or without weight, targeting obliques
- Pallof Press: Use a resistance band to improve rotational stability
- Farmer’s Walks: Carry heavy dumbbells or plates to engage the entire core
Aim to incorporate core work into your routine 2-3 times per week for optimal results.
Mental Preparation: Visualization Techniques for Linemen
While physical drills are crucial, mental preparation is equally important for linemen. Visualization techniques can help players improve their reaction times, decision-making skills, and overall performance on the field.

Implementing Visualization in Training
How can linemen effectively use visualization techniques? Try these strategies:
- Pre-practice visualization: Spend 5-10 minutes before practice mentally rehearsing successful plays and techniques
- Post-practice review: After training, visualize areas of improvement and successful repetitions
- Game scenario visualization: Imagine various game situations and your ideal responses
- Technique refinement: Mentally practice perfect form for specific moves or drills
Consistent use of visualization can lead to improved confidence, faster reactions, and better overall performance during games and practices.
Nutrition for Linemen: Fueling Performance and Recovery
Proper nutrition is a critical component of a lineman’s training regimen, supporting both performance and recovery. A well-balanced diet can help players maintain the necessary strength and endurance for their position.
Key Nutritional Considerations for Linemen
What should linemen focus on in their diet? Consider these nutritional guidelines:
- Adequate protein intake: Aim for 1.6-2.2 grams of protein per kilogram of body weight daily
- Complex carbohydrates: Fuel intense training with whole grains, fruits, and vegetables
- Healthy fats: Include sources like avocados, nuts, and olive oil for hormone balance and joint health
- Hydration: Consume water consistently throughout the day, especially before, during, and after training
- Timing: Eat a balanced meal 2-3 hours before practice and refuel with protein and carbs within 30 minutes post-workout
Consult with a sports nutritionist to develop a personalized meal plan that supports your specific training needs and goals.
Recovery Strategies: Maximizing Performance and Preventing Injuries
Effective recovery is crucial for linemen to maintain peak performance and reduce the risk of injuries. Implementing a comprehensive recovery strategy can help players bounce back faster between intense training sessions and games.
Essential Recovery Techniques for Linemen
Incorporate these recovery methods into your routine:

- Active recovery: Engage in light exercise or mobility work on rest days
- Foam rolling: Use a foam roller to release muscle tension and improve flexibility
- Contrast therapy: Alternate between hot and cold treatments to reduce inflammation and promote circulation
- Proper sleep: Aim for 7-9 hours of quality sleep per night to support muscle repair and cognitive function
- Massage: Regular sports massages can help alleviate muscle soreness and improve range of motion
Experiment with different recovery techniques to find what works best for your body and training schedule.
Skill-Specific Drills: Refining Pass Rush Techniques
While the original text focused on general drills, developing specific pass rush skills is crucial for defensive linemen. These drills can help players improve their ability to pressure the quarterback and disrupt offensive plays.
Effective Pass Rush Drills for Linemen
Incorporate these pass rush drills into your training routine:
- Swim Move Drill: Practice the swim technique against a stationary target or partner
- Bull Rush Drill: Work on driving through an opponent using proper leverage and hand placement
- Spin Move Drill: Develop a quick, effective spin move to evade blockers
- Rip and Dip Drill: Perfect the rip technique to get past offensive linemen
Practice these drills regularly, focusing on proper form and explosive movements to translate the skills to game situations.
Developing Football IQ: Film Study for Linemen
While physical preparation is essential, developing a high football IQ through film study can give linemen a significant advantage on the field. Understanding offensive tendencies, recognizing formations, and anticipating plays can help players react faster and make more impactful decisions.
Effective Film Study Techniques for Linemen
How can linemen make the most of their film study sessions? Consider these strategies:
- Study opponent tendencies: Look for patterns in play-calling, formations, and individual player habits
- Analyze successful plays: Focus on what works well for other defensive linemen and try to incorporate those techniques
- Review personal performance: Critically evaluate your own game film to identify areas for improvement
- Learn from elite players: Study NFL and college game film to observe advanced techniques and strategies
- Group film sessions: Participate in team film study to gain insights from coaches and teammates
Dedicate time each week to film study, treating it as an essential part of your overall football development.
Building Team Chemistry: Communication Drills for Linemen
Effective communication among linemen is crucial for coordinated play and overall defensive success. Incorporating communication drills into your practice routine can help build trust, improve on-field awareness, and enhance team performance.
Communication Exercises for Defensive Linemen
Try these communication-focused drills to improve teamwork:
- Silent Signals: Practice non-verbal cues to communicate assignments and adjustments
- Stunt Practice: Work on timing and coordination for stunts and twists with minimal verbal communication
- Blind Formation Recognition: Have players identify formations and make calls while facing away from the offense
- Rapid Fire Adjustments: Practice quick defensive adjustments based on offensive shifts and motions
Regularly incorporating these drills can lead to better on-field chemistry and more cohesive defensive play.
Injury Prevention: Prehabilitation Exercises for Linemen
Preventing injuries is a top priority for linemen, who are subject to significant physical stress during games and practices. Implementing a prehabilitation routine can help strengthen vulnerable areas and reduce the risk of common football injuries.
Key Prehabilitation Exercises for Linemen
Include these exercises in your workout routine to improve injury resilience:
- Shoulder External Rotations: Strengthen the rotator cuff to prevent shoulder injuries
- Hip Mobility Drills: Improve hip flexibility and reduce the risk of groin strains
- Ankle Strengthening: Perform calf raises and balance exercises to prevent ankle sprains
- Neck Strengthening: Use isometric exercises to build neck strength and reduce concussion risk
- Lower Back Stabilization: Incorporate exercises like bird dogs and supermans to protect the spine
Consult with a sports physical therapist or athletic trainer to develop a personalized prehabilitation program tailored to your specific needs and injury history.
Maximizing Off-Season Development: Creating a Comprehensive Training Plan
The off-season presents a valuable opportunity for linemen to focus on skill development, strength building, and overall athletic improvement. Creating a well-structured training plan can help players make significant progress and enter the next season better prepared for success.
Components of an Effective Off-Season Training Plan
What should linemen include in their off-season training regimen? Consider these key elements:
- Periodization: Structure your training into phases, focusing on different aspects of fitness and skill development
- Strength and Power: Incorporate progressive overload in weightlifting to build functional strength
- Conditioning: Maintain cardiovascular fitness with position-specific conditioning drills
- Flexibility and Mobility: Dedicate time to improving range of motion and reducing injury risk
- Skill Work: Practice position-specific drills to refine technique and develop new skills
- Rest and Recovery: Schedule adequate rest periods to allow for proper recovery and prevent burnout
Work with your coaches or a strength and conditioning specialist to design a personalized off-season program that addresses your individual needs and goals.
No Pads, No Problem: Five Drills To Improve Fundamentals
Even if it’s the off-season, you can always get better — you don’t even need pads or a full practice! Thankfully, there are tons of drills that can improve your defensive line play through strength and conditioning sessions. The following drills are ones that you can use to improve get-off reaction, hand speed, explosiveness, separation, leverage, and pass rush without the use of helmets and shoulder pads. Whether you’re training inside during the winter or outside during the spring, these drills can be applied at any place and time during your football training session.
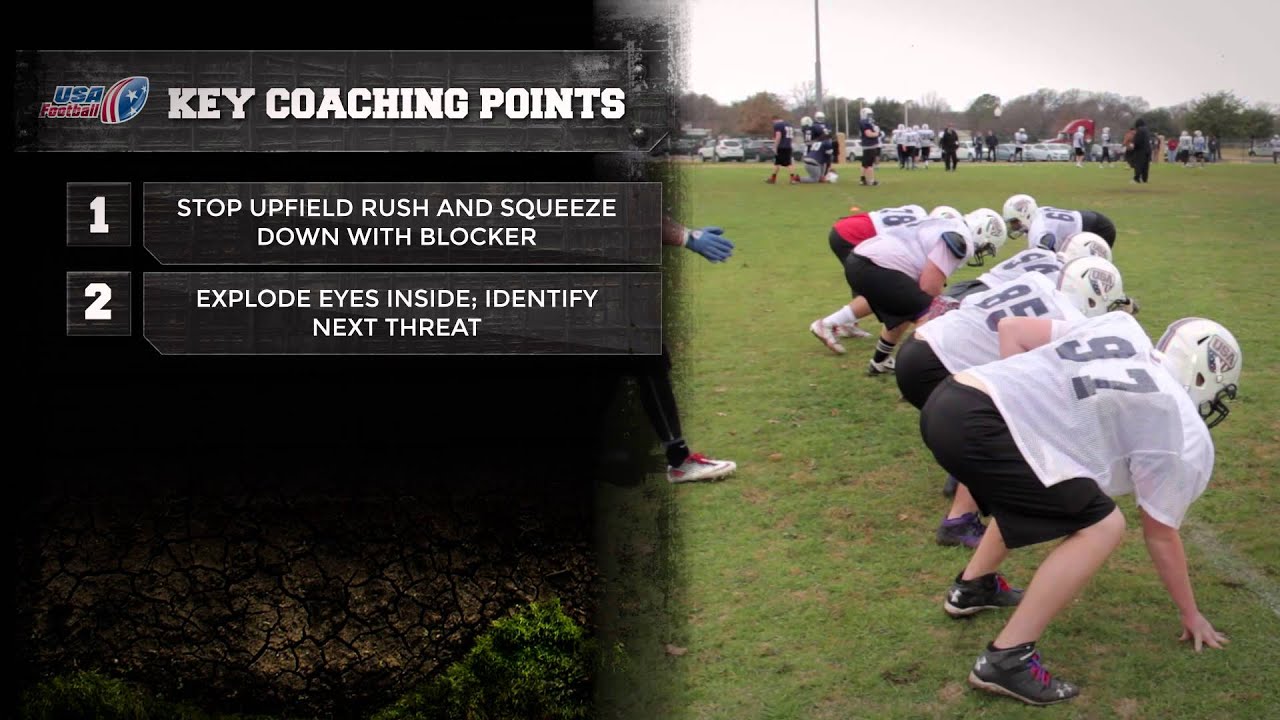
Drill #1: The Ball Drop
Purpose: Improve reaction time during the first step of get-off with a secondary emphasis on shooting hands to attack a blocker.
Equipment: You’ll need least two tennis balls or any type of rubber ball, no bigger than the palm of your hand, which also provides a good bounce.
Set-Up: Establish a visible line of scrimmage. Separate the defensive line into two single file lines at your line of scrimmage. The coach stands between both lines of players, each 4 yards away, with one tennis ball in each hand.
Execution
Then the coach will extend both of his arms out to the side at shoulder height with a ball in each hand. The two defensive linemen who are ready to go will get into a three point stance crowding the line of scrimmage. Each player will be lined up directly in front of the coach’s left and right hand. Both players will key the hand directly in front of them and when the coach opens his hands to drop the balls both players will fire out of their stances. After firing out, each player must shoot their hands out, lock the elbows and catch the ball after one bounce.
Coaching Point
Continue to emphasize a good first step and a flat back for pad level. The way I teach a good first step to my defensive line is by telling them that their first step should always replace the down hand (same hand same foot concept).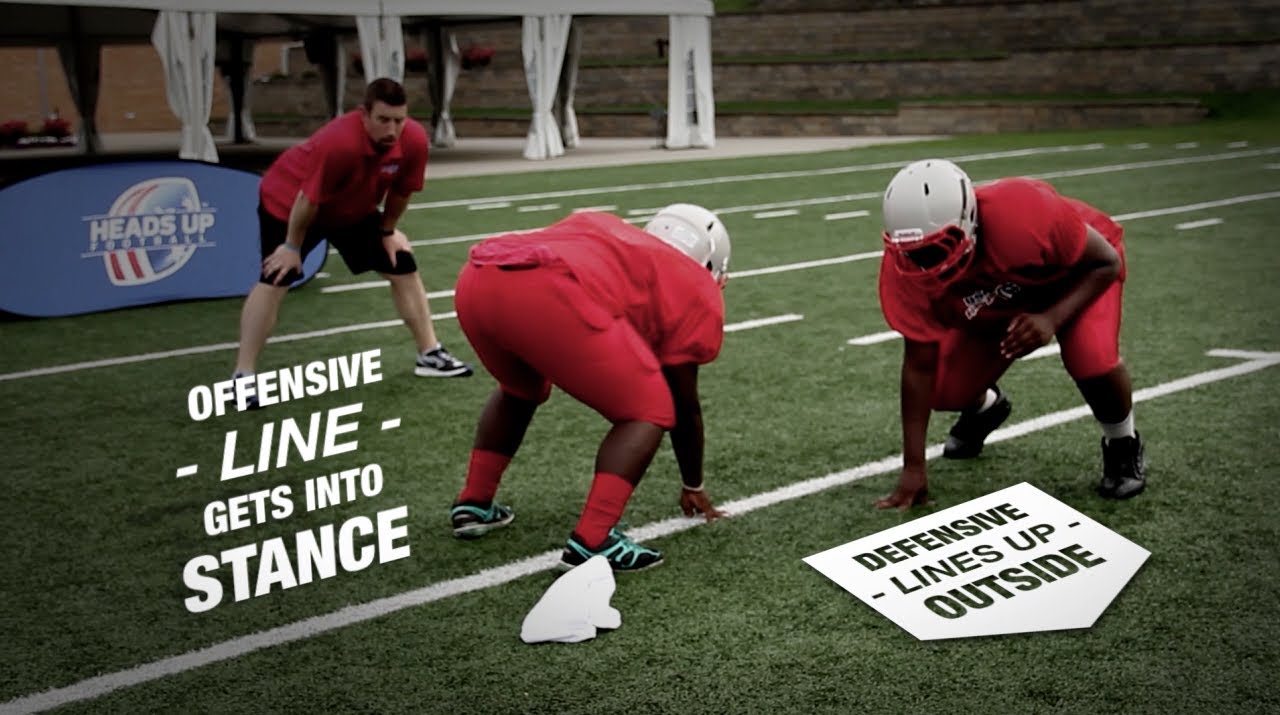 If pad level becomes too high, start dropping the balls a little closer to the ground. As you see improvement, back up a yard. If you are outside, use a track if available or push the balls to the grass instead of just dropping them.
Drill #2: Shield Hand Violence
Purpose
Improve hand speed from the ground and locking out an opponent.
Equipment Three hand shields
Set Up
Have three players hold one shield each. One defensive lineman will line up on all fours in a six-point stance with fingers touching the ground. The players holding the shields will line up directly in front of the defender in the shape of a triangle, two shields side by side and slightly turned in towards the defender. The third shield is centered directly behind the front two.
Execution
The coach designates one of the front two players holding the shields to start the drill. On the coach’s signal the player designated to begin the drill will quickly step towards the defender with his shield. The defender must shoot his hands from the ground as quick as possible and quickly lock out the pad and return his hands to the ground directly after. The player holding the shield will slide off to the side and the second player holding the next shield will quickly step towards the defender in the same way the first player did. The defender repeats the same action with his hands. Finally, the player holding the third shield will step straight ahead towards the defender and the defender will finish the drill by fully locking out the pad with a flat back and eyes up.
Coaching Point
The eyes, head, and thumbs of the player should be up every time the defender shoots his hands and locks out the pads. Hands should quickly recoil after each strike and fingers should go back to the ground before striking the next pad. On the last pad, the defender should never allow his body to touch the ground while locking out — defensive linemen can’t make plays lying on their stomachs.
Drill #3: Wipe Drill
Purpose
To teach defensive linemen how to regain leverage from a defeated position and escape the blocker when the ball is more than two gaps away.
Equipment
None
Set Up
Split the players up into two lines, one offense and one defense. The players will partner up and run the drill one group at a time. The side designated as the defense will get into a “fit” position (eyes and thumbs up grabbing the V of the neck with bent elbows and knees) with the blocker. The blocker will grab the defender on his shoulders and place his head on the shoulder of the defender in the direction they are going. If the defender is going left then the blocker’s head is on the defender’s left shoulder.
Execution
Each defender will start out going left. On the coach’s command, the blocker will sprint laterally to his right and do his best to reach or cut off the defender.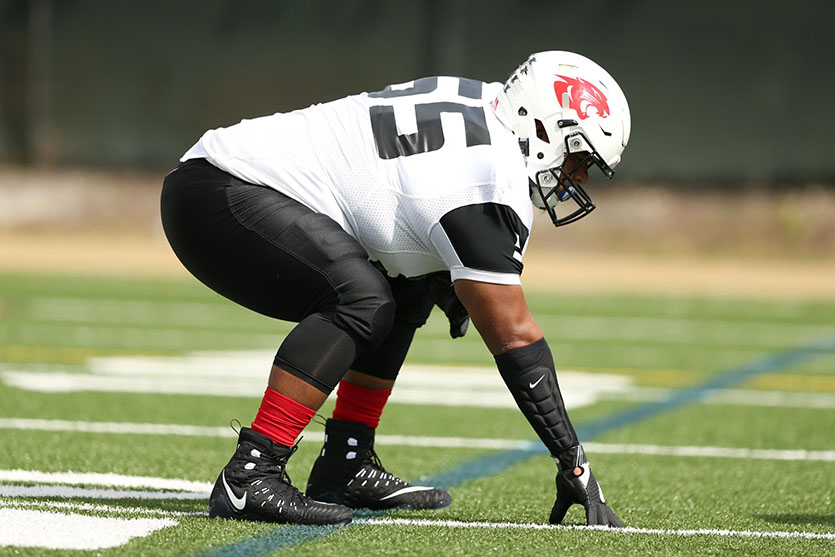 The defender must immediately lock out the blocker and push with his left hand. Once the defender locks out and gets his face to the left, he will execute a wipe by taking his right hand off the blocker and use the inside of his forearm to come across the wrists of the blocker as hard and quick as possible to knock his hands off and to get the defender’s shoulders and momentum finishing in the direction of the ball carrier.
Coaching Point
The blocker must hold the defender tightly and not just let go when the wipe is executed – make him work! The wipe cannot be executed until the defender has locked out the blocker. Remember to keep good pad level.
Drill #4: Base and Steer
Purpose
Teach understanding of feeling leverage, leverage change, and regaining leverage.
Equipment
None
Set Up
Players partner up and coach decides which side is defense. The coach will stand behind the defense so that the blockers can see him.
Execution
The defenders are in the “fit” position and the blockers have their hands on the defender’s shoulders while being able to see the coach. On the whistle, the coach will point left or right and the blockers will begin blocking their defender in that direction. The defender must lock out the blocker and regain leverage by getting the blocker’s shoulders turned. The coach will blow the whistle to stop them where they stand, and blow the whistle and point in the opposite or same direction to get them started again.
Coaching
Point Keep good pad level. Stress the first step in this drill and do not allow my defensive line to shuffle; we want to always create a new line of scrimmage (LOS). On the last rep give two quick whistles that tell them to rip and escape the block.
Drill #5: Tag Drill
Purpose Emphasizes closing the distance, aiming point, pad level, and bending towards the quarterback in pass rush.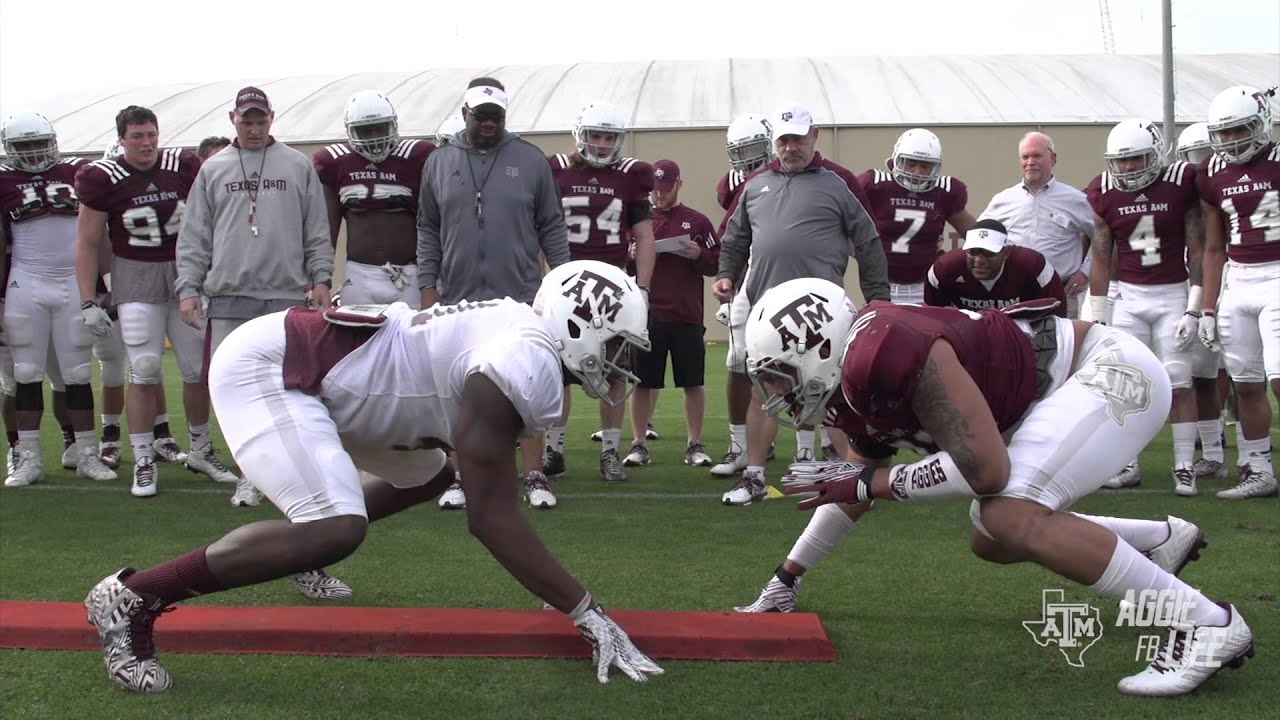 It teaches the defensive line how to rush, half their man and stay on an edge.
Equipment Four cones and four tennis balls
Set Up
Establish a Line of Scrimmage, or LOS, as a starting point for the defenders. Place each cone four yards behind the LOS. Place each towel or tennis ball slightly behind and to the right of each cone. Each player will line up at the LOS to the left of each cone. Another player will line up as an offensive lineman opposite the defender.
Execution On the coach’s command, the offensive player will kick step or back pedal towards the cone as fast as he can. The defender must get off with low pad level and beat the blocker to the cone. The defender must be able to dip his right shoulder and pick up the towel or tennis ball behind the cone.
Coaching Point
- Stage #1: Just use cones and balls, no blocker.
- Stage #2: Cones, balls, blockers.
- Stage #3: Just blockers going straight back.

(Related: Learn about working out like Julian Edelman here.)
Huddle Up
All in all, these drills might not be as exciting as helping your team score a seventy-yard touchdown, but you’ll never reach that point if you don’t put the time in fundamentally. These drills will put your mettle to the test, crucially identifying what you need to work on and what you can perfect. Seriously, grab a friend and get to work, that way, you’ll have someone to hold you accountable as well! Remember, sloppiness now will lead to sloppiness on the field too. Practicing good habits now will pay dividends when it matters the most, so don’t cut corners now.
If you’re still struggling with these drills, considering booking one of CoachUp’s private trainers to help you out! Our professionally trained coaches have the knowledge, experience, and ability to teach you through some the most difficult techniques and strategies — what are you waiting for?
Be prepared for the biggest moments by mastering the small ones off the field.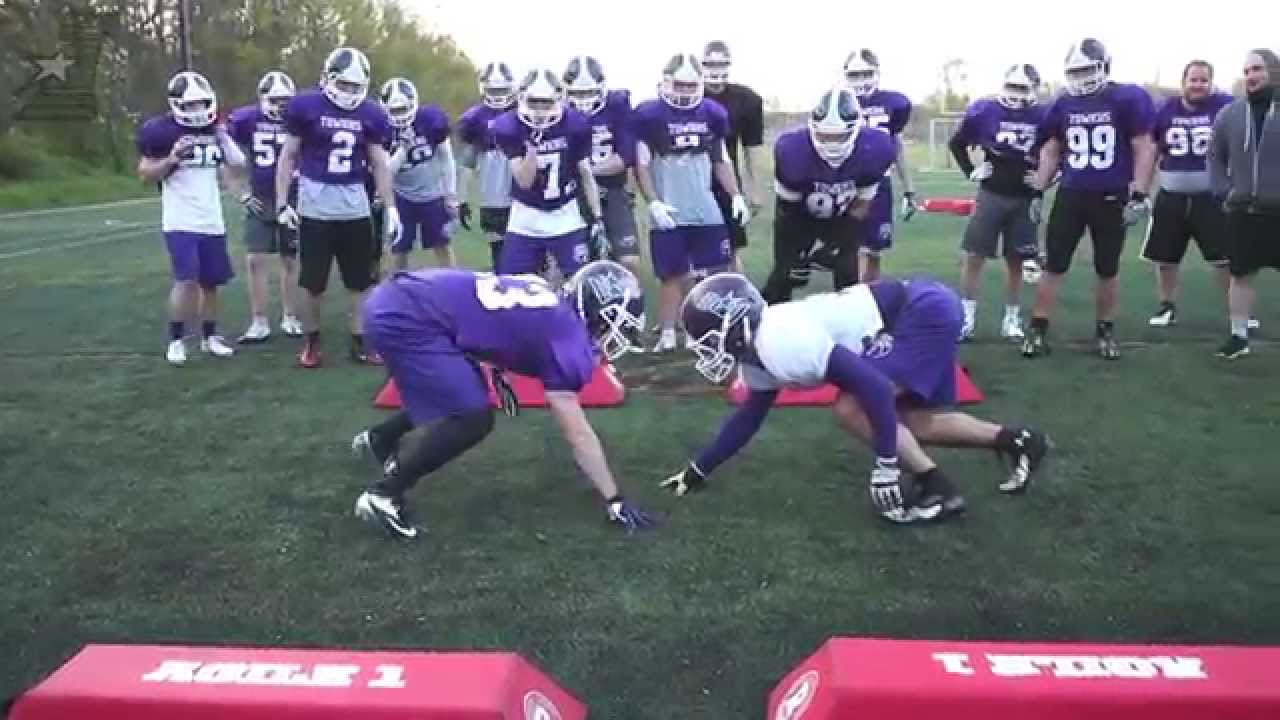
CoachUp is the safest and easiest way to find a coach for personalized training. With our 100% money-back guarantee and vetted coaches, anyone can achieve their full athletic potential. Find your perfect coach today and become the athlete you want to be!
How useful was this post?
Click on a star to rate it!
Average rating 4.7 / 5. Vote count: 7
No votes so far! Be the first to rate this post.
3 Football Drills to Become a Better Offensive Lineman
Build a Camp
A strong offense is key to a winning team. As an offensive lineman, you have to be ready to make any block. Strength training helps to move players out of the way, but offensive linemen also need to be fast on their feet. With IMG Academy’s How-To football drill videos, our coaches teach techniques to increase agility and improve overall performance to be game day ready.
In this video, you will be introduced to three football drills to become a better offensive lineman. Watch how student-athletes perform each drill with instruction on stance, footwork, and body positioning in order to stop the opposing team’s defense. Each drill is broken down to provide tutorials on the following three football training options:
- Stance and Starts
- Footwork and Hand Positions
- Fit and Finish Drive
The Stance and Starts drill focuses on the importance of proper posture, footwork, and tempo. Next, the Footwork and Hand Positions drill uses a ball to emphasize the need for correct hand and hip positions while making the block. The final drill, the Fit and Finish Drive, shows how to combine the right footwork with the proper hand position and then finish through the hips to make the play.
Ready to show off your skills on the field? Press play below to get started!
IMG Academy Football has created a library of football training drills that you can refer back to any time! Check out our other News stories as well as our YouTube channel (@imgacademy) for all of our How-To content.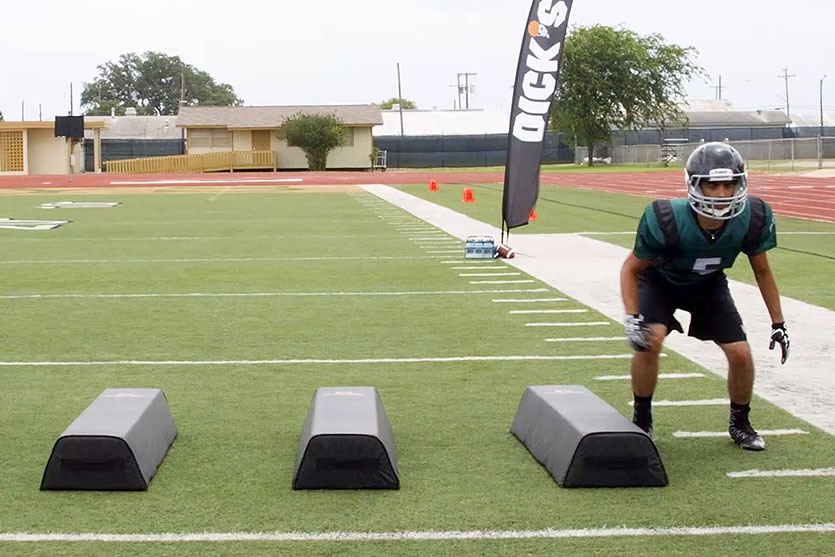
IMG Academy
- Author
by: IMG Academy
Need more help?
Request
Consult
Call
Us
Chat
Us
Filter results:
All SitesIMGAcademy.comIMGAcademy.mxIMGAcademy.jpIMGAcademy.co.kr
clear
Popular links
Legacy Hotel
Boarding School
Sport Camps
Campus Map
Tuition
Travel & Planning
Health & Safety
Events
Explore Florida
Golf Course
Wellness Spa
IMG Academy TV
Bookstore
Careers
contact us
For enrollment & program registration
1-800-872-6425
For all other inquires
1-866-300-4538
Health Services Center
1-941-752-2479
Campus Safety
1-941-752-2533
[email protected]
5650 Bollettieri BLVD.
Bradenton, FL 34210
Questions? Feedback? powered by Olark live chat software
Five actions that must be done when replacing pads
Fresh number
WG-Week
Motherland
Thematic applications
Union
Fresh number
26.09.2021 14:25
Share
Boris Zakharov
Many drivers, for various reasons, prefer to change the brake pads in their cars on their own. Someone does it out of habit, for someone it’s a hobby, and someone in this way is trying to save money on contacting an official service. In this regard, “RG” identified five points that you need to pay attention to when removing old and installing new consumables that are responsible for effective deceleration.
Istock
Checking the performance of the brakes
The first thing you should do after removing the wheel is to check if the brakes are sticking. This procedure should be mandatory, and the testing method should be elementary.
Rotate the brake disc by hand without using excessive force. If this fails, or the part moves with a noticeable effort, then you need to check the condition of the guides and piston. Your actions in this case will directly affect the safety of the ride, since wedging the elements of the brake system is fraught with emergency situations.
We clean the brake mechanisms from dirt
For this procedure, it is best to use a special metal brush or fine sandpaper. We pay special attention to the cleaning of brake discs and brake calipers.
Dirt deposits on these parts can cause grinding, squeaking and deterioration of the brake system. Plus, you should walk with a rag or fine sandpaper on rubber hoses. Otherwise, in a contaminated state, the hoses will be more likely to dry out and crack. You should act carefully so as not to accidentally damage both the hoses themselves and the rubber anthers.
Apply Copper Grease
Remember to first clean the areas where the brake pads make contact with the caliper from the used copper grease, then replace it with new.
After applying fresh lubricant to the guides, check the condition of the rubber boots. If the latter “leaked”, dirt and reagents could get into the elements of the brake system. These contaminants can cause brake wedging and uneven pad wear.
Remove the calipers, spread the cylinders, put the pads
To easily separate the caliper from the brake disc, the first one needs to be rocked from side to side.
The brake pads will push the pistons in and the caliper can be removed without much effort on your part.
When you start installing new pads in the next step, it makes sense to first drown the piston into the caliper using a clamp. In this case, in order not to damage the surface of the piston, you can use the old brake pad as a support pad. Although many “specialists” use an ordinary screwdriver to recess the piston, we do not recommend doing this. There is a high risk of damaging the rubber piston collar.
Bleeding the brakes, topping up the “brake”
And one more very important point – after replacing the pads, it is desirable to pump the brake system to remove air from the system. Although there is no intervention in the system when replacing the brake pads, experts recommend not only pumping the brake fluid during such a service, but also changing the fluid to a new one.
This procedure is absolutely necessary when, after replacing the pads, the pedal becomes soft and begins to sink. You will need a container for brake fluid and a clear rubber hose. Pour a little “brake” into the prepared container. Then pour new brake fluid into the master cylinder reservoir.
We connect the hose to the fitting, and lower the other end into a container with brake fluid. Then we ask the assistant to press the pedal several times and hold it depressed. After that, we turn off the fitting and the liquid begins to go into the prepared container. These manipulations should be repeated until a clean “brake”, without bubbles, goes. After replacing the pads, do not forget to check the brake fluid level, and if necessary, add it to the norm.
Share
Why brake pads whine #how_to_get rid of
Why do brake pads squeak while driving and after replacement? The main reasons and how to get rid of.

The whistle of brakes while driving is always alarming for motorists and listening to it is not a pleasant thing! Let’s look at the most common causes of brake pad whistling and how to deal with them.
Why are they whistling? Major pains.
The main reasons why brake pads whistle:
– the brake pad wear indicator whistles;
– pads are new;
– low-quality material;
– dirt got on the surface of the block;
– clamping spring broken;
– Jammed caliper guides.
The special squeaker indicator starts to whistle when the pad is worn to the maximum. If the pads are new, but after a while they didn’t get used, it’s a matter of poor-quality material. In both cases, the pads must be replaced.
The most commonplace reason why the front brake pads whistle is the ingress of dirt or sand on the clutch surface. In this case, it is enough to clean the surface of the block.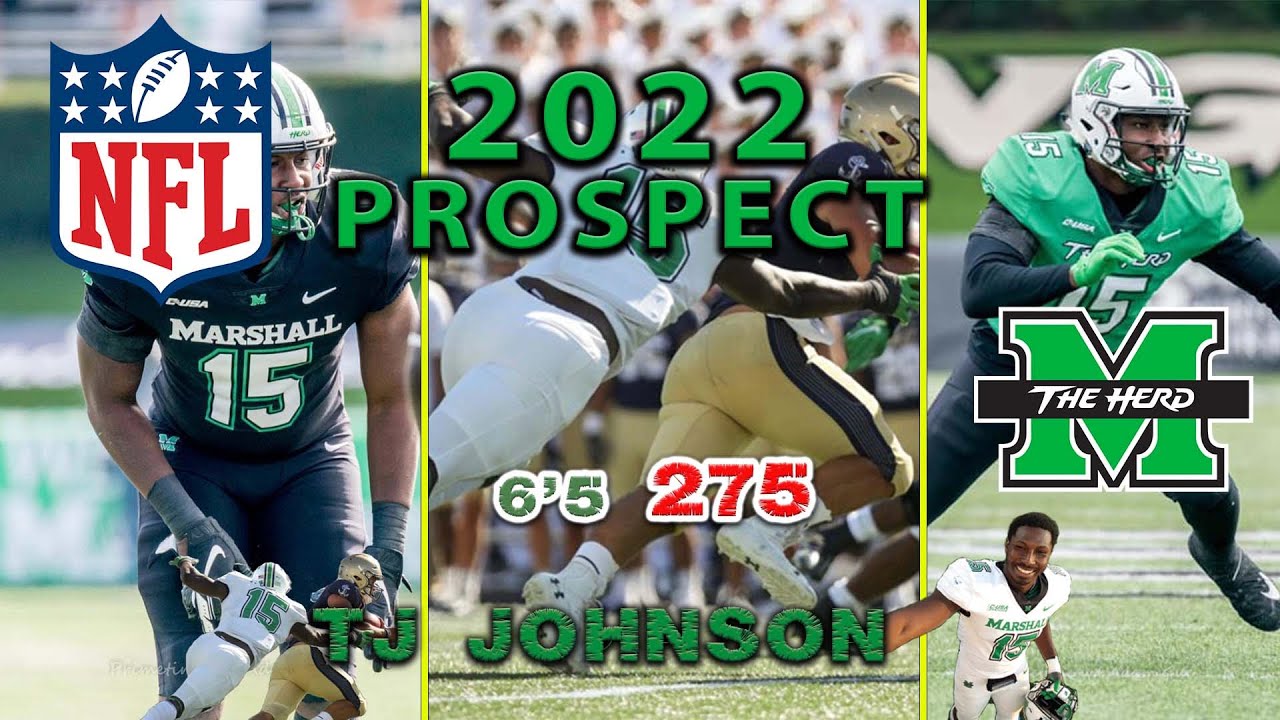 If this does not help, you can slightly remove the upper abrasive layer with a file, but you should not get too carried away.
Another reason for squealing brake pads is a faulty pressure spring. They can lose their elasticity, break or “fly away” in an unknown direction. In this case, the springs must be replaced.
Whistling can also signal acidification of the caliper fingers. It is enough to clean them and lubricate the guide seats.
Whistle while driving, what’s the problem?
If the brake pads whistle when driving, then the matter is in poor-quality pads.
As a rule, low-quality pads whistle when driving due to their heterogeneous structure, as well as foreign inclusions and chips. The friction linings of such pads may have a non-standard size or insufficient thickness.
Friction linings of high-quality pads have a homogeneous structure without chips, dents and foreign inclusions. This provides soft braking and high-quality heat dissipation. Pads made by hot pressing are considered especially durable.
#Important! On the boxes of original products should always be: the name and article number of the part, the hologram, the address and contacts of the manufacturer.
If they whistle when braking and stopping, where to look for the cause?
Brake pads whistle when braking in the following cases:
– insufficient lubrication in the brake caliper system;
– wear of brake discs;
– uneven fit of the brake cylinder.
You can solve the whistling problem yourself. First, if necessary, chamfer the pads. Then sand all the contact points with the caliper and apply a thin layer of special grease as indicated in the instructions.
New brake pads can also whine when braking. It is worth checking whether grooves have formed on the brake discs from operation. If so, the car will not brake effectively and the discs should be replaced.
When the whistle is heard only at the beginning of braking, and then disappears, it means that the brake cylinder is not evenly attached to the shoe. You can solve this problem yourself by sticking a special insulating pad on the back of the pad, which will absorb noise and vibration.
#Important! To avoid acidification, it is the caliper grease that is used! It is necessary to prevent grease from getting on the piston cups and guides, as it contributes to the swelling of the rubber.
Whistling after replacement with new ones, why and where is the problem hiding?
After replacement, hard brake pads or pads that have not yet worn in may whistle. In order for new brake pads to stop whistling, they need an average break-in of 50-100 kilometers or a couple of intense braking.
Rigid pads have a high abrasive content. Due to this, the brake discs begin to wear out and we hear a characteristic metallic whistle. Soft and medium soft pads act less aggressively on the discs, so there is less noise during operation.
How to solve the problem? Several effective tricks.
To eliminate the whistle of brake pads with your own hands, you need to:
– change bad pads;
– Lubricate the brake pads.
“For the demonstration, a photo from the site shnyagi.net was used.”
The pads need to be changed if they are old or if they are new but have not worn well. The reason may be poor-quality material or a fake for the original. A high price is not always a guarantee of quality, but you should not buy the cheapest pads either.
How to lubricate the brake pads if they whistle..? There are special lubricants, here are the most common:
– universal, suitable for all moving parts of the brake system;
– anti-seize, which are used for brackets, clamping springs and the back surface of the pads;
– anti-corrosion.
For lubrication, it is not recommended to use grease or anything that comes to hand, as this affects the life of the pads and can lead to acidification of the brake system elements.
#Lifehack or how not to do it! Some pads have factory bevels to suppress noise. Some craftsmen make such cuts on their own.