How to create effective lacrosse practice plans. What are the best drills for improving shooting, passing, and defensive skills. Where to find resources for custom plays and playbooks.
Essential Components of a Lacrosse Practice Planner
A comprehensive lacrosse practice planner is crucial for coaches and players looking to improve their skills and team performance. It should encompass various elements to ensure a well-rounded training session. Here are the key components:
- Custom drills tailored to team needs
- Offensive and defensive plays
- Conditioning exercises
- Skill-specific training
- Team strategy development
- Playbook creation and review
By incorporating these elements, coaches can create a structured and effective practice plan that addresses all aspects of the game.
Designing Custom Lacrosse Drills for Maximum Impact
Custom drills are the backbone of any successful lacrosse practice. They allow coaches to focus on specific areas of improvement for their team. To design effective custom drills, consider the following:
- Identify team weaknesses
- Set clear objectives for each drill
- Incorporate game-like scenarios
- Ensure proper progression in difficulty
- Allow for repetition and muscle memory development
Can custom drills really make a difference in team performance? Absolutely. When designed correctly, custom drills can address specific team needs and lead to significant improvements on the field.
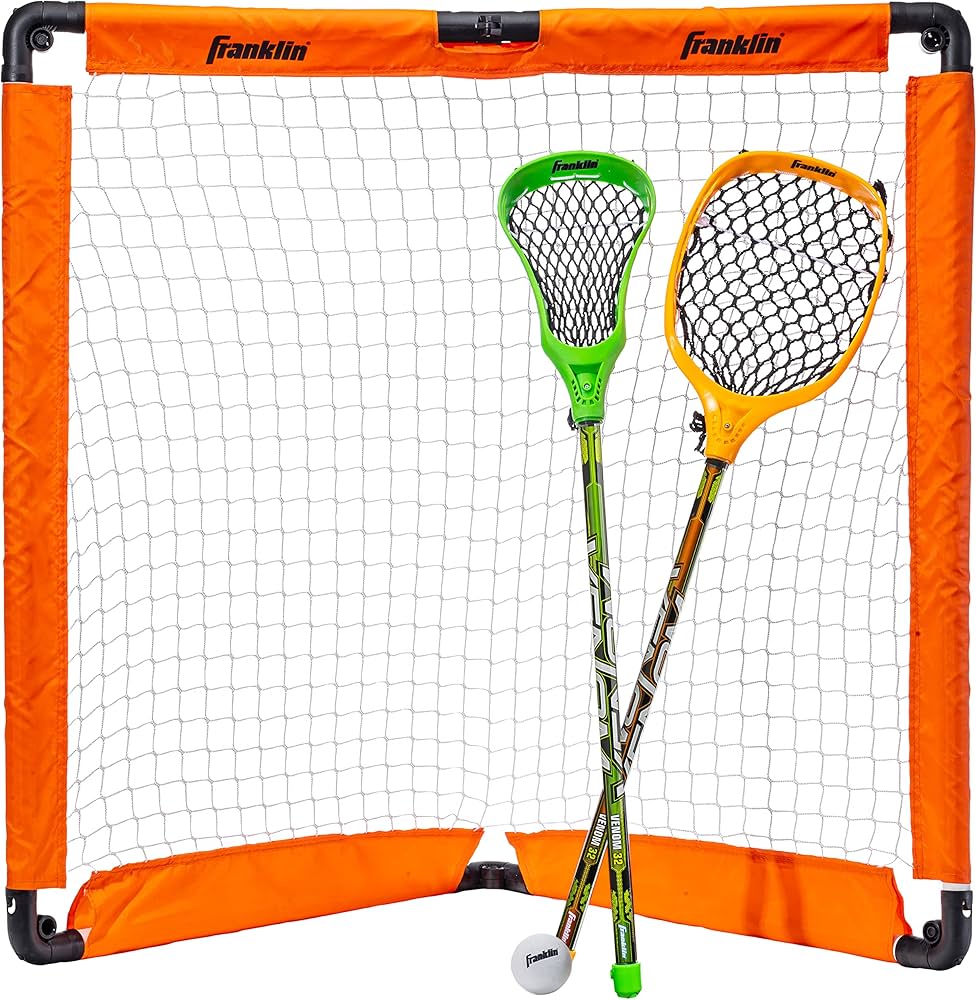
Shooting Drills to Enhance Scoring Potential
Effective shooting is crucial in lacrosse. Here are some drills to improve shooting accuracy and power:
- Set-Shooting practice
- Shot Selection drills (Sweep, Screen Shots, Engage, “Step-Back”, Separation)
- Off-Ball Cuts and Crippler shots
- Breakaways (Banana Curl)
These drills help players develop a diverse shot repertoire, enabling them to score from various positions on the field.
Passing and Catching Drills for Better Ball Control
Mastering the fundamentals of passing and catching is essential for any lacrosse player. Incorporate these drills into your practice plan:
- Figure Eight Drill
- Over the Shoulder Catching
- Spoke Drill
- Two Shooters and Salmonbellies Drills
Regular practice of these drills will improve hand-eye coordination, stick skills, and overall ball control.
Developing Effective Lacrosse Plays for Offense and Defense
Creating and practicing effective plays is crucial for team success. Here’s how to develop impactful offensive and defensive strategies:
- Analyze team strengths and weaknesses
- Study successful plays from professional teams
- Adapt plays to suit your team’s skill level
- Practice plays repeatedly to ensure understanding
- Incorporate variations to keep opponents guessing
Do well-designed plays guarantee success on the field? While they don’t guarantee success, they significantly increase the chances of outmaneuvering opponents and creating scoring opportunities.
Offensive Plays to Outsmart the Defense
Effective offensive plays can break down even the toughest defenses. Consider incorporating these plays into your playbook:
- Crease to Cutter
- 1 Pick 2 Shots
- Box Lax Up Down Drill
These plays focus on creating space, exploiting defensive weaknesses, and generating high-percentage scoring chances.
Defensive Strategies to Shut Down Opponents
A strong defense is the foundation of any successful lacrosse team. Implement these defensive drills and strategies:
- 3 Person Monkey in the Middle “Sticks Up”
- Footwork, Anticipation, and Containing drills
- 6 Nations Box Lacrosse Drill
These exercises improve communication, positioning, and reaction time, making your defense more formidable.
Creating Comprehensive Lacrosse Practice Plans
A well-structured practice plan ensures that all aspects of the game are covered efficiently. Here’s how to create an effective practice plan:
- Set clear objectives for each practice session
- Allocate time for warm-up and cool-down
- Balance individual skill work with team drills
- Incorporate game-like situations
- Allow time for play review and strategy discussions
Is it necessary to plan every minute of practice? While flexibility is important, having a detailed plan helps maintain focus and ensures all crucial elements are covered.
Balancing Skill Development and Team Strategy
Finding the right balance between individual skill work and team strategy is crucial. Here’s how to achieve this balance:
- Begin with fundamental skill drills
- Gradually introduce team concepts
- Use small-sided games to bridge individual skills and team play
- Conclude with full-team scrimmages or strategy sessions
This approach ensures players develop their individual abilities while learning to apply them within the team framework.
Utilizing Technology in Lacrosse Practice Planning
Modern technology can greatly enhance lacrosse practice planning and execution. Consider incorporating these tools:
- Video analysis software
- Digital playbook apps
- Wearable performance trackers
- Virtual reality training systems
Can technology really improve lacrosse practice efficiency? Yes, when used correctly, technology can provide valuable insights, streamline planning processes, and offer innovative training methods.
Video Analysis for Skill Improvement
Video analysis is a powerful tool for identifying areas of improvement. Here’s how to effectively use video in your practice planning:

- Record practices and games
- Review footage with players individually and as a team
- Use slow-motion and freeze-frame features to highlight technique
- Compare player movements to professional athletes
- Track progress over time using video evidence
This visual feedback can accelerate skill development and help players understand their strengths and weaknesses more clearly.
Developing a Comprehensive Lacrosse Playbook
A well-crafted playbook is essential for any serious lacrosse team. Here’s how to create an effective playbook:
- Categorize plays by game situation (offense, defense, special teams)
- Use clear diagrams and descriptions for each play
- Include variations and options for each play
- Provide player-specific responsibilities
- Regularly update and refine the playbook based on team progress
Should playbooks be kept simple or complex? The complexity of your playbook should match your team’s skill level and experience. Start with basic concepts and gradually introduce more sophisticated plays as the team develops.

Digital vs. Physical Playbooks: Pros and Cons
Choosing between digital and physical playbooks depends on your team’s needs and resources. Consider these factors:
- Digital Playbooks:
- Easy to update and distribute
- Interactive features and multimedia integration
- Accessible on various devices
- Potential technical issues
- Physical Playbooks:
- Tangible resource for players
- No reliance on technology
- Can be used during games without restrictions
- More difficult to update and distribute changes
Many teams opt for a combination of both, using digital playbooks for practice planning and physical copies for game-day reference.
Incorporating Conditioning into Lacrosse Practice Plans
Proper conditioning is crucial for maintaining peak performance throughout the game. Here’s how to effectively incorporate conditioning into your practice plans:
- Begin with a dynamic warm-up
- Integrate conditioning elements into skill drills
- Use small-sided games for sport-specific conditioning
- Implement interval training for improved endurance
- Conclude with cool-down and stretching exercises
Is it better to separate conditioning from skill work or combine them? Combining conditioning with skill work can maximize practice efficiency and simulate game-like situations. However, some dedicated conditioning sessions may still be necessary for optimal fitness.
Sport-Specific Conditioning Drills for Lacrosse
Lacrosse requires a unique blend of endurance, speed, and agility. Incorporate these sport-specific conditioning drills into your practice plan:
- Shuttle runs with stick skills
- Box drill with quick direction changes
- Continuous 1v1 battles
- Full-field sprints with ball control
These drills improve both physical fitness and game-relevant skills simultaneously.
Adapting Practice Plans for Different Skill Levels
Effective practice planning requires consideration of your team’s skill level. Here’s how to adapt your plans for different experience levels:
Beginner-Level Practice Plans
For novice players, focus on:
- Fundamental stick skills (cradling, passing, catching)
- Basic rules and positioning
- Simple offensive and defensive concepts
- Emphasis on fun and engagement
Intermediate-Level Practice Plans
As players progress, introduce:
- More complex stick skills and shot variations
- Advanced offensive and defensive strategies
- Position-specific training
- Increased focus on teamwork and communication
Advanced-Level Practice Plans
For experienced teams, incorporate:
- Highly specialized skill development
- Complex team strategies and set plays
- Situation-specific training
- Mental preparation and game analysis
How often should practice plans be adjusted based on skill level? Regularly assess your team’s progress and adjust plans accordingly. This might mean weekly tweaks or more significant changes between seasons.
Evaluating and Refining Your Lacrosse Practice Plans
Continuous evaluation and refinement of practice plans are essential for team improvement. Here’s how to effectively assess and adjust your plans:
- Gather feedback from players and assistant coaches
- Analyze game performance to identify areas needing focus
- Track individual and team progress over time
- Stay updated on new drills and strategies in the lacrosse community
- Be willing to experiment with new approaches
Should you stick to a set practice plan or be flexible? While consistency is important, flexibility allows you to address immediate team needs and keep practices fresh and engaging.
Metrics for Measuring Practice Effectiveness
Use these metrics to gauge the success of your practice plans:
- Improvement in key game statistics
- Player engagement and enthusiasm
- Execution of plays and strategies in games
- Individual skill progression
- Team chemistry and communication
Regularly reviewing these metrics will help you identify strengths and weaknesses in your practice approach.
By incorporating these elements into your lacrosse practice planner, you’ll create a comprehensive and effective training program. Remember to stay flexible, adapt to your team’s needs, and continually seek ways to improve. With dedication and smart planning, you’ll see significant improvements in individual skills, team performance, and overall success on the lacrosse field.
Lacrosse Planner – Etsy.de
Etsy is no longer supporting older versions of your web browser in order to ensure that user data remains secure. Please update to the latest version.
Take full advantage of our site features by enabling JavaScript.
Find something memorable,
join a community doing good.
(
64 relevant results,
with Ads
Sellers looking to grow their business and reach more interested buyers can use Etsy’s advertising platform to promote their items. You’ll see ad results based on factors like relevancy, and the amount sellers pay per click. Learn more.
)
Practice Plans, Drills & Videos – Langley Minor Lacrosse Association
Practice Plans
Drills
Videos
Goaltending
Drills
Videos
Lax Life
- Set-Shooting
- Shot Selection – Sweep/ Screen Shots/ Engage/ “Step-Back”/ Separation/ Off-Ball Cuts/ Crippler
- Breakaways (Banana Curl)
- Footwork/ Anticipation/ Containing
- Defensive Drill – 3 Person Monkey in the Middle “Sticks Up”
Paul Rabil
- How to Throw a Lacrosse Ball
- How to Cradle a Lacrosse Stick
- How to Catch a Lacrosse Ball
- How to Scoop a Lacrosse Ball
Jordan Hall Total Lacrosse
- Two Shooters and Salmonbellies Drills
- Shooting on Indoor Lacrosse Goals
Kevin Crowley – Hand Speed Trainer
- Figure Eight Drill
- Over the Shoulder Catching
- Spoke Drill
Ontario Lacrosse – Don Colman
- 6 Nations Box Lacrosse Drill
- Salmonbellies Box Lacrosse Drill
- Crease to Cutter
- Box Lax Up Down Drill
- 1 Pick 2 Shots
Nike Lacrosse – Thompson Brothers
- Body Dodging Tips
- How to Create Different Shots
- Inside Finishing
- How to do a Behind-the-Back Lacrosse Pass or Shot
- Lacrosse Shooting Drill
Box Lacrosse America
- Cross-Checking 101
- How to Take a Safe Hit
Whitby Minor Lacrosse
- Coaching Triangle
- Coaching Box Drill
- Coaching Cross Check
- Coaching 2-on-1
- Coaching 2-on-2
Lacrosse Nova Scotia
- Power Play “Basics”
- Penalty Killing “Box Defense”
- Provincial Lacrosse Player Skills Tracking “2-on-1’s”
- Fundamental Lacrosse Skills Tracking “Dynamic Passing”
Goaltending
The Complete Box Lacrosse Goalie Manual
A book for beginners to coaches; and a little something for everyone in between.
Goalie Drills
Goalie drills from BCLA clinician, Donald P. Watson.
Videos
- How To Play Box Lacrosse Goalie
- Holding the Stick at 22 Degrees
- Boddam Box Goalie Gear
Referee Game
Feedback
Log Volunteer Hours
Thunder Game Sheet Submission
View Volunteer Log
Feedback/Incident Report
Expense Reimbursement Form
ʔi ʔə tə n̓ɑ tәmәx ʔә ƛ̓ šxʷq̓ic̓əyɑʔɬ ʔiʔ šxʷq̓ʷɑ:n̓ƛ̓ən̓ɑʔɬ, mәsteyәxʷ
We respectfully acknowledge that our operations are on the unceded traditional territory of the Katzie and Kwantlen people.
Vantage M2 User Manual | Training planning
In the Polar Flow web service or app, you can plan your training and create personal training goals.
Create a training plan with the Season Planner
The Season Planner in the Polar Flow web service is a great tool for creating a customized annual training plan. Whatever your training goal, Polar Flow helps you create a comprehensive plan to achieve it. The Season Planner tool is located in the Polar Flow web service under the Programs tab.
Polar Flow for Coach is a free remote coaching platform that allows a coach to plan their training in detail, from full season plans to individual sessions.
Create a training target in the Polar Flow app and web service
Please note that training targets must be synced to your watch using the FlowSync software or the Polar Flow app before they can be used. The watch will tell you how to reach your goal during your workout.
Create a training target in the Polar Flow web service:
- Go to Diary, click Add > Training target.

- From the Add Training Target menu, select Sport and enter a Target Name (45 characters maximum), Date and Start Time, and any Notes if desired.

Then select the target type from the following:
Target Duration
- Select Duration .
- Enter the duration.
- To add a destination to your favorites list, click on Add to favorites .
- Click on Add to Diary to add the target to your Diary .
Target distance
- Select Distance .
- Enter the distance.
- To add a destination to your favorites list, press Add to favorites .
- Click on Add to Diary to add the target to your Diary .

Target calories
- Select Calories .
- Enter the number of calories.
- To add a destination to your favorites list, click on Add to favorites .
- Click on Add to Diary to add the target to your Diary .

Target training speed
- Select Training speed .
- Enter two of the three values: Duration , Distance or Training Speed . You will receive the third value automatically.
- To add a destination to your favorites list, click on Add to favorites .
- Click on Add to Diary to add the target to your Diary .
Please note that Workout Speed can only be synced with Grit X, Grit X Pro, Pacer, Pacer Pro, V800, Vantage M, Vantage M2, Vantage V, and Vantage V2.
Phase separation
- Select Phase separation .
- Add phases to your target. Press Duration to add a duration based phase or Distance to add a distance based phase. Select Name and Duration/Distance for each phase.
- Check the box next to Start next phase automatically to automatically move to a new phase. Otherwise, you will have to do it manually.
- Select phase intensity based on heart rate , speed or power .
Power-based training targets for phasing activities are currently only supported by Grit X, Grit X Pro, Pacer, Pacer Pro, and Vantage V2.
- If you want to repeat a phase, select + Repeat Phases and drag the desired phases to the section to repeat.
- Click on “Add to Favorites” to add the destination to your favorites list.
- Click on Add to Diary to add the target to your Diary .
How to create a target from a favorite training target
Once you have created a target and added it to your favorites, you can use it as a template for similar targets. This will make the process easier: you won’t have to do it from scratch every time, like creating a complex training target with phases.
To use an existing favorite as a template for a training target, do the following:
- Hover over the date in Diary .
- Click +Add > Favorite Destination and then select a destination from the list Favorite .
- A favorite item has been added to the diary as a scheduled goal for the day. By default, the scheduled time for a training target is set to 18:00.
- If you want to change something, click on the target in the “Diary” and edit it. Editing a target in this mode will not change the original favorite target.
- Click Save to update the changes.
In addition, you can edit your favorite training targets and create new ones on the Favorites page. Click on the top menu to go to the “Favorites” page.
Sync your goals with your watch
Don’t forget to sync your training targets from the Polar Flow web service with your watch using the FlowSync software or the Polar Flow app. If the sync fails, the targets will only appear in the Diary or Favorites sections of the Polar Flow web service.
For instructions on how to start a workout with a target, see Start a workout.
Create a training target in the Polar Flow 9 app0005
How to create a training target in the Polar Flow app:
- Go to the Training section and tap at the top of the page.
- Then select the target type from the following:
Favorite destination
- Select Favorite Destination.
- Select one of the existing Favorites or “Add New”.
- Tap next to an existing target to add it to your diary.
- The training target you selected will be added to the training calendar for today. Open a training target from your diary to edit your target time.
- When you select Add New, you can create a new destination in your favorites, such as a Quick Destination, Phased, Strava Live Segment, or Komoot Route.

Komoot Route Target is only available on Grit X, Grit X Pro, Pacer Pro and Vantage V2 models, Strava Live Site is available on Grit X, Grit X Pro, M460, Pacer, Pacer Pro, V650, V800, Vantage V and Vantage V2.
Quick target
- Select Quick Target.
- Select if the quick target is based on distance, duration, or calories.
- Add a sport.
- Name the target.
- Set your target distance, duration or calories.
- Touch “Done” to add the goal to the training diary.
Phase separation
- Select “Phase Separation”.
- Add a sport.
- Name the target.
- Set the time and date for the target.
- Touch the icon next to the phase to change the phase settings.
- Tap “Create Goal” to add a goal to your training diary.
Sync your watch with the Polar Flow app to transfer your training target to your watch.
What you need to take with you to fitness or to the gym
Are you ready for some serious training?! Have you packed everything you need in your bag? In order for the training to go as it should, one should not forget about the preliminary preparation for it. In this article, we will cover 9the most necessary things that you need to take with you to the gym and which should be in the sports bag of any self-respecting athlete.
Contents
- What to bring to the gym
- 1. Proper training shoes
- 2. Talc/Magnesia
- 3. Weightlifting belt
- 4. Athletic band/Plast yri
- 5. Notepad
- 6. Rubber hinges
- 7. Wrist wraps
- 8. Foam roller
- 9. Wrist straps
Any of you have a bag for going to the gym, no matter what brand – Under Armor, Nike or Adidas, it is designed to store all your fitness equipment. Nowadays, everyone wants to have the latest gadgets that meet all the requirements of a modern person in all areas of his life, this also applies to sports. The choice of accessories for training in the gym should be approached consciously, because the effectiveness and quality of training depends on it.
So what’s the best shoe for deadlifting? Which belt to choose? Should I spend money on a wrist bandage? Keep reading and you’ll find answers to your most pressing questions. ..
..
1. Proper training shoes
Have you ever thought about how shoes affect your body? We know that our body quickly adapts to any difficulties and stresses, however, it still strives to return to the “comfort zone” by any means, but this zone is not always good for health, it is only the result of the fact that our body has adapted to certain conditions. . Likewise with shoes.
Modern sports shoes designed for comfort and style, but not for training. The 12mm or more raised heel area, enhanced stability system, and cushioned footbed all sound great, but they affect ankle mobility and the inner foot musculature. If you wear these shoes all day long, your body’s center of gravity shifts forward, and your calves are in a state of constant, sub-maximal tension in order to balance your body.
Have you ever wondered why your calves feel tight to the touch despite doing calf stretching exercises several times a day on a daily basis? And you walk 10-14 hours a day in such shoes and you will get an answer to your question.
Before recommending any particular shoe and considering all of the above, let’s first look at what you’re trying to accomplish with the deadlift. During any exercise (deadlift, good morning, Romanian deadlift, etc.) we are trying to shift the weight or center of gravity back, thus trying to balance the bar in front of us. But, as we said, this will be difficult to do if the heel of your training shoes is raised.
So what would I recommend? Do not chase fashion trends and flashy advertising, choose minimalism, such shoes are ideal for lifting a lot of weight. I’m personally a big fan of New Balance’s Minimus all-around shoes. They offer a low degree of lateral stability which is great for changing direction if you’re an athlete, they have a slight rise of just 4mm which contributes to better kinesthetic feedback during workouts. I have 2 pairs and I love them very much. I highly recommend weightlifting to anyone involved in weight lifting in one way or another.
*NOTE: Many of you, I’m sure, are interested in the Olympic Big Heel Weightlifters. They are suitable for tall weightlifters with long hips. I have seen some weightlifters wear squat shoes to compensate for poor ankle mobility. If you can’t balance while lifting weights while squatting barefoot, or if you feel uncomfortable doing so, this is a problem that needs to be addressed. As I said before, you don’t need to treat the symptoms, you need to look for the cause.
Conclusion: High-soled shoes may look good, but they are not suitable for deadlifts. When exercising, wear flat-soled shoes.
2. Talc/Magnesia
This is a very necessary thing not only for weightlifters, but also for many other athletes. The strap is certainly a good thing, but I recommend that beginners and even average weightlifters get stronger without help.
Talc is very cheap, but if you can’t afford it, regular sidewalk chalk will do, pick your favorite color and grind the chalk into a powder. Of course, sidewalk chalk (calcium carbonate) is a little different from talc (magnesium carbonate), but with it you can perform a couple of deadlifts without consequences and at home, while no one is watching you.
If you work out in the gym, talc is almost always there, and I think they will not mind if you bring your own into the gym. If you are working out in a gym where, for some reason, the use of talc is prohibited, try liquid chalk. It doesn’t leave dust everywhere and is often sold with a special carabiner so you won’t lose it.
Conclusion: With talcum powder, you’ll have fewer mishaps, so get yourself some chalk, grind it up, and go sip something heavy.
3. Weightlifting belt
With belts, the situation is more complicated. Many start using them too early or too often as a “crutch” to compensate for the lack of strength and stability. If there is a big difference between the mass you lift with the belt and the mass without it, then it’s time to train without it and work on stability.
As your strength and endurance increase, the belt becomes more necessary and useful, as the number of sets with each workout increases, and with it the load on the back, so the belt can help stabilize the spine. Studies have shown that belts increase intra-abdominal pressure by up to 15% in a squat and by 30-40% during a deadlift.
When to start wearing a belt? If you have reached 85% of your 1RM or above, you might consider using a belt. In addition, you do not need a belt if you pump arm muscles. From the outside it looks cool, but it interferes with proper breathing and contributes to the appearance of a rash on the stomach. In gyms, you can find these, and many more, who apparently do not quite understand the purpose of using a belt.
I understand that you would like to try everything at once, however, in order not to harm your health, everything must be done gradually and in due time. The time will come, and the belt you will use during training very often. If you are just starting to learn the basics of strength exercises, find out first how you can perform them without a belt. If you’ve been lifting weights for a few months now, start experimenting with and without a belt, find a sweet spot for yourself, and stick with it.
Conclusion: Use the belt during sets above 85% of your 1RM, and only when you have reached an average level of strength and understand how to effectively use the belt during training.
4. Athletic Tape/Patches
Some weightlifters scoff at these accessories, but anyone who has ever done Olympic weightlifting or Texas deadlifts will understand. As the weight you lift increases and the number of lifts increases, your hands and fingers begin to experience tremendous stress and friction.
Athletic band prevents calluses from bursting if your hands are in poor condition. Plasters will also come in handy, because they can be used to seal old and new battle wounds.
I had to put my deadlift training on hold after scratching my shin once and then trying to stop the bleeding for the next 5 minutes. Don’t like band-aids, then wear long socks or sweatpants to prevent problems altogether.
Conclusion: Athletic tape and patches may seem unnecessary to you, but only until you open your corn or scratch something. Stock up now and you’ll thank me later.
5. Notepad
Subsequent performances of the same exercise, repeated over several days or several months, do not produce the same effect as the first performance of the same strength exercise. As I mentioned above, your body is constantly adapting to certain loads, but if this load is repeated over and over again, this is not an incentive to adapt again, so it is worth changing the load. Strength training is built around the laws of progressive overload, but how are you going to remember what you did a week ago, let alone a month ago?
Get a notepad and fill in all the information you need. If you don’t track your raises, then your progress will stagnate. I started with a simple pen and paper and now I have created a series of excel templates that I use myself and give to my athletes, it makes learning so much easier. Why not try?! If you’re familiar with the computer, experiment with building your own learning template, it’s actually pretty easy once you get the hang of the program.
Editor’s Note: The Muscle & Strength Forum has its own training logs for its members, making it easy to track your workouts and get advice from experienced members.
Conclusion: What is written down is remembered.
6. Rubber loops
Rubber loops are very useful for joint mobilization, you can perform a whole range of exercises when removed. Start by including them in your workout. They are light, portable, fairly cheap, and quite handy. With their help, you can develop the muscles in the thighs responsible for stability.
As I have mentioned in some of my previous articles, rubber bands can be used to change the force curve, as they provide resistance or help at certain points of elevation. During deadlifts, rubber loops make it harder to lockout. But in a squat, it is better to hang the loops on the crossbar.
Conclusion: It is better to purchase both full size and short loops, include them in your workout more often or use them as an overload protection.
7. Wrist bandages
I’m sure you’ve seen them before. Many athletes, as soon as they enter the gym, immediately put on a belt and wrist straps. There is nothing wrong with them, they help the average weightlifter cope with pain during the lifting of the maximum weight. You shouldn’t think of wrist straps as a belt, you don’t wear a belt all the time, at least you shouldn’t, so it would be wise to first accustom your hands and forearms to rough and intense work without them.
Wrist straps are very useful and I use them during my workouts to support maximum weight. It also happens that a weightlifter simply cannot perform workouts without straps due to some circumstances (past injuries, musculoskeletal deformities, etc.), because he experiences pain during them. The use of wrist straps has its time and place – the main thing is not to overdo it.
Conclusion: If you have short wrists and can’t hold heavy weights for long periods, then the wrist straps are a must. They relieve pain and give stability to the wrist.
8. Foam roller
My roller is extremely necessary for me, I use it during the warm-up, and also at the end of the workout I lie on it for 5-10 minutes to relax and speed up the recovery process. Some use PVC pipes or rubber lacrosse balls.
When you have problems with the musculoskeletal system, you want to solve them quickly, but do not rush to take drastic measures, this can speed up the process of erasing the joints. It has been proven that performing exercises with a roller helps to strengthen the musculoskeletal system and will avoid problems with the joints in the future.
Conclusion: Everyone wants to be flexible, but they often neglect rolling exercises, which warm up soft tissues, promote blood and lymph circulation.
9. Wrist straps
Wrist straps are very important in the career of any weightlifter. For example, snatch deadlifts, one-arm dumbbell rows, shrugs, and some other deadlift variations are just a few of the exercises where hand wraps can be quite helpful if done correctly. However, some here manage to overdo it.
In the gym, athletes can be seen pulling dumbbells with wrist straps, using them during the farmer’s walk, side raises, deadlifts, or even holding their protein shake after a workout.
Conclusion: Try to use hand straps when lifting heavy weights or if there is discomfort in the hands to prevent injury. They do not give an increase as such, but it is more reliable and more convenient to press with them.
Bottom line – what to bring to training:
- High-soled shoes may look good, but they are not suitable for deadlifts. When exercising, wear flat-soled shoes.
- With talcum powder, you’ll have fewer bad hits, so get yourself some chalk, grind it up, and go sip something heavy.
- Use the belt during sets above 85% of your 1RM, and only when you have reached an average level of strength and understand how to effectively use the belt during training.
- Athletic tape and plasters may seem like unnecessary things to you, but only until you open your corn or scratch something.

