What are the main positions in field hockey. How do forwards contribute to scoring goals. What role do midfielders play on both offense and defense. Why are fullbacks crucial for team defense. How does a sweeper provide extra defensive support. What makes the goalkeeper such a vital position.
Understanding the Fundamentals of Field Hockey Positions
Field hockey is a dynamic sport that requires a diverse set of skills from its players. With eleven players on each team, understanding the various positions and their responsibilities is crucial for both players and parents. This comprehensive guide will delve into the intricacies of each position, highlighting their unique roles and the skills required to excel in them.
Forwards: The Goal-Scoring Specialists
Forwards, also known as strikers, are the primary offensive players in field hockey. They operate between the midfield and the opponent’s goal, constantly seeking opportunities to score. Their main responsibilities include:
- Creating and exploiting scoring opportunities
- Maintaining offensive pressure on the opposing team
- Collaborating with teammates to execute offensive plays
- Quickly transitioning from defense to offense
Successful forwards possess exceptional ball control, quick decision-making skills, and the ability to maneuver in tight spaces. They must also demonstrate unselfish play, prioritizing team success over individual glory.
Key Attributes of Effective Forwards
To excel as a forward in field hockey, players should focus on developing the following skills:
- Precise shooting technique
- Rapid acceleration and deceleration
- Excellent spatial awareness
- Creative passing and ball distribution
- The ability to read and anticipate defensive movements
Does positioning play a crucial role for forwards? Absolutely. Forwards must constantly adjust their positions to create space, draw defenders away from teammates, and exploit gaps in the opposing team’s defense.
Midfielders: The Versatile Workhorses
Midfielders, also referred to as halfbacks, are the backbone of any field hockey team. They serve as the link between the defense and offense, requiring a diverse skill set and exceptional stamina. The primary responsibilities of midfielders include:

- Supporting both offensive and defensive plays
- Controlling the pace and flow of the game
- Distributing the ball efficiently to forwards and other teammates
- Quickly transitioning between offense and defense
- Providing defensive coverage when needed
Effective midfielders possess a combination of offensive creativity and defensive awareness. They must be able to read the game well, anticipate opponent movements, and make split-second decisions.
Essential Skills for Midfield Success
To thrive in the midfield position, players should focus on honing these key skills:
- Exceptional cardiovascular endurance
- Precise passing and receiving techniques
- Strong tactical understanding of the game
- Ability to maintain possession under pressure
- Effective communication with teammates
Is versatility important for midfielders? Undoubtedly. The most successful midfielders can seamlessly transition between offensive and defensive roles, adapting their play style to the team’s needs at any given moment.
Fullbacks: The Defensive Stalwarts
Fullbacks are the primary defensive players in field hockey, tasked with protecting their team’s goal and disrupting the opposing team’s offensive plays. Their main responsibilities include:
- Marking and containing opposing forwards
- Intercepting passes and clearing the ball from dangerous areas
- Providing support to midfielders during defensive transitions
- Initiating counterattacks after successful defensive stops
- Communicating with teammates to organize defensive formations
Successful fullbacks demonstrate excellent positional awareness, strong tackling skills, and the ability to remain calm under pressure. They must also possess good clearing abilities to quickly transition the ball out of their defensive zone.
Key Attributes of Effective Fullbacks
To excel as a fullback in field hockey, players should focus on developing the following skills:
- Strong tackling technique
- Excellent spatial awareness and positioning
- Powerful and accurate clearing shots
- Quick decision-making abilities
- Effective communication with teammates and the goalkeeper
Can fullbacks contribute to offensive plays? While their primary role is defensive, skilled fullbacks can certainly contribute to offensive plays by making well-timed runs up the field or delivering accurate long passes to initiate counterattacks.
The Sweeper: The Last Line of Field Defense
The sweeper position is a specialized defensive role that provides an extra layer of protection in front of the goalkeeper. Not all teams employ a sweeper, but when used, their responsibilities include:
- Positioning themselves behind the main defensive line
- Covering any gaps or breakdowns in the defense
- Providing support and communication to fullbacks
- Intercepting through balls and long passes
- Initiating defensive plays and organizing the backline
Effective sweepers possess exceptional game-reading abilities, strong leadership skills, and the capacity to remain composed under intense pressure. They must be able to anticipate offensive movements and react quickly to neutralize threats.
Critical Skills for Sweeper Success
To thrive in the sweeper position, players should focus on developing these key attributes:
- Excellent vision and anticipation
- Strong leadership and communication skills
- Precise tackling and intercepting abilities
- Quick decision-making under pressure
- Versatility to adapt to different defensive scenarios
How does the sweeper position differ from traditional fullbacks? While fullbacks focus on marking specific opponents, the sweeper has a more fluid role, covering spaces and providing support wherever needed across the defensive line.

The Goalkeeper: The Ultimate Defensive Anchor
The goalkeeper is arguably the most specialized position in field hockey, serving as the last line of defense against opposing attacks. Their primary responsibilities include:
- Protecting the goal from shots and deflections
- Directing and organizing the defensive line
- Initiating counterattacks with accurate clearances
- Making split-second decisions on when to challenge attackers
- Maintaining focus and composure throughout the match
Successful goalkeepers possess a unique combination of physical attributes, mental fortitude, and technical skills. They must be agile, courageous, and have excellent hand-eye coordination.
Essential Skills for Goalkeeping Excellence
To excel as a goalkeeper in field hockey, players should focus on honing these critical skills:
- Quick reflexes and reaction time
- Strong communication and leadership abilities
- Excellent positional awareness
- Proficiency in various saving techniques (e.g., kicking, diving, hand stops)
- Mental resilience and ability to remain focused under pressure
Why is communication so crucial for goalkeepers? Effective communication allows goalkeepers to organize their defense, alert teammates to potential threats, and coordinate defensive strategies, ultimately enhancing the team’s overall defensive performance.
Choosing the Right Position: Factors to Consider
Selecting the most suitable position in field hockey is a crucial decision for players and parents alike. Several factors should be taken into account when making this choice:
- Physical attributes and natural abilities
- Personal preferences and playing style
- Team needs and tactical considerations
- Long-term development goals
- Advice from coaches and experienced players
It’s important to remember that versatility is highly valued in field hockey. Many players benefit from experience in multiple positions, which can enhance their overall understanding of the game and make them more valuable team members.
The Importance of Positional Flexibility
While specializing in a particular position can lead to mastery, there are several advantages to maintaining positional flexibility:
- Enhanced understanding of team dynamics and strategy
- Increased playing time opportunities
- Ability to fill in for injured or absent teammates
- Improved overall skill set and game awareness
- Greater value to coaches and teams at higher levels of play
Should young players focus on a single position or try multiple roles? For youth players, it’s generally beneficial to experience multiple positions. This approach allows them to discover their strengths, improve weaknesses, and develop a comprehensive understanding of the game before specializing later in their playing careers.
Developing Position-Specific Skills: Training and Practice
Once a player has chosen a position or identified areas of focus, targeted training becomes essential for improvement. Here are some strategies for developing position-specific skills:
- Attend specialized clinics and camps
- Work with experienced coaches or mentors
- Utilize position-specific drills and exercises
- Study and analyze professional players in similar roles
- Participate in scrimmages and practice matches to apply skills in game situations
Consistent practice and dedication are key to mastering any position in field hockey. Players should set clear goals, track their progress, and continually seek feedback from coaches and teammates.
The Role of Mental Preparation in Positional Success
While physical skills are crucial, mental preparation plays an equally important role in positional success. Players should focus on developing:
- Strong focus and concentration abilities
- Effective stress management techniques
- Positive self-talk and visualization skills
- Quick decision-making under pressure
- Resilience and the ability to learn from mistakes
How can players improve their mental game? Regular mental training exercises, such as visualization, meditation, and goal-setting, can significantly enhance a player’s mental preparedness and on-field performance.
The Evolution of Field Hockey Positions: Modern Trends and Tactics
As field hockey continues to evolve, so do the roles and responsibilities associated with each position. Modern tactical approaches have led to more fluid positional play and increased versatility among players. Some current trends include:
- Hybrid positions that blend traditional roles
- Greater emphasis on total team defense and pressing
- Increased involvement of defenders in offensive plays
- More dynamic and interchangeable midfield formations
- Advanced goalkeeper techniques and involvement in build-up play
These trends highlight the importance of adaptability and continuous learning for players at all levels. Staying informed about tactical innovations and rule changes can give players a competitive edge and enhance their overall performance.
The Impact of Technology on Positional Play
Advancements in technology have also influenced how players approach their positions in field hockey. Some key technological impacts include:
- Video analysis tools for studying individual and team performance
- Wearable devices for tracking physical performance metrics
- Advanced training equipment for position-specific skill development
- Virtual reality simulations for tactical training
- Data analytics for optimizing team formations and strategies
How can players leverage technology to improve their positional play? By embracing these technological tools, players can gain valuable insights into their performance, identify areas for improvement, and make data-driven decisions to enhance their effectiveness in their chosen position.
Parents Guide to Field Hockey: Knowing the Positions
Field Hockey Tip
As a parent new to field hockey, it is important that you understand the different positions on the field to help your players decide which one they would like to play. Field hockey is a fast-moving sport with eleven players on the field. It may seem overwhelming to decipher which position is mot suited for your player. This guide will help give you a breakdown of the different positions on the turf, their responsibilities, and their skills. Once a player has chosen a position, athletes can attend a Nike Field Hockey Camp that will help them improve their position specific skills!
Forwards:
You can find forwards in between midfield and the opponent’s goalie. They are typically the people who score the most goals in a game. Forwards are also known to be called strikers. Their main job on the turf is to work together to head downfield and score. Great forwards are unselfish, move quickly, and create spacing and ball movement to help their teammates.
Midfielders:
Midfielders, also known as halfbacks, must be able to play both defense and offense as they are considered to be multi-taskers on the turf. It is important that midfielders have a high stamina because of their constant movement up and down the field. Midfielders must be ready to defend quickly if an offensive attack fails, while remaining vigilant to where the ball is.
Fullbacks:
Fullbacks are primarily defensive players. Their primary role is to defend an opposing forward and keep the ball away from reaching the goalie. A successful defensive stop will result in getting the ball back to the other side so the mid-fielders and forwards can score. A fullback should know where their opponent is constantly and support the mid-fielder when switching into the attack.
Sweeper:
Sometimes coaches will have a single fullback play close to their own goal. They are called a sweeper and are considered an extra defense since they will stay back behind the other fullbacks near the goalie. Their job is the same as a fullback, to defend an opposing forward and keep the ball away from the goal box.
Goalie:
Goalkeepers are arguably the most important position on the turf since they are the last line of defense before the opposing team can score. They must have quick reflexes and the ability to block hard shots with their bodies and stick. A goalie is also in charge of communicating with their teammates about defensive strategies. Goalies should focus on communicating with the fullbacks to help protect the goal.
Use this helpful guide for your beginning field hockey player and help them choose the position they would like to play! Check out more helpful field hockey tips and join us next summer at a Nike Field Hockey Camp!
%PDF-1.7
%
828 0 obj
>
endobj
xref
828 75
0000000016 00000 n
0000003400 00000 n
0000003531 00000 n
0000004751 00000 n
0000005232 00000 n
0000005269 00000 n
0000005851 00000 n
0000005965 00000 n
0000006077 00000 n
0000006327 00000 n
0000006999 00000 n
0000007559 00000 n
0000008133 00000 n
0000008723 00000 n
0000009303 00000 n
0000009871 00000 n
0000010461 00000 n
0000010784 00000 n
0000011335 00000 n
0000011484 00000 n
0000011559 00000 n
0000011656 00000 n
0000011805 00000 n
0000022929 00000 n
0000023008 00000 n
0000025657 00000 n
0000025781 00000 n
0000025905 00000 n
0000026002 00000 n
0000286991 00000 n
0000287066 00000 n
0000287736 00000 n
0000287811 00000 n
0000288236 00000 n
0000288311 00000 n
0000288672 00000 n
0000288785 00000 n
0000288860 00000 n
0000288935 00000 n
0000289247 00000 n
0000289302 00000 n
0000289418 00000 n
0000289493 00000 n
0000289807 00000 n
0000289862 00000 n
0000289978 00000 n
0000290053 00000 n
0000290366 00000 n
0000290421 00000 n
0000290537 00000 n
0000290612 00000 n
0000290926 00000 n
0000290981 00000 n
0000291097 00000 n
0000291711 00000 n
0000291750 00000 n
0000291825 00000 n
0000292135 00000 n
0000292210 00000 n
0000293986 00000 n
0000294061 00000 n
0000295317 00000 n
0000295392 00000 n
0000295860 00000 n
0000297562 00000 n
0000299264 00000 n
0000305769 00000 n
0000314205 00000 n
0000319351 00000 n
0000397050 00000 n
0000397426 00000 n
0000463223 00000 n
0000470340 00000 n
0000518855 00000 n
0000001796 00000 n
trailer
]/Prev 2915308>>
startxref
0
%%EOF
902 0 obj
>stream
hެV]lSe~OϺ?%ѡA\BN쬧-c
` N##K$Qo^ ^xat[+wyyN
Field Hockey Overview | Connecticut Field Hockey Camp
So your friends play field hockey, but you don’t, and you never know what they are talking about. Or maybe, you have never played before and are about to take lessons or go to a summer camp, and you want to know a little bit about the game first.
Whatever your reason for wanting to know, here are some simple things anyone talking about or playing field hockey should know.
Field Hockey Positions
Each time has 11 players on the field during the game including the goalie. Positions you might play include
- Forward. These are guys that get to score most. They spend most of the game in between midfield and the opponent’s goalie post.
- Midfielders. Sometimes called halfbacks or links, these are the multi-tasking runners of the group. Their job is to play both offense and defense, so they are running back up and down the field going back and forth between offense and defense. If you want to play this position, you need stamina because you are going to be doing a whole lot of running.
- Fullbacks. As you might guess from the name, these are the people who are fully in the back. They aren’t going to do much scoring, but that’s okay. Their job is to play defense. They stand close to their own goal, and try to keep the ball out of the goal before it even reaches the goalie. It is also their job to clear the ball – or get it back to the other side so the forwards can score.
- Sweeper. Sometimes, a coach wants a little bit of an edge against a goal being scored. While a team does not have to have a sweeper, they might use one in order to get that extra insurance. A sweeper is actually one of the fullbacks, but they stay in the back of the rest of the fullbacks and are the closest player to their team’s goalpost other than the goalie.
- Goalie. Some people will tell you that this is the most important person on the team. The goalie’s job is to keep the other team from scoring. To be a goalie, you have to have quick reflexes and the ability to communicate with your teammates about defensive strategies.
Coaches have a little bit of flexibility in how many of each position are on the field. It is most common to go 4-3-3, meaning four forwards, and three each of midfielders and fullbacks – with one goalie, of course. However, some coaches choose to play a 5-3-2 field. Either way, you only get one goalie.
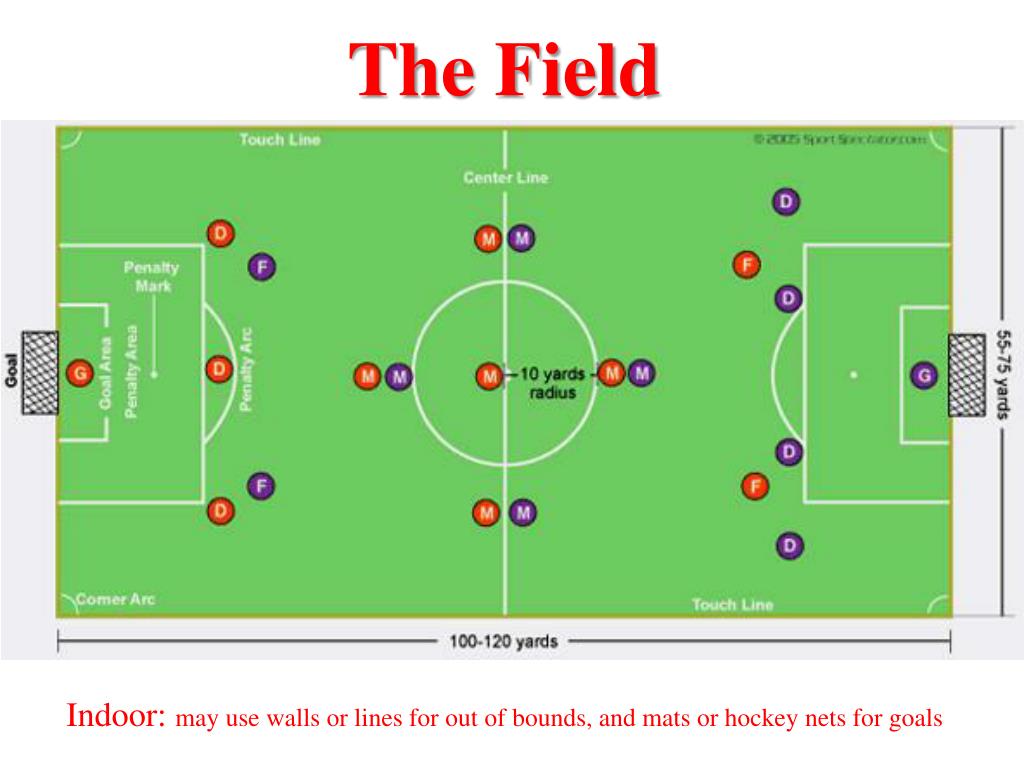
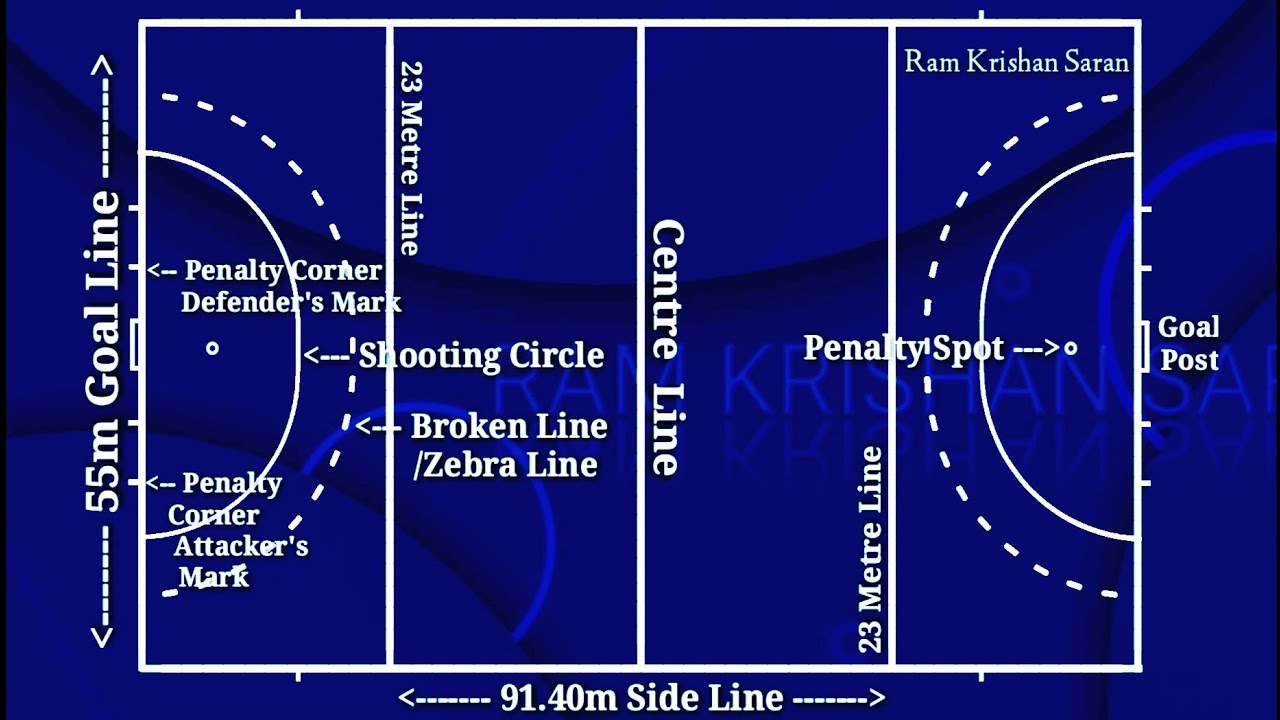
The Field (aka the Pitch)
A field hockey field, often called a pitch, has several different areas of play. In order to really grasp the sport, it is important to know these areas and what they mean.
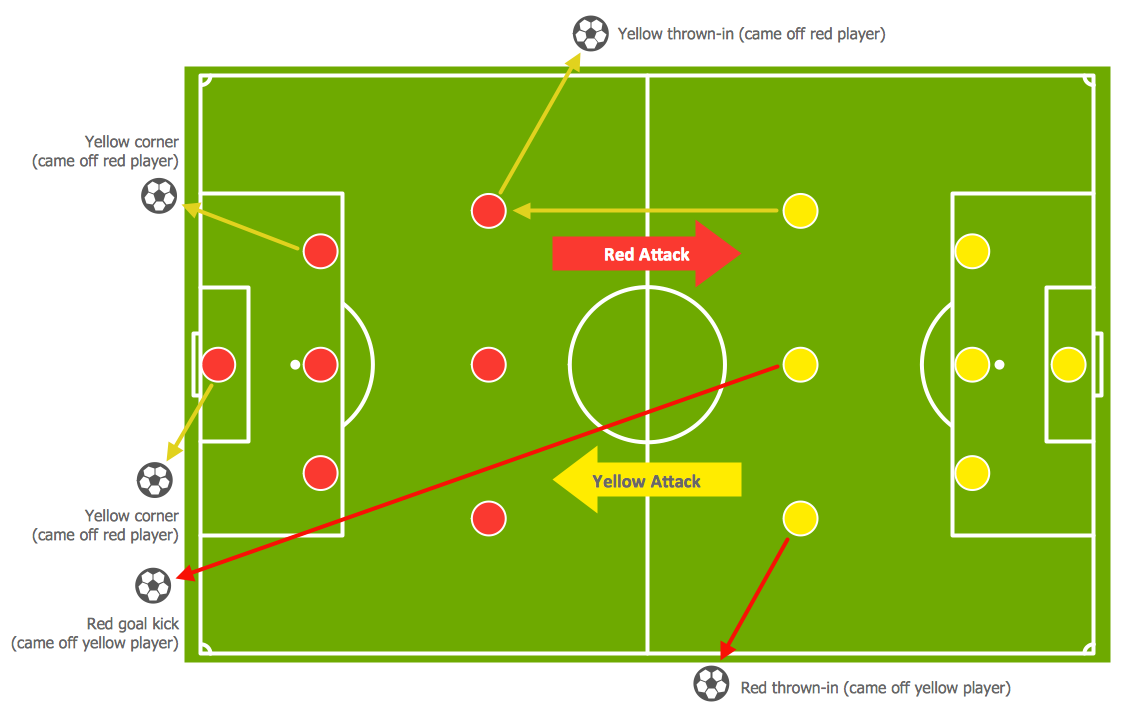
- Sideline. This is the boundary on the sides. A ball outside of the boundary line is out of play. When a team hits a ball over the sideline, the other team gets a side-in, which basically means they get to hit the ball back into play from the sideline.
- End line. Like a sideline, only it goes the width of the field, behind the goal posts. The ball is also out of play when it goes over the end lines.
- Center line. The line in the center of the field that divides the field in half.
- 25-yard line. The line on both sides of the field 25-yards in.
- Striking circle. The area of the field surrounding the goal that a player or a player the scorer deflects the ball off of must be in in order to score.
- Penalty stroke line. This is where you get to take your penalty shots.
- Substitute area. When someone needs a substitute, they must wait until the play is over. In the meantime, the relief player is waiting in this area until they get to sub in. The player coming out must get off the field before the new player can come onto the field.
Basic Field Hockey Overview
So now that you know the players and parts of the field, here is a general idea of how you play the game. First, you probably already know the point of the game: to win by scoring more goals than your opponent does. However, there is more to it than that.
A field hockey game consists of two halves. Each half lasts 25 or 30 minutes, depending on what level of play is going on. In the case of a tie game, there might also be overtime. Leagues have their own rules about this, but if you do play an overtime, it will likely be a ten-minute sudden death (meaning as soon as one team scores, the game is over.)
To make scoring more likely, there might be less players on the field during an overtime. If nobody scores in the overtime, the teams might take turns shooting penalty shots, with the teams scoring the most winning.
At the beginning of each half and after every goal, teams alternate a center pass. Both team line up on their sides of the field, and the player on the team whose turn it is to shoot the center pass stands at the center with the opposing team standing about five yards from the ball. When the whistle blows, the player in the center hits the ball into play.
Offensively, players are trying to score. However, in order to score, players must be in the striking circle or they must deflect the ball off one of their teammates who are in the circle.
Defensively, players are trying to keep the other team from scoring. They do this by marking (guarding) and tackling (try to take the ball away from the opponent.)
Players may not touch the ball with their bodies. They also must not make contact with another player or obstruct another player from the ball.
There you have it. Now that you’ve learned all that, when you head out to the pitch, or just talk to some field hockey-loving friends, you’ll understand a little bit about what is happening.
Field Hockey Positions
Player Positions
In field hockey, there are 11 players on the field at any given time. These 11 players include ten field players and one goalie. The ten field players are usually forwards, midfielders, and defenders. Often times, coaches will position players in formations.
The Goalie
The goalie is the most important position on the hockey field. They are the last line of defense if the opposing team is able to make it past the last two defenders. The most important responsibility of the goalie is to stop the ball from entering the goal at all cost. They could be the reason that the opposing team wins. They are the only player on the field that is allowed to stop the ball with their field.
The goalie needs a different set of skills than the other ten field players. Goalies need to be flexible and have superior hand-eye coordination in order to block shots taken by opponents.
The goalie wears a completely different set of gear than the field players. The goalie wears leg pads that cover their entire leg, arm pads that run from their shoulder to the wrists, and foam padded gloves, along with their mouth guard, they also sport an entire face mask.
The Defenders
Strong defenders on the hockey team are imperative, they are the heartbeat of the team. They should have strong stick skills and they should be proactive in their positioning.
The goal of the defenders should be to protect the goal, at all costs. Another duty of the defender is also is to accurately pass the ball to the forwards once it is cleared out of the striking circle.
In most player formations, there is usually three defenders, excluding the goalie. It is set up that way to defend alleviate some of the pressure put on the goalie, and evenly distribute it amongst the other defenders. The forwards usually do not pass the line of scrimmage. The only reason the forwards would pass the line of scrimmage into the striking circle is to receive a pass from the defender to take the ball back down the field
The Forwards
Forwards are the first line of offense in field hockey. Their responsibility is solely to score goals, steal the ball from the opposing team and keep the ball past the line of scrimmage.
In player formations, there are usually three to four forwards, depending on the formation. If there are four forwards, they are broken into micro-positions. The two forwards on the outside are also known as wings. They keep the ball inbounds and usually cut the ball across to the strikers to score. The two forwards in the center are known as the strikers.
A huge emphasis is put on them to score because that is their responsibility. They are the quickest on the field and have a lot of fun stick skills to get around defenders. If there isn’t any opportunity to score a goal, they must create them by forcing opponents to turn the ball over.
The Midfielders
Midfielders are the most dynamic, and versatile players on the hockey field. They are the perfect mix between a defender and a forward. Typically, they need to have the most endurance on the field. Like forwards, midfielders are also split up into micro-positions. The center midfielder is the first person to assist the strikers in the game.
They help the forwards score when necessary but also need to retreat back to assist the defenders. Their main position is handling the ball when it comes past the line of scrimmage. They are the playmakers, who usually have the most assists at the end of the game.
2020-2021 Longstreth Field Hockey Catalog
#2#D2’+
BACK
FRONT
FIELD HOCKEY SEASON PLANNER • A booklet to record all seasonal information including: attendance, emergency procedures, players’ positions and numbers, daily lesson plans, game results, field diagrams, recruiting information and end-of- season summary HO43 $4.95
FIELD HOCKEY DIAGRAM TABLET • 8.5″ x 11″ tablet of 40 sheets • Diagram of playing field to help you plan your strategy HO56 $4.95
FIELD HOCKEY SCOREBOOK • Published by Longstreth • 28 games per book HO40
SPORT WRITE PRO FIELD HOCKEY BOARD • Dimensions: 16.5″ x 12.5″ • Lightweight dry-erase board with marker • Front side features a full-field diagram • Back side features a half-field diagram HO47 $27.95
$4.95
PAT TONER “OUR FAVORITES” DRILL CARDS • By: Pat Toner, Jess Shellenberger and Marybeth Freeman • Set includes 150 new drills PTPC5 Our Favorites $29.95 PTPC4 Coaches Favorites $14.95 PTPC Full Card Set & Box $34.95
FIELD HOCKEY SPORTS BOARD • 10″ x 15″ magnetic diagramming coaching board • Lightweight, weather-proof plastic case • Built-in carrying handle and inside storage compartment • Use magnetic disks or dry-erase markers HO59 $46.95
THE POWER OF POSITIVE LEADERSHIP by Jon Gordon • Learn what leadership is really about and cultivate the habits and outlook to be successful. This book helps you become the leader your team needs. GB5 BOOK $24.95
NEW! THE POWER OF A POSITIVE TEAM by Jon Gordon • This book is designed to make a team more positive, cohesive, stronger and better. It is meant for teams to read to- gether. It’s written in such a way that if you and your team read it together, you will understand the obstacles you will face and what you must do to become a great team. GB6 BOOK $24.95
#6BL5’2’+
MUELLER FIRST AID KIT • Lightweight and compact • Kit comes with supplies for taping, cold therapy, and wound care • Comes with loops to be worn on belt MSFAK $17.95
THERAPEUTIC EVA FOAM ROLLER • Foam roller temporarily relieves tension, stretches sore muscles, and provides therapeutic massage • Dual textured foam roller for targeting specific muscles • Includes illustrated guidelines • 13″ x 5″ PPFR $24.95
TIGER TAIL 18″ • Helps relieve muscle knots, aches, cramping, spasms and stiffness • Soft foam spins smoothly for a consis- tent massage TT18 $29.95
MUELLER HERO PROTÉGÉ COMPLETE FIRST AID KIT • Rugged lightweight nylon bag with full- open design for easy access to gear • Includes all the first-aid necessities • 10″ L x 10″ W x 10″ H MHPK $216.95
PRE-WRAP • Colors: aqua, neon yellow sunburst, lime green, red, black, purple, yellow, blue, pink CUT $3.00
ATHLETIC TAPE • 1.5″ width
MUELLER BLISTER KIT • Contains all the essentials to care for blisters, calluses, abrasions, and pres- sure/friction burns MBK $15.95
MUELLER INSTANT COLD PACKS • Activates instantly when squeezed • Single use and easily disposable MCP case of 16 $25.95
• Colors: blue, green, red, gold, black, purple, maroon, grey, orange, pink, white LR17 $3.50 MWT (white) $3.00
KH
longstreth.com 800.545.1329
Made with FlippingBook – professional solution for displaying marketing and sales documents online
Know about Famous Hockey Positions on the Field
Hockey: Introduction
Hockey Positions: Hockey is India’s National game and while many people aren’t still aware of fact that India has won most Olympic Gold medals in this sport, it is still considered as “Not that much popular like Cricket” game in the country. Hockey, also referred to as field hockey generally is a game which consists of 11 players on both sides and the team which outrun the opposition by scoring the most number of goals in the stipulated time without getting as many goals scored against them is considered as the ultimate winner in the game. The Game is generally played by Hockley sticks and Hockey ball and all the players playing it on the field have to abide by the rules and guidelines framed by the International Hockey Federation.
Though the team formation of every team differs according to their playing style, every team is consists of one goalkeeper, two full-backs, three half-backs and five players playing as Forwards. There are also 5 to 7 Substitutes in the match which can be used during the match to replace the already playing players in case of Injury or in as per the match situation. Let’s take a brief look at Different Hockey positions and their relevance during the course of the whole game.
Basic Hockey Positions:-
Goalkeeper
Just like in every other team sport, the role of a goalkeeper here is to deny every other opportunity created by the opposition to score a goal. This can certainly be regarded as the most important Hockey position in the whole match as without a good Goalkeeper on the ground, no team can win the match convincingly.
Being a goalkeeper the person has the best outlook towards the opposition camp and can easily guide his team with the right instruction on the field. He can also advise the players to create different strategies and chances with the right frame of mind and the best approach.
Though the role of the goalkeeper has mostly been quoted for saving the goals and guarding the Circle only, he or she can also approach the opponent’s half when and wherever required. Still, this is needed only when a team is losing and there are just a few minutes left in the game and the team is going full throttle on attack
Full-back
Usually, there are two Full-back Hockey Positions in every team during a match but it still depends on every team’s Individual strategy. Full-backs are kind of Defenders whose role is to ensure that the opposition players get denied any chances of scoring a goal against their team. Their role along with the Goalkeeper is the most important role in the match. They not only act as a full-back but play a major role in covering other full-backs during the match and mostly specialize in defending during the Penalty corners.
Half-Back (Right/Left)
Players In Half-Backs Hockey Position along with players in the Full-Backs Hockey Position play an important role in the match as their role is also to stop the opposition players from scoring any goals in their half. Apart from that, their job is to create more attacks in the filed by making the right passes to the midfielders and the Forwards
They can also take free hits in the other half and create attacking chances by giving full support to the forwards and the midfield with accurate crosses.
Centre-Half
The Center-Half Hockey Position along with the defense is the most crucial position during the whole match and whiles a Centre half plays a key role in monitoring and controlling every pas and attack, the results of the match mostly depend on their performance.
Their core job is to collect passes from the half-backs or the full-backs and distribute it further to the forwards so as they can carry on with their attacking strategies. They can also switch to attacking mode or defensive mode when and wherever required and can further support the forwards to create better scoring chances and the defenders to stop the opposition from creating anymore attacks simultaneously.
Inside forwarding (Right/Left)
The Core Job of the Inside Forwards Hockey Position is to create better chances for the Centre forwards during the attack on the opposition goal. They can also play as a supportive hand to distribute the passes and crosses to the center half players and can even try to score goals if they find themselves in a better position to score than anyone else.
Still, their role isn’t just limited f to create attacks and they should also have the same expertise in supporting the defense when and wherever required during the match.
Winger (Right/Left)
Players playing in Winger Hockey Position are usually involved in creating sidelines attacks by connecting by with the center-half, half-backs or the inside forwards as per the match situation. While they are mostly positioned on the sidelines, they should have the perfect ability to control the whole game from their only. Though they can also support the Defense depending on the match situation, they are mostly required to create perfect crosses for the center-forwards from the sidelines during the game
While playing down the sidelines they can also take free hits and pass the ball in the circle to create better scoring chances for other players in his team.
Also Check: Drag Flick Technique in the Field Hockey
Centre-Forward
When it comes to attacking, players of Center-Forward Hockey Position is the most vital player for any team as his role is to score the goal for the team after taking the passes or the crosses from his teammates and should also be ready to attack whenever he or she gets the chance to enter the opposition’s circle during the match.
While the rest of the team carries on with their attacking moves in the opposition half, a Centre half should have the ability to just sprint in the Opposition’s circle and create a better goal-scoring chance for team. The Center-half should coordinate with the Centre Forward, the Wingers, and the full-backs in order to create more productive chances for his team to score.
Motion frequency during the hockey game, by position. Bars from left to…
Background
Inertial measurement units (IMUs) are used for running gait analysis in a variety of sports. These sensors have been attached at various locations to capture stride data. However, it is unclear if different placement sites affect the derived outcome measures.Objective
The aim of this systematic review and meta-analysis was to investigate the impact of placement on the validity and reliability of IMU-derived measures of running gait.Methods
Online databases SPORTDiscus with Full Text, CINAHL Complete, MEDLINE (EBSCOhost), EMBASE (Ovid) and Scopus were searched from the earliest record to 6 August 2020. Articles were included if they (1) used an IMU during running (2) reported spatiotemporal variables, peak ground reaction force (GRF) or vertical stiffness and (3) assessed validity or reliability. Meta-analyses were performed for a pooled validity estimate when (1) studies reported means and standard deviation for variables derived from the IMU and criterion (2) used the same IMU placement and (3) determined validity at a comparable running velocity (≤ 1 m·s−1 difference).ResultsThirty-nine articles were included, where placement varied between the foot, tibia, hip, sacrum, lumbar spine (LS), torso and thoracic spine (TS). Initial contact, toe-off, contact time (CT), flight time (FT), step time, stride time, swing time, step frequency (SF), step length (SL), stride length, peak vertical and resultant GRF and vertical stiffness were analysed. Four variables (CT, FT, SF and SL) were meta-analysed, where CT was compared between the foot, tibia and LS placements and SF was compared between foot and LS. Foot placement data were meta-analysed for FT and SL. All data are the mean difference (MD [95%CI]). No significant difference was observed for any site compared to the criterion for CT (foot: − 11.47 ms [− 45.68, 22.74], p = 0.43; tibia: 22.34 ms [− 18.59, 63.27], p = 0.18; LS: − 48.74 ms [− 120.33, 22.85], p = 0.12), FT (foot: 11.93 ms [− 8.88, 32.74], p = 0.13), SF (foot: 0.45 step·min−1 [− 1.75, 2.66], p = 0.47; LS: − 3.45 step·min−1 [− 16.28, 9.39], p = 0.37) and SL (foot: 0.21 cm [− 1.76, 2.18], p = 0.69). Reliable derivations of CT (coefficient of variation [CV] < 9.9%), FT (CV < 11.6%) and SF (CV < 4.4%) were shown using foot- and LS-worn IMUs, while the CV was < 7.8% for foot-determined stride time, SL and stride length. Vertical GRF was reliable from the LS (CV = 4.2%) and TS (CV = 3.3%) using a spring-mass model, while vertical stiffness was moderately (r = 0.66) and nearly perfectly (r = 0.98) correlated with criterion measures from the TS.Conclusion
Placement of IMUs on the foot, tibia and LS is suitable to derive valid and reliable stride data, suggesting measurement site may not be a critical factor. However, evidence regarding the ability to accurately detect stride events from the TS is unclear and this warrants further investigation.
Change the display order of categories, values, or data series
If in a chart for which you want to change the display order of the axes, you can quickly change the display order of the categories or values along the axis. In addition, in 3-D charts with a depth axis, you can change the order in which the data series are plotted so that large 3-D data markers do not block the smaller ones.
You can also change the order in which the data series are highlighted in the chart.
In this article
Reorder the chart for categories or values
In the diagram, do one of the following:
To change the order in which categories are clicked, click the horizontal (categories) axis.
To change the order in which values are clicked, click the vertical (values) axis.
To select the desired axis from the list of chart elements, you can also do the following:
Click the chart. The Chart Tools tab opens.
In the Chart Tools group, Format tab, in the Current Selection group, click the arrow next to Chart Elements and select the chart element you want.
On the Format tab, in the Current Selection group, click Format Selection .
In category Axis Parameters , do the following:
For categories, select the Categories field in in reverse order.
For values, select the value in the reverse order of .
Note: You cannot change the rotation order of values in a screen chart.
Back to the top of the page
Change the order of printing a series of data on a 3-D chart
You can change the order in which the data rows are printed so that large, bulky data markers do not block smaller ones.
Figure: 3-D charts with data series displayed in reverse order
In the chart, click the depth axis or select it from the list of chart elements, do the following:
Click the chart. The Chart Tools tab opens.
In the Chart Tools group, Format tab, in the Current Selection group, click the arrow next to Chart Elements and select the chart element you want.
On the Format tab, in the Current Selection group, click Format Selection .
In category Axis Parameters , in Axis Parameters window , select Row in reverse .
Back to the top of the page
Changing the order of data series in a chart
Click the chart for which you want to reorder the data series. Displays Chart Tools .
In , Charting Tools group , Design tab, Data group , click Select Data.
In Dialog Box Select Data Source, in the Legend Items (Series) field, select the data series you want to reorder.
Use the Up Arrow and Down Arrow to move the data row to the desired location.
Back to the top of the page
Cutting and expanding a pie chart
To select portions of a pie chart without changing the data, you can drag out a single segment, select the entire pie chart, or enlarge or fold entire sections using a pie chart or bar.
To emphasize a specific section of the pie chart, you can move it back from the rest of the pie chart, you graphs as follows:
Click the pie chart.
Double-click the desired segment and drag from the center of the chart.
Full cut pie chart
The fastest way to remove all slicers from a pie chart is to click and drag from the center of the pie chart.
To control the extension more precisely, follow these steps:
Right-click the pie chart and select format for data series .
To increase the separation , drag the 2010 slider or enter a percentage in the box.
Tip: You can also rotate the pie chart by rotating it.
Draw attention to small slices in a pie or line pie chart
Pie chart The and rulers of the Pie make it easy to view small slices of the pie chart. These chart types separate small ones from the main pie chart and display them in a secondary pie chart or stacked rulers.
In the example below, the pie chart adds a secondary pie chart to display the three smallest slices.Before comparing a regular pie chart:
with pie chart after:
If you do not specify how many data points should be displayed in the secondary pie chart or stack, the chart automatically displays the three smallest points. In this example, these are 3%, 3% and 4%.
Follow these steps to do it yourself:
Right-click the chart and select Change Chart Type for Series.
Select Pivot and then Secondary Pivot or Secondary Rule .
To change the appearance of a pie chart, click a portion of it, and then, in the Split Series box on the Format Data Series pane, select the type of data to display in the secondary chart.
There are two ways to change the number of data points in a secondary chart.
If the row is divided by positions: in the Values field in the second area, take the required number of positions (for example, 3, if you want to get the 3 smallest ones).
If the series is split by value or percentage: In the Values less box, enter a different number.In the example above (with 3%, 3% and 4%), you can enter 5%.
Notes:
The diagram on the left is always primary, and the diagram on the right is always secondary. You cannot change their order.
The connecting lines will be added automatically. You can delete them or change their style.
In Excel, percentages in data headers can be rounded. In this case, most likely there will be no more than 100 of them. To correct this error, change the number of decimal places in percentages on the Number tab in the Format Cells window (Home tab> Number group> Dialog box).
Learn more about pie charts
Adding and Removing Data in a Pie Chart
Create and save a template in PowerPoint
90,000 Adding notes and embellishments to charts :: think-cell
- 8.1
- Scales and axes
- 8.2
- Arrows and values
- 8.3
- Symbols
8.1 Scales and axes
8.1.1 Value axis
| In the menu: | Chart |
| Menu item: |
Use this function to display a numerical scale of values on your chart, represented by an axis line with tick marks or grid lines.Typically the y-axis in a chart is the value axis.
Note. The X-axis of the Mekko chart is also the value axis. The scatter and bubble charts also have two value axes that are always displayed. In addition, the x-axis of a chart can be the axis of values, not categories (see the Chart section). The X-axes of other charts are standard category axes.
Changing the scale of the value axis
When the value axis is selected, it has three handles shown below for the axis line and grid lines.If you are using gridlines, select one to display the axis handles.
- think-cell usually scales value axes. However, you can manually scale the value axis by dragging the handles at the end of the value axis. Axis values must always include the range between the minimum and maximum values in the table. If you do not want to display a specific value, remove it from the table or hide the corresponding row or column in the table. To restore the automatic scaling of the value axis, drag the handles until the word Automatic appears in the tooltip.If you hold down the Alt key while dragging, the value axis scale will return to automatic mode.
- The tick spacing of the value axis is usually calculated by think-cell. However, you can manually change it by dragging the middle marker. As you drag, the marker will jump to a supported tick spacing, and a tooltip will show the spacing you selected. When you release the marker, the selected tick spacing is applied to the axis. The automatic detection of the tick spacing can be restored by decreasing the interval until the word Automatic appears on the tooltip.
- The Same Scale button can be used to apply the same scale to multiple charts. For more information, see Same Scale.
Change type of value axis
The position of segments, lines, and areas on the axis can be determined based on their absolute values or their relative proportion (percentage) of the entire category. Accordingly, you can select Absolute and% from the axis type drop-down list on the contextual axis toolbar.
If you enable a percentage axis for a stacked chart, it will be converted to a 100% chart. The clustered chart will be converted to a stacked chart because only relative proportions are added to the bar that represents 100% of the category. If you select a percentage axis on a graph, it will be converted to an area chart.
Changing the direction of the value axis to the opposite
Scatter charts, bubble charts, and plots support reversing the axis direction by selecting Descending Values from the Axis Direction drop-down menu on the context-sensitive axis toolbar.In a graph with two axes, you can choose to reverse the order to emphasize negative correlations. Column charts, group charts, and area charts are mirrored when the direction of the axis is reversed.
Value axis placement
The Y-axis of values can be moved by selecting and dragging the axis with the mouse. As you drag, the available alternative axis positions are highlighted. Drag the axis to the desired location and release it to move.
As you select and drag the Y-axis of the graph values, you will notice that two points on each side of the graph are highlighted.If you drag an axis to one of these positions, the Y axis will be positioned on the corresponding side of the chart.
However, the selected location also changes the placement of tiles for the chart. Two styles of cell placement are supported for graphs.
- Cells on Categories The Y-axis intersects the X-axis at the center of the category. In this case, the data points of the first category are placed directly on the y-axis.
- Cells between categories The Y-axis crosses the X-axis between categories.Therefore, the data points are offset from the border of the chart.
Regardless of the axis cells, the position of the data points on the X axis always corresponds to the center of the category.
Selecting one of the inner selections will turn on the Bins on Categories mode, and if you select one of the outer selections will turn on the Bins Between Categories mode.
The buttons and on the value axis context menu can also be used to change the cell mode.
Placement of tick marks
Tick marks are usually displayed to the left of the axis line or grid lines.To move them to the right, select one of the tick marks and drag it to a different position.
Value axis context menu
The value axes have their own context menu. It displays the following buttons.
- Add divisions
- Add tick marks.
- Add divisions
- Add tick marks.
- Add grid lines
- Add grid lines.
- Add axis line
- Add an axis line.
- Add title
- Add axis title. You can drag the title to move it. You can also add a title to the baseline of the chart, even if it is not a value axis.
- Set logarithmic / linear scale
- Select a logarithmic or linear scale (see section Logarithmic scale).
- Add second Y-axis
- Add a second Y-axis (see the Second Axis section).
- Data scale
- Restore automatic determination of the scale interval and divisions if they were changed by the user or by the scaling operation (see.(See Same Scale.)
- Add break
- Add a break at the current position of the mouse pointer (see the section Break the Value Axis).
- Set cells on categories / between categories
- Changing the mode cells graph.
When necessary, the buttons serve as switches of the corresponding function, that is, if the divisions already exist, the same button removes them, since they cannot be added a second time.
8.1.2 Break value axis
| In the menu: | Segment, axis, line, area |
| Menu item: |
Use a break in the value axis to shrink the large segment and improve the readability of the smaller segments. To add a value axis break, click on the portion of the segment or axis where you want to insert the break and open the context menu.When you add a value axis break, the position at which you right-click on the segment or axis matters.
Any inserted break applies to the value axis (if shown) and to all segments that use the same axis range. Therefore, it is not possible to add a break on the axis at any position if there is a segment border in the columns of the chart. You can add a break only if there is a portion of the value axis at the location of the mouse pointer that is large enough to accommodate the two lines that represent the break.
This is shown in the following example. A break cannot be added to the top of the second column because the top of the third column is too close. However, there is enough room for the break in the range of the third column segment. Since both columns use this range of the value axis, both segments will be split:
Changing the break extent
You can adjust the size of the split segment by dragging the lines that appear when you select the break. These lines represent the range of the scale, which is compressed to save space.Drag the lines to select the size of the compressed portion of the scale. If you drag the line far enough so that the compressed range takes up as much space as originally needed, the gap disappears. By default, the selected portion of the scale is compressed as much as possible to leave enough space to display break lines.
Available gap types
think-cell supports two break shapes. A straight break (as shown above) is often used for standard histograms. The wavy break shown below helps save space on charts with wide and contiguous bars.If there is enough space, you can switch between shapes using the Set Wavy / Straight Shape option on the break context menu.
Note. Charts, area charts, and Mekko charts only support wavy break.
8.1.3 Date axis
If the table contains strictly increasing years, the axis label number forms can be changed to one of the date formats, for example, yy for two-digit years, yyyy for four-digit years, and other formats containing days and months (see.(See Number Format and Date Format Codes.)
If the labels are formatted as dates, or if Excel has the Date cell format selected for all cells in the category, you are using the date axis. When you change the scale of the date axis, months and weeks can be used as divisions.
You can combine two- and four-digit years on the date axis. For example, you can use four digits for the first and last category, and two for other categories.
To select the number of digits, click on the desired label and change the format.think-cell will automatically change other labels for a consistent display. For example, if you select the first label and use the two-digit date format yy , all labels will switch to two digits, since rarely two digits are only used for the first label. However, if you select one of the labels in the middle and use two digits, the first label will retain four digits, but all other labels between the first and last will use two digits:
8.1.4 Same scale
If there are several similar charts on the same slide, they often need to use the same scale.The physical dimensions of the segments of two charts can be compared only if their scales are the same.
The following example shows two charts with the same size but different scales. Notice that the height of the 7-unit bar in the waterfall chart is the same height as the 47-unit bar in the histogram.
To visually compare segments from different charts, select segments from those charts. Then open think-cell’s shortcut menu and click the Same Scale button to make the smaller scale the same as the larger one.For the example above, the resulting diagrams will look like this:
If the data represented by the chart changes, the scale of the chart may change. For all other charts, the same scale is selected, which is then also adjusted (including adding or resizing axis breaks).
Instead of selecting multiple segments, you can also select multiple axes, gridlines, or data points, one for each chart that must use the same scale.Then open the think-cell shortcut menu and click the Same Scale button. Various combinations are also available to you, for example, for a graph and a histogram, you can select a data point on a graph and a segment on a histogram.
To revert to automatic scaling, select a segment, axis, gridline, or data point and select Restore Automatic Scale from the context menu. If you are not sure which charts have the same scales, the easiest way is to restore the same scale for all charts, and then select the corresponding parts on the required charts and make the desired scale active.
On charts with two value axes, such as graphs and scatter charts, a second button is available. Same scale for the X axis. You can select the same scale for each axis independently of the others. For example, you can select the same scale for two charts on the x-axis so that they cover the same date range, with the y-axis corresponding to the data in each chart.
8.1.5 Logarithmic scale
You can turn on the logarithmic scale using the Set logarithmic scale button on the value axis context menu.To return to linear scale, click the Set linear scale button.
Note. Due to a limitation in the Microsoft Graph, divisions on log-scale axes can only be powers of 10, such as 0.1, 1, 10. The axis must also start at a power of 10 and end at a power of 10.
Logarithmic scale is not supported if it does not fit mathematically. Negative values are placed on the baseline and an exclamation mark is displayed next to the label to indicate that the value cannot be represented on a log scale.In addition, an axis always uses a linear scale if multiple series that are added to produce a total are associated with the axis.
8.1.6 Second axle
Charts containing lines may have an additional Y-axis. You can add a second Y-axis and associate a line with it. To do this, select the line and click the Set as Right / Left Axis button in the line context menu. If the chart has two Y-axes, you can use the same Set as Right / Left Axis button to change the Y-axis relationship of the individual lines in the chart.The second axis is the full value axis (Value axis). It can scale independently.
8.1.7 Spacing between categories
The spacing between columns in a chart is determined by the width of the column and the size of the chart. You can add extra spacing between individual column pairs by inserting category spacing.
To do this, click on the baseline and drag the marker to the right. The gap between categories is equal to the width of the column plus the width of one gap, with the marker fixed to multiples of that gap width.
When you add gaps between categories, the width of the columns is maintained, which increases or decreases the overall width of the chart.
To maintain the overall width of the chart, hold down the key Ctrl while dragging: the width of the columns can be increased or decreased according to the spacing between the categories.
Note. In some cases, a baseline break (see Category Axis Break) serves as an alternative to category spacing to save space.
8.1.8 Break of the category axis
| In the menu: | Spacing between columns of the category axis |
| Menu item: |
A category axis break indicates a break in the category axis scale. To insert it, right-click on the category axis between the two columns and select the appropriate menu item.
8.2 Arrows and Values
8.2.1 Arrows of difference
| In the menu: | Chart, segment in column and waterfall chart, point in line and area charts |
| Menu items: |
Difference arrows can be used in charts to visualize the difference between pairs of bars, wedges, and points. The difference is calculated automatically and updated when the underlying data changes.Difference text signature (see Text labels) supports the properties of font, number format, and label content (see Font, Number format, Label content).
think-cell supports two styles of difference arrows: level difference arrows and total difference arrows. Level difference arrows show the difference between pairs of segments or points in a chart, and total difference arrows show the difference between the column totals.
Arrow level difference
To add arrows for level differences, click the button or in the context menu.You can use the handles that appear when you select the difference arrow to specify two values for comparison. The ends of the difference arrow can be snapped to column segments, data points, or value lines if they exist (see Value line).
By default, the inserted difference arrow goes from the selected segment or category to the top segment of the next category. You can also define the required start and end segment / category for the difference arrow by selecting the start and end segments at the same time.Right-click one of them and select Add Level Difference Arrow. To select multiple segments at the same time, hold down the key Ctrl while making a selection (see Multiple selection). When working with a line or area chart, select the appropriate data points instead of segments.
If the arrow is too small and the bubble covers it, the bubble is automatically placed next to the arrow. To manually optimize the layout, you can drag the arrow as well as its label to a different location (Automatic Label Placement).To place an arrow between two columns, you can create an additional space between columns (Space Between Categories).
Total difference arrow
To add general difference arrows, click the or button on the shortcut menu and connect the ends of the difference arrow to the categories or columns that you want to compare.
Arrow modes
You can use three arrow modes. The button in the context menu changes accordingly, and the number in the label is recalculated.
An arrow is displayed pointing in one direction and the relative difference is calculated.
A double-headed arrow is displayed and the absolute difference is calculated.
An arrow is displayed pointing in the other direction and the relative difference is calculated.
8.2.2 Pointer CAGR
| In the menu: | Diagram, segment |
| Menu item: |
This function displays the cumulative annual growth rate.The date ranges on which the calculation is based are retrieved from the table cells associated with the category labels. The CAGR is automatically calculated and updated when the underlying data changes. For correct calculations, the corresponding cells in the table must contain the correct dates.
CAGR from category A to category B is calculated from
where n is the number of years in the date range. The convention is “30/360 days” to determine n if it is not an integer.
The automatic CAGR value is based on text caption (Text Captions) and supports font and number format properties (Font, Number Format).The arrow itself supports a color property (Color and Fill).
By default, only one CAGR value is inserted that covers the range from the selected category to the last category in the chart. You can use the markers that appear after you select the CAGR arrow to define the starting and ending categories.
You can also quickly specify the starting and ending CAGRs. To do this, select a segment in the starting category and a segment in the final category.Then right-click one of them and select Add Cumulative Growth Arrow. If you select segments in more than two categories, you will get a CAGR value for each pair of successively selected categories. To select multiple segments at the same time, hold down the key Ctrl while making a selection (see Multiple selection). When working with a line or area chart, select the appropriate data points instead of segments.
8.2.3 CAGR
Series
The CAGR arrow is always calculated based on the column totals.However, you may also want to display the cumulative annual growth of one of the series.
It can be shown in row labels. Just select the label and the CAGR parameter in the label content control on the floating toolbar.
The CAGR will now be calculated based on the series.
To select all row labels in one step, click on the first label and then hold down Shift and click on the last label (see Multiple selection).
8.2.4 Value line
| In the menu: | Chart |
| Menu item: |
This function draws a line parallel to the X-axis to visualize a specific value. You can create multiple value lines for a chart and place a line label to the left or right of the chart.
As appropriate, the value line, after initialization, is anchored to the arithmetic mean (stacked or grouped histogram) or weighted average (Mekko chart) of the column totals.In this case, the value is calculated automatically and is also updated automatically when the data changes.
You can drag the line as needed. For better drag-and-drop accuracy, use the PowerPoint controls to zoom in on the slide. You can also use the cursor keys ← , → , ↑ and ↓ to shift the line to a specific value. When using the arrow keys, the line moves gradually according to the label number format.
As always, you can add your own text to the label, or replace the standard label with your own content. For more information on labels and text boxes, see Text labels. You can also change the font (see Font) and the number format of the label (see Number format).
8.2.5 Indicator 100%
| In the menu: | Chart |
| Menu item: |
This function displays the 100% mark.It is enabled by default. You can place the label to the left or right of the diagram.
8.2.6 Row connectors
| In the menu: | Diagram, segment |
| Menu item: |
You can add series connector lines to an entire chart or a single segment. When you click a connector item on a segment menu, a connector line is created in the upper-right corner of that segment.To make a connector part of a waterfall calculation, use the appropriate waterfall connector (see Waterfall Chart). In addition, you can use universal connectors (see the Universal connectors section) if you cannot create the desired connections using the standard connectors.
8.2.7 Universal connectors
| Icon in the Items menu: |
Universal connectors differ from the other decoration elements described in this chapter because they are not specific to a specific element or component.Therefore, they are not available in the think-cell context menu.
Alternatively, you can insert universal connectors using the think-cell toolbar. Double-click the toolbar button to insert the universal connectors. To exit insert mode, click the button again or press Esc .
Each element of the diagram can provide connection points. A universal connector can connect to any two connection points that can belong to the same or different elements.Use a universal connector if you need a custom connector that is not supported by the diagram itself.
You can link two different charts with the universal connector. The handles at the ends of the connector snap to the points available for the connection as you move them. You can move the marker in the middle of the connector to replace the straight connector with a right-angled connector.
Note. A generic connector visually connects two objects, but does not affect the calculation of the waterfall chart.To make a connector part of a waterfall calculation, use the appropriate waterfall connector (see Waterfall Chart). For some chart types, standard connectors are available (see Row connectors) that should be used in place of universal connectors whenever possible.
8.3 Symbols
| In the menu: | Chart |
| Menu item: |
Legends can be used to describe different series of data or groups in a chart.
When you select the legend, a floating toolbar appears that contains linetype and font controls (Text Caption Property Controls). It allows you to select the linetype for the legend box and the size of the text. The placeholder visual order control can be used to select an order other than the order of the table or the chart itself.
In addition, when you select one of the placeholders, row and group property controls are available for specific charts.
