How to create transparent graphics in iMovie. How to overlay graphics on videos in iMovie. How to make graphics move and follow subjects in iMovie. How to use keyframes for animation in iMovie. How to export graphics with transparent backgrounds for use in iMovie.
Creating Custom Graphics for iMovie Projects
When working on iMovie projects, you may want to add custom graphics like arrows or pointers to highlight specific elements in your video. This process begins with creating the graphic itself. Here’s how you can do it:
- Use a graphics program like Preview on Mac to create a new image.
- Ensure the image dimensions match your video’s aspect ratio (typically 16:9 for HD video).
- Create your desired graphic (e.g., an arrow or circle) on a transparent background.
- Export the image as a PNG file with an alpha channel to preserve transparency.
Why is it important to use a transparent background? A transparent background allows your graphic to blend seamlessly with the video footage, creating a professional look without obscuring important details.

Importing Graphics and Video into iMovie
Once you have your custom graphic ready, it’s time to bring it into iMovie along with your video footage. Follow these steps:
- Open iMovie and create a new project.
- Import your video footage by dragging and dropping it into the media section.
- Drag your video clip into the timeline.
- Import your custom graphic by dragging it into the media section as well.
Can you import multiple graphics at once? Yes, you can import multiple graphics simultaneously by selecting them all before dragging them into iMovie.
Positioning and Sizing Your Graphic in iMovie
After importing your graphic, you’ll need to position it correctly over your video. Here’s how:
- Drag your graphic from the media section and place it above your video clip in the timeline.
- Stretch the graphic to cover the entire duration of your video clip.
- Select the graphic in the timeline and change its settings:
- Set “Cropping” to “Crop to Fill” to maintain its aspect ratio.
- Change “Video Overlay” to “Picture-in-Picture” for more control.
- Set “Dissolve” to zero to prevent transparency at the start and end.
- Resize and reposition the graphic in the preview window as needed.
How can you ensure your graphic doesn’t cover important parts of the video? Use the preview window to carefully position your graphic, and consider making it partially transparent if necessary.
![]()
Using Keyframes for Animation in iMovie
To make your graphic move and follow a subject in the video, you’ll need to use keyframes. Keyframes mark specific points where you define the position of your graphic. iMovie then automatically creates smooth transitions between these points. Here’s how to use keyframes:
- Move the playhead to where you want to start the animation.
- Position your graphic and click the “Add keyframe” button (it looks like a diamond).
- Move the playhead to the next point where you want to change the graphic’s position.
- Reposition the graphic and add another keyframe.
- Repeat this process, adding keyframes and repositioning the graphic as needed.
How many keyframes should you use for smooth animation? The number of keyframes depends on the complexity of the movement you’re trying to achieve. For simple linear movements, you might only need two or three keyframes. For more complex paths, you may need many more.
Fine-tuning Your Animation in iMovie
After setting up your initial keyframes, you may want to refine your animation. Here are some tips for fine-tuning:
- Use the arrow buttons next to the “Add keyframe” button to jump between keyframes quickly.
- Adjust the position of your graphic at each keyframe to ensure smooth movement.
- Add or remove keyframes as needed to improve the animation.
- Preview your animation frequently to check for any jarring movements or misalignments.
Is it possible to change the speed of the animation between keyframes? While iMovie doesn’t offer direct control over animation speed between keyframes, you can achieve this effect by adjusting the distance between keyframes in the timeline.
Advanced Techniques for Moving Graphics in iMovie
Once you’ve mastered the basics of adding moving graphics in iMovie, you can explore more advanced techniques to enhance your videos:
1. Multiple Moving Graphics
You can add multiple moving graphics to your video by repeating the process for each graphic. This can be useful for highlighting multiple subjects or creating more complex visual effects.
2. Changing Graphic Properties Over Time
In addition to position, you can animate other properties of your graphic:
- Scale: Make your graphic grow or shrink over time.
- Opacity: Fade your graphic in or out.
- Rotation: Rotate your graphic for dynamic effects.
3. Using Masks for Complex Shapes
For more complex shapes or to highlight specific areas of your video, you can use masks:
- Create a shape in a graphics program that will serve as your mask.
- Import this shape into iMovie as a separate graphic.
- Use the “Green/Blue Screen” effect to make the shape act as a mask for another layer.
How can masks enhance your iMovie projects? Masks allow you to create more sophisticated visual effects, such as revealing or hiding portions of your video in creative ways.
Troubleshooting Common Issues with Moving Graphics in iMovie
Even with careful planning, you may encounter some issues when working with moving graphics in iMovie. Here are some common problems and their solutions:
1. Jerky or Unsmooth Movement
If your graphic’s movement appears jerky, try adding more keyframes to create a smoother path. Alternatively, you may need to adjust the timing of your keyframes to achieve a more natural motion.
2. Graphic Disappearing or Changing Size Unexpectedly
Ensure that your graphic’s crop settings are set to “Crop to Fill” rather than “Ken Burns.” The Ken Burns effect can cause unexpected changes in size and position.
3. Poor Quality or Pixelated Graphics
If your graphic appears pixelated or low quality, check that you’ve imported a high-resolution image. For best results, use graphics that are at least as large as your video resolution.
4. Animation Not Syncing with Video
If your graphic’s movement doesn’t sync well with the video, try adjusting the position of your keyframes in the timeline. You may need to add more keyframes for more precise control.
What should you do if iMovie becomes slow or unresponsive when working with moving graphics? Try rendering your project (go to File > Share > File) to create a smoother preview. If problems persist, consider simplifying your project or upgrading your computer’s hardware.
Enhancing Your iMovie Projects with Moving Graphics
Incorporating moving graphics into your iMovie projects can significantly enhance their visual appeal and effectiveness. Here are some creative ways to use this technique:
1. Highlighting Important Information
Use arrows or circles to draw attention to specific elements in your video, such as:
- Key details in instructional videos
- Important moments in sports footage
- Specific features in product demonstrations
2. Creating Visual Narratives
Moving graphics can help tell a story or guide viewers through complex information:
- Use arrows to show the flow of processes in educational videos
- Highlight the path of objects or people in documentary-style footage
- Create animated infographics that reveal information over time
3. Enhancing Branding
Incorporate moving logos or brand elements to reinforce your brand identity:
- Animate your logo to introduce or conclude your video
- Use branded graphical elements that move with your content
- Create custom lower thirds that incorporate movement
How can moving graphics improve viewer engagement? By drawing attention to key elements and adding visual interest, moving graphics can help maintain viewer attention and improve information retention.

Best Practices for Using Moving Graphics in iMovie
To ensure your moving graphics enhance rather than detract from your video, consider these best practices:
1. Keep It Simple
Don’t overwhelm your viewers with too many moving elements. Use graphics sparingly and purposefully to maintain a clean, professional look.
2. Maintain Consistency
Use a consistent style for your graphics throughout your video. This includes colors, shapes, and animation styles.
3. Consider Timing and Pacing
Ensure your moving graphics align with the pacing of your video. Avoid rapid movements that might distract from the main content.
4. Test on Multiple Devices
Preview your video on different devices to ensure your graphics are visible and effective on various screen sizes.
5. Use Appropriate Colors
Choose colors for your graphics that contrast well with your video footage to ensure visibility.
How can you determine if your moving graphics are effective? Consider showing your video to a test audience and gathering feedback on whether the graphics enhance or distract from the overall message.
By mastering the art of adding moving graphics in iMovie, you can create more engaging, informative, and visually appealing videos. Whether you’re creating educational content, promotional videos, or personal projects, this technique can help elevate your work to a new level of professionalism.
Moving Graphic Pointers In iMovie
Learn how to create a transparent graphic that you can then overlay in iMovie to point out an area of interest. You can then have that graphic move around on the video to follow a subject. You can use this to highlight something in the video, or hide a face or some other element.
Check out Moving Graphic Pointers In iMovie at YouTube for closed captioning and more options.
Video Transcript: Hi, this is Gary with MacMost.com. On today’s episode I’m going to show you how to put a moving graphic that follows something around in a video you make in iMovie.
Let me point out that I’m using iMovie 10.0.7 and we’re going to create something where you can have a moving item, like that circle there you see in the video, follow something going on in the video.
I’m going to use a variety of techniques to create a video that has a moving graphical element in it. I’m just going to have a circle that follows a person in the video.
To do that first I need to have a graphic that I can use for that animation. I’m going to go to Preview here and create something new. I can’t create something new in Preview unless I have something in the Clipboard first. I’m going to do Command Control Shift and 4 screen capture just a little bit of white space there.
Now in Preview I can create New from Clipboard and I get this white space here, Preview. Now iMovie demands that graphics brought in are the same ratio as the video itself so I’m going to have to adjust the size here and make it a 16 by 9 video. So I’m going to change it so it is equivalent to 720p and I’ll shrink that down. You can see that I’ve got a graphic now that is the size of the video.
Now I want to create a circle right in the middle. So I’m going to create a circle graphic there. I can change the color here.![]() I don’t want it to be filled with anything. I want it to be an empty circle. I’m going to create it pretty big and then kind of put it in the center. It doesn’t have to be perfect.
I don’t want it to be filled with anything. I want it to be an empty circle. I’m going to create it pretty big and then kind of put it in the center. It doesn’t have to be perfect.
So now I have a red circle on a white background. I don’t want any background at all. So I’m going to select the selection tool here. I’m going to do Command A to select all and delete everything in the background which is that white that we copied from the screen. Now we only have a transparent background with this red circle in it.
Now I’m ready to export it. I’m going to export it as a PNG with the alpha channel and save that to my desktop as circle.
Now I’m in iMove. I’m going to drag and drop in, instead of just using the import function, a video here into the import media section. I have a video of some skiers. I’m going to create a new project, a new movie project. No theme. I’m going to drag this clip in here. So now I have, over here, I can see this video of some skiers.
Now I’m going to drag that circle graphic in. I’m going to put it above the video, right here. I’m going to stretch it so it fills the entire space. Now you can see it is transparent and it fills the entire thing.
I want to change this. I want to select it. I want to change the cropping to Crop to Fill, not Ken Burns, and I’m going to change the overlay setting. Instead of cutaway, which will fill the entire screen, to do it as Picture-In-Picture. So now I’ve got it over here as Picture-In-Picture. I also want to change Dissolve to zero so it doesn’t get transparent towards the beginning and end.
Go back to the beginning here and I can move this around. I can stretch it to make it a little bit bigger. I can highlight this one skier. I can set a key frame right here by clicking this key frame add button right here.
So now I want this to follow the skier. So at the beginning I’m going to move the playhead over a little bit until the skier kind of follows a line there and then starts to turn. So let’s stop right there. I’m going to add a key frame right here as well. I’m going to move the circle over.
Now I have two key frames and when I move back and forth you can see the circle moves with. I can easily get from one key frame to another using these arrows. So I’m going to get to this last key frame and I’m going to continue to move this forward a little bit to there. Let’s add another key frame here. It is kind of tricky to add the key frames as you see this is removing the key frame. We don’t actually want to do that. We want it to Add. Okay.
Then I’m going to move it here like that. It is automatically going to add each one each time. So I don’t have to press that add key frame button. I’m not going to try and follow this skier here exactly. That is going to be difficult to do. It would take a lot of key frames. So I’m going to get something that is kind of rough. If I follow the key frames back I can see where they all are.
I can go back here and Play and you can see there if I added more key frames it would do a better job of following that. You can make this a circle, you can make it a square, you can make it a big arrow. You can make it something opaque so you can kind of hide somebody’s face or license plate, or something like that.
So there is a lot that you can do with this. When you are done you can simply export this out to get the final video.
Using iMovie Markers
Markers are a simple tool in iMovie that allow you to create points in your video where the playback head and other elements will snap. You can use them to mark places to add things later, or to let you easily line up overlays, titles or other elements. You can add markers while the video is playing in the preview pane. They are similar to beat markers in previous versions of iMovie.
Check out Using iMovie Markers at YouTube for closed captioning and more options.
Video Transcript: Hi, this is Gary with MacMost.com. Let’s look at using Markers in iMovie.
I’m using iMovie version 10 and we’re going to look at using a feature called Markers.
Markers allow you to just place marks along some video. For instance, let’s drag some video into an empty project here. At any point I can add a marker. Go to Mark/Add Marker. But you can see it is really what you are supposed to do is use M to add a marker. So I can go right here and add marker M, another marker there, anywhere I want.
The use of these markers is simply as a place to snap to. So you can see how the timeline kind of snaps to it. So if I want to add another video, say a cutaway here, I can bring it in and you can see it is going to snap to this marker.
It is kind of useful because you can snap multiple things to the same marker or kind of predefine where you want things to be. For instance, let’s add a title here and you will see I will be able to snap that to the marker as well. So I just drag and drop the standard title and you can see how it snaps to it right there.
The same thing for audio. The same thing for anything. A photo, anything that you want to add you can easily use markers to have it snap to it.
You can drag these markers around. They don’t have names or anything. You can remove them. Also, the keyboard shortcut, Control shift M, removes them pretty easily.
One of the cool things about them is that you can add them while the video is playing. I’m going to hit the spacebar to play here and as the video is playing I can hit M at anytime and it adds a marker. So I can watch my video and when I see there is something I want to add a title or something at some point I can simply hit a M there to mark the spot.
So you can kind of use this like beat markers. You can, let’s start with a black background here from Maps & Backgrounds and then let’s make this long enough so it covers the song. It is about a thirty second song. So do thirty seconds. We’re going to add music. We can add that as the background to this. We can add this as the background or we can attach it to that.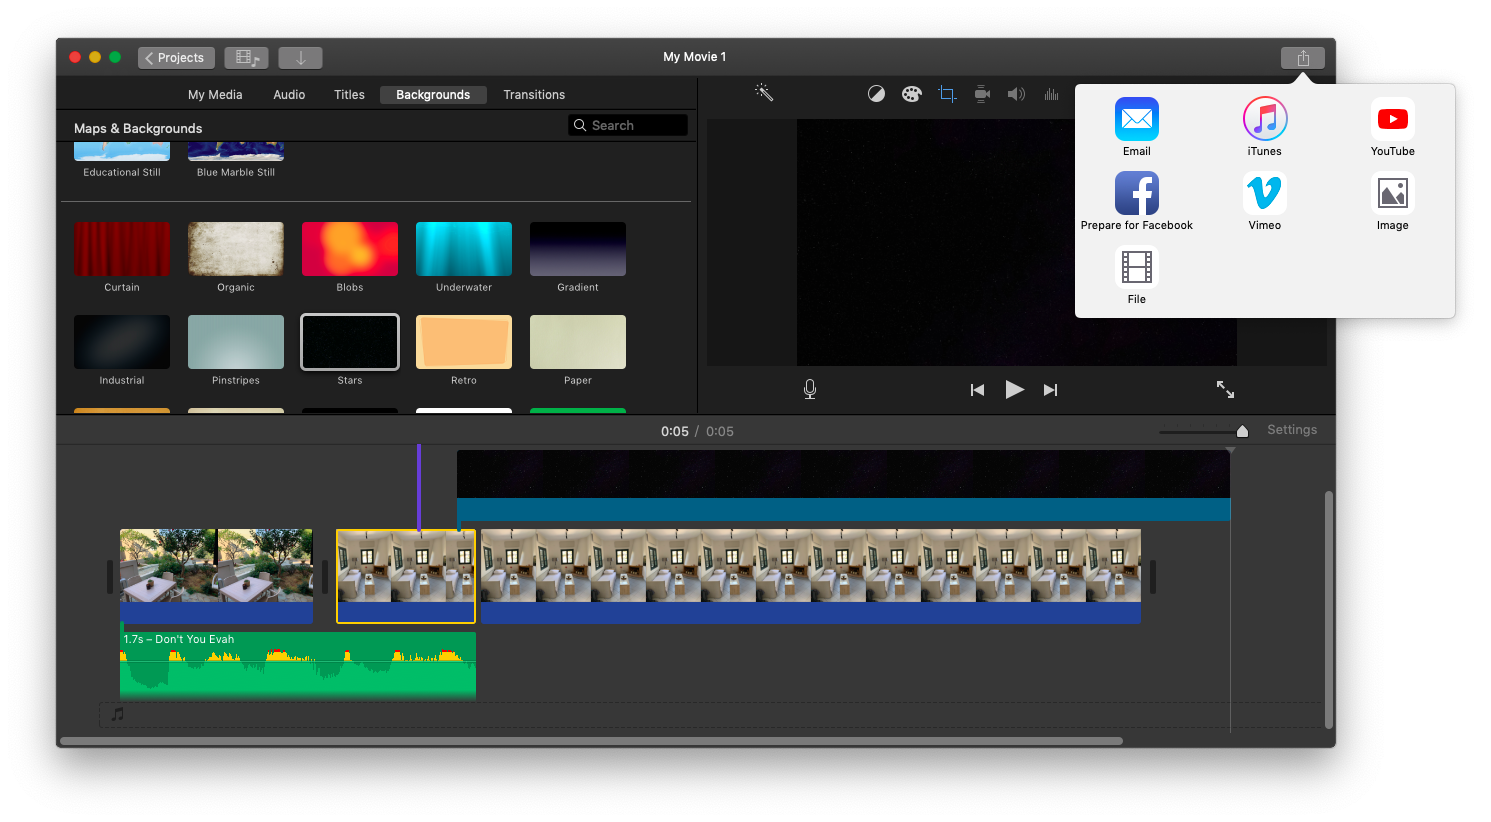 It doesn’t really matter as long as it is going to play. We have this track here, this black background track, to add markers to.
Now I can go back here and I can play it. Hit M wherever I think the photo should change during a slideshow. Next I want to add the photos. I go to my iPhoto library and I have some photos here I can use as samples. I will add them as basically cutaways above this black background. As soon as I add them I can shrink them. You can see how it is going to snap to the marker which is really nice. It makes it easy. Not quite as easy as beat markers which would have just been able to lay in a bunch of them at a time. I can lay in a bunch of photos at one time but they are all going to be the same duration which may actually work for matching to a beat but this gives you more versatility and it is relatively quick.
Now when I play this back we’ll see that the photos change to the beat.
Markers are so much more useful than just for music. You can add them anywhere you want for any reason.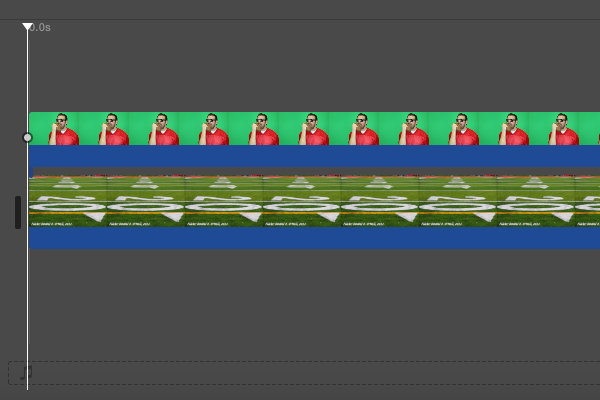 So, for instance, if I wanted to add sound effects to this I can add some sound effects at the right points just by skimming through the video and adding some explosion sound effects at the right spot or even some flashes on the screen or some other special effects or putting titling in certain places, captions if I’m going to use titling for captions, that kind of thing.
So anything you want where you have to snap items to a spot on the iMovie timeline it is useful to use Markers.
How To Add Pop-Up Text In iMovie
If you want to go beyond the title text feature in iMovie, you can create your own styled text in Keynote or any image editing tool and use the resulting image as an overlay. Then you can use picture-in-picture keyframes in iMovie to animate the text popping in from one side or scale as it moves. You can use this technique with any transparent image for a variety of effects.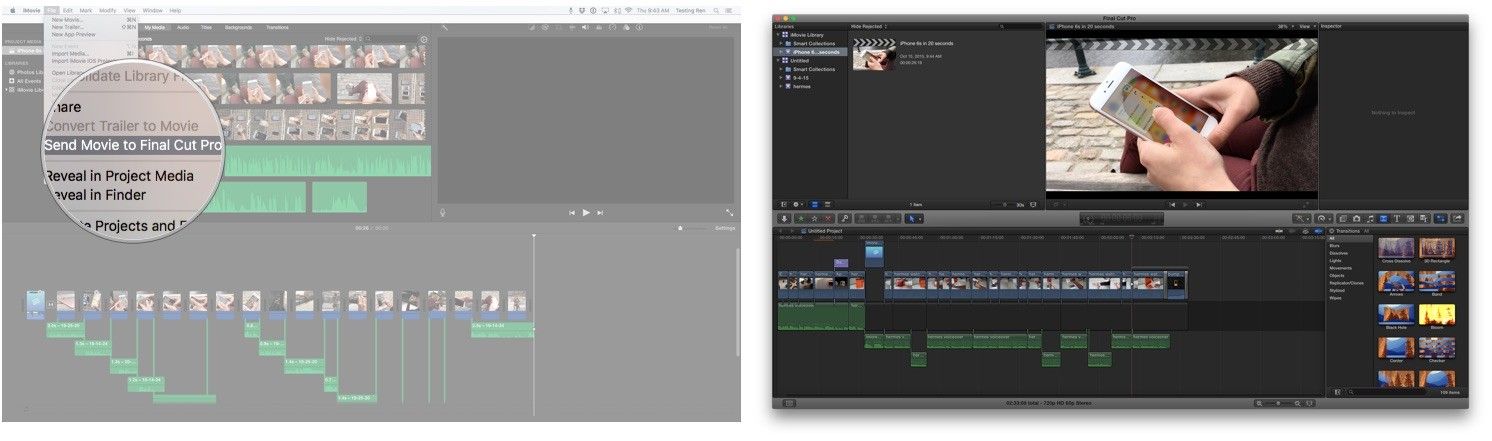
Check out How To Add Pop-Up Text In iMovie at YouTube for closed captioning and more options.
Video Transcript: Hi, this is Gary with MacMost.com. I’m going to show you how to add any text you want to an iMovie project and have it pop into place with some animation.
MacMost is brought to you thanks to a great group of supporters. Go to MacMost.com/patreon where you can read more, join us, and get exclusive content.
So the titles that are available on iMovie are quick and easy to use but they don’t always get you the effect you want. Sometimes you want specific text in a specific location and you want to animate onto the screen. Sometimes this is called pop-up text where it just moves in from off of the frame and moves back out again. You can use any image editing app you want to create text and put it as an overlay in iMovie. I’m going to show you how to do it in Keynote but you can use PhotoShop, Acorn, Pixelmator, Infinity, anything you want to create the transparent text background. Then I’ll show you how to bring it into iMovie and animate it.
So let’s start off in Keynote. Now we want to choose a wide theme because that’s going to be 16 x 9, the same ratio as most video. I’m going to start with just the standard black template here. I’m going to get rid of this sample text here and add my own text to it. I’m going to use a text box. It will be here in the middle. I’ll type some text. Then I’m going to make it much larger. As a matter of fact I’m not going to be afraid to fill the space with it. Even if I don’t want the text to actually be this big in the video I want it to take up as much of this screen as possible.
Now I can set it to be any kind of font that I want. So I’ll make it something kind of fancy. I can change its color and I can even add outlines. Do all sorts of things you normally couldn’t do with text. So after I’ve got it looking like I want I need to do a very important step here. I need to click on the background, just outside of any element, and under Format I need to change the background for the slide layout for the document itself to No Fill.:max_bytes(150000):strip_icc()/005-enable-imovie-11s-advanced-tools-2260017-8992dde5d03a48968c6237adbc16f90f.jpg) This is an important step. If you don’t do this you’re just going to get a big black rectangle with some text in it. I just want the text by itself.
This is an important step. If you don’t do this you’re just going to get a big black rectangle with some text in it. I just want the text by itself.
So now that I’ve made the background invisible one of the cool things I can do is if I have multiple pieces of text I want to include in the video I can do them all in one Keynote document. So I’m going to Control click here and duplicate this slide here and I’m going to put some other text here as an example. I can have fifty different pieces of text here. Now I’m going to go to File, Export To, and I’m going to export as images. Here I have to choose the format PNG. Jpeg format will not give me transparency. I want to make sure that the checkbox for Transparent Background is selected. Then I’ll go Next and I’ll Save this out to the desktop and call it Movie Text and export it.
It’s going to export each one of these slides as a different image. If I Hide Keynote here I can see there is the folder and here I’ve got two PNG’s. You can see that they’re transparent because there’s no black background there.![]() The two pieces of text are there. Now let’s go into iMovie. In iMovie I’ve got a project going already. Instead of using titles I’m going to simply bring these images in as overlays. So I’m going to move over the window here a bit and I’m going to drag and drop this PNG onto of the video. I’m not going to put it into the main timeline like this. I’m actually going to stick it on top of it so it’s an overlay.
The two pieces of text are there. Now let’s go into iMovie. In iMovie I’ve got a project going already. Instead of using titles I’m going to simply bring these images in as overlays. So I’m going to move over the window here a bit and I’m going to drag and drop this PNG onto of the video. I’m not going to put it into the main timeline like this. I’m actually going to stick it on top of it so it’s an overlay.
Now I can position it where I want and I can stretch the beginning and end. You can already see that this just appears over the background. It’s transparent. So now I’m going to change a few things about this. First I want to click on the video overlay settings here. With that selected I’ll change to Picture in Picture. Now I want to change the transition to zero seconds so it doesn’t actually dissolve or zoom or anything over any period of time. It just appears.
Then I want to click here in the Cropping settings. It might be set to Ken Burns by default but I want to change it to Fit so in other words turn off all the Cropping settings.![]() Then I’m going to go back over here to the Overlay settings so I’ve got this piece of text. I want to position it where I want and stretch it by pulling the corners to be the size I want. So say this is where I want it to be when it fully appears. Now all I have to do is have it transition in so it slides in from the right.
Then I’m going to go back over here to the Overlay settings so I’ve got this piece of text. I want to position it where I want and stretch it by pulling the corners to be the size I want. So say this is where I want it to be when it fully appears. Now all I have to do is have it transition in so it slides in from the right.
Notice this little interface here. These two arrows with this little Plus button inside of a diamond. That’s for adding Key Frames. This is what we’re going to use to animate. It’s a really powerful feature in iMovie that a lot of people don’t know is there. It only works if you’ve got a Picture in Picture overlay. So I’m going to position the cursor somewhere near the beginning of the clip here. If you don’t see this little interface here and you don’t see these blue dots around the Picture in Picture double click on the clip here to actually make sure you activate it.
Now I’m going to find its starting position and I’m going to put it just off to the right side of the screen. You see I can still see the box even though I can’t see the text. I’m going to hit the Plus button to add a Key Frame. Now I’m going to move the line so it’s right about here and I’m going to add another Key Frame and change the position to be where I want it to be. So now when I scrub over this I can see it starts off to the right and then it moves into place and stops. I’m going to go towards the end here, double click to set the position there, and then I’m going to click in here, add a little Key Frame there. Don’t do anything with the position there. I want it to move to another area and add another Key Frame there. So I’ll click in there and add another Key Frame and move it back out. So now at the end here I’ve got it moving out.
There are four Key Frames in this. The first one is just on the right side. The next one has it in position and so does the third one. The fourth one has it off the screen. I can use these arrows to go between all of these. So I can see there’s the first one, the second one, third one, and fourth one. So four Key Frames. Play around with this and practice this so you can get this right because you can have it appear anywhere. You can have it come off from the left side of the screen onto the right side of the screen. Up and down. You can resize so you can actually have it be a smaller size in one of the Key Frames and then go to a larger size on another Key Frame.
Let’s do another one. I’m going to select this and remove it. I’m going to move the second piece of text here. Then I’m going to change it so it’s Cropped to Fit. Then change it so it’s Picture in Picture. I’m going to take away any transition. Now I’m going to have it start in the upper left hand corner. I’m going to go and set the Key Frame there, Add a Key Frame, and I’m going to shrink it so it’s really tiny and even off screen there. Then I’m going to move the line over and then I’m going to Add another Key Frame. This one is going to be the bottom right hand corner and it’s going to be pretty large like that. Then I’m going to move again towards the end and create a new Key Frame. Notice that sometiimes I have to select the Picture in Picture for the Key Frame controls to appear. So I’m going to keep that as the same but I’m going to go to the end and add another Key Frame and then this one is going to shrink off to this side right over there.
Now my complete animation looks like this. So you can do so much with this. But first you really have to master using that Key Frame animation with overlays in iMovie. So practice with that. Then you can use it with text. You can use it with graphics. You can do all sorts of cool special effects that you probably didn’t think were possible in iMovie before.
Simple Animation In iMovie
You can use Picture-In-Picture and keyframes to animate object movement in iMovie. Once you add an overlay you can set one or more keyframes and the object will move over time to match each keyframe. You can import transparent graphics to use this feature to highlight a moving element in your video.:max_bytes(150000):strip_icc()/imovie2-ddaf0deaefc94130bb3b57cc6efc24a9.jpg)
Check out Simple Animation In iMovie at YouTube for closed captioning and more options.
Video Transcript: Hi this is Gary with MacMost.com. Let’s look at animating objects in iMovie.
So using iMovie 10 I’m going to show you how to do some simple animation using Picture-in-Picture and KeyFrames in iMovie.
So as an example we’re just going to use some photos here. I’m going to drag and drop this photo in and then I’m going to take another photo and drag and drop that as a cutaway on top there. What I want to do with both of these is I want to change the cropping so it is just Crop and not the Ken Burns thing and now we just basically see a movie where we have this video with this photo here.
Then it gets replaced with this photo and then I’m going to change that to a Picture-in-Picture. Now we can see it there in the corner. So it appears in the corner and then disappears again. I’m even going to go in and change the dissolve to nothing. So it just basically appears and then disappears.
So nothing too exciting so far. But if I have the Picture-in-Picture selected down here and I have the Picture-in-Picture adjustments turned on, the video overlay settings, I should see this interface that allows me to add an animated keyframe.
So animation keyframe are basically saying that this Picture-in-Picture needs to be at this spot at this point in time down here. So if I press this it will add a keyframe. Now I can move forward in time to another spot, select the Picture-in-Picture there and then I can move the Picture-in-Picture again there we go to another spot and it will create another keyframe. I can move here and it will create a third keyframe.
I can move through these keyframes by using these arrows and you can see it actually moving the playback head. When I play back the video you can see it will actually animate from spot to spot and stop at the last one.
It is kind of weird to do it with photos like this but let me show you a better example.
So now I have a video of some ducks here and I’ve brought in a semi-transparent graphic that I created in Pixelmator with just a circle and a transparent background. You can create it in Photoshop or whatever you have handy.
So I’m going to select that. I going to turn off the Ken Burns effect here and I’m also going to change it so that it is a Picture-in-Picture. So now it is a lot smaller and I can resize it to what I want. What I would like to do is follow a duck along.
I’ll move all the way back to the beginning here. I also have some dissolve here and I want to turn that off. So I can see it at the very beginning and let’s have it follow say this duck who moves quite a bit. So now we can have it follow the duck by simply kind of moving it along and then adding keyframes where we need.
So let’s move the duck along there. Great. So I’ll move this over here and add a keyframe. I’ll move it a little further and it is automatically going to add keyframes now after I’ve started doing this. I’m going to do it every so often kind of keeping pace with the duck since the duck is moving at slightly different speeds and not in a perfectly straight line.
So now when I playback the movie it should follow the duck. I think all I’m missing here is a good keyframe at the very beginning. Let me do that. Now there we go. The circle is following the duck along pretty nicely.
At any point I can add more key frames, if I want, in the middle do better follow the duck if it is lagging behind. I can just use these arrows to move through all of the keyframes. If I wanted to add one in the middle I can simply position the playhead somewhere in the middle, like that, and make an adjustment and it will add the keyframe there.
20 Useful iMovie Tricks To Beef Up Your iMovie skills
iMovie included more tools after upgraded to 11.0 since 2010. Though it is an intelligent design, there have not many instructive guidelines for users, which make troubles for the users who don’t have much time to find out hidden and useful tips and tricks. Here are 20 useful iMovie tricks hidden in different functions, which will be useful for you to be an iMovie Expert. Please note that all italic words and phrases stand for function button in this article.
1. Integrated with Facebook – Edit Facebook Photos Directly
When importing video clips, sometimes, users want to use Facebook photos, because it’s boring and time-killing to download them one by one from online internet and then import to iMovie. The best way is to connect iPhoto with a Facebook account and allow it to sync user’s Facebook photos with iLife Media Browser, after that all Facebook photos can be used in all iLife tools including iMovie directly.
How to make it?
At first open iPhoto>Accounts>Login to Facebook and then select, allow syncing photos with iLife Media Browser.
2. Analyze Video – Finding People in Football Game
Analyze Video can smooth out jumpy and handheld video if it is recorded by mobile devices like iPhone 4, And it also can tag different people if user’s needs to edit a football game video. It may take several minutes to analyze depending on video size. But after it completes, users will save much time in editing.
How to activate it?
Select File> on the top>Analyze Video>Stabilization and People
3. Swap Events and Projects – Look Like Final Cut Pro
Though I don’t like it much, Mac users who prefer professional look can’t help using this sophisticate tool-Final Cut Pro. For those users, who can change the interface in Windows – > Swap Events and Projects, and then the Project Library will swift the position with Event and meanwhile Timeline will show on the top left, which is opposite to the standard interface of iMovie but much similar with FCP.
How to make it easily?
Click the shift button in the left corner of middle toolbar and you can swap events and projects with one click.
4. Switch Timeline to More Traditional Format – Give a Familiar Operating Timeline
All Apple devices like to show how special they are in iMovie TimeLine. It doesn’t present clips in one long line but in stacks, which is much different from most video editing software. Generally, users can see the switch button on the top right corner of horizontal tool bar, which will be activated after users pick up Show Advanced Tools in iMovie >Preferences.
5. iMovie Drop Box – Import Multiple Files Once in a time
When using Drop Box, users can sync files in different devices as long as they log into the same account. iMovie Drop Box can play the same role in Mac. If users drag all clips before editing, it can sync all files to Library directly in the first time when open iMovie. The premise is users should download Drop Box, and then drag all media files in the Drop Box folder. This is the popup window to notice that users can choose Import Now to allow importing all files in Drop Box folder in bulk to iMovie.
6. Duplicate Last Title – Add File Names in Bulk Rapidly
It is not easy to add titles for all clips, especially when users have more than one movie in timeline. Using Duplicate the Last Title function in Clip is the most efficient way to do it. From there all users have to edit is the text in each movie that is selected. Editing saves more time than adding and editing.
How to make it?
Go Clip>Duplicate Last Title
7. Font Book – Customize Font
For some web designers, colors and fonts play important roles in their daily work. Though iMovie contains some Art Fonts, users may need more customized fonts to enrich the work with iMovie Font Book, which can be found in Text > Show Fonts. This function will show all the fonts in Mac. Please note that the iMovie Font Panel won’t activate until users drag some Text Effect for clips. This is the Font Book in my Mac.
8. Viewer on Other Display – Display Edited Project in Second Monitor
Most users know Side-by-Side Display when two movies need to be edited at the same time, while few know that it’s able to show an edited project in second display. Just Select Windows > Viewer on Other Display (don’t forget to connect the second monitor at first), then users can get the entire top/bottom of the video displayed in two independent monitors with more details.
9. iMovie Theater – Transfer Files between Different Apple Devices
This is a common need for those who have more than one Apple devices. For users who have iPhone, iPad and Macbook, the first option is to share all edited video is iMovie Theater. While it has some restricts like it can only support 5GB storage. The best thing is users can present and transfer iMovie files freely between different Apple devices. Please note that iMovie Theater is built to work with iCloud, therefore users need to make sure that all devices can connected to the same iCloud account.
10. Reduce Background Noise
iMovie 11.0 pays much attention on Audio function. Users can use the Equalizer to balance the audio. While the best function for Audio Adjustment is Reduce Background Noise. Granted a user records a shot video on street, but he/she needs a quiet or mute background. This function can help a lot. Open Inspector (in middle of toolbar, with icon of i) >Audio >Pick up Enhance: Reduce background noise by: drag the percentage bar to achieve the best result, higher percentage means stronger noise reduction.
11. Reduce Motion Distortion
It is common to find wobbly videos recorded by most consumer camcorders because of CMOS sensor issue. While iMovie can tune in the not-perfect video if users choose to use High or Extra High of Reduce Motion Distortion in Inspector.
12. Maps, Backgrounds and Animatics – Clarify Movie Story
There are only 15 templates in iMovie 11.0, therefore if users want to change the template styles (templates in iMovie Trailers is not interchangeable), the function of Maps, Backgrounds and Animatics can be prior option. Draw the blueprint for movie story with Animatics in timeline and then replace them with real shots. This is a great way to organize thoughts and plan for footage that users don’t have enough time to shoot temporarily.
How to make it?
Go Windows >Maps, Backgrounds and Animatics >Drag the toolbar to the end and pick up the suitable Animatics as below.
13. Panorama Meets Ken Burns Effect
Ken Burns Effect works for a long time in iMovie, but it’s still new for panorama in iMovie 11.0. I hardly used panorama in iMovie actually until it upgraded. Insert a panorama into the timeline and apply the Ken Burns effect, it seems to easily pan across the scene, which presents a better preview result. Move the pointer to the image, click the gear button showing in the left corner, choose Fit, Crop, and Ken Burns > Ken Burns and then adjust the panorama to the suitable size with different editing tools.
14. Add Comment and Chapter Marker
After I picked up Show Advanced Tools (check tips 4), there will be two tools showing in the top right corner, i.e. Chapter Marker and Comment. Comment can be useful to add notes, while Chapter Marker supports drag video in a place that plans to mark as a chapter.
15. Pointer and Keyword
It is common sense to use the pointer to drag files in iMovie, but anyone knows that this pointer can stop any editing tools by one click? For Keyword, it can be highly helpful to organize complicate clips. Comment can be the additional aid for Keyword function when users need more details. Pointer and Keyword can found in the middle of tool bar with tilt arrow icon and key icon.
16. Share in Facebook – Get More Social Attention
iMovie starts to integrate with Facebook after upgraded. Saving for this, users can also share clips on YouTube, Vimeo, CNN, Media Browser and Desk. Actually in my opinion, if Twitter can support video very well, iMovie may take it into account in the near future.
How to activate it?
Go Share->Facebook->Log in to share directly.
17. Magic Trackpad – Beef Up iMovie Operating Skills
Magic Trackpad is not the embedded function of iMovie, while it can beef up operating skills if users can use it freely and efficiently. One of the main features of Apple Apps is to support multi touch gesture and there is no exception with iMovie.
Here is the basic gesture:
To add a clip to your project, go to the Event browser and use a three finger swipe up on your trackpad.
Move the cursor above the media and pinch your fingers open to expand and pinch your fingers closed to contract your view of the media.
Select the clip within your timeline, and use a three finger swipe to move it to the right or left.
18. Switch Video to Audio in Seconds
Most iMovie users know the way to detach audio from video directly after right-click. The cooler thing is users can switch video to audio and then from audio to video in seconds as long as dragging a clip below another one which is in different timeline as below.
19. How to create your own Pointer
Step #1:
Launch the PREVIEW app and open any picture. I recommend opening one with 16:9-aspect-ratios. This is a screen-grab of a video in this example.
Step #2:
Select all (Apple-A) and hit backspace, an empty preview-picture created! Now on top of the window, you’ll notice a tool-bar, click on Annotations.
Step #3:
On the bottom-left, you’ll notice a small selection of tools like pointer, circle, box, text, color, thickness and font.
Now you can customize any kinds of pointers based on how many, what color, even your own text-design.
Step #4:
Save as PNG (or tiff), which allows the grey part to be transparent. Done!
20. iMovie Preferences
It is useful to work the toolbar, keyword, cut ways, picture in picture, green screen, and replace mode and chapter markers in iMovie.
How to make it?
First go to< iMovie preferences> then click all the options given in the below screenshot.
Further reading about iMovie, please check Everything You Want to Know about iMovie.
Featured photo credit: iMovie/Apple via images.apple.com
Essentials for iMovie Editing | The TpT Blog
Hi there teachers/video makers!
Seeing as many of you are using iMovie for your videos, we thought it would be useful to do a little overview of the program to help you get over the basic hurdles. Check out how to make a project, import your files, and layout your footage. Selecting your shots is key to a great video so you’ll want to make sure to refine your cuts and add images. Once you’ve done that, just include titles, and add music and you’re all set for your video to stand out in the crowd.
Let’s say you’ve just finished up filming. Go ahead and pat yourself on the back. That is no small feat. But don’t relax for too long. Although filming is necessary, this next part is just as crucial… It’s time to edit!
Making a Project
- Pop open iMovie
- Press the plus button in the upper left-hand corner and select “Movie”
- Or go to File>”New Movie”
Please note that you can click any of the images in this post to enlarge them.
The next screen will offer some “Themes.” I advise against these. They will most likely overly complicate your project; it’s much easier to start off with a clean slate.
Importing
There are many ways to edit and many tools you can use, but no matter how you go about it, you need media! Whether you’ve got pictures, video, or audio, it’s all the same importing process. Either go to File>Import or hit the huge arrow with the words “Import Media” below it. You’ll be able to navigate to your footage in the pop out window.
Once your footage is selected, hit “Import” and all your clips will show up in the media browser on the left-hand side of the screen. This is where you’ll access footage throughout the edit.
The Layout
Since we’re about to edit, it’s about time we take a brief tour of iMovie. As we’ve just established, the window on the left is the media browser, which is basically a bin into which you toss your footage.
To the right is the media viewer. This is where you’ll preview footage and eventually your cut; think of it like a TV screen.
If look you down, you’ll see a bar that extends across the entire window. That’s the timeline! In my opinion, that’s the most exciting section, since it’s where the cutting officially happens. If you look close, you’ll see a film strip and a music note icon. Those represent where video and audio are placed in the timeline. Video always sits above audio.
Also, take note of the vertical white line with a triangle on top, sitting at the end of the timeline. This is the playhead and it marks where playback will start.
Alright. Let’s get cracking. Or cutting.
Selecting Shots
The next step in the editing process is to watch all your footage and decide what you need (in the biz, this is called “logging”).
Click on a clip in the media browser and press play (if it starts playing in the middle, just hit rewind). Once you’ve found the part you like…
- Hold the cursor above the clip in the media browser. A yellow box will appear. This little guy is what you’ll use to select the range (“in” and “out” points) of your clip.
- Drag the cursor across the clip and visually “crop” the section you plan to use, or hit “I” to mark the in point (where you’d like your clip to begin) and then “O” (where you want the clip to end). Don’t worry if you didn’t get it EXACTLY right; ou can “massage the edit” later.
- Drag and drop the selection into the timeline. (As with pretty much all Mac-based programs, drag and drop is key here. Not only is that how you move footage; it’s also how you add transitions.)
A note on terminology: when you start putting clips in your timeline, you are building a sequence, which, when you think about it, is a perfect description. After all, you’re placing pictures and videos in the order you wish them to appear, hence, a sequence.
Navigating
Let’s say you’ve dropped the best clips into the timeline and now would like to watch it. There are several ways to navigate through your sequence.
- Jump from clip to clip using the rewind/fast forward arrows in the viewer window or by pressing the up or down arrows on the keyboard.
- Move frame by frame by pressing the back and forward arrows on the keyboard.
Go wherever you want by dragging the playhead.
Refining the Cut
So… you hit play and realize that you accidentally left in a flub (your only one, of course)! Never fear.
Adding Still Images
Now, video is not necessarily the only source of footage. Still images can also be used and their duration can be edited just like video. Sizing these images and the default settings that iMovie® likes to apply can be tricky though. iMovie® will automatically apply a zoom and pan, or “Ken Burns” effect .
If that’s not what you want, it can be disabled.
- Place the image in the timeline and select it.
- Press the crop icon above the viewer.
- Several options (fit, crop to fit, and Ken Burns) should appear just below it. Try out the different sizing options and decide what best suits your image.
Making Titles
What we now have in our timeline is a stringout, or a rough cut. How do you make it more exciting? Jazz it up with some titles!
- Click on the aptly labeled, “Titles” tab above the media browser.
- Choose one of the many animated title presets (“Standard” is not animated, by the way).
- Drag and drop it into your timeline.
You’ll notice your titles are displaying the default text and that just won’t do. Time to customize.
- Select the title in the timeline.
- Click on the “T” at the top of the viewer window.
- The text is now editable! Feel free to change it to any font, color, or size you see fit.
Something to keep in mind is that text does not come with a background, so if it’s placed in your timeline on top of a video clip, you’ll see the video underneath it. If that’s not what you had in mind, you can move your text before or after that clip in the timeline and it will appear over black.
If that’s a little boring for your taste, click on the “Backgrounds” tab of the media browser. Beneath the crazy presets are some plain solids. Just like everything else, drag and drop them where they belong in the sequence and place your titles on top.
Adding Music
The last element we will touch on in this overview is how to add music to your video. If you’ve already chosen some royalty free music, import it in the same manner as other media. If you’re in the market for some tunes, iMovie comes with some free stock music, which you can find in the Audio tab of the media browser.
Once you’ve got the perfect track, drag it into your sequence, and place it below your video. If it’s too loud, hover above the horizontal line that runs across the track. Up and down arrows will appear, which you can use to drag the line down to lower the level. If you want the music to fade in or out, hover over the clip again, but notice that there is a dot at either end. Clicking on these dots and dragging them towards the opposite end will fade your audio.
Let us know if these tips were helpful and please send any questions you may have to [email protected]! Most importantly, keep up the great work.
How to Add Text to a Video in iMovie
Text can be a simple component of a video, but it can also create the most impact. Whenever you add text to video, the goal is to convey information and without distracting from the narrative. Luckily, applications like iMovie make adding text to video a breeze. iMovie has lots of useful tools that will take your video production to the next level—without requiring a ton of time to learn how to use it.
Here are some examples of different types of text that you can add to a video in iMovie.
Add Text for Titles
Every story needs a title right? You can choose from multiple styles to add an impactful title to your video.
Use Text for Lower Thirds Callouts
Lower third text is commonly used to identify a subject like the person speaking on camera or the location.
Use Intertitles (Text During Film)
Help drive your narrative by using text to make a point or introduce the next idea.
Add Credits
Give props to everyone who helped make your video!
What makes adding text in iMovie even more convenient is the ready-made transitions and effects that come with each title option. You’ll get a professional, polished look with just a few keystrokes. We’re going to show you step-by-step how to add text in iMovie. iMovie’s user interface is super simple to navigate, but we have a beginner’s guide to iMovie for those of you who are new to the program. The process for adding text is the same no matter which style you choose. To get us started, we’re going to use footage of a motorcycle from our Creator to Creator collection.
Step 1. Launch iMovie
From the home screen select Create New and a blank Workspace will appear.
Step 2. Import Your Media
Go ahead a click on the Import Media arrow. You’ll be directed to a menu where you can navigate to your desired clips. Once you’ve selected your clips, click Import Selected in the bottom right corner. You’ll then be sent back to your Workspace with your video ready to go.
Join Our Creative Community
Access the best video tips, design hacks, and deals straight to your inbox.
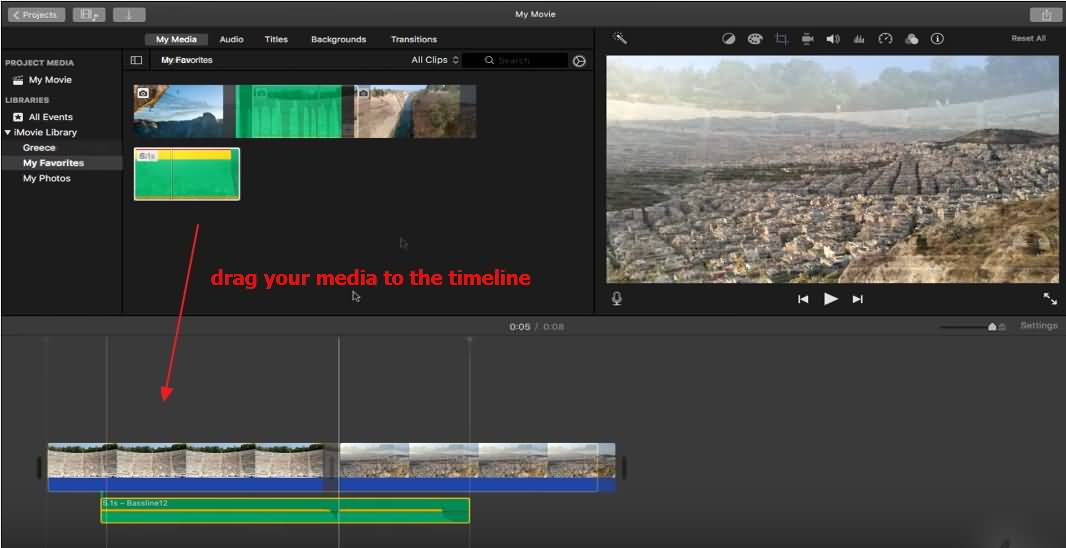
Step 3. Drag Your Video to the Timeline
Click and drag your video clip into the timeline—the clip will automatically expand so it will be easy to see what you’re working with. The expanded timeline allows you to quickly scrub through your footage to pick the perfect place for your title to appear.
Step 4. Add a Text Layer
Go to Titles at the top of the Workspace (above where your imported footage is located) and you’ll see a menu of text options and styles to choose from.
You can preview what each title looks like (including animations and effects) by moving your mouse across a title. Once you’ve found a text preset that you like, double-click on it and the title will drop into the timeline.
Step 5. Customize Your Text
You have the ability to drag and drop text anywhere in your video—it doesn’t have to be at the beginning or end. Play around with matching your title with the right timing in your footage. When you’ve figured out the placement, go to the upper right-hand corner of your Workspace to see the Text Controls menu.
This menu is where you can actually add text to the clip, as well as change the font style, size, color, and alignment. We went ahead and created this title for our clip:
Check out what it looks like in action.
iMovie makes it unbelievably simple to add text to video—not to mention, the design and effects templates are pretty spot-on. Creatives love a streamlined workflow, and adding text to video in iMovie is just that. Ready to try it out now? Stop by our library to grab authentic royalty-free stock footage to use in your next iMovie project.
Start Creating
Alex Reffie
Freelance Writer
Alex is a freelance writer for Storyblocks, as well as a student in the University of Florida’s telecom program. When she’s not scouring the web for the best memes, she’s catching up on social media trends, watching design tutorials or looking for new LinkedIn connections.
How to Crop and Rotate Photos / Videos in iMovie
Jun 01, 2021 • Proven Solutions
Sometimes you shoot video or photograph just to find it vertically oriented. When you edit these photos and videos in iMovie, you want to rotate them.And sometimes you just need a specific part of the video frame, so you need to take photos and videos to remove the imperfect part by focusing on a specific part. If your computer is running Windows and not Mac, you can check out this tutorial on how to crop video in Windows.
Part 1: An easier way to rotate and crop photos and videos
When editing videos or photos with iMovie, the format is most likely not supported by the software.Thus, you must convert them first. Therefore, to help you crop or rotate photos and videos in an easier way, I recommend another video editing tool, Wondershare Filmora for Mac (originally Wondershare Filmora for Mac). It’s an easy-to-use yet powerful Mac video editing tool that supports almost all popular video and audio formats! Now let’s see how to use to crop and rotate videos as well as photos.
Step 1. Import your media
Go to File> Import Media or just drag and drop photos, videos into the program. To help you get the files easily, a media browser is provided to import them from iTunes library, Photo Booth, and more. You can also record videos using a video capture device or using the built-in iSight.
Step 2: Cropping Videos and Photos
Click the Crop button on the toolbar.In the pop-up window, select “16: 9” or “4: 3” to crop automatically, or select “manual” and adjust the size window for manual cropping.
Step 3. Rotate Videos and Photos
Click the rotate button on the toolbar to rotate the video the way you like. Alternatively, you can also right-click the file and select the “rotate” option. Rotation 90 degrees clockwise or counterclockwise, flip horizontally and vertically are all available.
Step 4. Save your files
After cropping or rotating your videos or photos, click the Export button to save the file in a new format or upload to YouTube and even burn to DVD.
Learn more about Filmora editing tips
Part 2: How to Crop and Rotate Photos and Videos in iMovie
Related: How To Zoom In / Out Video In iMovie
Step 1.Open tools
First, open your iMovie project and open the crop and rotate tools. Click the crop button on the iMovie toolbar to open the crop tools in the viewer.
Step 2: Cropping Photos and Videos
In the Crop Tool Viewer, simply drag to resize and reposition the green area to focus on a specific part. Then move the pointer to the corner until it becomes a plus sign, and then drag to make it larger or smaller to resize.
Tip: You can click the Allow Black button to keep a black border around your still photo. This function only applies to still photos.
Step 3: Rotate Photos and Videos
Click Rotate to rotate your videos and photos left or right. Each click rotates your image 90 degrees.
Note: With the new orientation, the image may no longer fit the aspect ratio of the project, and black bars may appear at the top and bottom of the image (letterbox) or on the left and right sides of the image (column).
Step 4. Preview and Save
Click the play button in the viewer to view the photo and video. When you are satisfied with the result, simply click the Done button to finish rotating photos and videos or cropping photos and videos in iMovie.
You might also be interested in: How to resize video in iMovie
Frequently Asked Questions About Cropping and Rotating Videos in iMovie
1.Can you crop video in iMovie from iPhone?
Yes, just tap on the magnifying glass icon and then pinch on the device screen to crop the video.
2. Where can I find the crop button in iMovie?
The crop button is located in the toolbar above the preview window, but you won’t be able to see this toolbar until you add a video clip to the iMovie timeline.
3. Why is iMovie cropping my video?
iMovie will crop your video if its aspect ratio does not match the aspect ratio you choose for your project.The easiest way to fix this is to resize the video to the one specified in the project settings.
4. How to crop video to square in iMovie?
iMovie does not offer the option to change the aspect ratio of your project to square, and you will have to use other video editing or presentation software like Keynote if you want to create square videos.
5. How do I change the orientation of a video from portrait to landscape in iMovie?
, you just need to use the iMovie rotation tools to change the orientation of the video, but you shouldn’t expect great results.The objects in the new horizontal video you make this way will not rotate with the video, and for this reason you have to decide which video orientation you are going to use before you start shooting video, because this problem is almost impossible to fix in post. production.
6. Can I export vertical videos from iMovie?
The short and simple answer to this question is no. iMovie doesn’t offer a 9:16 ratio, which means you can’t export.
Liza Brown
Liza Brown is a writer and lover of all videos.
Follow @Liza Brown
90,000 how to add text to iMovie
By Elva | Sep 25,2018 10:08 am
How can I add text to iMovie?
When you add text as a title or freeze frame to a video, it perfectly complements the video scene – which is why you should consider using this effect.Adding text to a video in iMovie is very easy and requires little effort. Using text makes video scenes easier to understand and Apple Mac iMovie helps you add text to video on macOS (including High Sierra). This article will show you step-by-step how to add text to iMovie video to improve the visual experience of your videos.
…
Part 1. Best iMovie Alternative to Add Text to Video
Filmora Video Editor for Mac (or Filmora Video Editor for Windows ) is the best iMovie alternative for adding text to videos on Mac (macOS 10.13 including High Sierra). It offers over 130 types of titles and text for use in your video. The list is regularly updated with new templates. Moreover, if none suits your requirements, you can customize the font yourself:
- Various special effects are available, including split screen, chroma key, or face swap.
- Features over 300 video effects that allow you to be more creative with love, internet and pets templates
- Great animated titles will make your video amazing and special.
- Provides advanced editing features such as reverse play, video stabilization, and zoom.
Guide to Adding Texts in Alternative
As everyone knows, iMovie is one of the best programs you can use to add text to iMovie. It creates professional videos with exciting fonts and other effects.However, not everyone is able to use iMovie without problems. But users have other options to choose from. I want to present you the best alternative to iMovie for adding selected texts to videos – Filmora Video Editor .
Step 1: Upload the video to video editor
In the main window of the program, click on the “Import Media” button to load the video in which you want to add text. To save time, you can also drag the video file directly into the program
Step 2: Drag the video to the timeline
Then drag the video file to the timeline.
Step 3: add text inserts to the video
On the left side of the window, click on the “T” icon to show all types of texts. Choose the one you need. After that, drag the text to the timeline, to the line of text, adjust its position in the video scene.
Step 4: customize the texts
Double click on the text in the timeline and you will be taken to a new window. Type the text you want to add, choose a color and font.You can also create your own text by clicking on the “Customize” button.
Step 5: Upload the video in texts
After adding text and finishing editing, click “Export” to save the video to your computer.
Part 2. Add Text to Video with Apple iMovie
IMovie has two main versions – one for mobile and one for Mac. The mobile version of iMovie has limited features, but enough for adding text in the iMovie app.Therefore, in this part we will show you how to add text to iMovie on both mobile and Mac.
Step 1. Install and run iMovie: From the very beginning, you must make sure that iMovie is installed on your phone or Mac. After installation, launch it and proceed to create a new movie. You can also go to the theater tab and click on the plus button.
Step 2. Select a suitable template if you need it (optional): This step is necessary if you want to add text to an existing project.On the “new iMovie” screen, select the appropriate template for your video and make sure it fits the content. You can preview all the features of the template and make an informed decision about which one is best for your video.
In the templates, you will find titles with which you can type your text. Please note that it is possible to switch from one template to another if you find it insufficiently suitable. Once you’ve settled on a suitable template, it’s time to start working on your project by clicking on the “create movie” tab.
Step 3. Start entering text into your video: You will be able to enter additional content such as audio, video and pictures in the project timeline using the “edit” mode. You can drag and drop the video – it’s easier. When all the videos are arranged in the desired places, you should select the video and click the “titles” option.
An icon with the letter “T” will appear at the bottom, which will show you all the available text effects. Clicking on an effect will automatically add it to your video, but you can edit it in the preview window.When finished, you can save your changes.
Related Articles & Tips
90,000 iMovie or how to make video editing (from video and photos) on iPhone or iPad for free
Apple’s iMovie app allows you to edit videos directly on your iPhone or iPad without the need for a computer. At the same time, you have the ability to remove unnecessary frames, apply filters and add music.
♥ ON TOPIC: What is QuickTake on iPhone, or how to take a video in “Photo” mode.
iMovie is developed by Apple and is completely free of charge. With a user-friendly interface and support for intuitive Multi-Touch gestures, iMovie is one of the best video editors on iOS and iPadOS.
To create videos, you can use ready-made trailer templates with stunning graphics and music from popular composers. In addition, the program allows you to change transitions, overlay text, slow down and speed up videos, add effects, etc.d.
Download iMovie for iPhone and iPad for free (App Store)
Create a project, upload photos and videos to iMovie on iPhone and iPad
1. Download and launch the iMovie app.
2. Click on the button New Project and select item Movie .
On the display of your device, you can see the materials in your library.
3. Select the photos or videos you want to combine and click Create Movie .
After that, they will be immediately visible in the timeline (timeline), which will allow you to start editing.
4. Tap a video or photo in the timeline. A yellow border should appear around it. Move the frames on both sides to trim the video to the desired length. If you suddenly deleted an extra piece, you can undo your action by clicking on the button in the form of a rounded arrow on the right side of the screen.
If you want to divide the edited clip into several small fragments, select the file, drag the vertical white scale to the required place and press the button “Divide” .
To change the sequence of clips on the timeline, drag the selected video or photo to the desired location.
To add new videos or photos, press the button “+” .
To remove unwanted uploaded photos or videos from the timeline, just click on them and swipe them up. At the same time, a dust cloud icon will appear on the upper right corner of the thumbnail.
♥ RELATED TO: Picture-in-picture mode on the iPhone: how to enable and use.
How to change the speed of certain clips
In order to increase or decrease the speed of a certain clip, select it and press the button with the speedometer icon in the lower menu. Use the slider to adjust the playback speed, if it is maximum, you get the effect of accelerated shooting.
♥ ON TOPIC: How to hide (hide) photos or videos on iPhone or iPad + new features from iOS 14.
How to add audio to video
To add music to video, click on the “+” sign on the right and select “Audio” .
You can add both your own sound files and choose from a variety of ready-made soundtracks.
The section “Audio Effects” will give you the opportunity to use the noise of the surf, the rumble of thunder, the roar of a car and other similar effects. You can add a voiceover, for this you need to click on the microphone icon, leaving the main menu.
The melodies and sounds that you have selected will be shown in the timeline below the video.
They can also be edited: cut, increase and decrease the volume. Note that the soundtrack is muted by default. When working with transitions, it is worth aligning them with the rhythm of the music.
♥ RELATED TO: Tap on the iPhone lid – take a screenshot: how to bind actions to touching the back of the iPhone.
How to apply filters or add text to video in iMovie on iPhone and iPad
To apply a filter on a frame, select a photo or clip in the timeline and click on the icon with three circles.
To overlay text (titles), click the icon with the letter “T” .
If you want to see what the edit you made looks like, then move the vertical scale to the beginning of the frame.To rate your special effect or melody within the created video, click the play button.
♥ BY TOPIC: How to upload photos and videos to free unlimited cloud from iPhone or iPad to free up space.
How to customize transitions in iMovie
You’ve probably noticed that there are small squares on the timeline between the elements of the movie you are creating (whether photographs or clips). These elements are responsible for the transition from one scene to another, making it smooth.
To edit the transition, click on the square and select the appropriate effect option in the lower menu.
If two videos shot at the same time and in the same place are glued together, then you can try to abandon the transition altogether (there is such an option). Then the change of the picture will not seem too sharp. In the very bottom line, you can also set the transition speed. An interesting point – in the transitions “Slide” and “Shutter” you can change the direction of the effect by simply double-clicking on this icon.
To test the transitions, press the Play button .
♥ ON TOPIC: In iOS 14, at the top of the screen, a green or orange indicator lights up: what are they for?
Final steps and video export to iMovie
After finishing the installation, press the button Finish , after which the main page of the created project will open.
To return to editing the project, press the button Edit .
To rename the project, touch My project and enter a new name.
To save the video to the Photos application, the Files application or send the video via social networks, press the Share button and select the required option.
See also:
90,000 How to edit videos on iPhone or iPad: crop, overlay text, music, flip, merge, etc.d.
Many users immediately after shooting a video on iPhone are faced with the need to edit their video. In this article, we will tell you how to crop, overlay text, music, flip, merge videos using standard functions, as well as special applications.
♥ BY TOPIC: New in iOS 14: How to show thumbnails of photos and videos with actual aspect ratios in Photos on iOS.
How to Crop Video (Change Length) on iPhone or iPad
1. Open the video in the application Photo and click the Edit button in the upper right corner.
2. At the bottom of the screen, click on the camera icon (this tool is called Video ). Drag the sliders on the left and right to adjust the video duration. Click Done .
3.Select Save as new video if you want to keep the original version of the file and the edited new video, or Save video if you want to make changes to the original video.
We talked about this in more detail in this material.
♥ ON TOPIC: How to arrange icons on the iPhone and iPad desktop anywhere on the screen: 2 ways.
How to adjust brightness, contrast, exposure and other settings on video in iPhone or iPad
Tool correction allows you to adjust the basic parameters of the video: lighting, contrast, exposure, tints and others.Everything here is very similar to processing a photo. Using such a tool, you can, for example, turn a bright sunny day into a cloudy one, or vice versa. This processing will allow you to set a particular mood for the video.
1. Open the video in the application Photo and click the Edit button in the upper right corner.
2. At the bottom of the screen, click on the knob icon.
3. Select the required parameter (there are 15 of them) and move the scale left or right to change the video editing.When finished, click Done to save the results.
♥ ON TOPIC: Translator for iPhone: How to use the built-in Translator in iOS.
How to apply filters to video in iPhone or iPad
The third button is responsible for filters. They are applied to all videos at once. It is possible to use 9 filters, including the most famous: sepia, noir, black and white, enhance cold or warm shades, etc.At the same time, the tool also allows you to adjust the intensity of each mask on a scale from 0 to 100 units. Filters can dramatically change the style of an entire video.
1. Open the video in the application Photo and click the Edit button in the upper right corner.
2. At the bottom of the screen, click on the Filters icon.
3. Select the desired filter and move the scale left or right to change the intensity of the applied effect.When finished, click Done to save the results.
♥ ON TOPIC: How to use a compact dialer in iOS 14 on the iPhone.
How to cut (crop, crop) video on iPhone
The fourth parameter is the cropping tool. This is a pretty useful feature with which you can crop the video in the required aspect ratio. A clip shot with a rectangular shape can become square, and from a large picture you can leave only an interesting element and observe it exclusively.This function may be in demand, because it often happens that something is clearly superfluous in the frame.
1. Open the video in the Photos app and click the Edit button in the upper right corner.
2. At the bottom of the screen, tap the Trim icon.
3. To crop the video (cut out a fragment from the frame), drag the sides or corners of the frame that appears. If necessary, press the Reset button at the top of the screen to discard the changes.Click Done to apply the changes.
♥ ON TOPIC: How to download a video from VK (VKontakte) on an iPhone or iPad and watch without the Internet.
How to remove audio from video in iPhone or iPad
There is a built-in tool in iOS and iPadOS that allows you to remove audio from video. Sometimes it turns out to be in demand if you only need a picture, and at the time of shooting, background sounds stand out a lot.Few people want to listen to the operator’s chewing or the conversations of strangers.
1. Open the video in the Photos app and click the Edit button in the upper right corner.
2. At the bottom of the screen, click on the camera icon (this tool is called Video ).
3. In the upper left corner, click on the speaker icon. Click Done to apply the changes.
♥ RELATED TO: Picture-in-picture mode on the iPhone: how to enable and use.
How to Flip, Mirror, or Correct Perspective and Format on Video in iPhone
You can find tools to flip the video and change the perspective in section Crop (crop). Here you can also change the rotation of the video by 90 or 180 degrees (change the orientation of the video from vertical to horizontal and vice versa), align the picture with respect to the planes: vertical, horizontal or diagonal, mirror the video, and change the aspect ratio.
1. Open the video in the Photos app and click the Edit button in the upper right corner.
2. At the bottom of the screen, tap the Trim icon.
3.
– In order to flip the video 90 (180) degrees, use the button with the image of a square with an arrow, it is located at the top left of the screen.
– To flip the video to a more precise angle, use the Straighten slider below the video.
– In order to mirror the video, use the button with the image of two triangles with arrows, it is located in the upper left corner of the screen.
– To change the video format (aspect ratio), for example, 16: 9, 9:16, square or custom, select the corresponding icon in the upper right corner of the screen.
– To correct the perspective in the video, use the sliders Horizontal or Vertical located below the video.
♥ BY TOPIC: Slow motion video on iPhone: how to shoot and adjust the quality, which iPhones are supported.
How to Add Music to Video on iPhone
The easiest way to add sound to your video is to use the iMovie app. The only caveat is that you will need to save the tracks on the device, since in this case Apple Music and DRM-protected audio files will not work.
1. Open application Photos and find the video to which you want to add music.
2. Click the Edit button in the upper right corner, and then click the ellipsis icon at the top of the screen.
3. Select the iMovie application (if it is not installed, you can download it for free at this link) and wait for it to download. If iMovie doesn’t appear, tap More and make sure the editor is activated.
4. Click the note icon and select the song you want to use. Tracks from “Soundtracks” are free to use.
5. To mute the original video track, click the speaker button.
6. Press Done to save the video.
The original video will be replaced by the new version. If you want to undo your changes, open Photos → Edit → Revert .
♥ ON TOPIC: Timelapse (Interval) in the iPhone and iPad camera: what is it and how to shoot such a video?
How to Add Text to Video on iPhone
iMovie is perfect for this task. With it, you can add animated text to your video.
1. Open application Photos and select the video to which you want to add text.
2. Click the Edit button in the upper right corner, then click the ellipsis at the top of the screen.
3. Select the iMovie application (if it is not installed, you can download it for free at this link) and wait for it to download. If iMovie doesn’t appear, tap More and make sure the editor is activated.
4. Press the letter icon T and select the desired effect from the menu.
5. Click on the text to edit it and add any text. Click Done to save the video.
6. Click on the icon in the upper right corner of the screen to change the placement of titles.
As in the previous cases, the original video will be replaced with the new version with text. To undo the changes, open Photo → Edit → Revert .
♥ ON TOPIC: Reverse shooting on the iPhone, or how to shoot a video “backwards”.
How to merge (merge, combine) multiple videos on iPhone
iMovie provides the ability to combine multiple clips into one video.Other editors can be used for similar tasks, but iMovie is easy to use, and it is also a “native” Apple tool.
1. Open iMovie → Projects → Create Project + .
2. On the next screen, press section “Movie” .
3. Select the clips you want and click Make Movie .
4. To add more videos, click “+”.
6.Edit the video as needed.
6. Tap Done to save the project, then export the video by tapping Share at the bottom of the screen.
See also:
90,000 HOW TO: How to Add Text to iMovie Creations
It becomes easier to create your own films. If you are an Apple user, you can transfer your iPhone to iPhone directly to iMovie for editing.This includes adding text.
IMovie is a very effective free tool and you are not going to get special effects on the Hollywood green screen using iMovie, but for simple family travel movies.
Here’s how to add text to iMovie; title and subtitle are two types of text that you can add.
How to add title to iMovie
First, add your footage to iMovie. Click Create New , then click Import icon represented by down arrow .
After the footage has been imported into iMovie, select Titles at the top of the screen.
Select the type of text you want to use. You can view it by clicking on the thumbnail and looking at the screen to the right. Once you’ve selected the text you want, click and drag it to where your footage is.
By placing it on top of the frames, the title appears as a text overlay.Go to the preview screen and double-click the text box to make it editable.
Enter the text you want. Adjust the font, text size, alignment and color until it is what you want it to be.
Now that the title has been made, it is time to position it so that it is in the right place in the movie. Place the left edge where you want the text to appear first, and then drag the right edge with your mouse.The line of text will be longer and numbers will appear; this is the time the text will remain on the screen.
An alternative to overlaying text on film frames is to have the title appear before shooting. Instead of placing the title above the frame, drag it into the frames where you want it to appear.
And you did!
How to Add Subtitle in iMovie
Adding subtitles is a little more difficult due to the limitations of iMovie.Namely, subtitles are usually found at the bottom of the screen, and iMovie doesn’t have such an accurate feature.
Subtitles can be added, but you need to find a title that you can live with. Many of them have oscillatory effects or disappear; you need something static.
The closest will probably be Format , found below.
Format header places a white bar at the bottom of the screen. Click on it and enter what you want the subtitles to say.
Adjust the font, size, alignment, and color until the text looks exactly how you want.
Finally, the subtitles must match the speech on the screen. Place the left edge where you want the text to appear first, and then drag the right edge with your mouse. The line of text will be longer and numbers will appear, representing the amount of time the text will remain on the screen.
And you did.
How to use IMovie ▷ ➡️ Creative Stop ▷ ➡️
How to use iMovie . You’ve just completed your trip and need a free, easy-to-use tool to film a movie that captures your holiday moments. You want to create a kind of movie, add videos, photos, music and effects with your Mac . Therefore, you know that the best option is IMOVIE .
So it is. Great choice! Apple Video Edition is one of the best solutions for creating and editing home movies, it is also free and can be installed “standard” on all devices in bitten apple .
With iMovie, you can easily create new movies from scratch, or use one of the many templates available in the software and insert your content into predefined “trailers.” Plus, you can edit your videos as you see fit and make changes to them like speed up or slow down, add effects, and more.
How to use iMovie step by step
Create a new project
When you launch iMovie for the first time, the Home screen displays three tabs: Media Files , listing the files imported to iMovie. Cine , with exported videos in this section and projects , with a list of previously saved projects.
To start creating a movie or edit an existing one, you should consider tab projects . Then click on article Create new and choose the type of video to create between the two available options.
- Video : Ideal for those who want to create personalized video from scratch, taking care of even the smallest details.When you select a movie, you get access to a completely empty timeline.
- Trailer : To create a Hollywood-style clip from a predefined template. You can choose from thirty models, among which action , adrenaline , Cinematic success , Historical movie , fable , family , Vacation , Pets , retro , Miedo , Sports , Travel and many others.Select a model and click the Crear , a graphic with music, effects and content is suggested where you can add more.
Regardless of your choice, the iMovie one workspace will be available in front of you timeline down, media top left player in the upper right corner for a preview of your project and a number of tools for applying effects, changes and more.
Import files to iMovie and fill in the schedule
After creating a new project, you need to start creating a movie import videos, photos, music into iMovie on your PC (or on devices connected with a cable) and then insert them into the timeline to continue personalizing the movie.
To import files into iMovie, click the down arrow located in the upper left corner and select device and Carpeta where the latter are stored.
In addition to the device you are using, you can import files to your camcorder or mobile device by connecting it to your Mac using the appropriate cable. Now select the files to import and click the button. Import selected , wait a few minutes, and the imported photos, video and audio files will be visible in the section My media .
In the left menu, click on IMovie Library to see all imported files in iMovie, instead click on project name to see only imported files in selected projects, or click options Photo Library y Photo Library to view photos on your Mac.
In addition to the files you can import into your project, you should be aware that you also have “standard” audio files, video animations, and backgrounds available in iMovie.
In the additional menu next to My Media , you can access other files and effects, divided into sections.
- audio – Rich catalog of sound effects and backing tracks to choose from. You can explore the various available folders by selecting sounds divided into categories. environment , noise , tinkling , MAQUINARIA , Office – Home , boom , sports and many other instrumental themes are also available for use as background music.Also clicking on item iTunes on the left you can import Songs from iTunes library to the timeline.
- Valores – Section for creating simple text titles, with the ability to select models with animation and move the text to create interesting effects such as credits.
- Wallpaper – Wallpaper for application in a project is available by browsing the rich catalog of animated maps, moving wallpapers or simple solid color fixed wallpapers.
- Transitions – A section with useful effects to make the transition from one clip to another enjoyable. Transitions can be applied Cross disappears , Cross blur , mosaic , Internal rotation y much greater than
Import your files into iMovie and discover the available audio and video effects, you’re ready to start creating your first movie. Before putting files on the timeline, you need to know that it consists of several sections: the main one – for inserting videos and photos, the second – for adding an audio track.
In addition to this, you can use another section on clips, photos, titles and backgrounds that allows you to create overlays with the main section, and if you are going to add more sound effects, you can do so without restrictions.
With that said, move on to insert the first few lines into the timeline. Then click on item My Media and selecting the file you are interested in, this will present the yellow border – If it is a video or audio track, you can apply a clipping by dragging the border to the right or left and import only the selected part.
To add it to the workspace, click the button. Place + on top of the selected file or drag and drop it directly onto the timeline and the item will be automatically placed in the appropriate section.
To add backgrounds, titles, and sound effects to iMovie, click one of the voices in the middle. audio , Valores y Wallpaper is present at the top, select the clip, title or audio of interest and use the mouse pointer to scroll from left to right to see or hear a preview.Once you’ve selected the clip or effect you like best, drag it to the location on the timeline where you want to insert it.
You can follow the same procedure to add a transition between one clip and another: click item transitions select the one you like best and drag it between the clips to which you want to apply it.
If you are working on a project that includes a full-length clip, you can get a more or less detailed view of the timeline by executing cursor placed under the player.Swipe left or right to view the entire timeline or just a portion of it. You can also click on option setting and move cursor is located next to input Clip size increase or decrease the size of clips on the timeline.
Applying effects and changes to a movie
iMovie has a Toolbar (above the player) that lets you apply filters to your movie, speed up or down, rotate, reduce background noise, and more.
If you are afraid that you will not be able to improve your clips with the functions presented in the toolbar, you can trust the automatic enhancement function provided by iMovie: by pressing the button improve (determined by the magic wand) can automatically improve some aspects of video and audio, receiving movie with more balanced colors and optimized sound.
If you would like to make improvements to the movie yourself, here is a detailed list of features in the toolbar.
- Color balance (black and white circle button): allows you to change the color values of the video using the functions adjust the color , white balance , skin tone balance , You can also select automatic to automatically adjust the colors clip.
- Color Correction (Gamut): allows you to manually adjust colors, allowing you to control the saturation and temperature of the latter.
- Motions (two crossed Ls): to rotate the video, apply trims to the clip, and add effect Ken Burns , which allows you to define motion for the movie.
- Stabilize (Camcorder): A function that stabilizes shaky videos, thereby reducing the “shake” of movies.
- Align (vertical lines): This function is only available for audio clips.Allows you to reduce background noise and apply sound enhancements such as music enhancement , voice enhancement , noise reduction , bass enhancement , and more.
- Speed (Watch): Increase or decrease the film speed. It also allows you to insert a still image.
- Video & Audio Effects (three intersecting circles): allows you to apply video effects to a clip ( inverted , White and Black , Noir , Sepia , Vintage , Animation , Shine , X-ray , etc.and sound effects ( from , robot , space , telephone , Echo radio , Shadows down 1 , Shortwave radio , etc.).
In addition to applying changes using the buttons on the toolbar, you can directly interfere with individual videos in the timeline.
Right-click the thumbnail of the movie you want to edit (or by tapping with two fingers on the touchpad), and in the list that appears, select which edit to apply from size , copy , delete , Split clips , Separate audio , Add still image , Add cross fade and so on
Save the project and export the movie
If you have created a new project in iMovie, but you no longer have time to continue, click projects in the upper left corner and in the window that opens, write the name you want to give the movie.
Presione el botón Take to confirm. You will find everything in the iMovie projects list (which automatically saves the changes made to the project, so there is no need to Guardar all changes are made “manually”).
After completing the project, you can see the final result by pressing the ▶ ︎ button and, if you like, also set it to full screen mode (by clicking the icon, the two arrows).
If you like the result, you can start exporting the task by clicking the single arrow button inside the square (top right) and select one of the available export options.
- Cine – To export your movie to iMovie Theater, a great presentation environment where you can watch high quality versions of your movies. You can access the list of videos exported to Cinema by clicking on the Cinema Card present on the iMovie home screen. Plus, if you have an iCloud account, movies exported to Cinema are automatically displayed on all iCloud-linked devices, allowing you to watch movies on other PCs, iOS devices, and Apple TV.
- Email: – Allows you to export video and email it using Mail, the macOS mail application.
- iTunes : Automatically export a movie created with iMovie to Private Videos from iTunes.
- YouTube : Allows you to export your video and share it directly to your YouTube channel.
- Facebook : Export the project and share to Facebook.
- Vimeo : Allows you to export your project and upload it to Vimeo.
- Image – To save a still from a movie as a JPEG image for use with other applications.
Regardless of your choice, with the exception of Cinema, before exporting the movie, you can set up Title, el description, la label and resolution .In some cases, you can also select compression speed and quality .
How to use iMovie on iPhone / iPad
IMOVIE This is also available for iPhone / iPad as a free app. On mobile, it is obviously more limited than the Mac version, but it still gives great results.
To start using iMovie on your iPhone or iPad, launch the app and tap it with your voice. Create project, then tap option Video start with a blank project or in option trailer use one of the available predefined templates.
Now click the + button to add videos, photos or audio to the iMovie timeline and select files in your device’s library.
Otherwise, click the button to take photos or take videos locally or optionally iCloud Drive import files from your iCloud account. Once the file is selected, it will be automatically inserted into the application’s timeline.
To make changes or effects, you can click the cogwheel button located in the lower right corner, and choose whether you want to add the filter to the project or apply the theme, with the ability to add music and auto-fade.
Or you can directly interfere with the imported clip in the timeline by clicking on it and then in the toolbar at the bottom you can click the icon scissors split, duplicate or delete the video using the button denoted by the icon hours you can zoom in or out its speed.
You can also press the button T to add text to the movie and add effects to the button marked three overlapping rounds .
To see a preview of the created project, press the ▶ ︎ button and, if you are satisfied with the result, tap. The final is present in the upper left corner for the movie export.
Then click the arrow icon inside the square and select one of the available export options: Add to iCloud Drive to export the movie to iCloud Drive; Save Video to export your movie to your iOS library, choosing between Medium 300p , Cool 540p , HD 720p y HD 1080p or iTunes to export your movie or save your project to iTunes.
So far, a post on how to use iMovie.
How to convert “vertical video” to horizontal on iPhone
What is great about a smartphone is that at any time you can capture any event, incident or just a great shot in just a few seconds. But it is in such seconds that the real scourge of modern videos happens – vertical orientation .
This is when, instead of a normal frame, you see two black stripes at the edges, and a narrow video in the center.
Taking pictures on the iPhone to get caught in such a disservice from the developers is easy. This is what happens during filming:
You have disabled the orientation lock, you press REC and you get … a “flip”.
Logically, when you rotate the screen from portrait to landscape, the final video should look like this. But as a result, you get a shape-shifter. And no matter how then you turn the smartphone in your hands, you are doomed to watch the video with your head on one side.
The situation can be corrected directly on the iOS device, and all we need for this is the proprietary video editor iMovie [Download in the App Store] and a few simple steps.
1. Open the iMovie app and select the video you want to fix. From the bottom toolbar, select Share (the rectangle with an up arrow) and then Create Movie .
2. Wait while the selected video is exported to the timeline.
In the preview window (in the place where your video is displayed – just above the timeline), touch the screen with two fingers and, without releasing, rotate clockwise or counterclockwise (depending on which direction you want to rotate the video).
During the flip, a white direction indicator will appear.
3. As soon as you flip the video, new thumbnails are automatically generated in the timeline line. Click Done and then Save .Select the desired resolution and wait for the export to finish.
Video instruction for clarity:
Join our Facebook group
The video is ready and its incorrect orientation has been fixed.
Prepared with the support of re: Store
? Want more? Subscribe to our Telegram.
